While navigation controllers let users navigate hierarchical content or complex data by managing a stack of view controllers, tab bar controllers manage an array of view controllers that don’t necessarily have a relation to one another. In this article, we will explore tab bar controllers in more detail by creating a tabbed application from scratch.
Introduction
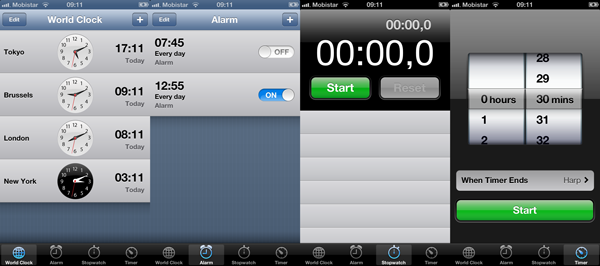
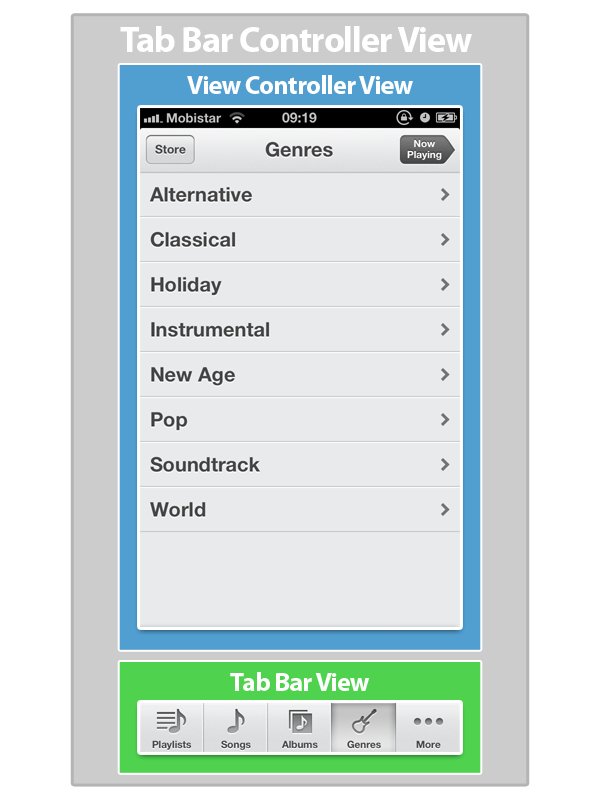
The UITabBarController class is another UIViewController subclass. While navigation controllers manage a stack of related view controllers, tab bar controllers manage an array of view controllers that have no explicit relation with one another (figure 1). The Clock (figure 1) and Music (figure 2) applications on iOS are two prime examples of tab bar controllers. Just like any other UIViewController subclass, a tab bar controller manages a UIView instance. The view of a tab bar controller is composed of two subviews, (1) the tab bar at the bottom of the view and (2) the view of one of the view controllers the tab bar controller manages (figure 2).
Before We Start
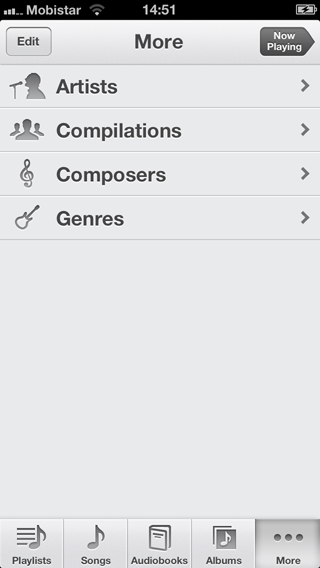
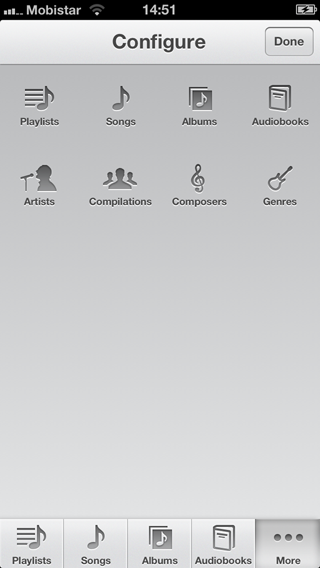
There are a few caveats to be aware of when working with tab bar controllers. Even though instances of UITabBar can only display five tabs, the UITabBarController class can manage more view controllers. Whenever a tab bar controller manages more than five view controllers, the tab bar’s last tab is titled More (figure 3). The additional view controllers can be accessed via this tab and it is even possible to edit the position of the tabs in the tab bar (figure 4).
Although tab bar controllers manage a view, your application is not supposed to directly interact with a tab bar controller’s view. If you decide that a tab bar controller is the right choice for an application, the tab bar controller is required to be the root view controller of the application window. In other words, the root view of the application window is always the tab bar controller’s view. A tab bar controller should never be installed as a child of another view controller. This is one of the key differences with navigation controllers.
Tabbed Library
In this article, we will revisit the Library application that we built in the previous article. By doing so, we can reuse several classes and get up to speed faster. In addition, it will show you that navigation controllers and tab bar controllers are quite different and that they are used in different situations and use cases. The application that we will build in this lesson will be named Tabbed Library and will be based on the UITabBarController class. While we build the Tabbed Library application, you will notice that the use of a tab bar controller forces the application in a very specific user interface paradigm that allows for little flexibility. Tab bar controllers are incredibly useful, but you have to accept that they put constraints on your application’s user interface to some extent.
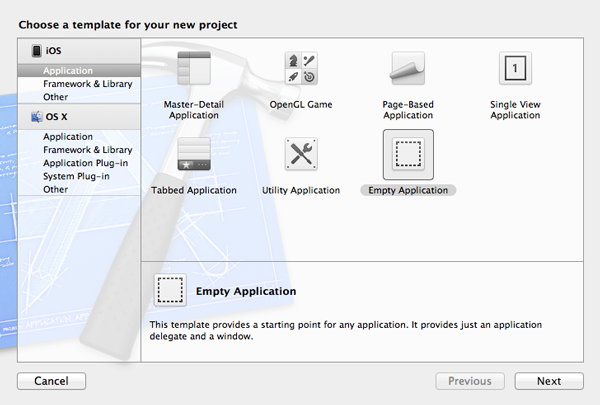
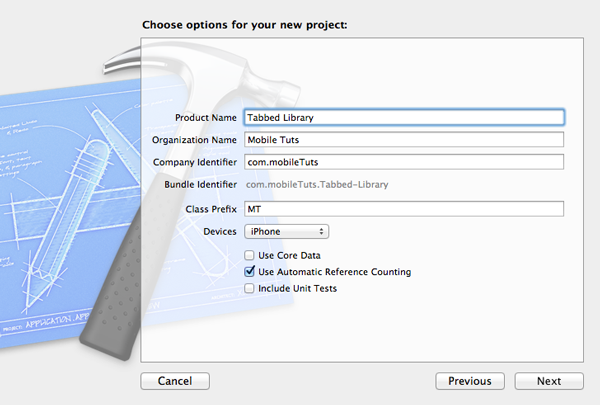
Open Xcode, create a new project (File > New > Project…), and select the Empty Application template (figure 5). Name the project Tabbed Library, assign an organization name and company identifier, set Devices to iPhone, and enable Automatic Reference Counting (ARC) for the project (figure 6). Tell Xcode where you want to save the project and hit Create.
Even though Xcode includes a Tabbed Application template, I prefer to start with an empty application template so you understand how the various pieces of the puzzle fit together. You will notice that tab bar controllers aren’t that complicated.
Taking a Head Start
When the Tabbed Library application is finished, the tab bar controller of the application will manage six view controllers. Instead of creating every view controller class from scratch, we are going to cheat a little bit by reusing the view controller classes that we created in the previous article. In addition, we will create several instances of the same view controller class to save us some time. The goal of this article is not to create a bunch of view controller classes. At this point, you should be pretty familiar with that process.
Download the source code from the previous article and open the Xcode project that is included in the source files in a new Finder window. Find the MTAuthorsViewController, MTBooksViewController, and MTBookCoverViewController classes and drag them over into our new project. While doing so, make sure to copy the files into the new project by checking the checkbox labeled Copy items into destination group’s folder (if needed) and don’t forget to add the files to the Tabbed Library target (figure 7). Don’t forget to also include the nib file of the MTBookCoverViewController class, MTBookCoverViewController.xib.
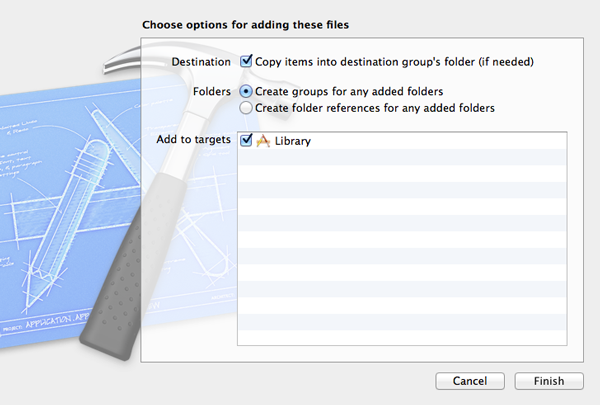
In addition to these three classes, we also need to copy the folder of resources, containing Books.plist and the image files, into our new project. Drag the folder named Resources into our project and use the same settings that we used to copy the class files (figure 7). We are now ready to instantiate the application’s tab bar controller and populate it with its first view controller.
Adding a Tab Bar Controller
Open MTAppDelegate.m and import the header file of the MTAuthorsViewController class by adding the following import statement at the top.
#import "MTAuthorsViewController.h"
In application:didFinishLaunchingWithOptions:, we initialize an instance of the UITabBarController class. Without any view controllers, the tab bar controller won’t be very useful so the next step is to initialize an instance of the MTAuthorsViewController class. Then set the viewControllers property of the tab bar controller by passing an array literal to the setViewControllers: method. At the moment, the array that we pass only contains the MTAuthorsViewController instance that we created earlier. As I have already mentioned, when working with a tab bar controller, the tab bar controller needs to be the root view controller of the application’s window (see below).
- (BOOL)application:(UIApplication *)application didFinishLaunchingWithOptions:(NSDictionary *)launchOptions {
    // Initialize Tab Bar Controller
    UITabBarController *tabBarController = [[UITabBarController alloc] init];
    // Initialize Authors View Controller
    MTAuthorsViewController *authorsViewController = [[MTAuthorsViewController alloc] init];
    // Set View Controllers Tab Bar Controller
    [tabBarController setViewControllers:@[authorsViewController]];
    // Initialize Window
    self.window = [[UIWindow alloc] initWithFrame:[[UIScreen mainScreen] bounds]];
    // Configure Window
    [self.window setRootViewController:tabBarController];
    [self.window setBackgroundColor:[UIColor whiteColor]];
    [self.window makeKeyAndVisible];
    return YES;
}
Build and run the application. At this point, the tab bar contains only one tab making the tab bar not very useful. We will remedy this in a few minutes. Have you tried tapping the name of an author in the table view? Nothing seems to happen when an author is selected in the table view, apart from the row being highlighted. Why is this? It is time for some debugging.
Open MTAuthorsViewController.m and revisit the implementation of tableView:didSelectRowAtIndexPath:. It is this table view delegate method that is called by the table view whenever a row is tapped. One of the most simplistic yet still useful debugging tools in your arsenal is NSLog. Add three log statements to the implementation of tableView:didSelectRowAtIndexPath: as shown below.
- (void)tableView:(UITableView *)tableView didSelectRowAtIndexPath:(NSIndexPath *)indexPath {
    // Initialize Books View Controller
    MTBooksViewController *booksViewController = [[MTBooksViewController alloc] init];
    NSLog(@"Books View Controller > %@", booksViewController);
    // Fetch and Set Author
    NSDictionary *author = [self.authors objectAtIndex:[indexPath row]];
    [booksViewController setAuthor:[author objectForKey:@"Author"]];
    NSLog(@"Author > %@", [author objectForKey:@"Author"]);
    // Push View Controller onto Navigation Stack
    NSLog(@"Navigation Controller > %@", self.navigationController);
    [self.navigationController pushViewController:booksViewController animated:YES];
}
Run our application once more, select an author from the list, and inspect the output in the console window (see below). Do you notice anything peculiar?
2012-12-19 17:39:49.358 Tabbed Library[15334:c07] Books View Controller > <MTBooksViewController: 0x741ab00>
2012-12-19 17:39:49.360 Tabbed Library[15334:c07] Author > J.R.R. Tolkien
2012-12-19 17:39:49.360 Tabbed Library[15334:c07] Navigation Controller > (null)
The navigationController property of the view controller is not set as it is equal to nil. A few lessons ago, I emphasized that it is possible to send messages to nil in Objective-C. The Objective-C runtime won’t throw an exception if you do. I also mentioned that some Cocoa patterns rely on this capability. However, as you can see in this example, it can also result in behavior that you might not expect.
Fixing this bug is easy, though. Head back to MTAppDelegate.m and initialize a navigation controller in application:didFinishLaunchingWithOptions: as shown below. Instead of adding authorsViewController to the tab bar controller’s list of view controllers, we set authorsViewController as the root view controller of the navigation controller and add the navigation controller to the tab bar controller’s list of view controllers.
- (BOOL)application:(UIApplication *)application didFinishLaunchingWithOptions:(NSDictionary *)launchOptions {
    // Initialize Tab Bar Controller
    UITabBarController *tabBarController = [[UITabBarController alloc] init];
    // Initialize Authors View Controller
    MTAuthorsViewController *authorsViewController = [[MTAuthorsViewController alloc] init];
    // Initialize Navigation Controller
    UINavigationController *navigationController = [[UINavigationController alloc] initWithRootViewController:authorsViewController];
    // Set View Controllers Tab Bar Controller
    [tabBarController setViewControllers:@[navigationController]];
    // Initialize Window
    self.window = [[UIWindow alloc] initWithFrame:[[UIScreen mainScreen] bounds]];
    // Configure Window
    [self.window setRootViewController:tabBarController];
    [self.window setBackgroundColor:[UIColor whiteColor]];
    [self.window makeKeyAndVisible];
    return YES;
}
Build and run the project once more. The navigation bar is where it is supposed to be and the authors view controller behaves as expected.
Adding Another Table View Controller
Create a new UITableViewController subclass and name it MTAllBooksViewController. This view controller will extract all the books from Books.plist and display them alphabetically in a table view. Open MTAllBooksViewController.m and add a new property (NSArray) named books to the class extension at the top.
#import "MTAllBooksViewController.h"
@interface MTAllBooksViewController ()
@property NSArray *books;
@end
In the view controller’s viewDidLoad method, we invoke extractBooks, a helper method that we will create shortly. I generally try to keep viewDidLoad as concise as possible by wrapping tasks in helper methods, such as extractBooks. This makes the code easier to read and consequently more maintainable.
- (void)viewDidLoad {
    [super viewDidLoad];
    // Set Title
    self.title = @"Books";
    // Extract Books
    self.books = [self extractBooks];
}
Let’s inspect the implementation of the extractBooks helper method. We start by creating a mutable array to which we will be adding the books of each author in the property list. The next two lines should be familiar if you have read the previous article. We ask the application bundle for the file path of Books.plist and use it to load the contents of Books.plist into an array named authors. Next, we iterate over the array of authors and add the books of each author to the mutable array we created earlier. To sort the array of books, we create a sort descriptor with a key of Title. After we sort the books by title, a new array is created, result, by sorting the mutable array using the sort descriptor. Finally, we return the sorted list of books.
- (NSArray *)extractBooks {
    // Buffer
    NSMutableArray *buffer = [[NSMutableArray alloc] init];
    // Load Authors
    NSString *filePath = [[NSBundle mainBundle] pathForResource:@"Books" ofType:@"plist"];
    NSArray *authors = [NSArray arrayWithContentsOfFile:filePath];
    for (int i = 0; i < [authors count]; i++) {
        NSDictionary *author = [authors objectAtIndex:i];
        // Add Books to Buffer
        [buffer addObjectsFromArray:[author objectForKey:@"Books"]];
    }
    // Sort Books Alphabetically
    NSSortDescriptor *sortDescriptor = [NSSortDescriptor sortDescriptorWithKey:@"Title" ascending:YES];
    NSArray *result = [buffer sortedArrayUsingDescriptors:@[sortDescriptor]];
    return result;
}
Sort descriptors, instances of NSSortDescriptor, are used to sort a collection of objects, such as arrays, by specifying the property that needs to be used to compare two objects of the collection. You can safely ignore this portion of the implementation of extractBooks if it isn’t entirely clear because it isn’t important to us in the scope of this article.
The implementations of the UITableViewDataSource protocol method is very similar to what we saw earlier in this series. Take a moment to inspect the implementation of each method below.
- (NSInteger)numberOfSectionsInTableView:(UITableView *)tableView {
    return 1;
}
- (NSInteger)tableView:(UITableView *)tableView numberOfRowsInSection:(NSInteger)section {
    return [self.books count];
}
- (UITableViewCell *)tableView:(UITableView *)tableView cellForRowAtIndexPath:(NSIndexPath *)indexPath {
    static NSString *CellIdentifier = @"Cell Identifier";
    [tableView registerClass:[UITableViewCell class] forCellReuseIdentifier:CellIdentifier];
    UITableViewCell *cell = [tableView dequeueReusableCellWithIdentifier:CellIdentifier forIndexPath:indexPath];
    // Fetch Book
    NSDictionary *book = [self.books objectAtIndex:[indexPath row]];
    // Configure Cell
    [cell.textLabel setText:[book objectForKey:@"Title"]];
    return cell;
}
With the new view controller class ready to use, head back to the application delegate’s application:didFinishLaunchingWithOptions: method, instantiate an instance of the MTAllBooksViewController class, and add the instance to the tab bar controller’s array of view controllers. Don’t forget to first import the header file of the MTAllBooksViewController class.
#import "MTAllBooksViewController.h"
- (BOOL)application:(UIApplication *)application didFinishLaunchingWithOptions:(NSDictionary *)launchOptions {
    // Initialize Tab Bar Controller
    UITabBarController *tabBarController = [[UITabBarController alloc] init];
    // Initialize Authors View Controller
    MTAuthorsViewController *authorsViewController = [[MTAuthorsViewController alloc] init];
    // Initialize Navigation Controller
    UINavigationController *navigationController = [[UINavigationController alloc] initWithRootViewController:authorsViewController];
    // Initialize All Books View Controller
    MTAllBooksViewController *allBooksViewController = [[MTAllBooksViewController alloc] init];
    // Set View Controllers Tab Bar Controller
    [tabBarController setViewControllers:@[navigationController, allBooksViewController]];
    // Initialize Window
    self.window = [[UIWindow alloc] initWithFrame:[[UIScreen mainScreen] bounds]];
    // Configure Window
    [self.window setRootViewController:tabBarController];
    [self.window setBackgroundColor:[UIColor whiteColor]];
    [self.window makeKeyAndVisible];
    return YES;
}
Build and run the project to see the result of our hard work. If you have an eye for detail, you may have noticed that the title of the second tab only appears after the tab is selected. Can you guess why that is?
View Did … Not Load
The cause of this odd quirk is actually quite simple. In general, a view isn’t loaded into memory until it is absolutely necessary. This usually means that a view is loaded into memory when it is about to be shown to the user. When the Tabbed Library application is launched, the first tab is selected by default. As long as the second tab isn’t selected (by either the user or programmatically), there is no need to load the view of the second view controller. As a result, the viewDidLoad method is not called until the second tab is selected, which in turn means that the title is not set until the second tab is selected.
The solution is simple. A better approach is to set the view controller’s title when the view controller is initialized. If we set the title in the class’ init method, we can be confident that the view controller’s title will be set in time.
Open MTAllBooksViewController.m and search for the initWithStyle: method. This is the designated initializer of the UITableViewController subclass. The style argument of initWithStyle: refers to the style of the table view managed by the table view controller. Remember from two lessons ago that a table view can have one of two styles, (1) plain (UITableViewStylePlain) or (2) grouped (UITableViewStyleGrouped).
This is also a good time to inspect the flow of a typical init method. An initialization method typically start with a call to the superclass’ init method, in this case initWithStyle:. I emphasized why this is important when we discussed the viewDidLoad method earlier in this series. The result of invoking the superclass’ initialization method is assigned to self, the instance of the class that we are working with. Next, we verify that self is not nil. If self is set (not nil), it is time to further configure the instance, that is, self. An initialization method should always return either the class instance or nil if something has gone wrong.
Let’s revisit and solve the initial problem by setting the view controller’s title in the initWithStyle: method as shown below.
- (id)initWithStyle:(UITableViewStyle)style {
    self = [super initWithStyle:style];
    if (self) {
        // Set Title
        self.title = @"Books";
    }
    return self;
}
Even though we don’t explicitly call initWithStyle: in the application delegate’s application:didFinishLaunchingWithOptions: method, when the init method of a UITableViewController subclass is invoked, behind the scenes the initWithStyle: is automatically invoked with UITableViewStylePlain as its argument. You can test this by adding a log statement in the initWithStyle: method as shown below.
- (id)initWithStyle:(UITableViewStyle)style {
self = [super initWithStyle:style];
if (self) {
// Set Title
self.title = @”Books”;
// Proof of Concept
NSLog(@”initWithStyle: is invoked automatically when init is invoked”);
}
return self;
}
That was a lot of talk for fixing a trivial problem. However, the above explanation is a good introduction to another important element of tab bar controllers, tab bar items. At the moment, the tabs of the tab bar only show the title of each view controller. In most applications, the tabs also show a small icon hinting at the function or purpose of the view controller behind the tab. Let’s see how to implement this.
Tab Bar Items
In the previous lesson, I wrote that every view controller on a navigation stack keeps a reference to the navigation controller managing the stack. The same is true for view controllers that are managed by a tab bar controller. A view controller managed by a tab bar controller keeps a reference to the tab bar controller.
In addition to these properties, a view controller also has a tabBarItem property, a unique instance of the UITabBarItem class. This property is used when the view controller is a child of a tab bar controller. A tab bar item has a title, an image, and a tag. The tag is just an integer that can be used to identify a tab bar item in the tab bar. By default, the tab bar item’s title is inherited from the view controller’s title property, which is why the tabs in the Tabbed Library application bear the title of their respective view controller.
Open MTAuthorsViewController.m and amend the initWithStyle: method to look like the implementation shown below. We create a tab bar item and assign it to the view controller’s tabBarItem property. The designated initializer of the UITabBarItem class accepts a title (NSString), an image (UIImage), and a tag (NSInteger). Before building and running the project, download the source files of this lesson and drag icon-authors.png and icon-authors@2x.png into your project. As you might remember, the file with the @2x suffix targets devices with a retina display, whereas the file without the @2x suffix targets non-retina devices.
- (id)initWithStyle:(UITableViewStyle)style {
    self = [super initWithStyle:style];
    if (self) {
        // Set Title
        self.title = @"Authors";
        // Set Tab Bar Item
        self.tabBarItem = [[UITabBarItem alloc] initWithTitle:@"Authors" image:[UIImage imageNamed:@"icon-authors"] tag:0];
    }
    return self;
}
Note that it is not necessary to specify the file extension of the image file when using the class method imageNamed: of UIImage. In general, you don’t need to specify what version of the file (retina or non-retina) to use. The file name suffices as the operating system knows which version to use based on the hardware of the device the application runs on.
I also moved the title assignment to the initWithStyle: method as we did in the MTAllBooksViewController class. Build and run the project once more to see the result.
We can do the same for the MTAllBooksViewController class. Open MTAllBooksViewController.m and update the initWithStyle: method as shown below. In addition to setting the view controller’s title, we set its tabBarItem property. However, this time we make use of initWithTabBarSystemItem:tag: to configure the tab bar item. You can use this method if you wish to use a system supplied tab bar item. The first argument of this method, UITabBarSystemItem, determines both the title and the image of the tab bar item.
It is also possible to give a tab bar item a badge value as shown in the implementation below. The badge value is expected to be an NSString instance.
- (id)initWithStyle:(UITableViewStyle)style {
    self = [super initWithStyle:style];
    if (self) {
        // Set Title
        self.title = @"Books";
        // Set Tab Bar Item
        self.tabBarItem = [[UITabBarItem alloc] initWithTabBarSystemItem:UITabBarSystemItemContacts tag:1];
        // Set Badge Value
        [self.tabBarItem setBadgeValue:@"12"];
    }
    return self;
}
When working with tab bar controllers, keep in mind that it is the root view controller of each tab that determines how the tab bar item of the respective tab looks. For example, if a tab bar controller manages a navigation controller with a number of view controllers, it is the tab bar item of the navigation controller’s root view controller that is used by the tab bar controller’s tab bar. The UITabBarItem class has a few other methods to further customize the look and feel of a tab bar item.
More View Controllers
Before ending this article, I would like to show you how the tab bar controller manages more than five view controllers. As I mentioned earlier, only five tabs are displayed at any one time, but the tab bar controller does provide support for managing more than five child view controllers. Update the application:didFinishLaunchingWithOptions: method as shown below.
- (BOOL)application:(UIApplication *)application didFinishLaunchingWithOptions:(NSDictionary *)launchOptions {
    // Initialize Tab Bar Controller
    UITabBarController *tabBarController = [[UITabBarController alloc] init];
    // Initialize Authors View Controller
    MTAuthorsViewController *authorsViewController = [[MTAuthorsViewController alloc] init];
    // Initialize Navigation Controller
    UINavigationController *navigationController = [[UINavigationController alloc] initWithRootViewController:authorsViewController];
    // Initialize All Books View Controller
    MTAllBooksViewController *allBooksViewController = [[MTAllBooksViewController alloc] init];
    // Initialize All Books View Controller
    MTAllBooksViewController *vc3 = [[MTAllBooksViewController alloc] init];
    MTAllBooksViewController *vc4 = [[MTAllBooksViewController alloc] init];
    MTAllBooksViewController *vc5 = [[MTAllBooksViewController alloc] init];
    MTAllBooksViewController *vc6 = [[MTAllBooksViewController alloc] init];
    // Set View Controllers Tab Bar Controller
    [tabBarController setViewControllers:@[navigationController, allBooksViewController, vc3, vc4, vc5, vc6]];
    // Initialize Window
    self.window = [[UIWindow alloc] initWithFrame:[[UIScreen mainScreen] bounds]];
    // Configure Window
    [self.window setRootViewController:tabBarController];
    [self.window setBackgroundColor:[UIColor whiteColor]];
    [self.window makeKeyAndVisible];
    return YES;
}
The extra view controllers that we added aren’t very useful, but they will show how a tab bar controller manages more than five child view controllers. Build and run the project and see how the additional view controllers are managed by the tab bar controller.
Conclusion
It is important to understand that the UITabBarController and UINavigationController classes each represent a unique user interface paradigm. This article also shows that tab bar controllers aren’t difficult to master once you understand the various components involved. In the next article, we will take a look at data persistence on iOS and the various options you have as a developer.