This three-part tutorial series will teach you how to build a custom music player with the iOS SDK. Read on!
Tutorial Teaser
Step 1: Updating the Storyboard
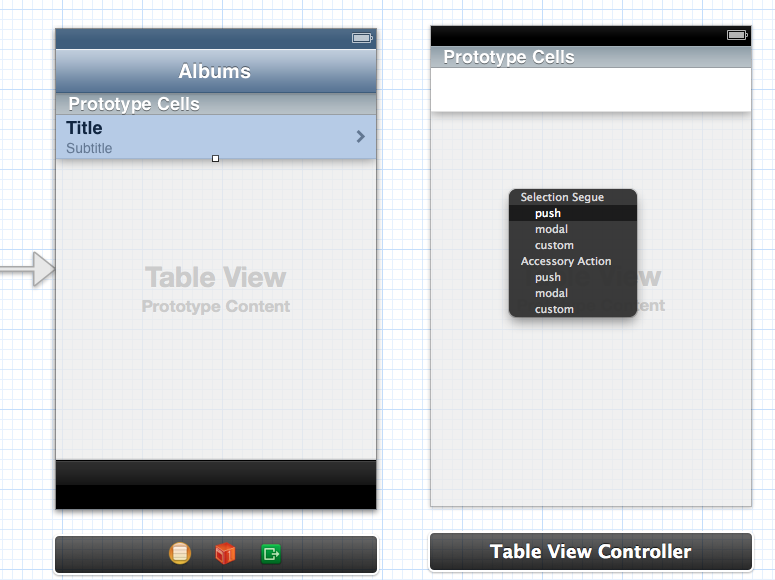
Open the storyboard and drag a table view controller from the Object Library to the canvas. We will use this Table View Controller to show a single album. CTRL-drag from the cell in the Albums Table View Controller to the new Table View Controller we just added and select “push” under the “Selection Segue” section from the pop-up menu.

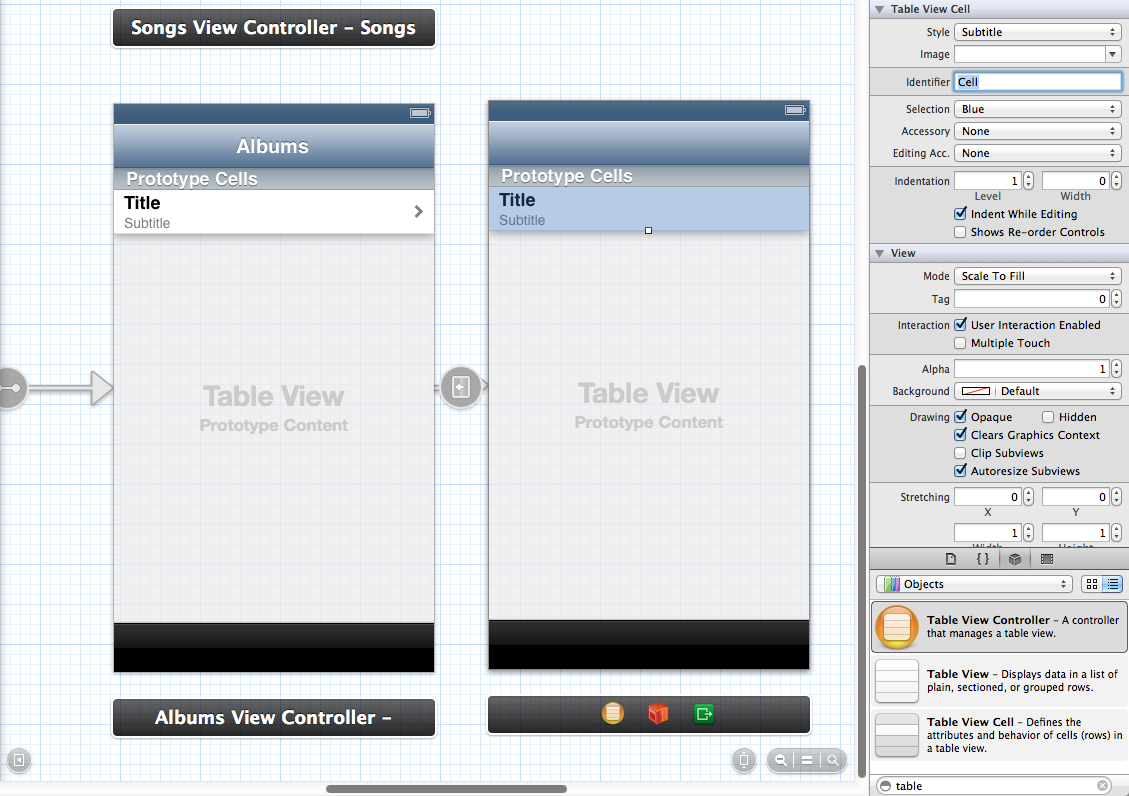
Now we are going to create our cells.The first cell in the table view will contain some information about the album, such as the artwork, the album artist, the duration of the album, and the number of songs on the album. The other cell will contain the songs from the album. Select the cell and open the Attributes Inspector. Set the Identifier to “Cell” and change the Style from “Custom” to “Subtitle”.

Now that we have created the cell for the songs, drag a new table view cell from the Object Library on top of the cell we just edited. Change it’s Selection Style from “Blue” to “None” and set the Identifier to “InfoCell”. After that, open the Size Inspector and change the Row Height to 120.
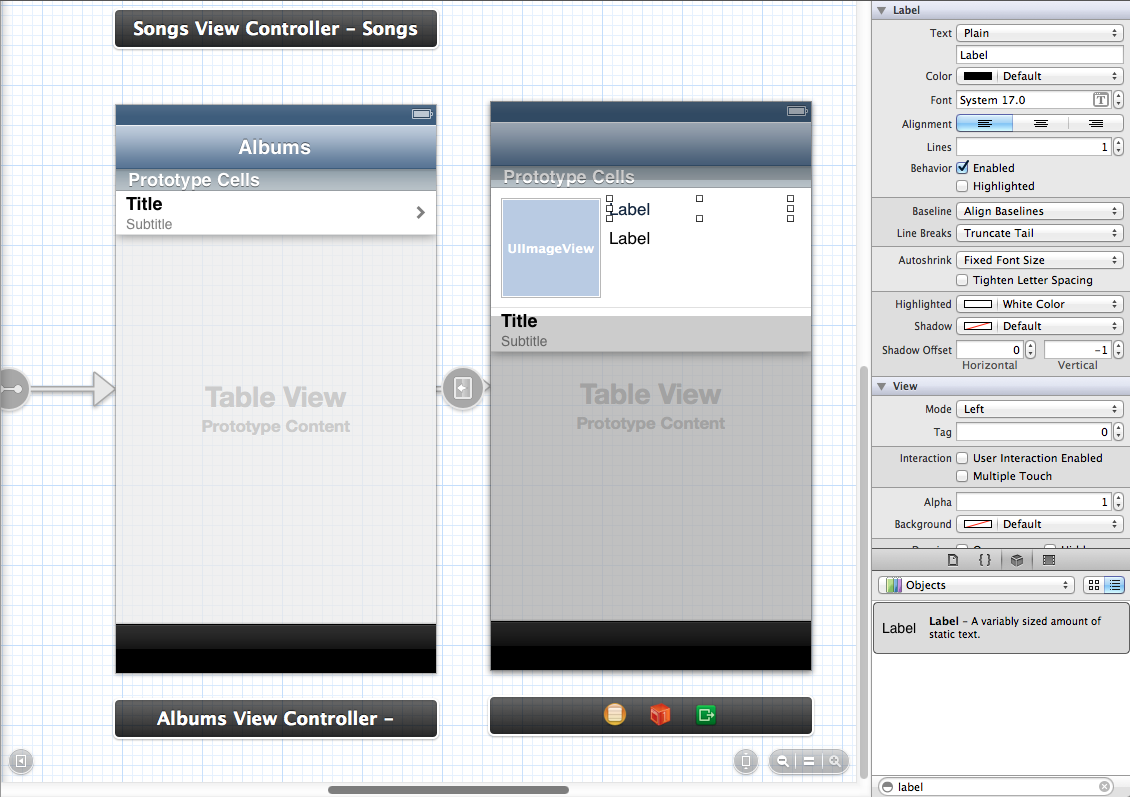
In this cell, we will need an image view for the artwork and two labels for the information. So, first, drag an Image View into the cell and change its size to 100×100. Also change the X and Y properties to 10. After that, drag the two labels in the cell and align them like the image below:

Select the first label, open the Attributes Inspector, and then change the Font to “System Bold 17.0″. Next, delete the text from both the labels and change the tag from the first label to 101 and the tag from the second label to 102. At last, select the image view and change its tag to 100. We will use these tags to adjust the labels and image view in the tableView:cellForRowAtIndexPath: method.
Step 2: Display a Selected Album
Go to “File” > “New” > “File…” to create a new file. Select “Objective-C class” and then click “Next”. Enter “AlbumViewController” for the class and make sure that it’s a subclass of UITableViewController and that both the checkboxes are not selected. Click “Next” again and than click “Create”.
Open AlbumViewController.h and modify the code to read as follows:
#import <UIKit/UIKit.h>
#import <MediaPlayer/MediaPlayer.h>
@interface AlbumViewController : UITableViewController
{
    NSString *albumTitle;
}
@property NSString *albumTitle;
@end
Here, we basically just add the MediaPlayer framework to our table view controller and we create an NSString which will contain the album title. We will update this string when the user selects an album.
Now open AlbumsViewController.m and add the following line under #import "AlbumsViewController.h":
#import "AlbumViewController.h"
After that, add the following method:
- (void) prepareForSegue:(UIStoryboardSegue *)segue sender:(id)sender
{
    AlbumViewController *detailViewController = [segue destinationViewController];
    MPMediaQuery *albumsQuery = [MPMediaQuery albumsQuery];
    NSArray *albums = [albumsQuery collections];
    int selectedIndex = [[self.tableView indexPathForSelectedRow] row];
    MPMediaItem *selectedItem = [[albums objectAtIndex:selectedIndex] representativeItem];
    NSString *albumTitle = [selectedItem valueForProperty:MPMediaItemPropertyAlbumTitle];
    [detailViewController setAlbumTitle:albumTitle];
}
Here we pass the title of the selected album to the detailViewController, which is the AlbumViewController. The storyboard will call this method at runtime when you trigger a segue in the current scene (i.e. when the user selects an album).
Now open AlbumViewController.m and add the following line under the @implementation:
@synthesize albumTitle;
After that, go to the viewDidLoad method and change it to read as follows:
- (void)viewDidLoad
{
    [super viewDidLoad];
    self.title = albumTitle;
}
Here, we simply set the the title of the navigation bar to the selected album title.
Now that we have created a new screen for the selected album, I think it’s a good idea to test the app. Click Build and Run to test the app. If you go to the albums tab and select an album, you will go to a new screen with an empty table view, but the title of the navigation bar should be the same as the selected album.
Get the Full Series!
This tutorial series is available to Tuts+ Premium members only. Read a preview of this tutorial on the Tuts+ Premium web site or login to Tuts+ Premium to access the full content.
Joining Tuts+ Premium. . .
For those unfamiliar, the family of Tuts+ sites runs a premium membership service called Tuts+ Premium. For $19 per month, you gain access to exclusive premium tutorials, screencasts, and freebies from Mobiletuts+, Nettuts+, Aetuts+, Audiotuts+, Vectortuts+, and CgTuts+. You’ll learn from some of the best minds in the business. Become a premium member to access this tutorial, as well as hundreds of other advanced tutorials and screencasts.