Quantcast
Channel: Envato Tuts+ Code - Mobile Development
Viewing all 1836 articles
Browse latest View live

Creating a Login Screen Using TextInputLayout

$
0
0
tag:code.tutsplus.com,2005:PostPresenter/cms-24168
What You'll Be Creating

Introduction

In this tutorial, I will talk again about Material Design. Google I/O 2015 was an important event for every Android developer and design was of course part of the discussion.

Google has realized that backward compatibility is the trickiest part of the material design implementation. Sure, support libraries, such as appcompat-v4 and appcompat-v7, are part of the solution. However, Theme.AppCompat doesn’t implement every material item 
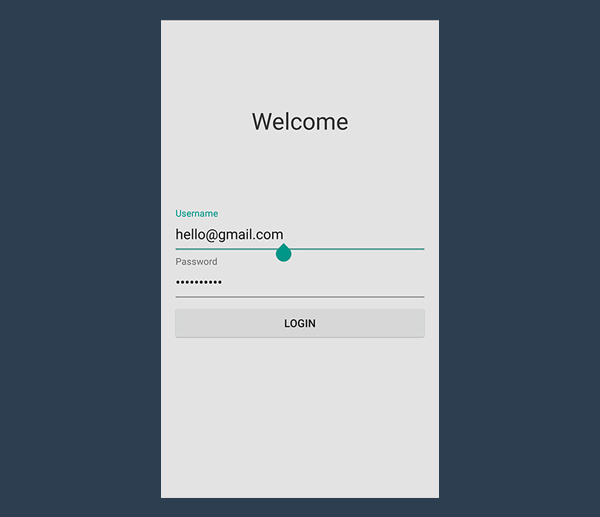
used in Google’s official applications. One of the features that is not present in the AppCompat theme is the possibility to position a floating label on top of an EditText widget. You can see what I mean in the below example.

Official Material Design TextInputLayout implementation

During Google I/O 2015, the Android team released a brand new support library, the Design Support Library. It comes in very handy for this kind of problem. This tutorial will show you how to use the new TextInputLayout widget that's included in the Design Support Library.

1. Implementing TextInputLayout

Step 1: Create a New Project

In Android Studio, choose New > New project from the File menu. Enter the required information to configure the project and create the project. In my example, I targeted the project to API 7, which is the minimum API level supported by the Design Support Library. By targeting such a low API level, your app will run on almost every Android device. I've named the main activity LoginActivity and its layout file activity_login.xml.

After setting up the project, remove in the main activity the onCreateOptionsMenuand onOptionsItemSelected method that are automatically generated by Android Studio. The login screen we're about to create doesn’t need a menu so it's fine to delete these methods. Remember also to delete the XML menu file that lives in the res/menu folder.

Step 2: Import the Support Libraries

To use the TextInputLayout widget, you have to import two libraries. The first one is appcompat-v7, which ensures that the material styles are backward compatible. The second one is the Design Support Library.

In your project's build.gradle file, add the following lines in the project's dependencies:

If Gradle doesn’t automatically ask you to synchronize your project, choose Make module 'app' from the Build menu or press F9. By doing so, the Android Studio build system will automatically fetch the necessary resources and you will be able to import any required classes.

Step 3: Design the User Interface

The user interface of this project is very simple. It shows a welcome label (which can be easily replaced by a logo if you have one) and two EditText elements, one for the username and one for the password. The layout also includes a button that triggers the login sequence. The background color is a nice, flat, light grey.

Another important detail worth remembering is the correct setting of the inputType attribute of the EditText elements. The inputType of the first EditText element should be set to textEmail while that of the second one should be set to textPassword. This is what the layout should look like.

You may also want to get rid of the app bar, previously known as the action bar, by editing the style.xml file as shown below.

Step 4: Using TextInputLayout

We have finally arrived at the most interesting part of this tutorial. A TextInputLayout widget behaves exactly as a LinearLayout does, it’s just a wrapper. TextInputLayout only accepts one child element, similar to a ScrollView. The child element needs to be an EditText element.

Note that I specified another parameter in the EditText item, a hint. As you already know, this attribute allows you to show a custom hint when there’s no content in the EditText. Once the user starts typing, the hint disappears. This isn't great, because they lose context of the information they are entering.

Thanks toTextInputLayout, this won’t be a problem anymore. While the EditText alone will hide the hint after the first character is typed, when wrapped in aTextInputLayout the hint will become a floating label above the EditText. A nice material animation is included too.

Next, let's do the same for the password field.

If you run the application now, nothing will happen. Sure, the EditText hint attribute will behave as expected. However, there's no material animation and no floating labels. Why is that? We're still missing some code to make everything work.

Step 5: Setting Hints

Below the setContentView method, initialize the references to the TextInputLayout views.

To animate the floating label, you just need to set a hint, using the setHint method.

And you’re done. Your login screen now properly follows the material design guidelines. Run the application to see your beautiful login screen.

Login Screen

2. Handling Errors

Another nice feature of TextInputLayout is the way it can handle errors. By validating the input, you prevent users from misspelling their email address or entering a password that is too short.

With input validation, incorrect credentials would be processed by the backend, errors would be generated and sent to the client, and shown to the (waiting) user. A considerable loss of time and a poor user experience. You should check the user's input before sending it to the backend.

Step 1: Implementing the onClick Method

You first have to handle the button click. There are plenty of ways to handle button clicks. One of them is by writing a custom method and specifying it in your XML file via the onClick attribute. I prefer setOnClickListener, but it’s really just a matter of personal taste.

We know that if this method is called, the user doesn’t need the keyboard anymore. Unfortunately, Android doesn't hide the virtual keyboard automatically, unless you tell it to. Call hideKeyboard in the onClick method body.

Step 2: Validating Input

Before setting the error labels, we need to define what's an error and what isn't. We're assuming that the username must be an email address and we want to prevent users from entering an invalid email address.

Validating an email address is a little bit complex. We have to rely on regular expressions. You can use the Apache Commons library too if you wish.

I've written the following regular expression, using the guidelines suggested by Wikipedia about email validity.

The meaning of this regular expression is quite simple. It's comprised of three capturing groups. The first one matches the letters of the alphabet (upper and lower case), numbers, and a series of accepted symbols. Because of the + quantifier, this group matches a string that’s composed of at least one character.

Next, there’s the @ symbol, which is of course required in every email address. The second group accepts only letters, numbers, and hyphens. The length also needs to be at least one (]+).

Finally, there's the last group, which contains a dot and whose purpose is matching subdomains and the TLD. Its quantifier is a star, *, which means that this group looks for a string whose length can be zero or more. In fact, email addresses with a domain, but no TLD, are actually valid.

Since we want to validate a String, we have to rely on Pattern and Matcher classes, included in the java.util.regex package. Import these classes in your activity and then implement the following method:

The validation of the password field is much simpler. Most organizations implement different policies for password validity, but everyone imposes a minimum length. A reasonable rule of thumb is that the password should never be shorter than six characters.

Step 3: Retrieving Data

As I said, TextInputLayout is just a wrapper, but unlike LinearLayout and ScrollView, you can get its child element using a specific method, getEditText. There's no need to use findViewById.

If TextInputLayout doesn't contain an EditTextgetEditText returns null so be careful of a NullPointException.

Step 4: Showing Errors

TextInputLayout error handling is easy and fast. The required methods are setErrorEnabled and setError.

setError sets a red error message that will be displayed below the EditText. If the parameter passed is null, the error message is cleared. It also changes the color of the whole EditText widget to red.

setErrorEnabled enables the error functionality. This directly affects the size of the layout, increasing the lower padding to make room for the error label. Enabling this functionality before setting an error message via setError means that this layout will not change size when an error is displayed. You should do some tests combining these two methods so that you actually see what I am talking about.

Another interesting fact is that if the error functionality has not been enabled yet and you call setError passing a non-null parameter, then setErrorEnabled(true) will be automatically called.

Now that we have defined what’s right and what’s wrong, and we know how to retrieve data  and display possible errors, the implementation of the onClick method becomes trivial.

I've added a doLogin method, but it's currently empty since this is beyond the scope of this tutorial.

3. Styling

You might want to do one last thing, changing the color of the TextInputLayout widget. By default, the AppCompact theme sets it to green, but quite often this color conflicts with your color palette.

Google wrote the Design Support Library very well. Every widget’s color is drawn directly from the theme’s colors, specified in your style.xml file. Just open it and add the colorAccent item to your active theme to change the form's color scheme.

Login Screen with a different color

Conclusion

In this tutorial, we saw how to implement the new layout item TextInputLayout, thanks to the just introduced Design Support Library. 

The design paradigm that this widget implements allows users to never never lose context of the information they are entering and it was actually introduced by Google last year, along with Material Design.

At that time, there was no support library giving developers the possibility to put this widget into action in their projects, until Google I/O 2015. Now, if your application expects some sort of data input, you will finally be truly material design compliant.

2015-07-27T16:15:15.000Z2015-07-27T16:15:15.000ZGianluca Segato

Exploring the Android M Developer Preview

$
0
0

In May, Google announced the next version of the Android platform, Android M. While it’s still unknown what the "M" stands for (Marshmallow? Macaroon? Macadamia Nut Cookie?), you can already get your hands on the Android M developer preview. Developer preview 2 was released only a few days ago.

In this tutorial, we'll look at how you can set up your development environment and install this early release of Android M, before exploring some of the new features included in this developer preview. We'll take a look at how you can use the new Data Binding library to cut down on boilerplate code, how your app can take advantage of Android M's new permissions model, and how Android's built-in app linking is set to become more powerful in Android M.

Disclaimer

Although you can explore Android M features in the developer preview, don't forget that this is a development release that delivers preview APIs, so you should expect significant changes right up until the final SDK. You also cannot publish any apps that target the M developer preview to Google Play.

Since this developer preview is a work in progress, it’s important you keep your development environment up to date and always work with the very latest release of the Android M developer preview. To make sure you don’t miss any updates, you may want to bookmark the Android Developers Blog, join the Android M Developer Community, and make a note of Google's (tentative) release dates.

  • Developer Preview 3: Late July
  • Final SDK: Q3 2015, with speculation that Android M will be released in September

1. Setting Up the Android M Preview SDK

If you want to start experimenting with the Android M developer preview release, you’ll need Android Studio 1.3 beta or higher.

The Android Studio team releases updates via several channels, stable, beta, dev, and the canary channel. Despite the beta tag, you'll find Android Studio 1.3 beta on the canary channel.

To connect to the canary channel:

  • Open Android Studio.
  • In the toolbar, click Android Studio and select Preferences.
  • Open the Appearance & Behavior menu, expand System Settings, and click Updates.

In the Preferences window open the Appearance  Behaviour menu then expand System settings and click Updates

  • Make sure the Automatically check updates for checkbox is selected.
  • Open the drop-down menu and select Canary Channel.
  • Click the Check Now button.

Open the drop-down menu and select Canary Channel

At this point, Android Studio should ask whether you want to download the latest canary build. Click Update and restart. If you don't see a dialogue box, try closing the Preferences window by clicking Update. This should force the dialogue box to appear.

Next, open your SDK Manager and download:

  • Android MNC Preview
  • Android Support Repository (revision 15 or later)

In the Android SDK Manager select Android M and Android Support Repository and then click Install

And that's it. Your development environment is now Android M-ready.

Over the next few sections, I'll cover some of the major features introduced in the preview SDK and show you how to start working with these features in your own Android M projects.

If you want to create an Android M sample project and try some of the code snippets for yourself, just create a new Android project as normal, but set the minimum SDK to MNC Android M (Preview).

2. Data Binding Library

Android M adds data binding to the developer's toolset with the release of a dedicated Data Binding library. This new Data Binding library sets out to minimize the amount of code you need to write by letting you bind data directly into specific views in your layout files.

The best way to understand how data binding works is to see it in action. So instead of looking at the theory behind data binding, let's get stuck into some code.

Step 1: Setting Up the Data Binding Library

To make data binding available to your project, you need to add the Data Binding library dependency to your project’s build.gradle file. Open your top-level Gradle build file and add the following:

You'll also need to add the data binding plug-in to every module where you want to use data binding. Open your module's build.gradle file and add the following:

Step 2: Data Binding Example

With the Data Binding library set up, let's look at a basic example of data binding. Imagine your have a Student class:

You want to display the student's first name in your layout file. To achieve this via data binding, you'd use the following in your layout file:

This new <layout> tag transforms your layout file into a data-binding layout file.

Between these <data> tags, you list all the variables you want to bind to your user interface elements.

This line of code defines a variable, student in this instance, and describes a property that you can then use within your layout.

After the closing <data> tag, you can create the rest of your layout as normal, the only difference is that you can now set the property of student to firstName in your layout file.

Android Studio may flag up some errors until you build your project. This is because the Data Binding library needs to generate a class that contains the bindings from the layout properties and knows how to assign values for the binding expressions. This file is only generated when you build your project, so open the Build menu and select Make project.

Android Studio builds your project and generates a new class named after your layout file, with the addition of a binding suffix (e.g., ActivityMainBinding).

To make this binding work, you need to add the binding class to the onCreate() method of your main activity:

This is a very simple data binding example. When you use the data binding library in your own projects, it usually makes sense to elaborate on this basic example and give your data objects the ability to update your application's user interface whenever the property of that data object changes. To see an example of this kind of data binding in action, check out Google's official Data Binding Guide.

3. Permissions on Android M

We're all storing more personal information on our smartphones and tablets than ever before, so it makes sense that Google are giving users increased control over the information their mobile apps have access to in Android M.

Up until now, Android apps have taken an all-or-nothing approach to permissions. At install time, apps request all the permissions they could possibly require upfront and users can then either accept or reject the entire permissions list.

Android M introduces a completely new permissions model that gives users the ability to pick and choose which permissions they grant each app at runtime. Essentially, apps request permissions as and when they need them, and the user can then either accept or deny each permission.

For example, the user could let the Facebook app access their location but not their device's microphone or camera. Users can also revoke previously-granted permissions. If they decide they no longer want Facebook to know their location, they can always revoke android.permission.ACCESS_FINE_LOCATION.

Permissions and Backwards Compatibility

The new permissions model is good news for security-conscious Android users, but what does it mean for developers?

Firstly, the new permissions model is only supported on Android M. Although the Android operating system actually makes backwards compatibility pretty straightforward (as you’ll see in a minute), it relies on your app knowing whether it's installed on a device running Android M or a device running an earlier version of Android.

Checking the version of Android may sound straightforward, but this fairly routine task gets a bit more confusing due to the development-only nature of Android M. Currently, for your app to check whether it's installed on the Android M developer preview, you need to use the MNC codename.

But according to Google’s code samples, once the API has been finalized, your app should use the following instead:

So use "MNC".equals for now, but don't be surprised if this changes at some point before the final SDK release. Also make sure you double-check this piece of code once the final Android M SDK makes an appearance.

Regardless of the version of Android your device winds up on, you declare all the permissions in your manifest as normal. Then, if your app is installed on a device running anything other than Android M, it simply reverts to the old permissions model and requests all the permissions at install time.

Handling permission requests and responses on Android M is a bit more complicated, but you still declare the permissions in exactly the same manner, in your manifest.

The only quirk is that if your app requires a permission on Android M only, you should declare it using the new <uses-permission-sdk-m> element. On Android M, <uses-permission-sdk-m> behaves exactly the same as <uses-permission>, but anything declared with <uses-permission-sdk-m>  is ignored on pre-Android M devices.

Requesting and Handling Permissions on Android M

Imagine your app has verified that it's installed on Android M, how do you go about making permission requests and handling user responses?

These are the different stages:

  • Check whether your app already has the required permission. Whenever your app needs to perform a restricted action, it should check whether it currently has access to the required permission. You need to complete this step even if the user has granted this permission previously. This is because the user can revoke a permission at any time and your app won't be notified. The good news is that checking for permissions is fairly straightforward, just call Context.checkSelfPermission(permission_name).
  • Don’t have the permission? Request it. You request permissions using the new Activity.requestPermissions(String[], int) method. When you call this method, the system displays a dialogue box where the user can either grant or deny the permission. You may notice there's no way of adding a String/@StringRes to explain why you’re making this request, so if it isn’t immediately obvious why your app needs a particular permission you may want to give the user some information before calling requestPermissions.
  • Receiving the user’s response. Once the user has granted or denied the permission, the system calls your activity’s onRequestPermissionsResult(int, String[], int[]) method and passes it the results.
  • Handling the user’s response. The final step is inspecting these results and acting accordingly. To act on the onRequestPermissionsResult() data, your activity needs to override this method:

Best Practices for the New Permissions Model

A new permissions model means new best practices. Here are a few guidelines that can help you use Android M's granular permission settings more effectively.

Require as Few Permissions as Possible

Every time your app makes a permissions request, you're giving the user the chance to reduce your app's functionality by denying that request. So you should design your app to make as few permission requests as possible.

You may also want to consider whether you can achieve the same results by instructing another app to perform the task in question via an intent. For example, instead of requesting android.permission.CAMERA, you could use a MediaStore.ACTION_IMAGE_CAPTURE intent.

Handle Rejection Gracefully

The user can deny any (and even every) permission request. If this happens, you'll want to ensure your app doesn't freeze, crash, stop working, or disable features without any explanation. After all, your users could think there's something fundamentally wrong with your app and may even leave you a negative review on Google Play as a result.

Handling rejection gracefully will vary depending on your app, but it could involve things like returning an empty data set, removing an option from your app's menu, or displaying a pop-up explaining that the user can unlock this feature by granting your app certain permissions.

Testing, Testing and More Testing

Your goal is to deliver a great user experience regardless of what permissions the user chooses to grant or deny. This means you'll want to make sure your app can handle every eventuality and the only way to do this is through testing.

4. App Linking

When you're browsing the internet, clicking a link will often bring up an App Chooser dialogue. While this is useful when you have multiple apps that could handle the linked content, this additional step often isn't necessary, particularly when you only have one app that can handle the content in question.

In the upcoming M release, Android's built-in app linking is getting an upgrade that aims to remove this often-unnecessary App Chooser step by automatically associating apps with web domains.

For example, imagine you clicked a link to a Twitter profile in your Google search results. In Android M, the system checks whether any of your apps can handle this Twitter URL and have auto-linking enabled. Android will then launch the official Twitter app without displaying the App Chooser dialogue (assuming you have Twitter installed on your device).

This is good news if you own a web domain that relates to your app. Once you've associated your website with your application, whenever a user clicks any link to your website, the operating system will automatically launch your app instead of displaying the App Chooser dialogue. This not only helps you deliver a more seamless user experience, but it keeps driving the user back towards your app, rather than giving them the option of using a competing third-party app or a web browser.

How Do I Establish App Linking?

To establish a link between your app and a web domain your own, you need to host a JSON file at the .well-known location on your domain.

If you wanted your app to automatically handle the links related to your website (mywebsite.com), you'd need to upload a JSON file to the root of mywebsite.com.

Here's an example of the contents and layout of a statement.json file that states Android should always use your app (myapp) to display content relating to mywebsite.com:

The package_name key refers to the the package name you declared in your app's manifest. The value of the sha256_cert_fingerprints key is the public certificate fingerprint (SHA256) of your app's signing certificate.

Note that in the first M developer preview release, this JSON file is verified via the HTTP protocol. In the final M release, it'll be verified over the encrypted HTTPS protocol. Again, this is one of the quirks of working with a developer preview and something you'll want to keep an eye on over subsequent releases.

The final step is telling the Android operating system that it doesn't need to prompt the user for certain types of links. This means adding the android:autoVerify="true" attribute to each <intent-filter> tag in your app's manifest.

When the android:autoVerify attribute is present in your app's manifest, the Android operating system verifies these links when the user first installs your app. Essentially, a list of unique hostnames is compiled from the <intent-filter> tags in the package, and Android M's new Intent Filter Verifier component attempts to fetch the JSON file from each hostname. These JSON files are then checked against the application ID and the certificate of the installed package, and Android's package manager stores the result.

Of course, if this verification fails then app link behavior will not be available to your app. But assuming verification is successful, Android M will automatically launch your app whenever the user clicks on any link related to your web domain.

Conclusion

In this tutorial, we've looked at how app linking, the new permissions model, and the Data Binding library will function in Android M. We've also seen how you can start experimenting with these new features today by setting up the Android M developer preview in Android Studio 1.3 beta or higher.

For more information about Android M, check out Google's official documentation. Here you'll find more information about the new features, a testing guide and, if you want to get some hands-on experience with Android M from the user's perspective, you'll find system images that you can flash to your Android device.

2015-07-29T16:45:47.000Z2015-07-29T16:45:47.000ZJessica Thornsby

Exploring the Android M Developer Preview

$
0
0
tag:code.tutsplus.com,2005:PostPresenter/cms-24357

In May, Google announced the next version of the Android platform, Android M. While it’s still unknown what the "M" stands for (Marshmallow? Macaroon? Macadamia Nut Cookie?), you can already get your hands on the Android M developer preview. Developer preview 2 was released only a few days ago.

In this tutorial, we'll look at how you can set up your development environment and install this early release of Android M, before exploring some of the new features included in this developer preview. We'll take a look at how you can use the new Data Binding library to cut down on boilerplate code, how your app can take advantage of Android M's new permissions model, and how Android's built-in app linking is set to become more powerful in Android M.

Disclaimer

Although you can explore Android M features in the developer preview, don't forget that this is a development release that delivers preview APIs, so you should expect significant changes right up until the final SDK. You also cannot publish any apps that target the M developer preview to Google Play.

Since this developer preview is a work in progress, it’s important you keep your development environment up to date and always work with the very latest release of the Android M developer preview. To make sure you don’t miss any updates, you may want to bookmark the Android Developers Blog, join the Android M Developer Community, and make a note of Google's (tentative) release dates.

  • Developer Preview 3: Late July
  • Final SDK: Q3 2015, with speculation that Android M will be released in September

1. Setting Up the Android M Preview SDK

If you want to start experimenting with the Android M developer preview release, you’ll need Android Studio 1.3 beta or higher.

The Android Studio team releases updates via several channels, stable, beta, dev, and the canary channel. Despite the beta tag, you'll find Android Studio 1.3 beta on the canary channel.

To connect to the canary channel:

  • Open Android Studio.
  • In the toolbar, click Android Studio and select Preferences.
  • Open the Appearance & Behavior menu, expand System Settings, and click Updates.

In the Preferences window open the Appearance  Behaviour menu then expand System settings and click Updates

  • Make sure the Automatically check updates for checkbox is selected.
  • Open the drop-down menu and select Canary Channel.
  • Click the Check Now button.

Open the drop-down menu and select Canary Channel

At this point, Android Studio should ask whether you want to download the latest canary build. Click Update and restart. If you don't see a dialogue box, try closing the Preferences window by clicking Update. This should force the dialogue box to appear.

Next, open your SDK Manager and download:

  • Android MNC Preview
  • Android Support Repository (revision 15 or later)

In the Android SDK Manager select Android M and Android Support Repository and then click Install

And that's it. Your development environment is now Android M-ready.

Over the next few sections, I'll cover some of the major features introduced in the preview SDK and show you how to start working with these features in your own Android M projects.

If you want to create an Android M sample project and try some of the code snippets for yourself, just create a new Android project as normal, but set the minimum SDK to MNC Android M (Preview).

2. Data Binding Library

Android M adds data binding to the developer's toolset with the release of a dedicated Data Binding library. This new Data Binding library sets out to minimize the amount of code you need to write by letting you bind data directly into specific views in your layout files.

The best way to understand how data binding works is to see it in action. So instead of looking at the theory behind data binding, let's get stuck into some code.

Step 1: Setting Up the Data Binding Library

To make data binding available to your project, you need to add the Data Binding library dependency to your project’s build.gradle file. Open your top-level Gradle build file and add the following:

You'll also need to add the data binding plug-in to every module where you want to use data binding. Open your module's build.gradle file and add the following:

Step 2: Data Binding Example

With the Data Binding library set up, let's look at a basic example of data binding. Imagine your have a Student class:

You want to display the student's first name in your layout file. To achieve this via data binding, you'd use the following in your layout file:

This new <layout> tag transforms your layout file into a data-binding layout file.

Between these <data> tags, you list all the variables you want to bind to your user interface elements.

This line of code defines a variable, student in this instance, and describes a property that you can then use within your layout.

After the closing <data> tag, you can create the rest of your layout as normal, the only difference is that you can now set the property of student to firstName in your layout file.

Android Studio may flag up some errors until you build your project. This is because the Data Binding library needs to generate a class that contains the bindings from the layout properties and knows how to assign values for the binding expressions. This file is only generated when you build your project, so open the Build menu and select Make project.

Android Studio builds your project and generates a new class named after your layout file, with the addition of a binding suffix (e.g., ActivityMainBinding).

To make this binding work, you need to add the binding class to the onCreate() method of your main activity:

This is a very simple data binding example. When you use the data binding library in your own projects, it usually makes sense to elaborate on this basic example and give your data objects the ability to update your application's user interface whenever the property of that data object changes. To see an example of this kind of data binding in action, check out Google's official Data Binding Guide.

3. Permissions on Android M

We're all storing more personal information on our smartphones and tablets than ever before, so it makes sense that Google are giving users increased control over the information their mobile apps have access to in Android M.

Up until now, Android apps have taken an all-or-nothing approach to permissions. At install time, apps request all the permissions they could possibly require upfront and users can then either accept or reject the entire permissions list.

Android M introduces a completely new permissions model that gives users the ability to pick and choose which permissions they grant each app at runtime. Essentially, apps request permissions as and when they need them, and the user can then either accept or deny each permission.

For example, the user could let the Facebook app access their location but not their device's microphone or camera. Users can also revoke previously-granted permissions. If they decide they no longer want Facebook to know their location, they can always revoke android.permission.ACCESS_FINE_LOCATION.

Permissions and Backwards Compatibility

The new permissions model is good news for security-conscious Android users, but what does it mean for developers?

Firstly, the new permissions model is only supported on Android M. Although the Android operating system actually makes backwards compatibility pretty straightforward (as you’ll see in a minute), it relies on your app knowing whether it's installed on a device running Android M or a device running an earlier version of Android.

Checking the version of Android may sound straightforward, but this fairly routine task gets a bit more confusing due to the development-only nature of Android M. Currently, for your app to check whether it's installed on the Android M developer preview, you need to use the MNC codename.

But according to Google’s code samples, once the API has been finalized, your app should use the following instead:

So use "MNC".equals for now, but don't be surprised if this changes at some point before the final SDK release. Also make sure you double-check this piece of code once the final Android M SDK makes an appearance.

Regardless of the version of Android your device winds up on, you declare all the permissions in your manifest as normal. Then, if your app is installed on a device running anything other than Android M, it simply reverts to the old permissions model and requests all the permissions at install time.

Handling permission requests and responses on Android M is a bit more complicated, but you still declare the permissions in exactly the same manner, in your manifest.

The only quirk is that if your app requires a permission on Android M only, you should declare it using the new <uses-permission-sdk-m> element. On Android M, <uses-permission-sdk-m> behaves exactly the same as <uses-permission>, but anything declared with <uses-permission-sdk-m>  is ignored on pre-Android M devices.

Requesting and Handling Permissions on Android M

Imagine your app has verified that it's installed on Android M, how do you go about making permission requests and handling user responses?

These are the different stages:

  • Check whether your app already has the required permission. Whenever your app needs to perform a restricted action, it should check whether it currently has access to the required permission. You need to complete this step even if the user has granted this permission previously. This is because the user can revoke a permission at any time and your app won't be notified. The good news is that checking for permissions is fairly straightforward, just call Context.checkSelfPermission(permission_name).
  • Don’t have the permission? Request it. You request permissions using the new Activity.requestPermissions(String[], int) method. When you call this method, the system displays a dialogue box where the user can either grant or deny the permission. You may notice there's no way of adding a String/@StringRes to explain why you’re making this request, so if it isn’t immediately obvious why your app needs a particular permission you may want to give the user some information before calling requestPermissions.
  • Receiving the user’s response. Once the user has granted or denied the permission, the system calls your activity’s onRequestPermissionsResult(int, String[], int[]) method and passes it the results.
  • Handling the user’s response. The final step is inspecting these results and acting accordingly. To act on the onRequestPermissionsResult() data, your activity needs to override this method:

Best Practices for the New Permissions Model

A new permissions model means new best practices. Here are a few guidelines that can help you use Android M's granular permission settings more effectively.

Require as Few Permissions as Possible

Every time your app makes a permissions request, you're giving the user the chance to reduce your app's functionality by denying that request. So you should design your app to make as few permission requests as possible.

You may also want to consider whether you can achieve the same results by instructing another app to perform the task in question via an intent. For example, instead of requesting android.permission.CAMERA, you could use a MediaStore.ACTION_IMAGE_CAPTURE intent.

Handle Rejection Gracefully

The user can deny any (and even every) permission request. If this happens, you'll want to ensure your app doesn't freeze, crash, stop working, or disable features without any explanation. After all, your users could think there's something fundamentally wrong with your app and may even leave you a negative review on Google Play as a result.

Handling rejection gracefully will vary depending on your app, but it could involve things like returning an empty data set, removing an option from your app's menu, or displaying a pop-up explaining that the user can unlock this feature by granting your app certain permissions.

Testing, Testing and More Testing

Your goal is to deliver a great user experience regardless of what permissions the user chooses to grant or deny. This means you'll want to make sure your app can handle every eventuality and the only way to do this is through testing.

4. App Linking

When you're browsing the internet, clicking a link will often bring up an App Chooser dialogue. While this is useful when you have multiple apps that could handle the linked content, this additional step often isn't necessary, particularly when you only have one app that can handle the content in question.

In the upcoming M release, Android's built-in app linking is getting an upgrade that aims to remove this often-unnecessary App Chooser step by automatically associating apps with web domains.

For example, imagine you clicked a link to a Twitter profile in your Google search results. In Android M, the system checks whether any of your apps can handle this Twitter URL and have auto-linking enabled. Android will then launch the official Twitter app without displaying the App Chooser dialogue (assuming you have Twitter installed on your device).

This is good news if you own a web domain that relates to your app. Once you've associated your website with your application, whenever a user clicks any link to your website, the operating system will automatically launch your app instead of displaying the App Chooser dialogue. This not only helps you deliver a more seamless user experience, but it keeps driving the user back towards your app, rather than giving them the option of using a competing third-party app or a web browser.

How Do I Establish App Linking?

To establish a link between your app and a web domain your own, you need to host a JSON file at the .well-known location on your domain.

If you wanted your app to automatically handle the links related to your website (mywebsite.com), you'd need to upload a JSON file to the root of mywebsite.com.

Here's an example of the contents and layout of a statement.json file that states Android should always use your app (myapp) to display content relating to mywebsite.com:

The package_name key refers to the the package name you declared in your app's manifest. The value of the sha256_cert_fingerprints key is the public certificate fingerprint (SHA256) of your app's signing certificate.

Note that in the first M developer preview release, this JSON file is verified via the HTTP protocol. In the final M release, it'll be verified over the encrypted HTTPS protocol. Again, this is one of the quirks of working with a developer preview and something you'll want to keep an eye on over subsequent releases.

The final step is telling the Android operating system that it doesn't need to prompt the user for certain types of links. This means adding the android:autoVerify="true" attribute to each <intent-filter> tag in your app's manifest.

When the android:autoVerify attribute is present in your app's manifest, the Android operating system verifies these links when the user first installs your app. Essentially, a list of unique hostnames is compiled from the <intent-filter> tags in the package, and Android M's new Intent Filter Verifier component attempts to fetch the JSON file from each hostname. These JSON files are then checked against the application ID and the certificate of the installed package, and Android's package manager stores the result.

Of course, if this verification fails then app link behavior will not be available to your app. But assuming verification is successful, Android M will automatically launch your app whenever the user clicks on any link related to your web domain.

Conclusion

In this tutorial, we've looked at how app linking, the new permissions model, and the Data Binding library will function in Android M. We've also seen how you can start experimenting with these new features today by setting up the Android M developer preview in Android Studio 1.3 beta or higher.

For more information about Android M, check out Google's official documentation. Here you'll find more information about the new features, a testing guide and, if you want to get some hands-on experience with Android M from the user's perspective, you'll find system images that you can flash to your Android device.

2015-07-29T16:45:47.000Z2015-07-29T16:45:47.000ZJessica Thornsby

iOS 9: Getting Started With SFSafariViewController

$
0
0

Mobile apps and viewing content on the web are ubiquitous now. For years, iOS developers have been charged with either creating their own web viewing experience inside their app or handing off the URL to Safari. Both of these approaches bring inherent disadvantages that were previously unavoidable.

That's all changed with iOS 9 and the introduction of the SFSafariViewController class. With it, you can now provide a full web viewing experience inside your app without having to spend important development time providing it.

1. Demo Overview

Before we begin, I'm going to lay out the approach I've taken with the demo app that goes along with this tutorial. As you'll see later, there really isn't much code involved with using the safari view controller. The real value of the safari view controller comes from understanding when to use it and, more importantly, why.

Options for Showing Web Content

As of iOS 9, developers have three options to display web content to a user:

  • Safari: Use openURL(_:) to show the page inside of safari, forcing the user to leave your application.
  • Custom Viewing Experience: You can leverage WKWebView or UIWebView to create a browsing experience from scratch.
  • SFSafariViewController: With SFSafariViewController, you can use nearly all of the benefits of viewing web content inside Safari without forcing users to leave your app.

Before iOS 9, the first two options were the only options for developers. Knowing when you had to use one or the other depended on the context of the presented content. While working on the demo application, we are going to use all three options.

Now that we know how content can be displayed, let's cover why it might be displayed in an app. On iOS, there are two major use cases for viewing web content.

  • Custom Web Content: This is content not meant for browsing. This could be a report or something similar generated from an API or server. Here, the user is looking at one piece of content and not doing much else.
  • Viewing Websites: This is the most common scenario. The user needs to browse the web momentarily to either log in to a service or navigate a website.

Also keep in mind that there is a third use case, web-based authentication. For this tutorial,  we aren't going to focus on that scenario.

Custom Web Content

If the extent of your user's web experience inside of your app falls into the first use case, the safari view controller is probably not what you need. In those cases, you are displaying content that you own and control, and may need to extensively customize.

If you find your app fits into this scenario, then use WKWebView. It's the successor to UIWebView and includes several enhancements, such as utilizing the Nitro JavaScript engine. This approach lets you build the entire user interface from scratch. You also have other affordances, such as loading files securely and using WKWebsiteDataStore for querying cookies.

Viewing Websites

The majority of apps, however, just need to provide a generalized web viewing experience. This is the perfect scenario for the safari view controller. Before iOS 9, developers spent time creating their own user interface for web browsing, which could lead to problems for users.

The browsing experience is inconsistent across different apps, which may confuse the user. Some interfaces may also lack the things users expect, such as a progress bar indicating how much of the page is loaded.

Further, you don't have access to all of Safari's features. This includes the reader view, the iCloud keychain for autofill capabilities, and more. If you wanted to have those features before iOS 9, you were forced to have the user leave your app entirely by opening the content inside Safari. The SFSafariViewController class solves every one of these problems.

2. Run the Demo App

To begin, build and run the demo application. You'll be presented with a very minimal user interface that has three options. Each option corresponds to one of the methods mentioned earlier to present web content.

Running the demo app

3. Opening Content in Safari

The first option we'll demonstrate is the more traditional route, which is handing off the URL to Safari. Open ViewController.swift and notice the urlString property at the top of the file. This will define what's presented in the coming examples, so feel free to set it to whatever you desire.

One important thing to note is that in iOS 9, TLS 1.2 is enforced by default. If the server you are trying to reach doesn't support this, you may see the following error in the console:

TLSError

There are ways around this, such as adding a key to your app's Info.plist file. This was a change made by Apple to increase security around the web browsing experience. Moving on, add the following code to the openInSafari(_:) action:

Build and run the app. When you tap the top button, "Open in safari", the operating system will leave your app and open the URL in Safari.

Opening a link in Safari

While this option is certainly viable, we've forced the user to leave our app. As developers, ideally we want the experience to stay contained within our app. One improvement iOS 9 has made with this approach, however, is the small back button in the top left:

Its now easier for the user to navigate back to the application

Tapping this button will take the user back to the app that handed off the URL to Safari. To fix the issue of the user being forced to leave our app, let's move on to the next approach.

4. Opening Content in Webkit or WebView

We'll now open the same URL inside our app. To do this, we'll use an embedded UIWebView. The logic for this simple web browser is found in the CustomWebViewController class.

Since we don't need any of the advanced features of WebKit, we'll just open the page inside a web view. In the ViewController class, replace the code in prepareForSegue(_:sender:) as follows:

Go ahead and run the app. Tap the middle button, "Open with webview", and the page should now load inside the app.

Opening the link in a custom web view

Even though the user stays in the app, the disadvantages with this approach are obvious. Without more development work on our end, there is no loading indication, URL address bar, and other things users expect when browsing the web. Let's now use the SFSafariViewController class to solve those issues.

5. Opening Content in Safari View Controller

Before we can use the SFSafariViewController class, we need to import Safari Services. At the top of ViewController.swift, add the following import statement below the import statement for UIKit:

Next, update the implementation of openWithSafariVC(_:) as shown below:

Run the app and tap the bottom button, "Open with safari view controller", to see the content now being displayed inside a SFSafariViewController instance.

Load the content inside a SFSafariViewController instance

We've now let the user stay inside of our app and they have all the advantages of Safari. Share sheets are available from the tab bar along with the option to add the page as a favorite or open the content in Safari.

There are a number of interesting configurations to take advantage of. For instance, we could let the user easily launch the browser in reader mode by passing true to entersReaderIfAvailable.

Additionally, the Safari view controller respects tint color. This makes it easy to keep the branding of your app present while still keeping Safari's familiar user interface intact.

However, one issue we need to resolve is that the user currently can't dismiss the view controller. Let's fix that now.

6. SFSafariViewControllerDelegate Protocol

To dismiss the view controller, we need to conform to the SFSafariViewControllerDelegate protocol. Open ViewController.swift and make the ViewController class conform to the SFSafariViewControllerDelegate protocol.

Next, add the following delegate method to the ViewController class:

This delegate method is called when the user taps the Done button in the Safari view controller. It should be used to dismiss the view controller and return to your app.

The only thing left to do is assign our view controller to be the delegate of the Safari view controller. Update the implementation of the openWithSafariVC(_:) method as shown below:

If you run the app and open the Safari view controller, you'll see that you can now dismiss the Safari view controller by tapping the Done button in the top right.

Conclusion

The Safari view controller is incredibly easy to use. In fact, it's one of the smallest APIs I've seen with only two initializers and two delegate methods. Even so, it brings all of the features users expect from Safari over to your app.

What's perhaps just as exciting is that developers will no longer have to spend time creating custom web browsers. Bringing a first class web browsing experience to your app takes a few lines of code with the SFSafariViewController class.

2015-07-31T16:15:15.000Z2015-07-31T16:15:15.000ZJordan Morgan

iOS 9: Getting Started With SFSafariViewController

$
0
0
tag:code.tutsplus.com,2005:PostPresenter/cms-24260

Mobile apps and viewing content on the web are ubiquitous now. For years, iOS developers have been charged with either creating their own web viewing experience inside their app or handing off the URL to Safari. Both of these approaches bring inherent disadvantages that were previously unavoidable.

That's all changed with iOS 9 and the introduction of the SFSafariViewController class. With it, you can now provide a full web viewing experience inside your app without having to spend important development time providing it.

1. Demo Overview

Before we begin, I'm going to lay out the approach I've taken with the demo app that goes along with this tutorial. As you'll see later, there really isn't much code involved with using the safari view controller. The real value of the safari view controller comes from understanding when to use it and, more importantly, why.

Options for Showing Web Content

As of iOS 9, developers have three options to display web content to a user:

  • Safari: Use openURL(_:) to show the page inside of safari, forcing the user to leave your application.
  • Custom Viewing Experience: You can leverage WKWebView or UIWebView to create a browsing experience from scratch.
  • SFSafariViewController: With SFSafariViewController, you can use nearly all of the benefits of viewing web content inside Safari without forcing users to leave your app.

Before iOS 9, the first two options were the only options for developers. Knowing when you had to use one or the other depended on the context of the presented content. While working on the demo application, we are going to use all three options.

Now that we know how content can be displayed, let's cover why it might be displayed in an app. On iOS, there are two major use cases for viewing web content.

  • Custom Web Content: This is content not meant for browsing. This could be a report or something similar generated from an API or server. Here, the user is looking at one piece of content and not doing much else.
  • Viewing Websites: This is the most common scenario. The user needs to browse the web momentarily to either log in to a service or navigate a website.

Also keep in mind that there is a third use case, web-based authentication. For this tutorial,  we aren't going to focus on that scenario.

Custom Web Content

If the extent of your user's web experience inside of your app falls into the first use case, the safari view controller is probably not what you need. In those cases, you are displaying content that you own and control, and may need to extensively customize.

If you find your app fits into this scenario, then use WKWebView. It's the successor to UIWebView and includes several enhancements, such as utilizing the Nitro JavaScript engine. This approach lets you build the entire user interface from scratch. You also have other affordances, such as loading files securely and using WKWebsiteDataStore for querying cookies.

Viewing Websites

The majority of apps, however, just need to provide a generalized web viewing experience. This is the perfect scenario for the safari view controller. Before iOS 9, developers spent time creating their own user interface for web browsing, which could lead to problems for users.

The browsing experience is inconsistent across different apps, which may confuse the user. Some interfaces may also lack the things users expect, such as a progress bar indicating how much of the page is loaded.

Further, you don't have access to all of Safari's features. This includes the reader view, the iCloud keychain for autofill capabilities, and more. If you wanted to have those features before iOS 9, you were forced to have the user leave your app entirely by opening the content inside Safari. The SFSafariViewController class solves every one of these problems.

2. Run the Demo App

To begin, build and run the demo application. You'll be presented with a very minimal user interface that has three options. Each option corresponds to one of the methods mentioned earlier to present web content.

Running the demo app

3. Opening Content in Safari

The first option we'll demonstrate is the more traditional route, which is handing off the URL to Safari. Open ViewController.swift and notice the urlString property at the top of the file. This will define what's presented in the coming examples, so feel free to set it to whatever you desire.

One important thing to note is that in iOS 9, TLS 1.2 is enforced by default. If the server you are trying to reach doesn't support this, you may see the following error in the console:

TLSError

There are ways around this, such as adding a key to your app's Info.plist file. This was a change made by Apple to increase security around the web browsing experience. Moving on, add the following code to the openInSafari(_:) action:

Build and run the app. When you tap the top button, "Open in safari", the operating system will leave your app and open the URL in Safari.

Opening a link in Safari

While this option is certainly viable, we've forced the user to leave our app. As developers, ideally we want the experience to stay contained within our app. One improvement iOS 9 has made with this approach, however, is the small back button in the top left:

Its now easier for the user to navigate back to the application

Tapping this button will take the user back to the app that handed off the URL to Safari. To fix the issue of the user being forced to leave our app, let's move on to the next approach.

4. Opening Content in Webkit or WebView

We'll now open the same URL inside our app. To do this, we'll use an embedded UIWebView. The logic for this simple web browser is found in the CustomWebViewController class.

Since we don't need any of the advanced features of WebKit, we'll just open the page inside a web view. In the ViewController class, replace the code in prepareForSegue(_:sender:) as follows:

Go ahead and run the app. Tap the middle button, "Open with webview", and the page should now load inside the app.

Opening the link in a custom web view

Even though the user stays in the app, the disadvantages with this approach are obvious. Without more development work on our end, there is no loading indication, URL address bar, and other things users expect when browsing the web. Let's now use the SFSafariViewController class to solve those issues.

5. Opening Content in Safari View Controller

Before we can use the SFSafariViewController class, we need to import Safari Services. At the top of ViewController.swift, add the following import statement below the import statement for UIKit:

Next, update the implementation of openWithSafariVC(_:) as shown below:

Run the app and tap the bottom button, "Open with safari view controller", to see the content now being displayed inside a SFSafariViewController instance.

Load the content inside a SFSafariViewController instance

We've now let the user stay inside of our app and they have all the advantages of Safari. Share sheets are available from the tab bar along with the option to add the page as a favorite or open the content in Safari.

There are a number of interesting configurations to take advantage of. For instance, we could let the user easily launch the browser in reader mode by passing true to entersReaderIfAvailable.

Additionally, the Safari view controller respects tint color. This makes it easy to keep the branding of your app present while still keeping Safari's familiar user interface intact.

However, one issue we need to resolve is that the user currently can't dismiss the view controller. Let's fix that now.

6. SFSafariViewControllerDelegate Protocol

To dismiss the view controller, we need to conform to the SFSafariViewControllerDelegate protocol. Open ViewController.swift and make the ViewController class conform to the SFSafariViewControllerDelegate protocol.

Next, add the following delegate method to the ViewController class:

This delegate method is called when the user taps the Done button in the Safari view controller. It should be used to dismiss the view controller and return to your app.

The only thing left to do is assign our view controller to be the delegate of the Safari view controller. Update the implementation of the openWithSafariVC(_:) method as shown below:

If you run the app and open the Safari view controller, you'll see that you can now dismiss the Safari view controller by tapping the Done button in the top right.

Conclusion

The Safari view controller is incredibly easy to use. In fact, it's one of the smallest APIs I've seen with only two initializers and two delegate methods. Even so, it brings all of the features users expect from Safari over to your app.

What's perhaps just as exciting is that developers will no longer have to spend time creating custom web browsers. Bringing a first class web browsing experience to your app takes a few lines of code with the SFSafariViewController class.

2015-07-31T16:15:15.000Z2015-07-31T16:15:15.000ZJordan Morgan

Creating Your First CocoaPod

$
0
0

Introduction

CocoaPods is a great tool to help with dependency management when building iOS or OS X applications. Having been around and well supported for years, CocoaPods' maturity is evident. While it's very common to use CocoaPods in your iOS or OS X software projects, it's less common to actually create a pod others to use. This tutorial will walk you through creating your first pod and it will give you some tips on what characterizes a great pod.

1. Install CocoaPods

Obviously, to create a pod, you need to install CocoaPods. It’s available as a Ruby gem from RubyGems. To install CocoaPods, execute the following commands from the command line:

This tutorial was written against CocoaPods 0.37.2.

2. Step by Step Overview

From a high level, there are five steps involved to create your first pod:

  1. Determine the idea for your first pod.
  2. Use the pod lib command to create the skeleton directory structure and associated files for your pod.
  3. Update the metadata of your pod, such as its license and version information.
  4. Add the code for your pod. This includes both the code for the pod itself as well as any code that would be needed for an example project.
  5. Make the pod publicly available.

3. Podstorming

Podstorming isn’t actually a word, but it’s time to brainstorm the functionality for your first pod. There are over 10,000 publicly available pods indexed in the official Specs repository. People have found all sorts of things to make available as a pod. Here are some suggestions to help you start podstorming, err, I mean brainstorming:

  • Utility Code: Do you have a unique take on how to perform certain string manipulations? Do you have a favorite subclass that you wrote for performing a slick animation on a UIView? Specific utility code like this is a great example of what can be turned into a pod. It’s often already well-factored and decoupled from other existing code bases.
  • Third Party Packages: Have you created a wrapper around another third party API? Do you have an app for which you’d like to provide hooks for other apps to integrate with, such as for authentication? Does your company provide a web API for web based resources that would be useful for other iOS apps to easily integrate with? If so, then a pod makes sense since it’s an easy way for other iOS applications to easily integrate with these packages.
  • UI Components: Did you create a buttery-smooth UI widget that you’d like other applications to be able to use? These are my favorite pods. It’s great to be able to add a complicated and delightful UI component to an application by simply including a pod dependency.
  • Anything that you’d like others to be able to use. Did you create something that you think others would find useful? If so, turn it into a pod so others can easily use it.

This tutorial will walk you through creating a pod that allows you to create a UILabel that blinks. We'll call it BlinkingLabel.

4. Create the Project

Time to dig in. Now that you know the functionality that your pod is going to provide, it’s time to create it. The pod lib command is an important tool that we'll use for two purposes during the creation process.

  1. pod lib lint will validate that everything is okay with your pod and that it’s ready to use by CocoaPods.
  2. pod lib create will actually help give you a jump start by providing a standard directory structure with a bunch of boilerplate files necessary for a high quality pod. pod lib create isn't the only way to create your pod, but it is the easiest.

Open a Terminal window, navigate to a working directory, and execute the following command:

  • When you're asked what language you want to use, answer Swift.
  • When asked if you’d like to include a demo application, answer Yes.
  • When determining whether to create a sample project or not, the CocoaPods team suggests asking yourself "Should this Pod include a screenshot?" If so, then it’s a good idea to include a sample project.
  • When asked which testing framework to use, answer None.
  • Answer No to the prompt regarding view based testing.

Testing is outside the scope of this tutorial, but don’t let it stop you from investigating this further after this tutorial. The ratio of tests to lines of code is a factor that is considered by the CocoaPods Quality Index.

When the scaffolding for your pod is set up, Xcode will open your brand new project ready for you to work on your pod.

5. Updating Your Pod's Metadata

There are three main pieces of metadata that need to be included with your pod:

  • .podspec: This file describes information about this specific version of your pod. Your pod's, version number, homepage, and author names are some examples of what’s included. Check the official reference page for more information.
  • README: If you’ve used GitHub before, you know how important a README is. A project’s README, written in Markdown, is displayed on the homepage of a project on GitHub. A proper README can be the difference between someone using your project or not. Additionally, it’s a factor contributing to a high CocoaPods Quality Index as well.
  • LICENSE: To have your pod accepted in the Spec repository, your pod needs to include a license. The pod lib create command automatically populates the LICENSE file with the MIT License and that's what we're going to use for this tutorial.

To get the .podspec in shape, open it in Xcode. You’ll find it under BlinkingLabel/Podspec Metadata/BlinkingLabel.podspec. Luckily, CocoaPods has created a well populated template for us when we executed the pod lib create command. You’re about to love that tool even more. The pod lib lint command will automatically validate the .podspec file to ensure it complies with best practices. Or, if you’re lazy, you can also use it figure out the bare minimum you need to do to create a proper .podspec file.

From the command line, in the root of the BlinkingLabel project, execute the following command:

This should output the following:

The tool tells you that there are three things that need to be fixed in the .podspec file:

  • add more information to the summary
  • add a proper description
  • specify a URL for the pod's homepage

Here are some suggested values for these fields:

  • s.summary: A subclass on UILabel that provides a blink.
  • s.description: This CocoaPod provides the ability to use a UILabel that may be started and stopped blinking.
  • s.homepage: https://github.com/obuseme/BlinkingLabel (replace obuseme with your GitHub username)

But wait, if you’ve been following the instructions step by step, technically there isn’t a project at that URL yet. It’s time to push your project to a public repository on GitHub. While there are other options for hosting your pods, GitHub is by far the most common.

To push your project to GitHub, browse to GitHub, login or create an account, and create a New Repository called BlinkingLabel. Then, from the command line, execute the following commands:

At this point, if you’ve done everything correctly and lint the .podspec file again, it should pass validation.

6. Adding Code

You now have the basic shell of a pod, but it doesn’t do anything. It’s time to add some functionality. The nifty thing about the sample project that CocoaPods created for you is that you can simultaneously write code for both the pod and the example project.

First, find the file ReplaceMe.swift under Pods/Development Pods/BlinkingLabel/Pod/Classes/ and delete it.

Project Navigator showing ReplaceMeswift

Next, create a new Swift file in the same directory and name it BlinkingLabel.swift. Replace the contents of the new file with the following:

You just added functionality to your first pod, a subclass on UILabel. The subclass provides a method to make the label blink and another method to stop it from blinking.

To ensure it’s easy for other developers to understand how to use BlinkingLabel, add some sample code to the example project. Open BlinkingLabel/Example for BlinkingLabel/ViewController.swift and make it look like this:

At this point, you'll see Xcode complaining with a lot of errors in ViewController.swift. This is because the pod for BlinkingLabel isn't installed on the example project yet. To do that, switch to the command line and from the root of the BlinkingLabel directory execute the following command:

Next, switch back to Xcode and select the BlinkingLabel-Example target and click the Run button.

Build and run the sample project

You should see something like this:

iOS Simulator showing example project

Tap Toggle Blinking to try out your new pod. The final step in creating your pod is to update the README.md. In Xcode, open README.md under BlinkingLabel/Podspec Metadata/README.md. You’ll see that CocoaPods added some default documentation for you. Don’t stop there, you can make it better. Add some documentation about the pod and include a screenshot. Remember that a README is often the first thing that someone will see when looking at your pod. It’s important that it is of high quality. Take a look at mine for some inspiration.

7. Making Your Pod Available

Now that you have a fully functional pod running on your local machine, it’s time to make BlinkingLabel available to others for inclusion in their projects. At a high level, this is accomplished by getting your new pod into the public Specs repository.

The Specs repository is the public place on GitHub where all public pods are indexed. You actually aren’t forced to use GitHub to host your pod's source code. You can also use BitBucket for example. Your pod's spec will be stored in the Specs repository on GitHub though.

It’s very simple to have your pod added to the Specs repository. There are three steps involved for submitting your pod. Don’t try these steps as I’ve already made BlinkingLabel public. They are only here to serve as a reference.

As a prerequisite, make sure your local changes to the BlinkingLabel project directory are added to git and pushed to the remote.

Step 1: Tagging

Tag your most recent commit and push it to the remote.

This step indicates that you are marking this commit as a specific release of your pod. The name of the tag should match s.version in your .podspec file. The next step will validate this.

Step 2: Validation

Next, run the following command from the command line to verify that everything is configured correctly between where your source code is stored and your .podspec file:

This should output the following:

Step 3: Pushing to Specs Repository

Finally, push the spec to the Specs repository by executing the following command:

This should output the following:

8. What Makes a Great Pod?

There are literally thousands of pods available in the Specs repository. When browsing for a pod, it’s not easy to determine a pod's quality. When bringing in third party code into your project, you want to have a high level of confidence in the code that you will be shipping to customers. Historically, a developer had to make their own interpretation of the quality of a random pod that they found.

As of June 2015, CocoaPods has provided a tool called the Quality Index that provides a summarized judgement on the quality of a given pod based on certain metrics. The comprehensive and most up to date metrics can be found on GitHub.

In summary, here are things that can help improve the Quality Index of your pod:

  • project popularity as measured by stars, forks, subscribers, and contributors
  • code documentation
  • high quality README
  • written in Swift
  • use of the GPL license
  • not many open issues
  • code quality ensured through automated tests
  • lean install size by minimizing included assets
  • smaller, well composed, classes

The Quality Index of a pod may either go up or down based on how well a given project conforms to these metrics.

Conclusion

Creating pods for others to use is fun and a good way to contribute back to the community. This tutorial has shown you what pieces of code make for good pods, how to create your first pod, how to make it publicly available, and what techniques can make for a great pod.

You now have the knowledge to create your first pod. I’d love to hear what pods you have in mind to build. Please come back and drop a link to your pod once it’s created.

2015-08-03T18:15:01.000Z2015-08-03T18:15:01.000ZAndy Obusek

Creating Your First CocoaPod

$
0
0
tag:code.tutsplus.com,2005:PostPresenter/cms-24332

Introduction

CocoaPods is a great tool to help with dependency management when building iOS or OS X applications. Having been around and well supported for years, CocoaPods' maturity is evident. While it's very common to use CocoaPods in your iOS or OS X software projects, it's less common to actually create a pod others to use. This tutorial will walk you through creating your first pod and it will give you some tips on what characterizes a great pod.

1. Install CocoaPods

Obviously, to create a pod, you need to install CocoaPods. It’s available as a Ruby gem from RubyGems. To install CocoaPods, execute the following commands from the command line:

This tutorial was written against CocoaPods 0.37.2.

2. Step by Step Overview

From a high level, there are five steps involved to create your first pod:

  1. Determine the idea for your first pod.
  2. Use the pod lib command to create the skeleton directory structure and associated files for your pod.
  3. Update the metadata of your pod, such as its license and version information.
  4. Add the code for your pod. This includes both the code for the pod itself as well as any code that would be needed for an example project.
  5. Make the pod publicly available.

3. Podstorming

Podstorming isn’t actually a word, but it’s time to brainstorm the functionality for your first pod. There are over 10,000 publicly available pods indexed in the official Specs repository. People have found all sorts of things to make available as a pod. Here are some suggestions to help you start podstorming, err, I mean brainstorming:

  • Utility Code: Do you have a unique take on how to perform certain string manipulations? Do you have a favorite subclass that you wrote for performing a slick animation on a UIView? Specific utility code like this is a great example of what can be turned into a pod. It’s often already well-factored and decoupled from other existing code bases.
  • Third Party Packages: Have you created a wrapper around another third party API? Do you have an app for which you’d like to provide hooks for other apps to integrate with, such as for authentication? Does your company provide a web API for web based resources that would be useful for other iOS apps to easily integrate with? If so, then a pod makes sense since it’s an easy way for other iOS applications to easily integrate with these packages.
  • UI Components: Did you create a buttery-smooth UI widget that you’d like other applications to be able to use? These are my favorite pods. It’s great to be able to add a complicated and delightful UI component to an application by simply including a pod dependency.
  • Anything that you’d like others to be able to use. Did you create something that you think others would find useful? If so, turn it into a pod so others can easily use it.

This tutorial will walk you through creating a pod that allows you to create a UILabel that blinks. We'll call it BlinkingLabel.

4. Create the Project

Time to dig in. Now that you know the functionality that your pod is going to provide, it’s time to create it. The pod lib command is an important tool that we'll use for two purposes during the creation process.

  1. pod lib lint will validate that everything is okay with your pod and that it’s ready to use by CocoaPods.
  2. pod lib create will actually help give you a jump start by providing a standard directory structure with a bunch of boilerplate files necessary for a high quality pod. pod lib create isn't the only way to create your pod, but it is the easiest.

Open a Terminal window, navigate to a working directory, and execute the following command:

  • When you're asked what language you want to use, answer Swift.
  • When asked if you’d like to include a demo application, answer Yes.
  • When determining whether to create a sample project or not, the CocoaPods team suggests asking yourself "Should this Pod include a screenshot?" If so, then it’s a good idea to include a sample project.
  • When asked which testing framework to use, answer None.
  • Answer No to the prompt regarding view based testing.

Testing is outside the scope of this tutorial, but don’t let it stop you from investigating this further after this tutorial. The ratio of tests to lines of code is a factor that is considered by the CocoaPods Quality Index.

When the scaffolding for your pod is set up, Xcode will open your brand new project ready for you to work on your pod.

5. Updating Your Pod's Metadata

There are three main pieces of metadata that need to be included with your pod:

  • .podspec: This file describes information about this specific version of your pod. Your pod's, version number, homepage, and author names are some examples of what’s included. Check the official reference page for more information.
  • README: If you’ve used GitHub before, you know how important a README is. A project’s README, written in Markdown, is displayed on the homepage of a project on GitHub. A proper README can be the difference between someone using your project or not. Additionally, it’s a factor contributing to a high CocoaPods Quality Index as well.
  • LICENSE: To have your pod accepted in the Spec repository, your pod needs to include a license. The pod lib create command automatically populates the LICENSE file with the MIT License and that's what we're going to use for this tutorial.

To get the .podspec in shape, open it in Xcode. You’ll find it under BlinkingLabel/Podspec Metadata/BlinkingLabel.podspec. Luckily, CocoaPods has created a well populated template for us when we executed the pod lib create command. You’re about to love that tool even more. The pod lib lint command will automatically validate the .podspec file to ensure it complies with best practices. Or, if you’re lazy, you can also use it figure out the bare minimum you need to do to create a proper .podspec file.

From the command line, in the root of the BlinkingLabel project, execute the following command:

This should output the following:

The tool tells you that there are three things that need to be fixed in the .podspec file:

  • add more information to the summary
  • add a proper description
  • specify a URL for the pod's homepage

Here are some suggested values for these fields:

  • s.summary: A subclass on UILabel that provides a blink.
  • s.description: This CocoaPod provides the ability to use a UILabel that may be started and stopped blinking.
  • s.homepage: https://github.com/obuseme/BlinkingLabel (replace obuseme with your GitHub username)

But wait, if you’ve been following the instructions step by step, technically there isn’t a project at that URL yet. It’s time to push your project to a public repository on GitHub. While there are other options for hosting your pods, GitHub is by far the most common.

To push your project to GitHub, browse to GitHub, login or create an account, and create a New Repository called BlinkingLabel. Then, from the command line, execute the following commands:

At this point, if you’ve done everything correctly and lint the .podspec file again, it should pass validation.

6. Adding Code

You now have the basic shell of a pod, but it doesn’t do anything. It’s time to add some functionality. The nifty thing about the sample project that CocoaPods created for you is that you can simultaneously write code for both the pod and the example project.

First, find the file ReplaceMe.swift under Pods/Development Pods/BlinkingLabel/Pod/Classes/ and delete it.

Project Navigator showing ReplaceMeswift

Next, create a new Swift file in the same directory and name it BlinkingLabel.swift. Replace the contents of the new file with the following:

You just added functionality to your first pod, a subclass on UILabel. The subclass provides a method to make the label blink and another method to stop it from blinking.

To ensure it’s easy for other developers to understand how to use BlinkingLabel, add some sample code to the example project. Open BlinkingLabel/Example for BlinkingLabel/ViewController.swift and make it look like this:

At this point, you'll see Xcode complaining with a lot of errors in ViewController.swift. This is because the pod for BlinkingLabel isn't installed on the example project yet. To do that, switch to the command line and from the root of the BlinkingLabel directory execute the following command:

Next, switch back to Xcode and select the BlinkingLabel-Example target and click the Run button.

Build and run the sample project

You should see something like this:

iOS Simulator showing example project

Tap Toggle Blinking to try out your new pod. The final step in creating your pod is to update the README.md. In Xcode, open README.md under BlinkingLabel/Podspec Metadata/README.md. You’ll see that CocoaPods added some default documentation for you. Don’t stop there, you can make it better. Add some documentation about the pod and include a screenshot. Remember that a README is often the first thing that someone will see when looking at your pod. It’s important that it is of high quality. Take a look at mine for some inspiration.

7. Making Your Pod Available

Now that you have a fully functional pod running on your local machine, it’s time to make BlinkingLabel available to others for inclusion in their projects. At a high level, this is accomplished by getting your new pod into the public Specs repository.

The Specs repository is the public place on GitHub where all public pods are indexed. You actually aren’t forced to use GitHub to host your pod's source code. You can also use BitBucket for example. Your pod's spec will be stored in the Specs repository on GitHub though.

It’s very simple to have your pod added to the Specs repository. There are three steps involved for submitting your pod. Don’t try these steps as I’ve already made BlinkingLabel public. They are only here to serve as a reference.

As a prerequisite, make sure your local changes to the BlinkingLabel project directory are added to git and pushed to the remote.

Step 1: Tagging

Tag your most recent commit and push it to the remote.

This step indicates that you are marking this commit as a specific release of your pod. The name of the tag should match s.version in your .podspec file. The next step will validate this.

Step 2: Validation

Next, run the following command from the command line to verify that everything is configured correctly between where your source code is stored and your .podspec file:

This should output the following:

Step 3: Pushing to Specs Repository

Finally, push the spec to the Specs repository by executing the following command:

This should output the following:

8. What Makes a Great Pod?

There are literally thousands of pods available in the Specs repository. When browsing for a pod, it’s not easy to determine a pod's quality. When bringing in third party code into your project, you want to have a high level of confidence in the code that you will be shipping to customers. Historically, a developer had to make their own interpretation of the quality of a random pod that they found.

As of June 2015, CocoaPods has provided a tool called the Quality Index that provides a summarized judgement on the quality of a given pod based on certain metrics. The comprehensive and most up to date metrics can be found on GitHub.

In summary, here are things that can help improve the Quality Index of your pod:

  • project popularity as measured by stars, forks, subscribers, and contributors
  • code documentation
  • high quality README
  • written in Swift
  • use of the GPL license
  • not many open issues
  • code quality ensured through automated tests
  • lean install size by minimizing included assets
  • smaller, well composed, classes

The Quality Index of a pod may either go up or down based on how well a given project conforms to these metrics.

Conclusion

Creating pods for others to use is fun and a good way to contribute back to the community. This tutorial has shown you what pieces of code make for good pods, how to create your first pod, how to make it publicly available, and what techniques can make for a great pod.

You now have the knowledge to create your first pod. I’d love to hear what pods you have in mind to build. Please come back and drop a link to your pod once it’s created.

2015-08-03T18:15:01.000Z2015-08-03T18:15:01.000ZAndy Obusek

Build a Hosted Web App on Android, iOS and Windows Using ManifoldJS

$
0
0

Recently at //BUILD/ 2015, Microsoft announced manifoldJS—the simplest way to build hosted apps across platforms. While John Shewchuk, Technical Fellow and the CTO for the Microsoft Developer Platform, did a great job building a hosted web app right on-stage (you can see the recap here), I’d like to go into a bit more detail, explaining why you should use hosted web apps and how to build one for yourself using manifoldJS.

Why Hosted and ManifoldJS?

Hosted web apps bring the best of the web to store apps on with minimal effort. They are a great way to get more user reach with the experience you’ve already built. And when you update your web experience, your users get the same update in hosted web apps too! 

The problem is, until now, the hard thing about hosted apps was how different the process is on every platform. ManifoldJS changes that by putting the focus on the W3C Manifest for Web Apps—a standards-driven, open source approach for creating apps—and then uses that metadata to create a hosted native app on Android, iOS, and Windows. 

When a platform supports hosted apps, we build it natively and then we use Cordova to polyfill the platforms that don’t have native support.

manifoldJS the simplest way to create hosted apps across platforms and devices

Getting Started With ManifoldJS

There are basically two ways to get going. If you’re a web developer who lives in the command line, start with the CLI interface. For devs who want to run manifoldJS in the cloud, we have the same tools on the website.

Three different phones showing Shiftr and Knockout

The first thing you want to do is create a manifest for your website. This should be pretty familiar to web developers, as it’s a fairly simple JSON object. Here is a sample from my own site:

For more details on building a manifest file, including how to serve it from your webserver, check out this post on the manifest. If you want a little help building that manifest, try the code generator on the manifoldjs.com site. We’ll walk you through the values you need with the wizard, and then provide you with a completed manifest for your website at the end.

Using the CLI Tool

ManifoldJS runs on familiar technology. The only requirement is that you have Node.js installed. ManifoldJS will run on any system (Mac, Linux, Windows) but can only build apps for platforms that are supported on that system.

Installing the tool:

ManifoldJS will handle the install for all of its dependencies through NPM. From there, you simply pass in your website:

From there, one of two things will happen:

  1. If you have a manifest on your site, it will pull it down, along with the corresponding images, and build the apps from it.
  2. If you don’t have a manifest on the site, we will simply assume some default data, and generate your apps, along with a manifest for you. We’ll also use placeholder images so we can still build the tools.

If you would like to see what’s happening, simply turn on some logging and keep your eye on the console. Along with logging, we have a number of other options you can set to control the output of the tool.

Parameters

ParameterDescription
<website-url>(required) URL of the hosted website
-m|–manifest (optional) Location of the W3C Web App manifest file (URL or local path). If not specified, the tool looks for a manifest in the site URL. Otherwise, a new manifest will be created pointing to the site URL.
-d|–directory (optional) Path to the generated project files (default value: current directory)
-s|–shortname (optional) Application short name. When specified, it overrides the short_name value of the manifest
-l|–loglevel (optional) Tracing log level options; Available log levels: debug, trace, info, warn, error (default value: warn)
-p|–platforms (optional) Platforms to generate. Supported platforms: windows, android, ios, chrome (default value: all platforms)
-b|–build (optional) Forces the building process

Using the Web-Based Manifest Generator

All this same great functionality is available in our web-based tool as well. Visit the web generator and get started.

Web-Based Manifest Generator

Once you complete the steps, you’ll just click on the download at the end, and a zip with all your packages will be sent to you.

Your App “Scope”

The Manifest for Web Apps allows you to specify the “scope” of your app. This helps determine where your app stops and the open web begins. Only URLs within your scope will show up in the app. If you’re using more than one domain, or are calling content from our domains, simply add in URI access values to your manifest.

An Even More Powerful Web Experience With Native APIs

As web developers, we are always asking for APIs that help us blur the lines between the feature set of native apps and that of the web. Hosted web apps are a trusted environment on most platforms, where the code is tied directly back to a developer. Because of this, some platforms allow you to have access to native APIs that you can’t reach in the browser.

On Android, iOS, and Windows, we use Cordova to polyfill for the hosted apps. The added advantage of this is that you can add the Cordova js files to your website and use those APIs in your hosted app. However, in Windows 10 you actually have access to the entire API surface of Windows Universal Apps—that’s everything from Bluetooth to low-level human interface. To allow these APIs for your app, simply add this to your manifest:

With the access rules in place, we’ll turn on the APIs for you to call directly, or call through the Cordova APIs.

Next Steps

We’re working to make the process of building hosted web apps even easier, but for now there are still a few final steps that will be in the hands of the developers to complete. 

For every platform, we provide guidance on how to deploy to each App Store. Testing is an important part of app development, and we also have tips and suggestions for getting the most out of your hosted web app. Also, the apps all have to be submitted to the appropriate app stores, and we will point you in the right direction for that as well.

Hosted web apps allow you to develop store apps while maintaining the integrity and uniqueness of the web. Now, developing those apps just got a little simpler with ManifoldJS. You focus on the web standards, we’ll do the rest.

More Hands-On With JavaScript

It might surprise you a bit, but Microsoft has a bunch of free learning on many open source JavaScript topics, and we’re on a mission to create a lot more with Microsoft Edge. Check out our team’s learning series:

And some free tools: Visual Studio Community, Azure Trial, and cross-browser testing tools for Mac, Linux, or Windows.

This article is part of the web dev tech series from Microsoft. We’re excited to share Microsoft Edge and the new EdgeHTML rendering engine with you. Get free virtual machines or test remotely on your Mac, iOS, Android, or Windows device @ http://dev.modern.ie/.

2015-08-05T12:05:05.000Z2015-08-05T12:05:05.000ZJeff Burtoft

Build a Hosted Web App on Android, iOS and Windows Using ManifoldJS

$
0
0
tag:code.tutsplus.com,2005:PostPresenter/cms-24444

Recently at //BUILD/ 2015, Microsoft announced manifoldJS—the simplest way to build hosted apps across platforms. While John Shewchuk, Technical Fellow and the CTO for the Microsoft Developer Platform, did a great job building a hosted web app right on-stage (you can see the recap here), I’d like to go into a bit more detail, explaining why you should use hosted web apps and how to build one for yourself using manifoldJS.

Why Hosted and ManifoldJS?

Hosted web apps bring the best of the web to store apps on with minimal effort. They are a great way to get more user reach with the experience you’ve already built. And when you update your web experience, your users get the same update in hosted web apps too! 

The problem is, until now, the hard thing about hosted apps was how different the process is on every platform. ManifoldJS changes that by putting the focus on the W3C Manifest for Web Apps—a standards-driven, open source approach for creating apps—and then uses that metadata to create a hosted native app on Android, iOS, and Windows. 

When a platform supports hosted apps, we build it natively and then we use Cordova to polyfill the platforms that don’t have native support.

manifoldJS the simplest way to create hosted apps across platforms and devices

Getting Started With ManifoldJS

There are basically two ways to get going. If you’re a web developer who lives in the command line, start with the CLI interface. For devs who want to run manifoldJS in the cloud, we have the same tools on the website.

Three different phones showing Shiftr and Knockout

The first thing you want to do is create a manifest for your website. This should be pretty familiar to web developers, as it’s a fairly simple JSON object. Here is a sample from my own site:

For more details on building a manifest file, including how to serve it from your webserver, check out this post on the manifest. If you want a little help building that manifest, try the code generator on the manifoldjs.com site. We’ll walk you through the values you need with the wizard, and then provide you with a completed manifest for your website at the end.

Using the CLI Tool

ManifoldJS runs on familiar technology. The only requirement is that you have Node.js installed. ManifoldJS will run on any system (Mac, Linux, Windows) but can only build apps for platforms that are supported on that system.

Installing the tool:

ManifoldJS will handle the install for all of its dependencies through NPM. From there, you simply pass in your website:

From there, one of two things will happen:

  1. If you have a manifest on your site, it will pull it down, along with the corresponding images, and build the apps from it.
  2. If you don’t have a manifest on the site, we will simply assume some default data, and generate your apps, along with a manifest for you. We’ll also use placeholder images so we can still build the tools.

If you would like to see what’s happening, simply turn on some logging and keep your eye on the console. Along with logging, we have a number of other options you can set to control the output of the tool.

Parameters

ParameterDescription
<website-url>(required) URL of the hosted website
-m|–manifest (optional) Location of the W3C Web App manifest file (URL or local path). If not specified, the tool looks for a manifest in the site URL. Otherwise, a new manifest will be created pointing to the site URL.
-d|–directory (optional) Path to the generated project files (default value: current directory)
-s|–shortname (optional) Application short name. When specified, it overrides the short_name value of the manifest
-l|–loglevel (optional) Tracing log level options; Available log levels: debug, trace, info, warn, error (default value: warn)
-p|–platforms (optional) Platforms to generate. Supported platforms: windows, android, ios, chrome (default value: all platforms)
-b|–build (optional) Forces the building process

Using the Web-Based Manifest Generator

All this same great functionality is available in our web-based tool as well. Visit the web generator and get started.

Web-Based Manifest Generator

Once you complete the steps, you’ll just click on the download at the end, and a zip with all your packages will be sent to you.

Your App “Scope”

The Manifest for Web Apps allows you to specify the “scope” of your app. This helps determine where your app stops and the open web begins. Only URLs within your scope will show up in the app. If you’re using more than one domain, or are calling content from our domains, simply add in URI access values to your manifest.

An Even More Powerful Web Experience With Native APIs

As web developers, we are always asking for APIs that help us blur the lines between the feature set of native apps and that of the web. Hosted web apps are a trusted environment on most platforms, where the code is tied directly back to a developer. Because of this, some platforms allow you to have access to native APIs that you can’t reach in the browser.

On Android, iOS, and Windows, we use Cordova to polyfill for the hosted apps. The added advantage of this is that you can add the Cordova js files to your website and use those APIs in your hosted app. However, in Windows 10 you actually have access to the entire API surface of Windows Universal Apps—that’s everything from Bluetooth to low-level human interface. To allow these APIs for your app, simply add this to your manifest:

With the access rules in place, we’ll turn on the APIs for you to call directly, or call through the Cordova APIs.

Next Steps

We’re working to make the process of building hosted web apps even easier, but for now there are still a few final steps that will be in the hands of the developers to complete. 

For every platform, we provide guidance on how to deploy to each App Store. Testing is an important part of app development, and we also have tips and suggestions for getting the most out of your hosted web app. Also, the apps all have to be submitted to the appropriate app stores, and we will point you in the right direction for that as well.

Hosted web apps allow you to develop store apps while maintaining the integrity and uniqueness of the web. Now, developing those apps just got a little simpler with ManifoldJS. You focus on the web standards, we’ll do the rest.

More Hands-On With JavaScript

It might surprise you a bit, but Microsoft has a bunch of free learning on many open source JavaScript topics, and we’re on a mission to create a lot more with Microsoft Edge. Check out our team’s learning series:

And some free tools: Visual Studio Community, Azure Trial, and cross-browser testing tools for Mac, Linux, or Windows.

This article is part of the web dev tech series from Microsoft. We’re excited to share Microsoft Edge and the new EdgeHTML rendering engine with you. Get free virtual machines or test remotely on your Mac, iOS, Android, or Windows device @ http://dev.modern.ie/.

2015-08-05T12:05:05.000Z2015-08-05T12:05:05.000ZJeff Burtoft

Creating Onboarding Screens for Android Apps

$
0
0
tag:code.tutsplus.com,2005:PostPresenter/cms-24465
Final product image
What You'll Be Creating

Introduction

It doesn’t take a genius to understand that an app that makes new users feel welcome and comfortable is likely to enjoy a lot more popularity than one that leaves them lost and confused. As a result, many developers these days are trying to ensure that their users have a nice onboarding experience.

If you are developing an innovative app whose functionality and uses might not be obvious to new users, you should consider adding a few onboarding screens to your app. In this tutorial, I will show you a simple way to quickly create and add such screens to your Android app.

1. Add Gradle Dependencies

First, add the Material Design Library as a compile dependency to the build.gradle file of the app module so that you can use user interface elements of Android L in older versions of Android.

Next, add a compile dependency for SmartTabLayout , a library that offers a custom title strip element for the ViewPager component.

We’ll also use classes that belong to the Android Support v4 Library. However, you don’t have to add it manually, because Android Studio adds it by default.

2. Define the Layout of the Onboarding Activity

The onboarding Activity will be responsible for displaying all the onboarding screens. Therefore, this Activity will have the following widgets:

  • A ViewPager instance that lets the users use the swipe gesture to move from one onboarding screen to the next.
  • A ButtonFlat labeled Skip, which allows impatient users to skip the onboarding process.
  • A ButtonFlat labeled Next, which takes the user to the next onboarding screen.
  • A SmartTabLayout that serves as a page indicator for the ViewPager component.

After putting these widgets in a RelativeLayout and positioning them, the code in the layout XML file of the onboarding Activity should look like this:

Feel free to change the layout to match your preferences. I will be calling this layout file activity_onboarding.xml.

3. Define the Layouts of the Onboarding Screens

For this tutorial, you will be creating three onboarding screens. To keep the tutorial simple, the screens will have only two TextView widgets. In a real app, you should also strive to keep the onboarding screens as simple as possible to avoid that new users are overwhelmed when they open your app for the first time.

The layout XML file of the first screen is named onboarding_screen1.xml and has the following contents:

Use the same XML in the layout files of the other two screens and name them onboarding_screen2.xml and onboarding_screen3.xml. Of course, you should change the text property of each TextView widget so that each onboarding screen is unique.

4. Create a Fragment for Each Onboarding Screen

Create a new Java class and name it OnboardingFragment1.java. Make it a subclass of Fragment and override its onCreateView method. Next, call the inflate method to create a View using the layout we defined in onboarding_screen1.xml and return the View. Your class should look like this:

The Fragment for your first onboarding screen is now ready. Follow the same process to create two more Fragment subclasses, OnboardingFragment2.java and OnboardingFragment3.java, which use the layouts defined in onboarding_screen2.xml and onboarding_screen3.xml respectively.

5. Create the Onboarding Activity

Create a new Java class and name it OnboardingActivity.java. Make it a subclass of FragmentActivity and override its onCreate method.

Next, declare a ViewPager, a SmartTabLayout, and two ButtonFlat widgets as member variables of the class.

In the onCreate method, call setContentView to display the layout defined in activity_onboarding.xml and use the findViewById method to initialize the member variables.

You now have to create a FragmentStatePagerAdapter that the ViewPager can use to display the onboarding screens. Create a new variable of type FragmentStatePagerAdapter and name it adapter. Initialize it by passing the result of the getSupportFragmentManager method to its constructor. Because it’s an abstract class, Android Studio will automatically generate code for the abstract methods as shown below.

In the getCount method, return the number of onboarding screens.

Add a switch statement to the getItem method to return the correct Fragment based on the value of position.

Still in the onCreate method, associate the FragmentStatePagerAdapter with the ViewPager by calling the setAdapter method.

Now that the ViewPager is ready, point the SmartTabLayout to it by calling the setViewPager method.

It is now time to add click handlers to the ButtonFlat widgets. You can do so using the setOnClickListener method, passing a new instance of the View.OnClickListener class to it.

In the handler of the skip button, call a method named finishOnboarding. We’ll implement this method in the next step.

In the handler of the next button, use setCurrentItem along with getCurrentItem to move to the next onboarding screen. Also, if getCurrentItem returns the last onboarding screen, call a method named finishOnboarding. We’ll implement this method in a moment.

The code for the handlers of the buttons should look like this:

You may want to make a few changes to the layout of the onboarding Activity, such as removing the skip button and changing the label of the next button to Done when the user reaches the last onboarding screen. You can do so by adding a SimpleOnPageChangeListener to the SmartTabLayout and overriding its onPageSelected method.

6. Ending the Onboarding Experience

When the user has seen all the onboarding screens, or chose to skip them, you should end the onboarding experience by calling the finishOnboarding method (that’s the name we used in the previous step).

In the finishOnboarding method, get a reference to the SharedPreferences object of the app and set a boolean for the key onboarding_complete to true using the putBoolean method. We’ll be using this key in the next step to make sure that users see the onboarding screens only if they have not completed the onboarding process.

Next, create a new Intent and call the startActivity method to launch the main Activity (the Activity that is supposed to open when the user clicks the app’s icon).

Finally, call finish to close OnboardingActivity. The is what the implementation of the finishOnboarding method should look like:

7. Starting the Onboarding Activity

The onboarding Activity should start as early as possible if a user that hasn’t finished the onboarding process opens the app. This means that you will be adding the code for detecting new users and launching OnboardingActivity in the onCreate method of your app’s main Activity.

By checking if the SharedPreferences object has a key called onboarding_complete whose value is true, you can determine if the user has finished the onboarding process. If the value of the key is false, close the main Activity immediately and create a new Intent to launch OnboardingActivity. Take a look at the following code block to better understand this concept.

8.Update the App Manifest

If you haven’t done it already, declare OnboardingActivity in the app manifest.

9. Compile and Run

You can now compile your app and run it on an Android device. As this will be your first run, you should see the onboarding screens instead of the main Activity.

Conclusion

In this tutorial, you learned how to create simple onboarding screens and add them to your Android app. Use these screens to very succinctly answer questions, such as what your app can do and when it should be used.

For an optimal user experience, the onboarding process should be as short as possible and the user should be able to skip it at any time.

2015-08-07T10:50:00.000Z2015-08-07T10:50:00.000ZAshraff Hathibelagal

An Introduction to Handoff

$
0
0

Introduction

With iOS 8 and OS X Yosemite, Apple introduced a great new feature for developers to take advantage of, Handoff. Handoff allows apps to transfer data and application state information from one device to another over Bluetooth. This enables users of your apps to begin a task on one of their devices and then continue it seamlessly on another.

An example of this would be starting to write a message on your iPhone and then finishing and sending that same message on your iPad. In this tutorial, I am going to show you how you can adopt Handoff in your own applications through a very simple note taking app.

This tutorial requires that you are running Xcode 6+ and have two Handoff compatible devices. Not all iOS 8 devices have Bluetooth LE (Low Energy), which is required for Handoff. This feature is therefore only available—and can only be tested on—the following devices:

  • iPhone 5 and later
  • iPad 4th Generation, including every iPad Air model
  • iPad Mini
  • iPod Touch 5th Generation

During testing, you need to sign in to the same iCloud account on each device and enable Handoff in the device's settings.

1. Project Setup

Create a new project in Xcode and choose the Single View Application template from the iOS > Application section.

Project template

Configure the project as shown below. Note that Language is set to Swift and Devices is set to Universal.

Project options

Once Xcode has created your project, open ViewController.swift and replace the implementation of the ViewController class with the following implementation:

The implementation is pretty straightforward. It makes the ViewController class adopt both the UITextFieldDelegate and UITextViewDelegate protocols, and it adds a UITextField and UITextView to the view controller's view for text input.

Build and run your app on one of your test devices and you should see a very basic user interface with two input fields, a text field for a title and a text view for the note's content.

Initial user interface

2. Setting Up Handoff

Activities transferred between devices with Handoff are modelled by the NSUserActivity class. You will learn more about this class and how to use it later in this tutorial. First, your app must be configured to successfully create these activities.

Each type of activity your app supports must be given a unique identifier, similar to how every iOS application has its own unique id. These identifiers can be whatever you want but the best practice is to use reverse-DNS notation, such as com.tutsplus.handoff-introduction.note. The instance of the application running on each device must also be signed by the same iOS development team in order for the activities to be recognized properly.

You first need to add the activity identifiers that your app supports to the target's Info.plist. Open the target's Info.plist and add the NSUserActivityTypes key. Make this item an Array and add a single item, com.tutsplus.handoff-introduction.note, as shown in the screenshot below.

Defining user activity types

Next, select the project in the Project Navigator and, in the editor on the right, open the General tab. In the Identity section, set Team to the correct iOS development team.

Choose the correct development team

With these steps completed, provided you are signed in to the same iCloud account and connected to the same Wi-Fi network on each of your testing devices, your application is ready to start using Handoff.

3. Sending a User Activity

Next, you need to add some code in order for the user activity to be sent from one device to another. Update the viewDidLoad method of the ViewController class as shown below.

This creates a basic NSUserActivity object with the identifier you added to your target's Info.plist earlier. You give this activity object a title and a userInfo dictionary with empty string values for the title and content keys.

In this tutorial, we are going to be putting strings into our activity's userInfo dictionary. However, you can add any property list type, such as numbers, arrays, and dictionaries, as well as any NSCoding compliant object.

You then assign this new activity to the userActivity property of your ViewController instance so that the Handoff API has a reference to it. The UIViewController class inherits this property from the UIResponder class.

Lastly, you call becomeCurrent on the activity object to tell the system that this is the current user activity to be sent out by the application.

You have now set up your user activity successfully, but we also need to fill it with some content as the user writes their note. To do this, we update the current user activity by overriding the updateUserActivityState(_:) method in the ViewController class. This method is called periodically by the Handoff API to update the current user activity. Add the following code to the ViewController class.

The updateUserActivityState(_:) method gives us a reference to the current user activity and it replaces the values in the activity's userInfo dictionary with the latest values from your app. Note that we also invoke this method on the superclass.

We also implemented two other methods, textField(_:shouldChangeCharactersInRange:replacementString:) of the UITextFieldDelegate protocol and textView(_:shouldChangeTextInRange:replacementText:) of the UITextViewDelegate protocol. In these methods, we update the current user activity whenever the text in any of the input fields changes. While this isn't necessary, this ensures that your activity will always contain the latest information.

You are now ready to test out your app with Handoff. Build and run your app on both of your test devices. Press the lock button on one device to put the device to sleep while keeping the app open on the other. Wake up the device that you just locked and you should see the app icon appear in the bottom left corner of the lock screen. Perform a swipe gesture on this icon and your app will resume via Handoff.

Alternatively, you can double-click the home button to enter the app switcher and your Handoff capable app will show up on the left of the home screen. At the moment, your app only resumes to the same blank interface. Let's fix that now.

4. Restoring From a User Activity

Restoring an app from a Handoff NSUserActivity is handled by your application delegate. The app delegate then passes the user activity object to the application's root view controller to restore itself. If the view controller that needs to process the activity isn't the root view controller of your application, then you simply pass it from the root view controller down to the view controller hierarchy until you reach the desired place in your app.

Open AppDelegate.swift and add the following method to the AppDelegate class:

In this method, you pass the user activity object to the application's root view controller and, by returning true, you tell the application that you have successfully received and processed the Handoff user activity.

Next, open ViewController.swift and add the following method to the ViewController class:

Similar to the updateUserActivityState(_:) method from earlier in this tutorial, you override the restoreUserActivityState(_:) method in order to retrieve the information from the NSUserActivity object. In your implementation of this method, you update both of you input fields with the data stored in the user activity object.

Build and run your app on both of your test devices and begin writing a note on one device. From either the lock screen or app switcher on your other device, open the app via Handoff and you should see the text that you had been writing on your first device on your second one.

Data transferred successfully

5. Error Handling and Delegate Methods

Unlike many APIs provided by Apple for iOS, error handling isn't easy when using Handoff if you don't know where these errors need to be handled. The first point at which your app will be notified of a Handoff error is via the application(_:didFailToContinueUserActivityWithType:error:) in the app delegate class. In this method you can determine what the cause of error was and what type of activity the error relates to. Note that the type of an NSUserActivity object is the same as the unique identifier you assign it.

When your application continues from a Handoff activity, it first needs to download the data associated with the activity from the original device over Bluetooth. Before this download is complete though, another application delegate method is called: application(_:willContinueUserActivityWithType:). In this optional method, you can return a boolean value to tell the Handoff API whether or not you want to continue receiving the user activity. In some situations, this may be useful as you can disable a particular type of NSUserActivity when certain conditions are met.

Conclusion

In this tutorial, I showed you how you can use the NSUserActivity class to easily adopt Handoff in your own iOS 8 applications. You created a very simple application, capable of transferring data wirelessly to another device over Bluetooth.

While the example application we went through in this tutorial was very simple, your own applications can have as many user activity types as you want for a wide variety of functionality. As always, if you have any comments or questions, leave them in the comments below.

2015-08-07T16:45:05.000Z2015-08-07T16:45:05.000ZDavis Allie

An Introduction to Handoff

$
0
0
tag:code.tutsplus.com,2005:PostPresenter/cms-24349

Introduction

With iOS 8 and OS X Yosemite, Apple introduced a great new feature for developers to take advantage of, Handoff. Handoff allows apps to transfer data and application state information from one device to another over Bluetooth. This enables users of your apps to begin a task on one of their devices and then continue it seamlessly on another.

An example of this would be starting to write a message on your iPhone and then finishing and sending that same message on your iPad. In this tutorial, I am going to show you how you can adopt Handoff in your own applications through a very simple note taking app.

This tutorial requires that you are running Xcode 6+ and have two Handoff compatible devices. Not all iOS 8 devices have Bluetooth LE (Low Energy), which is required for Handoff. This feature is therefore only available—and can only be tested on—the following devices:

  • iPhone 5 and later
  • iPad 4th Generation, including every iPad Air model
  • iPad Mini
  • iPod Touch 5th Generation

During testing, you need to sign in to the same iCloud account on each device and enable Handoff in the device's settings.

1. Project Setup

Create a new project in Xcode and choose the Single View Application template from the iOS > Application section.

Project template

Configure the project as shown below. Note that Language is set to Swift and Devices is set to Universal.

Project options

Once Xcode has created your project, open ViewController.swift and replace the implementation of the ViewController class with the following implementation:

The implementation is pretty straightforward. It makes the ViewController class adopt both the UITextFieldDelegate and UITextViewDelegate protocols, and it adds a UITextField and UITextView to the view controller's view for text input.

Build and run your app on one of your test devices and you should see a very basic user interface with two input fields, a text field for a title and a text view for the note's content.

Initial user interface

2. Setting Up Handoff

Activities transferred between devices with Handoff are modelled by the NSUserActivity class. You will learn more about this class and how to use it later in this tutorial. First, your app must be configured to successfully create these activities.

Each type of activity your app supports must be given a unique identifier, similar to how every iOS application has its own unique id. These identifiers can be whatever you want but the best practice is to use reverse-DNS notation, such as com.tutsplus.handoff-introduction.note. The instance of the application running on each device must also be signed by the same iOS development team in order for the activities to be recognized properly.

You first need to add the activity identifiers that your app supports to the target's Info.plist. Open the target's Info.plist and add the NSUserActivityTypes key. Make this item an Array and add a single item, com.tutsplus.handoff-introduction.note, as shown in the screenshot below.

Defining user activity types

Next, select the project in the Project Navigator and, in the editor on the right, open the General tab. In the Identity section, set Team to the correct iOS development team.

Choose the correct development team

With these steps completed, provided you are signed in to the same iCloud account and connected to the same Wi-Fi network on each of your testing devices, your application is ready to start using Handoff.

3. Sending a User Activity

Next, you need to add some code in order for the user activity to be sent from one device to another. Update the viewDidLoad method of the ViewController class as shown below.

This creates a basic NSUserActivity object with the identifier you added to your target's Info.plist earlier. You give this activity object a title and a userInfo dictionary with empty string values for the title and content keys.

In this tutorial, we are going to be putting strings into our activity's userInfo dictionary. However, you can add any property list type, such as numbers, arrays, and dictionaries, as well as any NSCoding compliant object.

You then assign this new activity to the userActivity property of your ViewController instance so that the Handoff API has a reference to it. The UIViewController class inherits this property from the UIResponder class.

Lastly, you call becomeCurrent on the activity object to tell the system that this is the current user activity to be sent out by the application.

You have now set up your user activity successfully, but we also need to fill it with some content as the user writes their note. To do this, we update the current user activity by overriding the updateUserActivityState(_:) method in the ViewController class. This method is called periodically by the Handoff API to update the current user activity. Add the following code to the ViewController class.

The updateUserActivityState(_:) method gives us a reference to the current user activity and it replaces the values in the activity's userInfo dictionary with the latest values from your app. Note that we also invoke this method on the superclass.

We also implemented two other methods, textField(_:shouldChangeCharactersInRange:replacementString:) of the UITextFieldDelegate protocol and textView(_:shouldChangeTextInRange:replacementText:) of the UITextViewDelegate protocol. In these methods, we update the current user activity whenever the text in any of the input fields changes. While this isn't necessary, this ensures that your activity will always contain the latest information.

You are now ready to test out your app with Handoff. Build and run your app on both of your test devices. Press the lock button on one device to put the device to sleep while keeping the app open on the other. Wake up the device that you just locked and you should see the app icon appear in the bottom left corner of the lock screen. Perform a swipe gesture on this icon and your app will resume via Handoff.

Alternatively, you can double-click the home button to enter the app switcher and your Handoff capable app will show up on the left of the home screen. At the moment, your app only resumes to the same blank interface. Let's fix that now.

4. Restoring From a User Activity

Restoring an app from a Handoff NSUserActivity is handled by your application delegate. The app delegate then passes the user activity object to the application's root view controller to restore itself. If the view controller that needs to process the activity isn't the root view controller of your application, then you simply pass it from the root view controller down to the view controller hierarchy until you reach the desired place in your app.

Open AppDelegate.swift and add the following method to the AppDelegate class:

In this method, you pass the user activity object to the application's root view controller and, by returning true, you tell the application that you have successfully received and processed the Handoff user activity.

Next, open ViewController.swift and add the following method to the ViewController class:

Similar to the updateUserActivityState(_:) method from earlier in this tutorial, you override the restoreUserActivityState(_:) method in order to retrieve the information from the NSUserActivity object. In your implementation of this method, you update both of you input fields with the data stored in the user activity object.

Build and run your app on both of your test devices and begin writing a note on one device. From either the lock screen or app switcher on your other device, open the app via Handoff and you should see the text that you had been writing on your first device on your second one.

Data transferred successfully

5. Error Handling and Delegate Methods

Unlike many APIs provided by Apple for iOS, error handling isn't easy when using Handoff if you don't know where these errors need to be handled. The first point at which your app will be notified of a Handoff error is via the application(_:didFailToContinueUserActivityWithType:error:) in the app delegate class. In this method you can determine what the cause of error was and what type of activity the error relates to. Note that the type of an NSUserActivity object is the same as the unique identifier you assign it.

When your application continues from a Handoff activity, it first needs to download the data associated with the activity from the original device over Bluetooth. Before this download is complete though, another application delegate method is called: application(_:willContinueUserActivityWithType:). In this optional method, you can return a boolean value to tell the Handoff API whether or not you want to continue receiving the user activity. In some situations, this may be useful as you can disable a particular type of NSUserActivity when certain conditions are met.

Conclusion

In this tutorial, I showed you how you can use the NSUserActivity class to easily adopt Handoff in your own iOS 8 applications. You created a very simple application, capable of transferring data wirelessly to another device over Bluetooth.

While the example application we went through in this tutorial was very simple, your own applications can have as many user activity types as you want for a wide variety of functionality. As always, if you have any comments or questions, leave them in the comments below.

2015-08-07T16:45:05.000Z2015-08-07T16:45:05.000ZDavis Allie

Getting Started With ReactiveX on Android

$
0
0

Introduction

Developing a complex Android app that has lots of network connections, user interactions, and animations often means writing code that is full of nested callbacks. Such code, sometimes called callback hell, is not only lengthy and hard to understand, but also error-prone. ReactiveX offers an alternative approach that is both clear and concise, to manage asynchronous tasks and events.

RxJava is a JVM implementation of ReactiveX, developed by NetFlix, and is very popular among Java developers. In this tutorial, you will learn how to use RxJava bindings for Android, or RxAndroid for short, in your Android projects.

1. Setting Up RxAndroid

To use RxAndroid in an Android Studio project, add it as a compile dependency in the app module’s build.gradle.

2. Basics of Observers and Observables

When working with ReactiveX, you will be using observables and observers extensively. You can think of an observable as an object that emits data and an observer as an object that consumes that data. In RxJava and RxAndroid, observers are instances of the Observer interface, and observables are instances of the Observable class.

The Observable class has many static methods, called operators, to create Observable objects. The following code shows you how to use the just operator to create a very simple Observable that emits a single String.

The observable we just created will emit its data only when it has at least one observer. To create an observer, you create a class that implements the Observer interface. The Observer interface has intuitively named methods to handle the different types of notifications it can receive from the observable. Here’s an observer that can print the String emitted by the observable we created earlier:

To assign an observer to an observable, you should use the subscribe method, which returns a Subscription object. The following code makes myObserver observe myObservable:

As soon as an observer is added to the observable, it emits its data. Therefore, if you execute the code now, you will see Hello printed in Android Studio’s logcat window.

You might have noticed that we didn’t use the onCompleted and the onError methods in myObserver. As these methods are often left unused, you also have the option of using the Action1 interface, which contains a single method named call.

When you pass an instance of Action1 to the subscribe method, the call method is invoked whenever the observable emits data.

To detach an observer from its observable while the observable is still emitting data, you can call the unsubscribe method on the Subscription object.

3. Using Operators

Now that you know how to create observers and observables, let me show you how to use ReactiveX’s operators that can create, transform, and perform other operations on observables. Let’s start by creating a slightly more advanced Observable, one that emits items from an array of Integer objects. To do so, you have to use the from operator, which can generate an Observable from arrays and lists.

When you run this code, you will see each of the numbers of the array printed one after another.

If you’re familiar with JavaScript, Ruby, or Kotlin, you might be familiar with higher-order functions such as map and filter, which can be used when working with arrays. ReactiveX has operators that can perform similar operations on observables. However, because Java 7 doesn’t have lambdas and higher-order functions, we’ll have to do it with classes that simulate lambdas. To simulate a lambda that takes one argument, you will have to create a class that implements the Func1 interface.

Here’s how you can use the map operator to square each item of myArrayObservable:

Note that the call to the map operator returns a new Observable, it doesn’t change the original Observable. If you subscribe to myArrayObservable now, you will receive squares of the numbers.

Operators can be chained. For example, the following code block uses the skip operator to skip the first two numbers, and then the filter operator to ignore odd numbers:

4. Handling Asynchronous Jobs

The observers and observables we created in the previous sections worked on a single thread, Android’s UI thread. In this section, I will show you how to use ReactiveX to manage multiple threads and how ReactiveX solves the problem of callback hell.

Assume you have a method named fetchData that can be used to fetch data from an API. Let’s say it accepts a URL as its parameter and returns the contents of the response as a String. The following code snippet shows how it could be used.

This method needs to run on its own thread, because Android does not allow network operations on the UI thread. This means you would either create an AsyncTask or create a Thread that uses a Handler.

With ReactiveX, however, you have a third option that is slightly more concise. Using the subscribeOn and observeOn operators, you can explicitly specify which thread should run the background job and which thread should handle the user interface updates.

The following code creates a custom Observable using the create operator. When you create an Observable in this manner, you have to implement the Observable.OnSubscribe interface and control what it emits by calling the onNext, onError, and onCompleted methods yourself.

When the Observable is ready, you can use subscribeOn and observeOn to specify the threads it should use and subscribe to it.

You might still be thinking that the reactive approach isn’t drastically better than using the AsyncTask or Handler classes. You are right, you don’t really need ReactiveX if you have to manage only one background job.

Now consider a scenario that would result in a complex codebase if you used the conventional approach. Let’s say you have to fetch data from two (or more) websites in parallel and update a View only when all the requests have completed. If you follow the conventional approach, you would have to write lots of unnecessary code to make sure that the requests completed without errors.

Consider another scenario in which you have to start a background job only after another background job has completed. Using the conventional approach, this would result in nested callbacks.

With ReactiveX’s operators, both scenarios can be handled with very little code. For example, if you have to use fetchData to fetch the contents of two websites, fore example Google and Yahoo, you would create two Observable objects, and use the subscribeOn method to make them run on different threads.

To handle the first scenario in which both requests need to run in parallel, you can use the zip operator and subscribe to the Observable it returns.

Similarly, to handle the second scenario, you can use the concat operator to run the threads one after another.

5. Handling Events

RxAndroid has a class named ViewObservable that makes it easy to handle events associated with View objects. The following code snippet shows you how to create a ViewObservable that can be used to handle the click events of a Button.

You can now subscribe to clicksObservable and use any of the operators you learned about in the previous sections. For example, if you want your app to skip the first four clicks of the button and start responding from the fifth click onwards, you could use the following implementation:

Conclusion

In this tutorial, you learned how to use ReactiveX’s observers, observables, and operators to handle multiple asynchronous operations and events. As working with ReactiveX involves functional, reactive programming, a programming paradigm most Android developers are not used to, don’t be too hard on yourself if you don’t get it right the first time. You should also know that ReactiveX code will be a lot more readable if you use a modern programming language, such as Kotlin, that supports higher-order functions.

To learn more about reactive extensions, I encourage you to browse the resources available at ReactiveX.

2015-08-10T17:45:08.000Z2015-08-10T17:45:08.000ZAshraff Hathibelagal

Getting Started With ReactiveX on Android

$
0
0
tag:code.tutsplus.com,2005:PostPresenter/cms-24387

Introduction

Developing a complex Android app that has lots of network connections, user interactions, and animations often means writing code that is full of nested callbacks. Such code, sometimes called callback hell, is not only lengthy and hard to understand, but also error-prone. ReactiveX offers an alternative approach that is both clear and concise, to manage asynchronous tasks and events.

RxJava is a JVM implementation of ReactiveX, developed by NetFlix, and is very popular among Java developers. In this tutorial, you will learn how to use RxJava bindings for Android, or RxAndroid for short, in your Android projects.

1. Setting Up RxAndroid

To use RxAndroid in an Android Studio project, add it as a compile dependency in the app module’s build.gradle.

2. Basics of Observers and Observables

When working with ReactiveX, you will be using observables and observers extensively. You can think of an observable as an object that emits data and an observer as an object that consumes that data. In RxJava and RxAndroid, observers are instances of the Observer interface, and observables are instances of the Observable class.

The Observable class has many static methods, called operators, to create Observable objects. The following code shows you how to use the just operator to create a very simple Observable that emits a single String.

The observable we just created will emit its data only when it has at least one observer. To create an observer, you create a class that implements the Observer interface. The Observer interface has intuitively named methods to handle the different types of notifications it can receive from the observable. Here’s an observer that can print the String emitted by the observable we created earlier:

To assign an observer to an observable, you should use the subscribe method, which returns a Subscription object. The following code makes myObserver observe myObservable:

As soon as an observer is added to the observable, it emits its data. Therefore, if you execute the code now, you will see Hello printed in Android Studio’s logcat window.

You might have noticed that we didn’t use the onCompleted and the onError methods in myObserver. As these methods are often left unused, you also have the option of using the Action1 interface, which contains a single method named call.

When you pass an instance of Action1 to the subscribe method, the call method is invoked whenever the observable emits data.

To detach an observer from its observable while the observable is still emitting data, you can call the unsubscribe method on the Subscription object.

3. Using Operators

Now that you know how to create observers and observables, let me show you how to use ReactiveX’s operators that can create, transform, and perform other operations on observables. Let’s start by creating a slightly more advanced Observable, one that emits items from an array of Integer objects. To do so, you have to use the from operator, which can generate an Observable from arrays and lists.

When you run this code, you will see each of the numbers of the array printed one after another.

If you’re familiar with JavaScript, Ruby, or Kotlin, you might be familiar with higher-order functions such as map and filter, which can be used when working with arrays. ReactiveX has operators that can perform similar operations on observables. However, because Java 7 doesn’t have lambdas and higher-order functions, we’ll have to do it with classes that simulate lambdas. To simulate a lambda that takes one argument, you will have to create a class that implements the Func1 interface.

Here’s how you can use the map operator to square each item of myArrayObservable:

Note that the call to the map operator returns a new Observable, it doesn’t change the original Observable. If you subscribe to myArrayObservable now, you will receive squares of the numbers.

Operators can be chained. For example, the following code block uses the skip operator to skip the first two numbers, and then the filter operator to ignore odd numbers:

4. Handling Asynchronous Jobs

The observers and observables we created in the previous sections worked on a single thread, Android’s UI thread. In this section, I will show you how to use ReactiveX to manage multiple threads and how ReactiveX solves the problem of callback hell.

Assume you have a method named fetchData that can be used to fetch data from an API. Let’s say it accepts a URL as its parameter and returns the contents of the response as a String. The following code snippet shows how it could be used.

This method needs to run on its own thread, because Android does not allow network operations on the UI thread. This means you would either create an AsyncTask or create a Thread that uses a Handler.

With ReactiveX, however, you have a third option that is slightly more concise. Using the subscribeOn and observeOn operators, you can explicitly specify which thread should run the background job and which thread should handle the user interface updates.

The following code creates a custom Observable using the create operator. When you create an Observable in this manner, you have to implement the Observable.OnSubscribe interface and control what it emits by calling the onNext, onError, and onCompleted methods yourself.

When the Observable is ready, you can use subscribeOn and observeOn to specify the threads it should use and subscribe to it.

You might still be thinking that the reactive approach isn’t drastically better than using the AsyncTask or Handler classes. You are right, you don’t really need ReactiveX if you have to manage only one background job.

Now consider a scenario that would result in a complex codebase if you used the conventional approach. Let’s say you have to fetch data from two (or more) websites in parallel and update a View only when all the requests have completed. If you follow the conventional approach, you would have to write lots of unnecessary code to make sure that the requests completed without errors.

Consider another scenario in which you have to start a background job only after another background job has completed. Using the conventional approach, this would result in nested callbacks.

With ReactiveX’s operators, both scenarios can be handled with very little code. For example, if you have to use fetchData to fetch the contents of two websites, fore example Google and Yahoo, you would create two Observable objects, and use the subscribeOn method to make them run on different threads.

To handle the first scenario in which both requests need to run in parallel, you can use the zip operator and subscribe to the Observable it returns.

Similarly, to handle the second scenario, you can use the concat operator to run the threads one after another.

5. Handling Events

RxAndroid has a class named ViewObservable that makes it easy to handle events associated with View objects. The following code snippet shows you how to create a ViewObservable that can be used to handle the click events of a Button.

You can now subscribe to clicksObservable and use any of the operators you learned about in the previous sections. For example, if you want your app to skip the first four clicks of the button and start responding from the fifth click onwards, you could use the following implementation:

Conclusion

In this tutorial, you learned how to use ReactiveX’s observers, observables, and operators to handle multiple asynchronous operations and events. As working with ReactiveX involves functional, reactive programming, a programming paradigm most Android developers are not used to, don’t be too hard on yourself if you don’t get it right the first time. You should also know that ReactiveX code will be a lot more readable if you use a modern programming language, such as Kotlin, that supports higher-order functions.

To learn more about reactive extensions, I encourage you to browse the resources available at ReactiveX.

2015-08-10T17:45:08.000Z2015-08-10T17:45:08.000ZAshraff Hathibelagal

iOS 9: Introducing Search APIs

$
0
0
tag:code.tutsplus.com,2005:PostPresenter/cms-24375

Introduction

At WWDC 2015, Apple officially announced iOS 9. In addition to many new features and improvements, this update also gives developers the opportunity to make the content of their apps more discoverable and accessible through Spotlight search. New APIs available in iOS 9 allow you to index any content or interface state within your app, making it accessible to your users through Spotlight. The three components of these new search APIs are:

  • the NSUserActivity class, which is designed for viewed app content
  • the Core Spotlight framework, which is designed for any app content
  • web markup, designed for apps that have content that is mirrored on a website

In this tutorial, I'm going to show you how you can use the NSUserActivity class and the Core Spotlight framework in your own applications.

Prerequisites

This tutorial requires that you are running Xcode 7 on OS X 10.10 or later. To follow along with me, you also need to download the starter project from GitHub.

1. Using NSUserActivity

In the first part of this tutorial, I'm going to show you how you can index an app's content through the NSUserActivity class. This API is the same one that is used for Handoff, a feature introduced in iOS 8 last year, and handles both saving and restoring an application's current state.

If you have not worked with NSUserActivity before, then I suggest you first read my my tutorial covering the basics of Handoff and NSUserActivity before continuing with this one.

Before writing any code, open the starter project and run the app in the iOS Simulator or on a test device. At this stage, you will see that the app simply displays a list of four TV shows and a detail page for each one.

Show list
Show detail

To begin, open the starter project and navigate to DetailViewController.swift. Replace the configureView method of the DetailViewController class with the following implementation:

The code that configures the labels in the view controller is unchanged, but let's go through the user activity code step by step:

  1. You create a new NSUserActivity object with the unique identifier com.tutsplus.iOS-9-Search.displayShow. The starter project has already been configured to use this identifier so be sure to leave this identifier unchanged.
  2. You then assign a userInfo dictionary to the user activity. This will be used later to restore the state of the application.
  3. You give the activity's title property a string value. This is what will show up in the Spotlight search results.
  4. To ensure that the content is searchable by more than just its title, you also provide a set of keywords. In the above code snippet, the set of keywords includes each word of the show's name as well as its genre.
  5. Next, you set a number of properties of the NSUserActivity object to tell the operating system what you want this user activity to be used for. In this tutorial, we are only looking at the search component of the API so we disable Handoff and enable search.
  6. Finally, you call the becomeCurrent method on the user activity at which point it is automatically added to the device's index of search results.

In the above implementation, you probably noticed the two lines in comments. While we won't be using these properties in this tutorial, it's important to know what each property is used for.

  • With the above implementation, a user activity and search result is created for each individual show only once the application has been opened. When you make your user activity eligibleForPublicIndexing, Apple begins to monitor the usage and interaction of this particular activity from the user's search results. If the search result is engaged by many users, Apple promotes the user activity to its own cloud index. Once the user activity is in this cloud index, it is searchable by anyone who has installed your application, regardless of whether they have opened that particular content or not. This property should only be set to true for activities that are accessible by all users of your application.
  • A user activity can also have an optional expirationDate. When this property is set, your user activity will only show up in search results up until the specified date.

Now that you know how to create an NSUserActivity capable of displaying search results in Spotlight, you are ready to test it out. Build and run your app, and open up a few of the shows in your application. Once you have done this, go back to the home screen (press Command-Shift-H in the iOS Simulator) and swipe down or scroll to the far left screen to bring up the search view.

Start typing the title of one of the shows that you opened and you will see that it shows up in the search results as shown below.

Start typing the title of one of the shows

Alternatively, enter the genre of one of the shows you opened. Because of the keywords that you assigned to the user activity, this will also cause the show to be listed in the search results.

Enter the genre of one of the shows

Your application's content is correctly indexed by the operating system and results are showing up in Spotlight. However, when you tap a search result, your application doesn't take the user to the respective search result. It merely launches the application.

Luckily, as with Handoff, you can use the NSUserActivity class to restore the correct state in your application. To make this work we need to implement two methods.

Implement the application(_:continueUserActivity:restorationHandler:) method in the AppDelegate class as shown below.

Next, implement the restoreUserActivityState(_:) method in the MasterViewController class.

At the time of writing, the latest version of Xcode 7 (Beta 3) contains an issue where the userInfo property of a user activity being restored can be empty. That is why I handle any errors and display an alert with the userInfo that is returned by the operating system.

Build and run your app again, and search for a show. When you tap on a show in the search results, the app should take you straight to the detail view controller and display the current information for the show you tapped.

Application being restored correctly

2. Using the Core Spotlight Framework

Another set of APIs available in iOS 9 to make your content searchable for users is the Core Spotlight framework. This framework has a database-style design and lets you provide even more information about the content that you want to be searchable.

Before you can use the Core Spotlight framework, we need to link the project against the framework. In the Project Navigator, select the project and open the Build Phases tab at the top. Next, expand the Link Binary With Libraries section and click the plus button. In the menu that appears, search for CoreSpotlight and link your project against the framework. Repeat these steps for the MobileCoreServices framework.

Adding the CoreSpotlight framework

Next, to ensure that the search results our app provides are from Core Spotlight, delete your app from your test device or the iOS Simulator and comment out the following line in the DetailViewController class:

Finally, open MasterViewController.swift and add the following lines before the Show structure definition:

Next, add the following code to the viewDidLoad method of the MasterViewController class:

Before we test this code, let's go through each step of the for loop.

  1. You create a CSSearchableItemAttributeSet object, passing in a content type for the item. If your search result links to a photo, for example, you would pass in the kUTTypeImage constant.
  2. You assign the show's name to the title property of the attribute set. Just like with NSUserActivity, this title is what will appear at the top of your search results.
  3. Next, you create a descriptive string and assign this to the contentDescription property of your searchable attribute set. This string will be displayed below the result's title in Spotlight.
  4. You create an array of keywords form the search result just as you did with NSUserActivity.
  5. Lastly, you create a CSSearchableItem with a unique item identifier, unique domain identifier to group items together, and an attribute set. Unlike with NSUserActivity, which returns the user activity from the search result, the unique identifiers you use for a CSSearchableItem are the only information that you receive from the operating system when your search result is selected by the user. You need to use these identifiers to restore your app back to the correct state.

Once you have created a CSSearchableItem for the TV shows, you index them using the indexSearchableItems(_:completionHandler:) method on the default CSSearchableIndex object.

Build and run your app, and all of your shows will be indexed by Spotlight. Navigate to the search view and search for one of the shows.

CoreSpotlight search result

Core Spotlight search results are handled by the same methods as those from NSUserActivity, but the process is slightly different. When a CSSearchableItem is selected from the search results, the system creates an NSUserActivity object for you that contains the unique identifier of the selected item.

In your app delegate's application(_:continueUserActivity:restorationHandler:) method, you can use the following implementation to retrieve the information you need from a Core Spotlight search result:

A good practice when indexing content from your app with the Core Spotlight framework is to also delete your items when they are no longer needed. The CSSearchableIndex class provides three methods to delete searchable items:

  • deleteAllSearchableItemsWithCompletionHandler(_:)
  • deleteSearchableItemsWithDomainIdentifiers(_:completionHandler:)
  • deleteSearchableItemsWithIdentifiers(_:completionHandler:)

As an example, add the following code to the end of the viewDidLoad method of the MasterViewController class:

Build and run your app one more time. When you try to search for any of your shows, no results are returned, because they have been deleted from the index.

3. Combining NSUserActivity and Core Spotlight

Another new addition to the NSUserActivity class in iOS 9 is the contentAttributeSet property. This property allows you to assign a CSSearchableItemAttributeSet, just like the ones you created earlier. This attribute set allows your search results for NSUserActivity objects to show the same amount of detail as Core Spotlight search results.

Start by adding the following imports at the top of DetailViewController.swift:

Next, update the configureView method in the DetailViewController class with the following implementation:

Build and run your app one final time, and open a few of your shows. When you now search for a show, you will see that your results, created with NSUserActivity, contain the same level of detail as the Core Spotlight search results.

NSUserActivity result with CoreSpotlight detail

Conclusion

In this tutorial, you learned how to make your application's content accessible through iOS Spotlight by using the NSUserActivity class and the Core Spotlight framework. I also showed you how to index content from your application using both APIs and how to restore your application's state when a search result is selected by the user.

The new search APIs introduced with iOS 9 are very easy to use and make your application's content easier to discover and more accessible to your application's users. As always, if you have any comments or questions, leave them in the comments below.

2015-08-12T17:30:40.000Z2015-08-12T17:30:40.000ZDavis Allie

Telerik: Transform Your Mobile App From Idea to Reality

$
0
0

Creating a mobile application for multiple platforms requires a different approach than, for example, creating a desktop or web application. What does it take to go from an idea to a mobile application that runs on multiple platforms? Telerik answers this question for you.

Telerik has more than a decade of experience building software for a wide range of platforms. It can help you by offering a solution that takes you from idea to finished product in record time. The company's tools and development environment is ideal for building cross-platform mobile applications.

Watch Telerik's free webinar to learn everything you need to know to get started today. The webinar covers every aspect of the process, from understanding the mobile development environment to deploying your application. If you have an idea for a mobile application, then consider Telerik as your partner to make it a reality.

2015-08-13T16:45:39.000Z2015-08-13T16:45:39.000ZBart Jacobs

Telerik: Transform Your Mobile App From Idea to Reality

$
0
0
tag:code.tutsplus.com,2005:PostPresenter/cms-24594

Creating a mobile application for multiple platforms requires a different approach than, for example, creating a desktop or web application. What does it take to go from an idea to a mobile application that runs on multiple platforms? Telerik answers this question for you.

Telerik has more than a decade of experience building software for a wide range of platforms. It can help you by offering a solution that takes you from idea to finished product in record time. The company's tools and development environment is ideal for building cross-platform mobile applications.

Watch Telerik's free webinar to learn everything you need to know to get started today. The webinar covers every aspect of the process, from understanding the mobile development environment to deploying your application. If you have an idea for a mobile application, then consider Telerik as your partner to make it a reality.

2015-08-13T16:45:39.000Z2015-08-13T16:45:39.000ZBart Jacobs

What Is EXC_BAD_ACCESS and How to Debug It

$
0
0

At one point or another, you will run into a crash caused by EXC_BAD_ACCESS. In this quick tip, you will learn what EXC_BAD_ACCESS is and what it is caused by. I will also give you a few tips to fix bugs that are caused by EXC_BAD_ACCESS.

1. What Is EXC_BAD_ACCESS?

Once you comprehend the underlying cause of EXC_BAD_ACCESS, you'll better understand its cryptic name. There's a simple explanation and a more technical explanation. Let's start with the simple explanation first.

Keeping It Simple

Whenever you encounter EXC_BAD_ACCESS, it means that you are sending a message to an object that has already been released. This is the most common scenario, but there are exceptions as we'll discuss in a moment.

What It Really Means

The technical explanation is a bit more complex. In C and Objective-C, you constantly deal with pointers. A pointer is nothing more than a variable that stores the memory address of another variable. When you send a message to an object, the pointer that points to the object you're sending the message to needs to be dereferenced. This means that you take the memory address the pointer is pointing to and access the value of that block of memory.

When that block of memory is no longer mapped for your application or, put differently, that block of memory isn't used for what you think it's used, it's no longer possible to access that chunk of memory. When this happens, the kernel sends an exception (EXC), indicating that your application cannot access that block of memory (BAD ACCESS).

In summary, when you run into EXC_BAD_ACCESS, it means that you try to send a message to a block of memory that can't execute that message.

In some cases, however, EXC_BAD_ACCESS is caused by a corrupt pointer. Whenever your application attempts to dereference a corrupt pointer, an exception is thrown by the kernel.

2. Debugging EXC_BAD_ACCESS

Debugging EXC_BAD_ACCESS can be tricky and frustrating. However, now that EXC_BAD_ACCESS is no longer an enigma for you, it should be less daunting.

The first thing you need to understand is that your application doesn't necessarily crash the moment the block of memory is no longer accessible by your application. That's what often makes debugging EXC_BAD_ACCESS so difficult.

The same is true for corrupt pointers. Your application won't crash because a pointer went corrupt. It also won't crash if you pass a corrupt pointer around in your application. When your application attempts to dereference the corrupt pointer, however, thing go wrong.

Zombies

While zombies have gained in popularity over the past few years, they have been around in Xcode for more than a decade. The name zombie may sound a bit dramatic, but it's actually a great name for the feature that's going to help us debug EXC_BAD_ACCESS. Let me explain how it works.

In Xcode, you can enable zombie objects, which means deallocated objects are kept around as zombies. Put differently, deallocated objects are kept alive for debugging purposes. There's no magic involved. If you send a message to a zombie object, your application will still crash as a result of EXC_BAD_ACCESS.

Why is this useful? What makes EXC_BAD_ACCESS difficult to debug is that you don't know what object your application was trying to access. Zombie objects solve this problem in many cases. By keeping deallocated objects alive, Xcode can tell you what object you were trying to access, making the search for the problem that much easier.

Enabling zombies in Xcode is very easy. Note that this may differ depending on the version of Xcode that you're using. The following approach applies to Xcode 6 and 7. Click the active scheme in the top left and choose Edit Scheme.

Select Run on the left and open the Diagnostics tab at the top. To enable zombie objects, tick the checkbox labeled Enable Zombie Objects.

Enable zombie objects in the current scheme

If you now run into EXC_BAD_ACCESS, the output in Xcode's Console will give you a much better idea of where to start your search. Take a look at the following example output.

In the above example, Xcode is telling us that a message of respondsToSelector: was sent to a zombie object. However, the zombie object is no longer an instance of the ChildViewController class. The block of memory that was previously allocated to the ChildViewController instance is no longer mapped for your application. This should give you a pretty good idea of what the root cause of the problem is.

Unfortunately, zombie objects won't be able to save your day for every crash caused by EXC_BAD_ACCESS. If zombie objects don't do the trick, then it's time for some proper analysis.

Analyze

If zombie objects don't solve your problem, then the root cause may be less trivial. In that case, you need to take a closer look at the code that's being executed when your application crashes. This can be cumbersome and time-consuming.

To help you find problems in your code base, you could ask Xcode to analyze your code to help you find problematic areas. Note that Xcode analyzes your project, which means that it will point out every potential problem it encounters.

To tell Xcode to analyze your project, choose Analyze from Xcode's Product menu or press Shift-Command-B. It will take Xcode a few moments, but when it's finished you should see a list of issues in the Issue Navigator on the left. Issues found by the analysis are highlighted in blue.

Issues are highlighted in blue

When you click an issue, Xcode takes you to the block of code that needs your attention. Note that Xcode is only making a suggestion. In some cases, it is possible that the issue is not relevant and doesn't need fixing.

Xcode will tell you exactly what is wrong with your code

If you can't find the bug that's causing EXC_BAD_ACCESS, then it's important to carefully scrutinize every issue Xcode found during the analysis of your project.

Conclusion

EXC_BAD_ACCESS is a common frustration among developers and it is something that is inherent to manual memory management. Issues related to memory management have become less frequent since the introduction of ARC (Automatic Reference Counting), but they have by no means disappeared.

2015-08-14T17:50:53.000Z2015-08-14T17:50:53.000ZBart Jacobs

What Is EXC_BAD_ACCESS and How to Debug It

$
0
0
tag:code.tutsplus.com,2005:PostPresenter/cms-24544

At one point or another, you will run into a crash caused by EXC_BAD_ACCESS. In this quick tip, you will learn what EXC_BAD_ACCESS is and what it is caused by. I will also give you a few tips to fix bugs that are caused by EXC_BAD_ACCESS.

1. What Is EXC_BAD_ACCESS?

Once you comprehend the underlying cause of EXC_BAD_ACCESS, you'll better understand its cryptic name. There's a simple explanation and a more technical explanation. Let's start with the simple explanation first.

Keeping It Simple

Whenever you encounter EXC_BAD_ACCESS, it means that you are sending a message to an object that has already been released. This is the most common scenario, but there are exceptions as we'll discuss in a moment.

What It Really Means

The technical explanation is a bit more complex. In C and Objective-C, you constantly deal with pointers. A pointer is nothing more than a variable that stores the memory address of another variable. When you send a message to an object, the pointer that points to the object you're sending the message to needs to be dereferenced. This means that you take the memory address the pointer is pointing to and access the value of that block of memory.

When that block of memory is no longer mapped for your application or, put differently, that block of memory isn't used for what you think it's used, it's no longer possible to access that chunk of memory. When this happens, the kernel sends an exception (EXC), indicating that your application cannot access that block of memory (BAD ACCESS).

In summary, when you run into EXC_BAD_ACCESS, it means that you try to send a message to a block of memory that can't execute that message.

In some cases, however, EXC_BAD_ACCESS is caused by a corrupt pointer. Whenever your application attempts to dereference a corrupt pointer, an exception is thrown by the kernel.

2. Debugging EXC_BAD_ACCESS

Debugging EXC_BAD_ACCESS can be tricky and frustrating. However, now that EXC_BAD_ACCESS is no longer an enigma for you, it should be less daunting.

The first thing you need to understand is that your application doesn't necessarily crash the moment the block of memory is no longer accessible by your application. That's what often makes debugging EXC_BAD_ACCESS so difficult.

The same is true for corrupt pointers. Your application won't crash because a pointer went corrupt. It also won't crash if you pass a corrupt pointer around in your application. When your application attempts to dereference the corrupt pointer, however, thing go wrong.

Zombies

While zombies have gained in popularity over the past few years, they have been around in Xcode for more than a decade. The name zombie may sound a bit dramatic, but it's actually a great name for the feature that's going to help us debug EXC_BAD_ACCESS. Let me explain how it works.

In Xcode, you can enable zombie objects, which means deallocated objects are kept around as zombies. Put differently, deallocated objects are kept alive for debugging purposes. There's no magic involved. If you send a message to a zombie object, your application will still crash as a result of EXC_BAD_ACCESS.

Why is this useful? What makes EXC_BAD_ACCESS difficult to debug is that you don't know what object your application was trying to access. Zombie objects solve this problem in many cases. By keeping deallocated objects alive, Xcode can tell you what object you were trying to access, making the search for the problem that much easier.

Enabling zombies in Xcode is very easy. Note that this may differ depending on the version of Xcode that you're using. The following approach applies to Xcode 6 and 7. Click the active scheme in the top left and choose Edit Scheme.

Select Run on the left and open the Diagnostics tab at the top. To enable zombie objects, tick the checkbox labeled Enable Zombie Objects.

Enable zombie objects in the current scheme

If you now run into EXC_BAD_ACCESS, the output in Xcode's Console will give you a much better idea of where to start your search. Take a look at the following example output.

In the above example, Xcode is telling us that a message of respondsToSelector: was sent to a zombie object. However, the zombie object is no longer an instance of the ChildViewController class. The block of memory that was previously allocated to the ChildViewController instance is no longer mapped for your application. This should give you a pretty good idea of what the root cause of the problem is.

Unfortunately, zombie objects won't be able to save your day for every crash caused by EXC_BAD_ACCESS. If zombie objects don't do the trick, then it's time for some proper analysis.

Analyze

If zombie objects don't solve your problem, then the root cause may be less trivial. In that case, you need to take a closer look at the code that's being executed when your application crashes. This can be cumbersome and time-consuming.

To help you find problems in your code base, you could ask Xcode to analyze your code to help you find problematic areas. Note that Xcode analyzes your project, which means that it will point out every potential problem it encounters.

To tell Xcode to analyze your project, choose Analyze from Xcode's Product menu or press Shift-Command-B. It will take Xcode a few moments, but when it's finished you should see a list of issues in the Issue Navigator on the left. Issues found by the analysis are highlighted in blue.

Issues are highlighted in blue

When you click an issue, Xcode takes you to the block of code that needs your attention. Note that Xcode is only making a suggestion. In some cases, it is possible that the issue is not relevant and doesn't need fixing.

Xcode will tell you exactly what is wrong with your code

If you can't find the bug that's causing EXC_BAD_ACCESS, then it's important to carefully scrutinize every issue Xcode found during the analysis of your project.

Conclusion

EXC_BAD_ACCESS is a common frustration among developers and it is something that is inherent to manual memory management. Issues related to memory management have become less frequent since the introduction of ARC (Automatic Reference Counting), but they have by no means disappeared.

2015-08-14T17:50:53.000Z2015-08-14T17:50:53.000ZBart Jacobs

An Introduction to Quartz 2D

$
0
0

What Is Quartz 2D?

Quartz 2D is Apple's 2D drawing engine, an important component of the Core Graphics framework. You may often see Quartz 2D referred to as Core Graphics or simply CG.

Quartz 2D uses the "painter's model". In the painter’s model, each successive drawing operation applies a layer of “paint” to an output “canvas”, often called a page. Think of this as an artist working on a painting. If the artist were to paint the entire canvas blue and then paint some clouds onto the canvas then the clouds would cover the blue beneath them. Once something is "painted" onto the canvas, it cannot be changed but by adding more paint atop of it.

All drawing in Quartz 2D is done through a graphics context of type CGContextRef. With a reference to a graphics context, you can use the Quartz 2D functions to draw to the context, perform operations, such as translating the context, and change graphic state parameters, such as line width and fill color. Quartz 2D is a C-based API, as such you will invoke the C functions passing in the context as a parameter.

To draw to the screen on iOS, you must subclass a UIView and override its drawRect(_:)method. It is inside this drawRect(_:) method that you will do any custom drawing. You should never call the drawRect(_:) method directly in your code. If you need to update the screen with fresh drawing commands, you should call the methods setNeedsDisplay() or setNeedsDisplayInRect(_:).

When using Quartz 2D on iOS, the coordinate (0,0) is at the top left of the screen. The x coordinate increases as you move right and the y coordinate increases as you move down.

Throughout this tutorial, you may wish to consult the Quartz 2D programming guide. The purpose of this tutorial is to get started using Quartz 2D. There is much that will not be covered and to fully appreciate all that Quartz 2D has to offer I suggest you read the programming guide.

With this brief introduction out of the way, let's get started using Quartz 2D.

1. Preparing a UIView for Drawing

Assuming you have a project open and are ready to start working with Quartz 2D, the steps you need to take are fairly simple. You'll need to create a class that is a subclass of UIView, add a view from the Object library to your project in Interface Builder, and set that view's class to the UIView subclass you created. Let's go through this step by step.

Step 1: Subclassing UIView

Go to File> New> File.... Under the iOS section, select Source and then choose Cocoa Touch Class as the template.

New Cocoa Touch Class

On the screen that follows, give your class a name, make sure it's a UIView subclass, and set the language to Swift. Press Next and choose where to save your new class.

Set File Options

If you view the source of your newly created class, you will see the drawRect(_:) method. It's currently commented out, but we will change that in a few moments.

Step 2: Adding a View and Setting the Class

Open the project's storyboard and open the Object Library on the right. In the search field at the bottom, enter "UIView" to filter out objects we're not interested in.

Show Object Library

Drag a UIView instance onto the view controller. With the view selected, open the Identity Inspector on the right and change Class to whatever you named the subclass.

Set Class on View

Any code you add inside the drawRect(_:) method will be drawn when the UIView subclass is instantiated. The view automatically configures the drawing environment so that you can begin drawing immediately. The view configures the CGContextRef mentioned at the beginning of this lesson and it is inside the drawRect(_:) method that you will get a reference to it.

2. Starter Project

To get us started quickly, I have provided a starter project that has all the views already wired up and ready to use. The UIView subclasses are named after the drawing command we will be exploring. For example, when we are learning about drawing lines the corresponding class will be named DrawLinesView.

You can download the starter project from GitHub. We will get started coding in the next step.

3. Obtaining a Reference to the Graphics Context

Before you can do any drawing, you need to get a reference to the graphics context. This is accomplished as follows.

This returns an opaque type, CGContextRef, and you will pass this context into the C functions to do the custom drawing. Now that we know how to get a reference to the graphics context we can start exploring the drawing commands.

4. Drawing a Line

If you've downloaded the starter project, open DrawLineView.swift and add the following to the drawRect(_:) method.

We first get a reference to the drawing context as discuss earlier. Because this is something we will do for every example, I won't mention this in the coming examples.

The CGContextSetStrokeColorWithColor(_:_:) function sets the color with which the line will be drawn or stroked. The parameters we pass in are the graphics context and the new stroke color.

If you think of the graphics context as the canvas of a painter, then the CGContextMoveToPoint(_:_:_:) function moves the paintbrush to a particular point on the canvas from which to begin or continue drawing. Imagine drawing on a piece of paper, lifting your hand, and moving to a different part of the paper and continuing to draw. Essentially that is what this method accomplishes. We pass in the graphics context and an x and y coordinate to start the drawing from.

The CGContextAddLineToPoint(_:_:_:) function takes as parameters the graphics context, the x value for the end of the line segment, and the y value for the end of the line segment. After adding the line segment, the current point will be set to the endpoint of the line segment. We started the drawing operation at (0,0), after this drawing operation the cursor or paintbrush is at (200,200).

Finally, to do the actual drawing you need to call the CGContextStrokePath(_:) function passing in the graphics context.This function simply draws a line along the path we specified.

Build and run the sample project to see the effect.

5. Drawing a Rectangle

Open DrawRectangleView.swift and add the following to the drawRect(_:) method. You should be familiar with the first two lines by now.

The CGRectMake(_:_:_:_:) function is part of CGGeometry and provides an easy way to create a CGRect structure. As its name implies, CGRect  is a structure that contains the location and dimensions of a rectangle. A CGRect has two fields, origin and size, which are a CGPoint and a CGSize respectively. If you are not familiar with these data types, then have a quick read in the CGGeometry reference.

We create a constant, rectangle, using the CGRectMake(_:_:_:_:) function and call the CGContextAddRect(_:_:) function, which takes as parameters the graphics context and a CGRect. Lastly, we call CGContextStrokePath(context) to draw the rectangle.

Build and run the project to see the rectangle drawn to the screen.

6. Drawing a Circle

Open DrawCircleView.swift and update the drawRect(_:) method as follows.

You may be wondering why we are calling CGRectMake(_:_:_:_:) when we are drawing a circle? The rectangle is the area the circle must fit within. In the code above, we create a circle by using a square. If you want to draw an oval or ellipse, then you need to make the rectangle more rectangular in shape.

We then call the CGContextAddEllipseInRect(_:_:) function, which takes as parameters the graphics context and the rectangle into which to draw the ellipse. The circle is drawn by calling CGContextStrokePath(_:), passing in the graphics context.

7. Drawing an Arc

Open DrawArcView.swift and add the following code inside the drawRect(_:) method.


The CGContextAddArc(_:_:_:_:_:_:_:) function takes quite a few parameters:

  • the graphics context
  • the x value for the center of the arc
  • the y value for the center of the arc
  • the arc's radius
  • the angle to the starting point of the arc, measured in radians from the positive x-axis
  • the angle to the end point of the arc, measured in radians from the positive x-axis
  • a value of 1 to create a clockwise arc or a value of 0 to create a counterclockwise arc

8. Drawing a Path

To draw more complex shapes, you create a path and stroke it. Take a look at the drawRect(_:) method in DrawPathView.swift.

In the drawRect(_:) method, we call CGContextAddLineToPoint(_:_:_:) a number of times to create a triangle. Note that the triangle is not filled, only stroked. In the next step, we will see how to fill the triangle with color.

9. Filling a Path

Open FillPathView.swift and update the drawRect(_:) method as shown below.

In the previous step, we stroked a path, but you can also fill a path with a particular color. In the above drawRect(_:) method, we start by creating a path for the same triangle as in the previous example. This time we set a fill color using the CGContextSetFillColorWithColor(_:_:) function and call CGContextFillPath(_:) rather than CGContextStrokePath(_:).

10. Filling an Ellipse

Aside from filling paths, you can also fill ellipses and rectangles. In this example, we will fill an ellipse. Filling a rectangle, however, is very similar. Documentation will tell you how that's done. Update the drawRect(_:) method in FillEllipseView.swift as shown below.

Most of this code should be familiar by now. We are using a new function, CGContextSetLineWidth(_:_:), to set the line width and we call CGContextFillEllipseInRect(_:_:) to fill the ellipse. This function takes as parameters the graphics context and the rectangle in which to fill the ellipse.

11. Adding Lines

The CGContextAddLines(_:_:_:) function is a handy function when you have a number of connected straight line segments you wish to draw. Here we recreate the triangle from earlier in the examples, using the CGContextAddLines(_:_:_:) function. Add the following code to AddLinesView.swift.

The CGContextAddLines(_:_:_:) function takes as parameters the graphics context, an array of values that specify the start and end points of the line segments to draw as CGPoint structures, and the number of elements in the array. Note that the first point in the array specifies the starting point.

12. Drawing a Gradient

With Quartz 2D, it's easy to draw gradients. Both linear and radial gradients are supported. In this example, we will draw a linear gradient. The documentation will help you if you're interested in drawing radial gradients. Add the following to DrawGradientView.swift.

The CGContextDrawLinearGradient(_:_:_:_:_:) function takes as parameters:

  • the graphics context
  • a CGGradient structure
  • a start point
  • an end point
  • option flags that specify whether the fill is extended beyond the starting or ending point

A CGGradient structure defines a smooth transition between colors across an area. It has a color space, two or more colors, and a location for each color. The constants colorspace, colors, and locations in the above example represent these parts that make up the CGGradient.

To draw the gradient, we call the CGContextDrawLinearGradient(_:_:_:_:_:) function, passing in the graphics context, the CGGradient, start and end values, and 0 to indicate that the fill should extend beyond the starting location.

13. Drawing a Shadow

A shadow is an image drawn underneath, and offset from, a graphics object such that the shadow mimics the effect of a light source cast on the graphics object. — Quartz 2D Programming Guide

 There are two functions you can use to draw shadows, CGContextSetShadow(_:_:_:) and CGContextSetShadowWithColor(_:_:_:_:). When using CGContextSetShadow(_:_:_:), all objects drawn are shadowed using a black color with 1/3 alpha. The CGContextSetShadowWithColor(_:_:_:_: function allows you to specify a color for the shadow.

Let's see how this works in practice. Add the following to SetShadowWithColor.swift.

When drawing shadows, you should save the state of the graphics context, make any required changes, and then restore the graphics state. We call CGContextSaveGState(_:) to save the current state of the graphics context, specify an offset for the shadow, shadowOffset, and call the CGContextSetShadowWithColor(_:_:_:_:) function. This functions takes as parameters:

  • the graphics context
  • the offset for the shadow
  • the blur amount
  • the color of the shadow

The rest of the code should be familiar to you. Lastly, we restore the graphics context by calling CGContextRestoreGState(_:), passing in the graphics context.

14. Drawing a Happy Face

I thought it would be fun to end this tutorial by drawing a simple happy face using what we have learned throughout this tutorial. Add the following to DrawHappyFaceView.swift.

The implementation of the drawRect(_:) method should make sense by now and you should have a happy face drawn to the screen.

Conclusion

This brings this tutorial to an end. You should now have a basic understanding of how to perform custom drawing using the Quartz 2D drawing engine. I hope you have learned something useful by reading this tutorial.

2015-08-17T16:15:06.000Z2015-08-17T16:15:06.000ZJames Tyner
Viewing all 1836 articles
Browse latest View live