This iOS tutorial will teach you how to establish a Bluetooth connection between two iOS devices using the GKPeerPickerController, GKPeerPickerControllerDelegate, GKSession, and GKSessionDelegate classes. We’ll also cover how to send data back and forth through the connection by creating a simple text messaging app.
Step 1: Project Setup
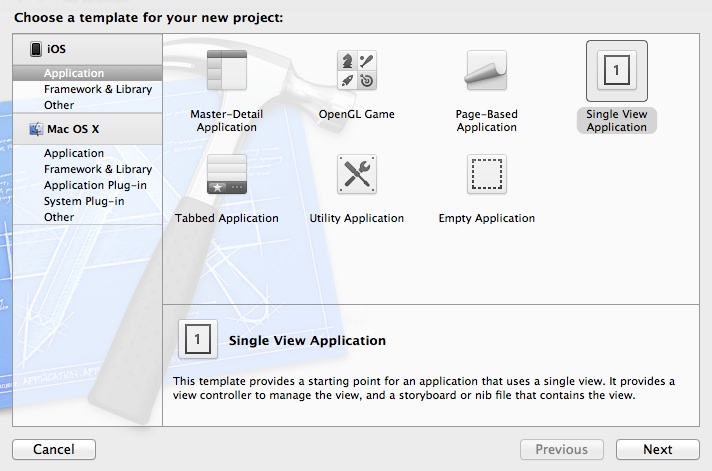
Launch Xcode and click File > New > Project. Click “Application” under the iOS pane on the left. Click the “Single View Application” icon and click “Next.”

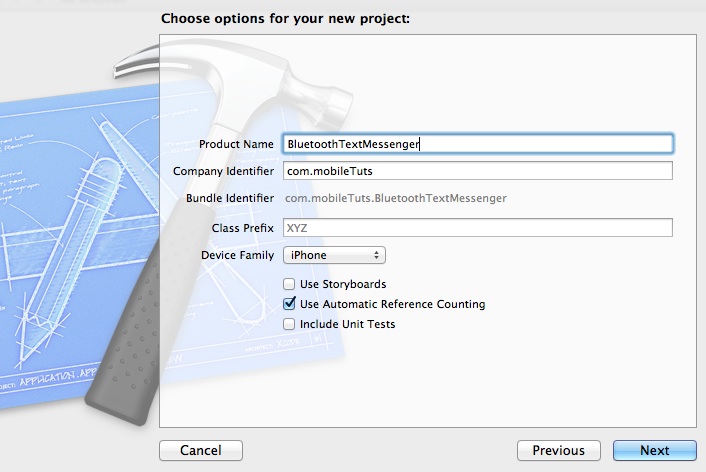
In the “Product Name” field, type “BluetoothTextMessenger” and enter a name for your Company Identifier, such as “com.mobiletuts.” Choose “iPhone” from the “Device Family” menu. Uncheck “Use Storyboards” and “Include Unit Tests” and then check “Use Automatic Reference Counting.” Click “Next”, choose a location to save your project, and then click “Create.”

Step 2: Declaring the Methods
Let’s start by declaring and defining the methods to connect to a device and send data. In the “ViewController.m” file, add the following code:
@interface ViewController ()
- (void)sendMessage:(id)sender;
- (void)connectToDevice:(id)sender;

@end

- (void)connectToDevice:(id)sender {}
- (void)sendMessage:(id)sender {}
Step 3: Setting Up the Interface
Let’s create two buttons, a label, and a text field for our text messenger. Click on the “ViewController.h” file and add the following code:
@property (strong, nonatomic) UILabel           *messageReceivedLabel;
@property (strong, nonatomic) UITextField       *messageToSendTextField;
@property (strong, nonatomic) GKSession         *session;
@property (strong, nonatomic) UIButton          *sendButton;
Click on the “ViewController.m” file and add the following code to complete the properties.
@synthesize messageReceivedLabel    = _messageReceivedLabel;
@synthesize messageToSendTextField  = _messageToSendTextField;
@synthesize session                 = _session;
@synthesize sendButton              = _sendButton;
While still within the “ViewController.m” file, add the following code to programmatically create the interface:
//Button to connect to other device
UIButton *connectButton = [UIButton buttonWithType:UIButtonTypeRoundedRect];
connectButton.frame = CGRectMake(20.0f, 20.0f, 80.0f, 40.0f);
[connectButton setTitle:@"Connect" forState:UIControlStateNormal];
connectButton.tintColor = [UIColor darkGrayColor];
[connectButton addTarget:self action:@selector(connectToDevice:) forControlEvents:UIControlEventTouchUpInside];
[self.view addSubview:connectButton];

//Button to send message to other device
UIButton *sendButton_ = [UIButton buttonWithType:UIButtonTypeRoundedRect];
sendButton_.frame = CGRectMake(220.0f, 20.0f, 80.0f, 40.0f);
[sendButton_ setTitle:@"Send" forState:UIControlStateNormal];
sendButton_.tintColor = [UIColor darkGrayColor];
sendButton_.enabled = NO;
[sendButton_ addTarget:self action:@selector(sendMessage:) forControlEvents:UIControlEventTouchUpInside];
self.sendButton = sendButton_;
[self.view addSubview:self.sendButton];

//Label for message that is received
self.messageReceivedLabel = nil;
CGRect messageReceivedLabel_Frame = CGRectMake(20.0f, 80.0f, 280.0f, 44.0f);
UILabel *messageReceivedLabel_ = [[UILabel alloc] initWithFrame:messageReceivedLabel_Frame];
messageReceivedLabel_.textAlignment = UITextAlignmentCenter;
messageReceivedLabel_.font = [UIFont boldSystemFontOfSize:20.0f];
self.messageReceivedLabel = messageReceivedLabel_;
[self.view addSubview:self.messageReceivedLabel];

//Text field to input message to send
CGRect messageToSendTextField_Frame = CGRectMake(20.0f, 144.0f, 280.0f, 44.0f);
UITextField *messageToSendTextField_ = [[UITextField alloc] initWithFrame:messageToSendTextField_Frame];
messageToSendTextField_.font = [UIFont systemFontOfSize:20.0f];
messageToSendTextField_.backgroundColor = [UIColor whiteColor];
messageToSendTextField_.clearButtonMode = UITextFieldViewModeAlways;
messageToSendTextField_.placeholder = @"Enter a message to send";
messageToSendTextField_.contentVerticalAlignment = UIControlContentVerticalAlignmentCenter;
self.messageToSendTextField = messageToSendTextField_;
[self.view addSubview:self.messageToSendTextField];
The two buttons initiate the connection and send a text message, while the text field holds the outgoing message and the label displays the incoming message.
Step 4: Adding the Framework
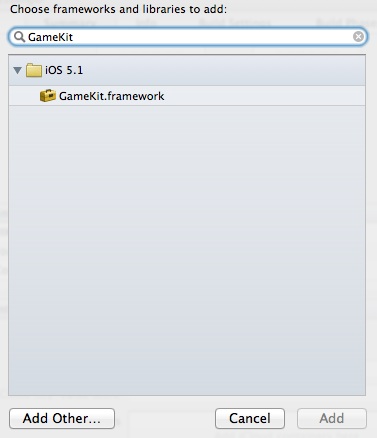
GameKit provides an easy way to connect through Bluetooth. Using GKPeerPickerControllerDelegate and GKSessionDelegate, the intricacies of the connection, such as windows to show the connections and who is nearby, are taken care of by the delegate automatically. Start by importing the “GameKit” framework. Click on the app’s target, the Xcode file listed at the top of the far left pane. Scroll down to the “Linked Frameworks and Libraries” pane. Click the plus button and type in “GameKit”. Click “GameKit.framework” and then click “Add”.

Step 5: Conforming to the Delegates
Click on the “ViewController.h” file and edit the following code to conform to the GKSessionDelegate and GKPeerPickerControllerDelegate protocols.
@interface ViewController : UIViewController <GKSessionDelegate, GKPeerPickerControllerDelegate>
Step 6: Adding the Connection Logic
The two classes each perform different tasks relating to a connection. GKPeerPickerController provides an interface to establish the connection between two devices, then provides a GKSession object as the result of the connection. The GKSession object then handles the connection and any data passed depending on how your app is configured.
Establishing a Connection
Let’s add the logic in the order in which it occurs. First, we’ll create a connection using GKPeerPickerController. Navigate back to the previously defined method connectToDevice: and add the following logic inside the braces to attempt to connect to a device when the connect button is tapped.
if (self.session == nil) {
    //create peer picker and show picker of connections
    GKPeerPickerController *peerPicker = [[GKPeerPickerController alloc] init];
    peerPicker.delegate = self;
    peerPicker.connectionTypesMask = GKPeerPickerConnectionTypeNearby;
    [peerPicker show];
}
In the above code, we check to make sure there isn’t a session, meaning the device is not connected. If there is no session, a GKPeerPickerController is created and the ViewController is assigned as the delegate so that it can implement the GKPeerPickerControllerDelegate methods. Lastly, the GKPeerPickerController is shown on the screen with a list of available nearby Bluetooth connections.
Getting the GKSession Object
Once the peerPicker is shown, a series of delegate methods are called that handle the connection. While still in the “ViewController.m” file, add the following code:
- (GKSession *)peerPickerController:(GKPeerPickerController *)picker sessionForConnectionType:(GKPeerPickerConnectionType)type
{
    //create ID for session
    NSString *sessionIDString = @"MTBluetoothSessionID";
    //create GKSession object
    GKSession *session = [[GKSession alloc] initWithSessionID:sessionIDString displayName:nil sessionMode:GKSessionModePeer];
    return session;
}
This delegate method gets a session based on the connection type specified. In this instance, GKSessionModePeer is used because we want to look for connection devices like a client and advertise the connection like a server. The sessionID is necessary to identify the session and can be whatever value suits your needs. The returned GKSession uses the sessionID as its identifier, and new peers can use the identifier to connect to the same GKSession.
Dismissing the Picker
Next, you’ll want to implement peerPickerController:didConnectPeer:toSession: in order to take control of the session and dismiss the picker. Type the following code in the “ViewController.m” file.
- (void)peerPickerController:(GKPeerPickerController *)picker didConnectPeer:(NSString *)peerID toSession:(GKSession *)session
{
    //set session delegate and dismiss the picker
    session.delegate = self;
    self.session = session;
    picker.delegate = nil;
    [picker dismiss];
}
The session delegate is set to self so that the ViewController can implement the GKSessionDelegate methods. Then the ViewController is removed as the picker’s delegate, and the picker is dismissed as it is no longer needed.
Set the ViewController to Receive Data
Set the ViewController object to receive data from its peers by adding the following code.
- (void)session:(GKSession *)session peer:(NSString *)peerID didChangeState:(GKPeerConnectionState)state
{
    if (state == GKPeerStateConnected){
        [session setDataReceiveHandler:self withContext:nil]; //set ViewController to receive data
        self.sendButton.enabled = YES; //enable send button when session is connected
    }
    else {
        self.sendButton.enabled = NO; //disable send button if session is disconnected
        self.session.delegate = nil;
        self.session = nil; //allow session to reconnect if it gets disconnected
    }
}
Each time the connection state changes, this delegate method is called. In the code, we check to see if the session is connected, and, if it is, the ViewController is set to handle the data received from peers connected to the session. If the session is not connected, the delegate and session are set to nil so that another connection can be established.
Sending Data
To send the contents of the text field to the device that is connected, navigate back to the previously defined method sendMessage: and add the following code inside the braces.
//package text field text as NSData object
NSData *textData = [self.messageToSendTextField.text dataUsingEncoding:NSASCIIStringEncoding];
//send data to all connected devices
[self.session sendDataToAllPeers:textData withDataMode:GKSendDataReliable error:nil];
The first line packages up the text of the text field as an NSData object so it can be sent through Bluetooth. The second line tells the session to send the data to all peers connected to the session.
Receiving Data
Data received from a peer comes in the form of an NSData object. In order to unpack the text, add the following code:
- (void)receiveData:(NSData *)data fromPeer:(NSString *)peer inSession:(GKSession *)session context:(void *)context
{
    //unpackage NSData to NSString and set incoming text as label's text
    NSString *receivedString = [[NSString alloc] initWithData:data encoding:NSASCIIStringEncoding];
    self.messageReceivedLabel.text = receivedString;

}
The first line of code in this method unpacks the NSData object, returning an NSString object. Next the text property of the label is set as the incoming string.
Step 7: Testing the Connection
Connect a device to your computer. Click Product > Run, or the Run arrow in the upper left corner, to build and run the app on a device. Once the app is running on a device, disconnect it and connect a second device to your computer. Build and run the app on this device as well. Launch the app on both devices. Tap the connect button on both devices and follow the prompts to connect your devices. Type a message and tap “Send” to see it appear on the other device.
Conclusion
One thing to keep in mind is that a Bluetooth connection is designed for sending small bits of data, such as text or set of numbers. If you are planning on sending something large like a photo, you’ll probably want to use Wi-Fi or an Internet connection instead. While this app probably won’t have you dropping your favorite text messenger, it does show how to connect and send bits of data through Bluetooth, a handy feature for any app that could benefit from sharing small chunks of data between devices.