Quantcast
Channel: Envato Tuts+ Code - Mobile Development
Viewing all 1836 articles
Browse latest View live

Data Persistence and Sandboxing on iOS

$
0
0

Persisting data across application launches is a requirement that most iOS applications have, from storing user preferences using the user defaults system to managing large datasets in a relational database. In this article, we will explore the most common strategies used for storing data in an iOS application. I will also talk about the file system on iOS and how application sandboxing affects data persistence.


Introduction

You have come a long way, grasshopper, and you have learned a lot! However, there is one vital aspect of iOS development that we haven’t discussed yet: data persistence. Virtually every iOS application stores data for later use, and that data could be anything from user preferences to temporary caches or even large relational datasets.

Before discussing the most common data persistence strategies developers have on the iOS platform, I will first spend a few moments discussing the file system and the concept of application sandboxing. Did you really think you could store your application’s data wherever you’d like on the file system? Think again, padawan.


File System and Application Sandboxing

Security on the iOS platform has been one of Apple’s top priorities ever since the iPhone was introduced in 2007. In contrast to OS X applications, an iOS application is placed in an application sandbox. In contrast to what most people think, an application’s sandbox does not only refer to an application’s sandbox directory in the file system. The application sandbox also includes controlled and limited access to user data stored on the device, system services, and hardware.

With the introduction of the Mac App Store, Apple has begun to enforce application sandboxing on OS X as well. Even though the constraints put on OS X applications are not as stringent as the ones imposed on iOS applications, the general concept is similar but not identical. The application sandbox of an iOS application, for example, contains the application bundle, which is not true for OS X applications. The differences are predominantly historical.

Sandbox and Directories

The operating system installs each iOS application in a sandbox directory, which contains the application bundle directory and three additional directories, Documents, Library, and tmp. The application’s sandbox directory, often referred to as its home directory, can be accessed by calling a simple Foundation function, NSHomeDirectory().

NSLog(@"HOME > %@", NSHomeDirectory());

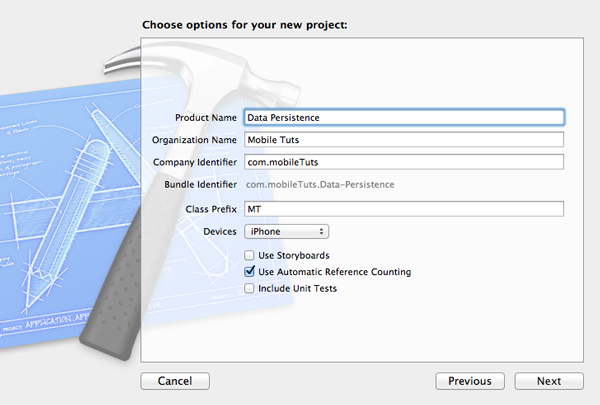
You can verify this yourself. Create a new Xcode project based on the Single View Application template, name it Data Persistence (figure 1), and add the following code snippet to application:didFinishLaunchingWithOptions: in the application delegate.

Data Persistence and Sandboxing on iOS - Create a New Xcode Project - Figure 1

If you run the application in the iOS Simulator, the output in the console will look something like the output shown below.

2012-12-19 20:29:52.594 Data Persistence[2256:c07] HOME > /Users/bart/Library/Application Support/iPhone Simulator/6.0/Applications/0BD6FF06-0482-4EEB-8747-7DD90D85DAB5

However, if you run the application on a physical device, the output looks a bit different as you can see below. The application sandbox and the limitations imposed are identical, though.

2012-12-19 20:30:52.571 Data Persistence[250:907] Home > /var/mobile/Applications/A4D17A73-84D7-4628-9E32-AEFEA5EE6153

Retrieving the path to the application’s Documents directory requires a bit more work as you can see in the code snippet below. We use the NSSearchPathForDirectoriesInDomains() function and pass the NSDocumentDirectory constant as the first argument to indicate that we are only interested in the application’s Documents directory. The second and third argument are of less importance for our current discussion. The function returns an instance of NSArray containing one result, the path to the application’s Documents directory.

NSArray *directories = NSSearchPathForDirectoriesInDomains(NSDocumentDirectory, NSUserDomainMask, YES);
NSString *documents = [directories lastObject];
NSLog(@"DOCUMENTS > %@", documents);

You may be wondering why I used lastObject instead of objectAtIndex: to fetch the first and only object in the array of paths. Even though I can be pretty sure that the array returned isn’t empty, if the array were to be empty and the array would receive a message of objectAtIndex: with an argument of 1, the application would crash as the result of an uncaught exception. By sending the array a message of lastObject, however, the array returns nil if it doesn’t contain any objects, which means that no exception would be thrown. Remember, the documentation is your friend.

Why Sandboxing?

What is the benefit of sandboxing? The primary reason for sandboxing applications is security. By confining applications to their own sandbox, compromised applications cannot cause damage to the operating system or other applications. By compromised applications, I mean both applications that have been hacked, applications that are intentionally malicious, as well as applications that contain critical bugs that may inadvertently cause damage.

Even though application are sandboxed on the iOS platform, iOS applications can request access to certain files or assets that are outside of their application sandbox through a number of system interfaces. An example of this is the music library stored on an iOS device. It shouldn’t surprise you that the system frameworks are in charge of any file related operations in these situations.

What Goes Where?

Even though you can do pretty much anything you want in your application’s sandbox, Apple has provided a few guidelines with regards to what should be stored where. It is important to know about these guidelines for several reasons. When an iOS device is backed up by iTunes, not all the files in an application’s sandbox are included in the backup. The tmp directory, for example, should only be used for temporarily storing files, because the operating system is free to empty this directory if the device is low on disk space and this directory is not included in backups. The Documents directory is meant for user data, whereas the Library directory is used for application data that is not strictly tied to the user. The Caches directory in the Library directory is another directory that is not backed up by iTunes.

Also keep in mind that your application is not supposed to modify the contents of the application bundle directory. The application bundle directory is signed when the application is installed. By modifying the contents of the application bundle directory in any way, the aforementioned signature is altered and the application will not be allowed to launch again. This is another security measure put into place by Apple to protect consumers.


Data Persistence Options

There are several strategies for storing application data on disk. In this article, we will take a brief look at four common approaches on iOS, (1) user defaults, (2) property lists, (3) SQLite, and (4) Core Data.

The options described in this article generally should not be used interchangeably. Each strategy has its benefits as well as its drawbacks. Let’s start by taking a look at the user defaults system.


User Defaults

The user defaults system is something that iOS inherited from OS X. Even though it was created and designed for storing user preferences, it can be used for storing any type of data as long as it is a property list type, that is, NSString, NSNumber, NSDate, NSArray, NSDictionary, and NSData, or any of their mutable variants.

The user defaults database is nothing more than a collection of property lists, one property list per application. The property list is stored in a folder named Preferences in the application’s Library folder, which hints at the property list’s purpose and function.

One of the reasons that developers like the user defaults system is because it is so easy to use. Take a look at the code fragment below to see what I mean. By calling the standardUserDefaults class method on NSUserDefaults, a reference to the shared defaults object is returned.

NSUserDefaults *userDefaults = [NSUserDefaults standardUserDefaults];
[userDefaults setBool:YES forKey:@"Key1"];
[userDefaults setInteger:123 forKey:@"Key2"];
[userDefaults setObject:@"Some Object" forKey:@"Key3"];
[userDefaults boolForKey:@"Key1"];
[userDefaults integerForKey:@"Key2"];
[userDefaults objectForKey:@"Key3"];
[userDefaults synchronize];

In the last line, we call synchronize on the shared defaults object to write any changes to disk. It is rarely necessary to invoke synchronize, because the user defaults system saves changes when necessary. However, if you store or update a setting using the user defaults system, it can sometimes be useful or necessary to explicitly save the changes to disk.

At first glance, the user defaults system seems to be nothing more than a key-value store located at a specific location. However, the NSUserDefaults class, defined in the Foundation framework, is more than an interface for managing a key-value store. Take a look at its class reference for more information.

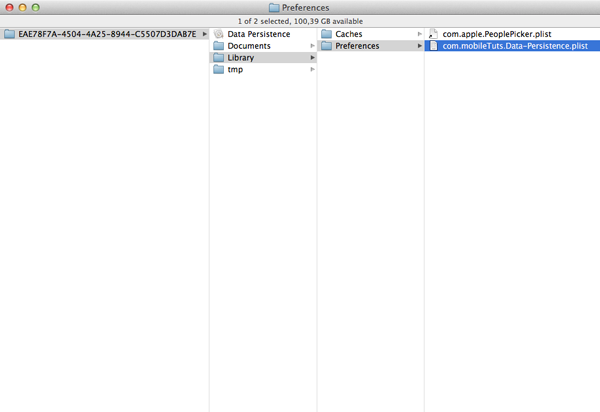
Before we move on, paste the above code snippet in the application delegate’s application:didFinishLaunchingWithOptions: method and run the application in the iOS Simulator. Open a new Finder window and navigate to Library > Application Support > iPhone Simulator > 6.0 > Applications. Find the application folder that corresponds with the application by inspecting the different, cryptically named folders in the Applications folder. The cryptically named folder is actually the application sandbox directory. In the application sandbox directory, open the Preferences folder, located in the Library folder, and inspect its contents (figure 2). You should see a property list with a name identical to the application’s bundle identifier. This is the user defaults store for your application.

Data Persistence and Sandboxing on iOS - Locating the User Defaults Property List in the Preferences Directory - Figure 2

Property Lists

We have already covered property lists in this series. Using property lists is a convenient strategy to store and retrieve an object graph. Property lists have been around for ages, are easy to use, and they are therefore a great option for storing data in an iOS application.

As I mentioned earlier, it is important to keep in mind that a property list can only store property list data. Does this mean that it is not possible to store custom model objects using property lists? No, it is. However, custom model objects need to be archived (a form of serialization) before they can be stored in a property list. Archiving an object simply means that the object needs to be converted to a data type that can be stored in a property list, such as an NSData instance.

Archiving Objects

Do you remember the NSCoding protocol defined in the Foundation framework? The NSCoding protocol defines two methods (initWithCoder: and encodeWithCoder:) a class must implement both of these to allow instances of the class to be encoded and decoded. Encoding and decoding are the underlying mechanisms for object archival and distribution. How object archival works will become clear a bit later in this series. In this lesson, I will only illustrate how to write arrays and dictionaries to disk.

Writing to File

The following code snippet should give you an idea of how easy it is to write an array or dictionary to disk. In theory, the object graph stored in a property list can be as complex or as large as you’d like. However, keep in mind that property lists are not meant to store tens or hundreds of megabytes of data, and attempting to use them in that way will likely result in degraded performance.

Let’s take a look at the code snippet below. We start by storing a reference to an array literal in a variable named fruits. Next, we create the file path for storing the property list that we are about to create. The file path is created by appending a string to the file path of the Documents directory, which we retrieved earlier in this lesson. The string that we append will be the name of the property list (including its extension, .plist) that we will create in a second. Writing the array to disk is as easy as calling writeToFile:atomically: on the array. You can ignore the atomically flag for now.

NSArray *fruits = @[@"Apple", @"Mango", @"Pineapple", @"Plum", @"Apricot"];
NSString *filePathFruits = [documents stringByAppendingPathComponent:@"fruits.plist"];
[fruits writeToFile:filePathFruits atomically:YES];
NSDictionary *miscDictionary = @{@"anArray" : fruits, @"aNumber" : @12345, @"aBoolean" : @YES};
NSString *filePathDictionary = [documents stringByAppendingPathComponent:@"misc-dictionary.plist"];
[miscDictionary writeToFile:filePathDictionary atomically:YES];
NSArray *loadedFruits = [NSArray arrayWithContentsOfFile:filePathFruits];
NSLog(@"Fruits Array > %@", loadedFruits);
NSDictionary *loadedMiscDictionary = [NSDictionary dictionaryWithContentsOfFile:filePathDictionary];
NSLog(@"Misc Dictionary > %@", loadedMiscDictionary);

As the example illustrates, writing a dictionary to disk follows a similar pattern. The example also illustrates how to create arrays and dictionaries from a property list, but this is something that we already covered earlier in this series.

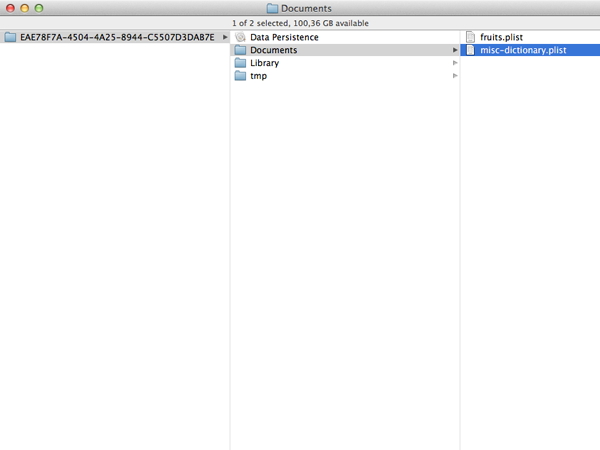
Run the application in the iOS Simulator and navigate to the application’s Documents directory as we saw earlier. In this directory, you should see the two property lists we just created (figure 3).

Data Persistence and Sandboxing on iOS - Locating the Property Lists in the Documents Directory - Figure 3

SQLite

If your application is data driven and works with large amounts of data, then you may want to look into SQLite. What is SQLite? The tagline on the SQLite website reads “Small. Fast. Reliable. Choose any three.”, which sums it up nicely. SQLite is a library that implements a lightweight embedded relational database. As its name implies, it is based on the SQL standard (Structured Query Language) just like MySQL and PostgreSQL. The main difference with other SQL databases is that SQLite is portable, very lightweight, and that it is serverless instead of a separate process accessed from the client application. In other words, it is embedded in the application and therefore very fast.

The SQLite website claims that it is the most widely deployed SQL database, and it is certainly a popular choice for client-side data storage. Aperture and iPhoto, for example, rely on SQLite for some of their data management.

The advantage SQLite has over working directly with objects is that SQLite is orders of magnitude faster, and this is largely due to how relational databases and object oriented programming languages fundamentally differ. To bridge the gap between SQLite and Objective-C, a number of Object Relational Mapping (ORM) solutions have been created over time. The ORM that Apple has created for iOS and OS X is named Core Data, which we will take a look at later in this lesson.

Flying Meat’s FMDB

Using SQLite on iOS means working with a C-based library. If you prefer an object oriented solution, then I highly recommend Gus Mueller’s (Flying Meat, Inc.) Objective-C wrapper for SQLite, FMDB. It makes working with SQLite much easier if you prefer an object oriented interface. Recently, FMDB reached an important milestone, the release of version 2.0. The library now supports ARC (Automatic Reference Counting) out of the box and comes with a number of improvements. I have used FMDB in the past and have been very happy with the API and the library’s robustness and reliability.


Core Data

Developers new to Core Data often mistake Core Data for a database, while it really is an object relational mapping solution created and maintained by Apple. Matt Gallagher has written a great post about the differences between Core Data and a database. Core Data provides a relational object oriented model that can be serialized into an XML, binary, or SQLite store. Core Data even supports an in-memory store.

Why should you use Core Data instead of SQLite? By asking this question, you wrongly assume that Core Data is a database. The advantage of using Core Data is that you work with objects instead of raw data, such as rows in a SQLite database or data stored in an XML file. Even though Core Data had some difficult years when it was first released, it has grown into a robust framework with a lot of features, such as automatic migrations, change tracking, faulting, and integrated validation.

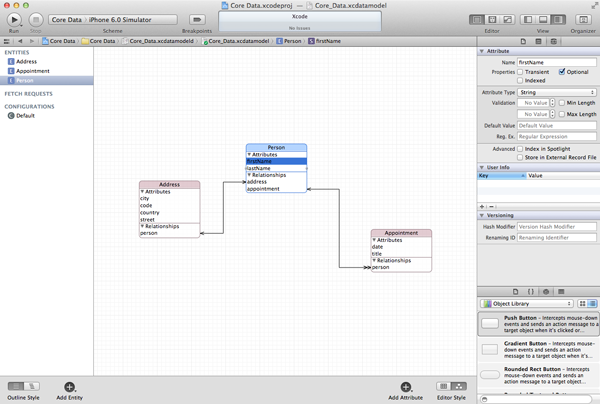
Another great feature that many developers appreciate is the Core Data model editor built into Xcode that lets you model your data model through a graphical interface (figure 4).

Data Persistence and Sandboxing on iOS - Xcode's Core Data Model Editor - Figure 4

Whether Core Data is the right solution for your application depends on the data that you plan to manage, both in terms of the quantity as well as the underlying model. If you plan to manage extremely large datasets, then Core Data might become a performance bottleneck over time. In that case, SQLite might be a better solution.


iCloud

You have probably heard of iCloud and you may be wondering where iCloud fits into the story of data persistence. iCloud is not a form of data persistence like SQLite or Core Data is. Instead, it is a platform or service for making user data available across multiple devices and multiple instances of an application (or even a family of applications).

The iCloud platform encompasses several services or components. The component that interests us is iCloud Storage, which includes three types of storage, (1) key-value storage, (2) document storage, and (3) Core Data storage. If you want to read more about iCloud Storage, I recommend reading a series about iCloud Storage that I wrote earlier this year.


Conclusion

You should now have a good idea of the options you have in terms of data persistence when developing for the iOS platform. Keep in mind that not all the strategies that I have discussed are equal.

This series is slowly coming to a close. In the next two instalments, we will create another application to put what we have learned so far into practice. The best way to learn is by doing!


Building a Shopping List Application From Scratch – Part 1

$
0
0

In the next two lessons, we will put the knowledge learned in this session into practice by creating a basic shopping list application. Along the way, you will also learn a number of new concepts and patterns, such as creating a custom model class and implementing a custom delegate pattern. We have a lot of ground to cover, so let’s get started!


Outline

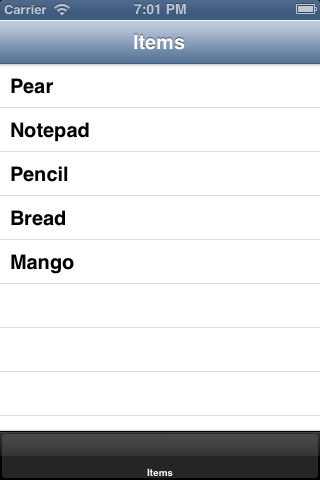
The shopping list application that we are about to create has two core features, (1) managing a list of items (figure 1), and (2) creating a shopping list by selecting one or more items from the list of items (figure 2). We will build the application around a tab bar controller to make switching between the two views fast and straightforward. In this lesson, we will focus on the first core feature, the list of items. In the next lesson, we will put the finishing touches on list of items and we zoom in on the shopping list, the application’s second core feature.

Building a Shopping List Application From Scratch - Part 1 - The First Tab Manages a List of Items - Figure 1
Building a Shopping List Application From Scratch - Part 1 - The Second Tab Contains the Shopping List - Figure 2

Even though the shopping list application is not complicated from a user’s perspective, there are several decisions that we need to make during its development. What type of store will we use to store the list of items? Can the user add, edit, and delete items from the list? These are questions that we will address at some point in the next two lessons.

In this lesson, I will also show you how to seed the shopping list application with some data to give users something to start with. Seeding an application with data is often a great idea to help new users get up to speed quickly.


Step 1: Creating the Project

Launch Xcode and create a new iOS project based on the Empty Application project template (figure 3). Name the project Shopping List and enter an organization name, company identifier, and class prefix (figure 4). Set Devices to iPhone and enable ARC (Automatic Reference Counting) for the project (figure 4). Tell Xcode where to save the project and hit Create.

Building a Shopping List Application From Scratch - Part 1 - Creating a New Project - Figure 3
Building a Shopping List Application From Scratch - Part 1 - Configuring the Project - Figure 4

Step 2: Creating the List View Controller

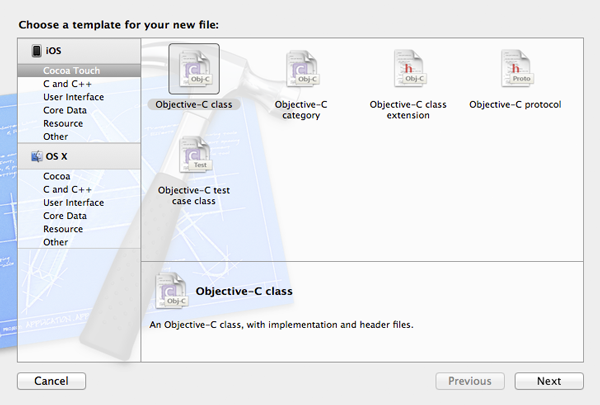
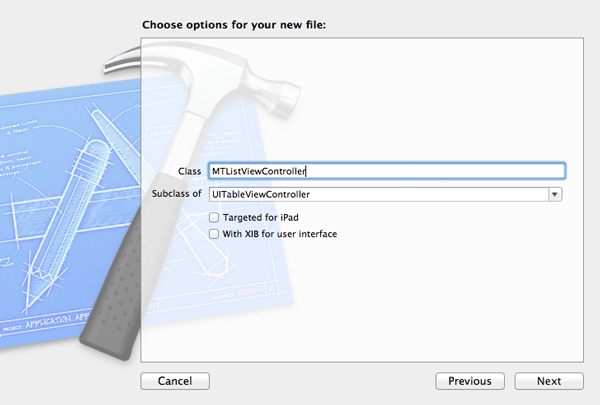
As you might have expected, the list view controller is going to be a subclass of UITableViewController. Create a new Objective-C class (File > New > File…, figure 5) with a name of MTListViewController and make it a subclass of UITableViewController (figure 6). Tell Xcode where you want to save the files of the new class and hit Create.

Building a Shopping List Application From Scratch - Part 1 - Creating a New Objective-C Class - Figure 5
Building a Shopping List Application From Scratch - Part 1 - Configuring the New Objective-C Class - Figure 6

Open the application delegate’s implementation file (MTAppDelegate.m) and create an instance of the new class. As I mentioned at the start of this tutorial, the root view controller of our application is going to be a tab bar controller, which means that we also need to create an instane of UITabBarController. To complicate matters even more, the list view controller is going to be the root view controller of a navigation controller. It will provide us with more options down the road and it will also give us a navigation bar for free, which we will need a bit later in this tutorial.

Take a look at the implementation of application:didFinishLaunchingWithOptions: to see how these three view controllers work together. Don’t forget to import the header file of the MTListViewController class. Even though the setup may look complex, there is nothing that we haven’t yet covered in this series.

#import "MTListViewController.h"
- (BOOL)application:(UIApplication *)application didFinishLaunchingWithOptions:(NSDictionary *)launchOptions {
    // Initialize List View Controller
    MTListViewController *listViewController = [[MTListViewController alloc] init];
    // Initialize Navigation Controller
    UINavigationController *listNavigationController = [[UINavigationController alloc] initWithRootViewController:listViewController];
    // Initialize Tab Bar Controller
    UITabBarController *tabBarController = [[UITabBarController alloc] init];
    // Configure Tab Bar Controller
    [tabBarController setViewControllers:@[listNavigationController]];
    // Initialize Window
    self.window = [[UIWindow alloc] initWithFrame:[[UIScreen mainScreen] bounds]];
    // Configure Window
    [self.window setRootViewController:tabBarController];
    [self.window setBackgroundColor:[UIColor whiteColor]];
    [self.window makeKeyAndVisible];
    return YES;
}

Build and run the project. You should see a tab bar with one tab at the bottom, an empty navigation bar at the top, and an empty table view in the center.

Building a Shopping List Application From Scratch - Part 1 - A Humble Beginning to the Shopping List Application - Figure 7

Step 3: Creating the Item Model Class

How are we going to work with items in the shopping application? In other words, what type of object will we use to store the properties of an item, such as its name, price, and a string that uniquely identifies each item? The most obvious choice is to store the item’s properties in a dictionary (NSDictionary). Even though this would work just fine, it would severely limit and slow us down as the application gains in complexity.

For the shopping list application, we will create a custom model class. It requires a bit more work to set up, but it will make development much easier down the road. Create a new Objective-C class with a name of MTItem and make it a subclass of NSObject. Tell Xcode where to save the class and click the Create button.

Properties

Add four properties to the header file of the new model class, (1) uuid of type NSString to uniquely identify each item, (2) name also of type NSString, (3) price of type float, and (4) inShoppingList of type BOOL to indicate whether the item is present in the shopping list. It is also key that the MTItem class conforms to the NSCoding protocol. The reason for this will become clear in a few moments. Inspect the complete header file (without comments) below:

#import <Foundation/Foundation.h>
@interface MTItem : NSObject <NSCoding>
@property NSString *uuid;
@property NSString *name;
@property float price;
@property BOOL inShoppingList;
@end

Archiving

One strategy to save custom objects such as instances of the MTItem class to disk is through a process known as archiving. We will use NSKeyedArchiver and NSKeyedUnarchiver to archive and unarchive instances of the MTItem class. Both classes are defined in the Foundation framework as their class prefix (NS) indicates. The NSKeyedArchiver class takes a set of objects and stores them to disk as binary data. An added benefit of this approach is that binary files are generally smaller than plain text files that contain the same information.

If we want to use NSKeyedArchiver and NSKeyedUnarchiver to archive and unarchive instances of the MTItem class, the latter needs to adopt the NSCoding protocol (as we specified in the header file of MTItem). Remember from the lesson about the Foundation framework, the NSCoding protocol declares two methods that a class must implement to allow instances of the class to be encoded and decoded. Let’s see how this works.

If you create custom classes, then you are responsible for specifying how instances of the class should be encoded (converted to binary data). In encodeWithCoder:, the class conforming to the NSCoding protocol specifies how instances of the class should be encoded. Take a look at the implementation below. The keys that we use are not that important, but you generally want to use the property names for clarity.

- (void)encodeWithCoder:(NSCoder *)coder {
    [coder encodeObject:self.uuid forKey:@"uuid"];
    [coder encodeObject:self.name forKey:@"name"];
    [coder encodeFloat:self.price forKey:@"price"];
    [coder encodeBool:self.inShoppingList forKey:@"inShoppingList"];
}

Whenever an encoded object needs to be converted back to an instance of the respective class, it is sent a message of initWithCoder:. The same keys that we used in encodeWithCoder: are used in initWithCoder:. This is very important.

- (id)initWithCoder:(NSCoder *)decoder {
    self = [super init];
    if (self) {
        [self setUuid:[decoder decodeObjectForKey:@"uuid"]];
        [self setName:[decoder decodeObjectForKey:@"name"]];
        [self setPrice:[decoder decodeFloatForKey:@"price"]];
        [self setInShoppingList:[decoder decodeBoolForKey:@"inShoppingList"]];
    }
    return self;
}

You never need to call any of these methods directly. They are only called by the operating system. By conforming the MTItem class to the NSCoding protocol, we only tell the operating system how to encode and decode instances of the class.

Creating Instances

To make the creation of new instances of the MTItem class easier, we create a custom class method. This is completely optional, but it will make development easier as you will see later in this lesson. Open the header file of the MTItem class and add the following method declaration. The + sign that precedes the method declaration indicates that this is a class method as opposed to an intance method.

+ (MTItem *)createItemWithName:(NSString *)name andPrice:(float)price;

The implementation of the class contains one new element, the NSUUID class. The implementation of createItemWithName:andPrice: starts with the creation of a new instance of the class, followed by the configuration of the new instance by setting its properties. By default, a new item is not present in the shopping list so we set the inShoppingList property to NO. Setting the uuid property is done by asking the NSUUID class for an instance of the class and asking the returned instance for a uuid string. As I said, it is important that we can uniquely identify each instance of the MTItem class. The uuid will look something like 90A0CC77-35BA-4C09-AC28-D196D991B50D.

+ (MTItem *)createItemWithName:(NSString *)name andPrice:(float)price {
    // Initialize Item
    MTItem *item = [[MTItem alloc] init];
    // Configure Item
    [item setName:name];
    [item setPrice:price];
    [item setInShoppingList:NO];
    [item setUuid:[[NSUUID UUID] UUIDString]];
    return item;
}

Step 4: Load and Save Items

Data persistence is going to be key in the shopping list application, so let’s take a look at how to implement this. Open the implementation file of MTListViewController and add a private property of type NSMutableArray and name it items (see below). The items displayed in the view controller’s table view will be stored in items. It is important that items is a mutable array as we will add the ability to add new items a bit later in this lesson.

#import "MTListViewController.h"
@interface MTListViewController ()
@property NSMutableArray *items;
@end

In the class’ initialization method, we load the list of items from disk and store it in the private items property that we declared a few moments ago. We also set the view controller’s title to Items as shown below. The view controller’s loadItems method is nothing more than a helper method to keep the class’ initWithStyle: method concise and readable. Let’s take a look at the implementation of loadItems.

- (id)initWithStyle:(UITableViewStyle)style {
    self = [super initWithStyle:style];
    if (self) {
        // Set Title
        self.title = @"Items";
        // Load Items
        [self loadItems];
    }
    return self;
}

Loading Items

The loadItems method starts with retrieving the path of the file in which the list of items is stored. We do this by calling pathForItems, another helper method that we will look at in a few moments. The NSFileManager class, in the next line of code, is a class that we haven’t worked with yet. The NSFileManager class provides an easy-to-use Objective-C API for working with the file system. We obtain a reference to an instance of the class by asking it for the default manager. The default manager is sent a message of fileExistsAtPath: and passed the file path we obtained in the first line. If a file exists at the location specified by the file path, then we load the contents of the file into the items property. If no file exists at that location, then we instantiate an empty mutable array.

- (void)loadItems {
    NSString *filePath = [self pathForItems];
    if ([[NSFileManager defaultManager] fileExistsAtPath:filePath]) {
        self.items = [NSKeyedUnarchiver unarchiveObjectWithFile:filePath];
    } else {
        self.items = [NSMutableArray array];
    }
}

Loading the file into the view controller’s items property is done through the NSKeyedUnarchiver class as we discussed earlier. The class is able to read the binary data contained in the file and convert it to an object graph, an array of MTItem instances in this example. This process will become clearer when we look at the saveItems method in a minute.

If we were to load the contents of a file that doesn’t exist, then the items property would be set to nil instead of an empty mutable array. This is a subtle but important difference as we will see a bit later in this tutorial.

Let’s now take a look at the pathForItems helper method. The method starts with retrieving the path of the Documents directory in the application’s sandbox. This step should be familiar. The method returns the path to the file that contains the application’s list of items by appending a string to the path to the documents directory. You may want to read the previous sentence a few times to let it sink in. The beauty of using stringByAppendingPathComponent: is that the insertion of path separators is done for us wherever necessary. In other words, the system makes sure that we receive a properly formatted file path.

- (NSString *)pathForItems {
    NSArray *paths = NSSearchPathForDirectoriesInDomains(NSDocumentDirectory, NSUserDomainMask, YES);
    NSString *documents = [paths lastObject];
    return [documents stringByAppendingPathComponent:@"items.plist"];
}

Saving Items

Even though we won’t be saving items until later in this lesson, it is a good idea to implement it while we are at it. The implementation of the saveItems method is very concise thanks to the pathForItems helper method. We first retrieve the path to the file that contains the application’s list of items and then write the contents of the items property to that location. Easy. Right?

- (void)saveItems {
    NSString *filePath = [self pathForItems];
    [NSKeyedArchiver archiveRootObject:self.items toFile:filePath];
}

As we saw earlier, the process of writing an object graph to disk is known as archiving. We use the NSKeyedArchiver class to accomplish this by calling archiveRootObject:toFile: on the NSKeyedArchiver class. In this process, every object in the object graph is sent a message of encodeWithCoder: to convert it into binary data. As I told you earlier, you usually don’t call encodeWithCoder: directly.

To verify that loading the list of items from disk works, place a log statement in the viewDidLoad method of the MTListViewController class as shown below. Build and run the project and check if everything is working.

- (void)viewDidLoad {
    [super viewDidLoad];
    NSLog(@"Items > %@", self.items);
}

If you take a look at the output in the console window, you will notice that the items property is equal to en empty array as we expect at this point. It is important that items is not equal to nil. In the next step, we will give the user a few items to work with, a process that is known as seeding.


Step 5: Seeding the Data Store

Seeding an application with data can often mean the difference between an engaged user and a user quitting the application after using it for less than a minute. Seeding an application with some data not only helps users getting up to speed, it also shows new users how the application looks and feels with data in it.

Seeding the shopping list application with an initial list of items is not difficult. When the application launches, we first check if the data store has already been seeded with data, because we don’t want to create duplicate items. This would only confuse or frustrate the user. If the data store hasn’t been seeded yet, we load a list with seed data and use that list to create the data store of the application.

The logic for seeding the data store can be called from a number of locations in an application, but it is important to think ahead. We could put the logic for seeding the data store in the MTListViewController class, but what if, in a future version of the application, other view controllers also have access to the list of items. A good place to seed the data store is in the application delegate class. Let’s see how this works.

Open MTAppDelegate.m and amend the implementation of application:didFinishLaunchingWithOptions: to look like the one shown below. The only difference with the previous implementation is that we first call seedItems on the application delegate. It is important that seeding the data store takes place before the initialization of any of the view controllers, because the data store needs to be seeded before any of the view controllers loads the list of items.

- (BOOL)application:(UIApplication *)application didFinishLaunchingWithOptions:(NSDictionary *)launchOptions {
    // Seed Items
    [self seedItems];
    // Initialize List View Controller
    MTListViewController *listViewController = [[MTListViewController alloc] init];
    // Initialize Navigation Controller
    UINavigationController *listNavigationController = [[UINavigationController alloc] initWithRootViewController:listViewController];
    // Initialize Tab Bar Controller
    UITabBarController *tabBarController = [[UITabBarController alloc] init];
    // Configure Tab Bar Controller
    [tabBarController setViewControllers:@[listNavigationController]];
    // Initialize Window
    self.window = [[UIWindow alloc] initWithFrame:[[UIScreen mainScreen] bounds]];
    // Configure Window
    [self.window setRootViewController:tabBarController];
    [self.window setBackgroundColor:[UIColor whiteColor]];
    [self.window makeKeyAndVisible];
    return YES;
}

The implementation of seedItems is not complicated. We start by storing a refence to the shared user defaults instance after which we check if the user defaults system (1) has an entry for a key with name MTUserDefaultsSeedItems and (2) if this entry is a boolean with a value of YES. The key can be whatever you like as long as you are consistent in naming the keys that you use. The key in the user defaults store tells us if the application has already been seeded with data or not. This is important since we only want to seed the shopping list application once.

If the application hasn’t been seeded yet, we load a property list from the application bundle named seed.plist. This file contains an array of dictionaries with each dictionary representing an item with a name and a price. Before iterating through the seedItems array, we create a mutable array to store the MTItem instances that we are about to create. For each dictionary in the seedItems array, we create an MTItem instance, using the class method we declared earlier in this lesson, and we add the instance to the items array.

Finally, we create the path to the file in which we will store the list of items and we write the contents of the items array to disk as we saw in the saveItems method in the MTListViewController class. The method archiveRootObject:toFile: returns YES if the operation ended successfully and it is only then that we update the user defaults store by setting the boolean value for the key MTUserDefaultsSeedItems to YES. The next time the application launches, the data store will not be seeded again.

- (void)seedItems {
    NSUserDefaults *ud = [NSUserDefaults standardUserDefaults];
    if (![ud boolForKey:@"MTUserDefaultsSeedItems"]) {
        // Load Seed Items
        NSString *filePath = [[NSBundle mainBundle] pathForResource:@"seed" ofType:@"plist"];
        NSArray *seedItems = [NSArray arrayWithContentsOfFile:filePath];
        // Items
        NSMutableArray *items = [NSMutableArray array];
        // Create List of Items
        for (int i = 0; i < [seedItems count]; i++) {
            NSDictionary *seedItem = [seedItems objectAtIndex:i];
            // Create Item
            MTItem *item = [MTItem createItemWithName:[seedItem objectForKey:@"name"] andPrice:[[seedItem objectForKey:@"price"] floatValue]];
            // Add Item to Items
            [items addObject:item];
        }
        // Items Path
        NSString *itemsPath = [[self documentsDirectory] stringByAppendingPathComponent:@"items.plist"];
        // Write to File
        if ([NSKeyedArchiver archiveRootObject:items toFile:itemsPath]) {
            [ud setBool:YES forKey:@"MTUserDefaultsSeedItems"];
        }
    }
}

You probably have noticed that we made use of another helper method to retrieve the application’s documents directory. You can find its implementation below. It is very similar to the implementation of the pathForItems method in the MTListViewController class.

- (NSString *)documentsDirectory {
    NSArray *paths = NSSearchPathForDirectoriesInDomains(NSDocumentDirectory, NSUserDomainMask, YES);
    return [paths lastObject];
}

Before you build and run the project, (1) import the header file of the MTItem class and (2) make sure to copy the property list, seed.plist, to your project. It doesn’t matter where you store it as long as it is included in the application’s bundle. Build and run the project once more and inspect the output in the console to see if the data store was successfully seeded with the contents of seed.plist.

#import "MTItem.h"

Keep in mind that seeding a data store with data or updating a database takes time. If the operation takes too long, the system might kill your application before it has had the chance to finish launching. Apple calls this phenomenon the watchdog killing your application. Your application is given a limited amount of time to launch. If it fails to launch within that timeframe, the operating system kills your application. This means that you have to carefully consider when and where you perform certain operations such as seeding your application’s data store.


Step 6: Displaying the List of Items

We now have a list of items to work with. Displaying the items in the table view of the list view controller isn’t difficult. Take a look at the implementation of the three methods of the UITableViewDataSource protocol shown below. Their implementations should be familiar to you by now. Don’t forget to import the header file of the MTItem class.

#import "MTItem.h"
- (NSInteger)numberOfSectionsInTableView:(UITableView *)tableView {
    return 1;
}
- (NSInteger)tableView:(UITableView *)tableView numberOfRowsInSection:(NSInteger)section {
    return [self.items count];
}
- (UITableViewCell *)tableView:(UITableView *)tableView cellForRowAtIndexPath:(NSIndexPath *)indexPath {
    static NSString *CellIdentifier = @"Cell Identifier";
    [tableView registerClass:[UITableViewCell class] forCellReuseIdentifier:CellIdentifier];
    UITableViewCell *cell = [tableView dequeueReusableCellWithIdentifier:CellIdentifier forIndexPath:indexPath];
    // Fetch Item
    MTItem *item = [self.items objectAtIndex:[indexPath row]];
    // Configure Cell
    [cell.textLabel setText:[item name]];
    return cell;
}
Both the registerClass:forCellReuseIdentifier: method and the actual cell reuse identifier string are included in tableView:cellForRowAtIndexPath: above for the sake of brevity. In your own projects, you should place these two lines somewhere else, such as viewDidLoad, to prevent them from being called each time a table view cell is created.

Build and run the project once more to see the list of items being displayed in the list view controller’s table view (figure 8).

Building a Shopping List Application From Scratch - Part 1 - The Table View Populated with Seed Data - Figure 8

Step 7: Adding Items – Part 1

No matter how well we craft the list of seed items, the user will certainly want to add additional items to the list. The most common approach on iOS to add new items to a list is by presenting the user with a modal view in which new data can be entered. This means that we will need to (1) add a button to add new items, (2) create a view controller that manages the view that accepts user input, (3) create a new item based on the user’s input, and (4) add the newly created item to the table view.

Adding a Button

Adding a button to the navigation bar requires only one line of code. Revisit the viewDidLoad method of the MTListViewController class and update it to reflect the implementation below. In the lesson about tab bar controllers, we saw that every view controller has a tabBarItem property. Similarly, every view controller has a navigationItem property, a unique instance of UINavigationItem, that represents the view controller in the navigation bar of the parent view controller, that is, the navigation controller. The navigationItem property has a leftBarButtonItem property, which is an instance of UIBarButtonItem and references the bar button item displayed on the left side of the navigation bar. The navigationItem property also has a titleView and a rightBarButtonItem property.

- (void)viewDidLoad {
    [super viewDidLoad];
    // Create Add Button
    self.navigationItem.leftBarButtonItem = [[UIBarButtonItem alloc] initWithBarButtonSystemItem:UIBarButtonSystemItemAdd target:self action:@selector(addItem:)];
    NSLog(@"Items > %@", self.items);
}

In the viewDidLoad method, we set the leftBarButtonItem property of the view controller’s navigationItem to an instance of UIBarButtonItem by invoking initWithBarButtonSystemItem:target:action: and passing UIBarButtonSystemItemAdd as the first argument. This method creates a system-provided instance of UIBarButtonItem. Even though we have already encountered the target-action pattern, the second and third parameter of initWithBarButtonSystemItem:target:action: might need some explaining. Whenever the button in the navigation bar is tapped, a message of addItem: is sent to target, that is, self or the instance of MTListViewController. As I said, we have already encountered the target-action pattern when we connected a button’s touch event to an action in Interface Builder a few lessons ago. This is very similar with the difference that the connection is made programmatically.

The target-action pattern is very common in Cocoa. The idea is simple. An object keeps a reference to (1) the message or action selector that needs to be sent to a particular object and (2) the target, an object to which the message needs to be sent. What is a selector? A selector is the name or the unique identifier that is used to select a method that an object is expected to execute. A selector is of type SEL and can be created using the @selector compiler directive.

Before building and running the application in the iOS Simulator, we need to create the corresponding addItem: method in the view controller. If we don’t do this, the view controller will not be able to respond to the message it receives when the button is tapped and an exception will be thrown. Take a look at the format of the method definition in the code snippet below. As we saw earlier in this series, the action accepts one argument, the object that sends the message to the view controller (target), that is, the button in the navigation bar. You can add a log statement to the method implementation to test if the setup works correctly. Build and run the project to test the button in the navigation bar.

- (void)addItem:(id)sender {
    NSLog(@"Button was tapped.");
}

Create a View Controller

Create a new UIViewController subclass (not UITableViewController), name it MTAddItemViewController, and tell Xcode to create a nib file for the class by checking the checkbox labeled With XIB for user interface.

We first need to create two outlets in the class’s header file for the two text fields that we will create in a few moments. This process should be familiar by now. Take a look at the header file (without comments) pasted below.

#import <UIKit/UIKit.h>
@interface MTAddItemViewController : UIViewController
@property IBOutlet UITextField *nameTextField;
@property IBOutlet UITextField *priceTextField;
@end

We also need to create two actions in the class’s implementation file (MTAddItemViewController.m). The first action, cancel:, will cancel the creation of a new item, whereas the second action, save:, will save the newly created item.

- (IBAction)cancel:(id)sender {
}
- (IBAction)save:(id)sender {
}

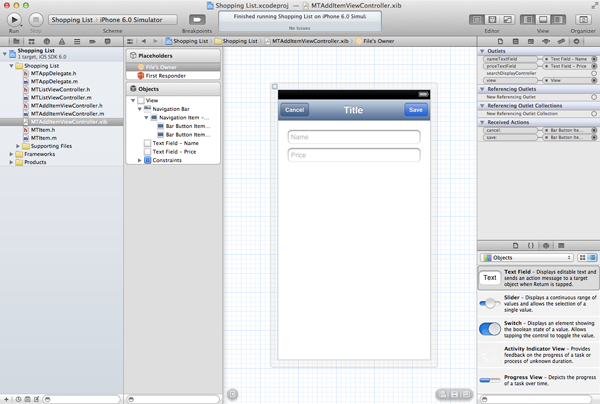
Open the nib file (MTAddItemViewController.xib) to create the user interface. Drag a navigation bar from the Object Library to the view controller and position it at the top of the view (figure 9). As you can see, a navigation bar is just another user interface element that doesn’t necessarily have to be linked to a navigation controller.

Add two UIBarButtonItem instances to the navigation bar and position one on each side of the navigation bar. Select the left bar button item, open the Attributes Inspector, and set Identifier to Cancel (figure 9). Do the same for the right bar button item, but instead set the Identifier to Save (figure 9). Next, select the File's Owner object and open the Connections Inspector. Drag from the cancel: action to the left bar button item and from the save: action to the right bar button item.

Drag two UITextField instances from the Object Library to the view controller’s view. Position the text fields as shown in the figure below (figure 9). Select the top text field, open the Attributes Inspector, and enter Name in the Placeholder field. Select the bottom text field and, in the Attributes Inspector, set its placeholder text to Price and set the Keyboard setting to Number Pad. This will ensure that users can only enter numbers in the text field. Select the File’s Owner object, open the Connections Inspector, and connect the nameTextField and priceTextField outlets to the corresponding text fields in the user interface.

Building a Shopping List Application From Scratch - Part 1 - Creating the User Interface of the MTAddItemViewController class - Figure 9

That was quite a bit of work. Remember that Interface Builder is only a tool to help you create a user interface. Every action in Interface Builder can also be performed programmatically. Some developers don’t even use nib files and create the entire application’s user interface programmatically. That is exactly what happens under the hood anyway.

Implementing addItem:

With the MTAddItemViewController class ready to use, let’s revisit the addItem: action in the MTListViewController class. Before we do, however, import the header file of the MTAddItemViewController class at the top.

#import "MTAddItemViewController.h"

The implementation of the addItem: action is short as you can see below. We create a new instance of the MTAddItemViewController class and present it modally by calling presentViewController:animated:completion: on self, the list view controller instance. When presentViewController:animated:completion: is called, the view of the addItemViewController instance will slide up from the bottom and will be presented full screen. The method accepts a completion block as its third argument. Despite their usefulness, I won’t cover blocks in this tutorial as it is a more complicated topic for beginners. Instead of passing a block as the third argument, we pass nil.

- (void)addItem:(id)sender {
    // Initialize Add Item View Controller
    MTAddItemViewController *addItemViewController = [[MTAddItemViewController alloc] initWithNibName:@"MTAddItemViewController" bundle:nil];
    // Present View Controller
    [self presentViewController:addItemViewController animated:YES completion:nil];
}

Blocks have been added to the C language by Apple. They are often compared to closures in other languages. If you want to learn more about blocks, then take a look at this tutorial by Collin Ruffenach.

Dismissing the View Controller

The user should also be able to dismiss the view controller by tapping the cancel or save button of the add item view controller. Revisit the cancel: and save: actions in the MTAddItemViewController class and update their implementations as shown below. We will revisit the save: action a bit later in this tutorial.

- (IBAction)cancel:(id)sender {
    [self dismissViewControllerAnimated:YES completion:nil];
}
- (IBAction)save:(id)sender {
    [self dismissViewControllerAnimated:YES completion:nil];
}

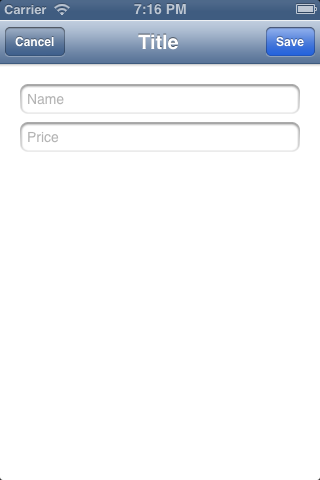
The dismissViewControllerAnimated:completion: is interesting. By calling this method on the view controller whose view is presented modally, it forwards the message to the view controller that presented the view controller. In our example, this means that the add item view controller forwards the message to the list view controller, because the add item view controller was presented by the list view controller when the addItem: action was fired. Build and run the project to see the MTAddItemViewController class in action (figure 10).

Building a Shopping List Application From Scratch - Part 1 - The MTAddItemViewController Class In Action - Figure 10

Step 7: Adding Items – Part 2

How will the list view controller know when a new item has been added by the add item view controller? Should we keep a reference to the list view controller that presented the add item view controller? This would introduce tight coupling, which isn’t a good idea as it would make our code much less independent and reusable. The problem that we are faced with can be solved by implementing a custom delegate protocol. Let’s see how this works.

Delegation

The idea is simple. Whenever the user taps the save button, the add item view controller will collect the information from the text fields and notify its delegate that a new item was saved. The delegate object will be an object conforming to a custom delegate protocol that we will define. It is up to the delegate object to decide what needs to be done with the information the add item view controller sends. The add item view controller is only responsible for capturing the user’s input and notifying its delegate.

Open MTAddItemViewController.h and add a forward protocol declaration at the top. A forward protocol declaration is similar to a forward class declaration, which we already encountered in this series. It is a promise to the compiler that the MTAddItemViewControllerDelegate protocol is defined and exists.

Next, add a property for the delegate to the class interface. The delegate is of type id, which means that it can be any Objective-C object. However, the delegate is required to conform to the MTAddItemViewControllerDelegate protocol as specified by the name of the protocol between angle brackets after the property type. This is the reason that we added the forward protocol declaration at the top. The weak specifier in the property declaration is for memory management purposes. It indicates that the reference that the add item view controller stores to its delegate is a weak reference as opposed to a strong reference. Even though memory management is an important aspect of Cocoa development, I won’t cover weak and strong references in this lesson.

#import <UIKit/UIKit.h>
@protocol MTAddItemViewControllerDelegate;
@interface MTAddItemViewController : UIViewController
@property (weak) id<MTAddItemViewControllerDelegate> delegate;
@property IBOutlet UITextField *nameTextField;
@property IBOutlet UITextField *priceTextField;
@end

Below the class interface of MTAddItemViewController, we declare the MTAddItemViewControllerDelegate protocol. In contrast to the UITableViewDataSource and UITableViewDelegate protocols, the MTAddItemViewControllerDelegate is short and simple. The protocol declaration starts with @protocol and ends with @end, just like a class interface starts with @interface and ends with @end.

As a reminder, a protocol declaration defines or declares the methods that objects conforming to the protocol should implement. Methods in a protocol declaration are required by default. To declare optional methods, the @optional compiler directive should be used.

By adding the NSObject protocol (between angle brackets) after the name of the protocol, we declare that the MTAddItemViewControllerDelegate protocol extends (or builds upon) the NSObject protocol.

The MTAddItemViewControllerDelegate protocol defines only one method. The method informs the delegate object when a new item has been added by the user and passes the name and price of the new item.

@protocol MTAddItemViewControllerDelegate <NSObject>
- (void)controller:(MTAddItemViewController *)controller didSaveItemWithName:(NSString *)name andPrice:(float)price;
@end

As I mentioned in the lesson about table views, it is good practice to pass the sender of the message, the object notifying the delegate object, as the first argument of each delegate method. This makes it easy for the delegate object to communicate with the sender if necessary.

Notifying the Delegate

It is time to use the delegate protocol that we just declared. Revisit the save: method in the MTAddItemViewController class and update it as shown below. The contents of the text fields are first stored in the name and price variables, which are then passed as arguments to the controller:didSaveItemWithName:andPrice: delegate method.

- (IBAction)save:(id)sender {
    // Extract User Input
    NSString *name = [self.nameTextField text];
    float price = [[self.priceTextField text] floatValue];
    // Notify Delegate
    [self.delegate controller:self didSaveItemWithName:name andPrice:price];
    // Dismiss View Controller
    [self dismissViewControllerAnimated:YES completion:nil];
}

Responding to Save Events

The final piece of the puzzle is to make the MTListViewController class conform to the MTAddItemViewControllerDelegate protocol. Open MTListViewController.h, import the header file of the MTAddItemViewController class, and update the interface declaration of MTListViewController to make the class conform to the new protocol.

#import <UIKit/UIKit.h>
#import "MTAddItemViewController.h"
@interface MTListViewController : UITableViewController <MTAddItemViewControllerDelegate>
@end

The import statement is required to tell the compiler about the MTAddItemViewControllerDelegate protocol that is declared in the header file of the MTAddItemViewController class. Because we already import the header file of MTAddItemViewController in MTListViewController.h, you can remove the same import statement from the implementation file, MTListViewController.m.

As we did with the UITableViewDataSource and UITableViewDelegate protocols, we need to implement the methods defined in the MTAddItemViewControllerDelegate protocol. In MTListViewController.m, add the following implementation of controller:didSaveItemWithName:andPrice:.

- (void)controller:(MTAddItemViewController *)controller didSaveItemWithName:(NSString *)name andPrice:(float)price {
    // Create Item
    MTItem *item = [MTItem createItemWithName:name andPrice:price];
    // Add Item to Data Source
    [self.items addObject:item];
    // Add Row to Table View
    NSIndexPath *newIndexPath = [NSIndexPath indexPathForItem:([self.items count] - 1) inSection:0];
    [self.tableView insertRowsAtIndexPaths:@[newIndexPath] withRowAnimation:UITableViewRowAnimationNone];
    // Save Items
    [self saveItems];
}

We create a new instance of the MTItem class, by invoking the class method we created earlier, and pass the name and price that we received from the add item view controller instance. In the next step, the items property is updated by adding the newly created item. Of course, the table view doesn’t automagically reflect that we added a new item to the list of items. We need to manually insert a new row at the bottom of the table view. To save the new item to disk, we call saveItems on the view controller, which we implemented earlier in this tutorial.

Setting the Delegate

The final piece of this somewhat complex puzzle is to set the delegate of the add item view controller when we present it to the user. We do this in the addItem: action as shown below.

- (void)addItem:(id)sender {
    // Initialize Add Item View Controller
    MTAddItemViewController *addItemViewController = [[MTAddItemViewController alloc] initWithNibName:@"MTAddItemViewController" bundle:nil];
    // Set Delegate
    [addItemViewController setDelegate:self];
    // Present View Controller
    [self presentViewController:addItemViewController animated:YES completion:nil];
}

Build and run the project one more time and see how everything works together – as by magic.


Conclusion

That was a lot to take in, but we have accomplished quite a bit already. In the next lesson, we will make some changes to the list view controller to edit and remove items from the list, and we will also add the ability to create a shopping list from the list of items.
Building a Shopping List Application From Scratch – Part 2

$
0
0

In the previous lessen, we laid the foundation for the shopping list application. In the first part of this lesson, we will further refine the application by enabling the user to edit and delete items from the list. In the second part of this lesson, we add the ability to select items from the list to create the shopping list.


Outline

As I mentioned in the previous article, one of the core features of the shopping list application is managing a list of items. We have done a great job so far, but the user should have the ability to edit and delete items from the list, which will be the focus of the first part of this tutorial. In the second part, we will implement the second core feature of the shopping list application, creating a shopping list by selecting items from the list of items.


Step 8: Deleting Items

Deleting items from the list is an important addition in terms of user experience and overall usability. Adding this ability involves (1) removing the item from the view controller’s items property (the table view’s data source), (2) updating the table view, and (3) saving the changes to disk. Let’s see how this works in practice.

We first need to add an edit button to the navigation bar. In the view controller’s viewDidLoad method, create an instance of UIBarButtonItem and assign it to the rightBarButtonItem property of the view controller’s navigationItem property. As in the previous lesson, we create a bar button item by calling the initWithBarButtonSystemItem:target:action: initialization method. The first parameter that we pass is UIBarButtonSystemItemEdit. In addition, we pass self as the target and set the action to editItems:.

- (void)viewDidLoad {
    [super viewDidLoad];
    // Create Add Button
    self.navigationItem.leftBarButtonItem = [[UIBarButtonItem alloc] initWithBarButtonSystemItem:UIBarButtonSystemItemAdd target:self action:@selector(addItem:)];
    self.navigationItem.rightBarButtonItem = [[UIBarButtonItem alloc] initWithBarButtonSystemItem:UIBarButtonSystemItemEdit target:self action:@selector(editItems:)];
    NSLog(@"Items > %@", self.items);
}

The implementation of the editItems: action is only one line of code as you can see below. Whenever the user taps the edit button, the table view is toggled into or out of edit mode. We do this by using a little trick. We ask the table view whether it currently is in edit mode, which returns a BOOL value, and inverse the returned value (YES becomes NO and vice versa). The method we call on the table view is setEditing:animated:, which is a specialized setter that accepts an animation parameter.

- (void)editItems:(id)sender {
    [self.tableView setEditing:![self.tableView isEditing] animated:YES];
}

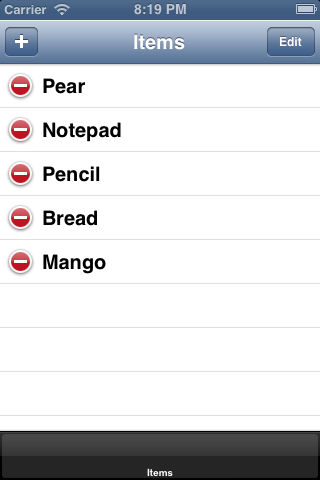
If you run the shopping list application in the iOS Simulator and tap the edit button, you should see the table view being toggled into and out of edit mode (figure 1).

Building a Groceries Application From Scratch - Part 2 - Toggling the Table View Into and Out Of Edit Mode - Figure 1

To methods of the UITableViewDataSource protocol are important for enabling editing in a table view, (1) tableView:canEditRowAtIndexPath: and (2) tableView:commitEditingStyle:forRowAtIndexPath:.

When the user taps the edit button, the table view asks its data source which rows are editable by sending the data source a message of tableView:canEditRowAtIndexPath:. When YES is returned for a particular index path, the table view instructs the table view cell of the corresponding row that it needs to toggle into or out of edit mode, depending on the table view’s edit mode. In practice, this means that the table view cell shows or hides its editing controls. This concept is best understand by implementing the tableView:canEditRowAtIndexPath: method as shown below.

- (BOOL)tableView:(UITableView *)tableView canEditRowAtIndexPath:(NSIndexPath *)indexPath {
    if ([indexPath row] == 1) {
        return NO;
    }
    return YES;
}

The above implementation of tableView:canEditRowAtIndexPath: enables the user to edit every row in the table view except for the second row. Run the application in the iOS Simulator and give it a try (figure 2).

Building a Groceries Application From Scratch - Part 2 - Toggling the Table View Into and Out Of Edit Mode - Figure 2

For the shopping list application, the user needs to be able to edit every row in the table view, which means that tableView:canEditRowAtIndexPath: should always return YES as illustrated below.

- (BOOL)tableView:(UITableView *)tableView canEditRowAtIndexPath:(NSIndexPath *)indexPath {
    return YES;
}

You may have noticed that nothing happens when you try to delete a row in the table view. The puzzle isn’t finished yet. Whenever the user taps the delete button of a row, the table view sends its data source a message of tableView:commitEditingStyle:forRowAtIndexPath:. The second argument of the corresponding method denotes what type of action the user has performed, that is, inserting or deleting a row. The shopping list application will only provide support for deleting rows from the table view.

Deleting rows from a table view involves (1) deleting the corresponding item from the data source, the view controller’s items property, and (2) updating the table view by deleting the corresponding row.

Let’s inspect the implementation of tableView:commitEditingStyle:forRowAtIndexPath:. The method starts by checking whether the editing style is equal to UITableViewCellEditingStyleDelete as we only want to allow the user to delete rows from the table view. If the editing style is equal to UITableViewCellEditingStyleDelete, then (1) the corresponding item is removed from the items array, (2) the corresponding row is deleted from the table view, and (3) the updated list of items is saved to disk.

- (void)tableView:(UITableView *)tableView commitEditingStyle:(UITableViewCellEditingStyle)editingStyle forRowAtIndexPath:(NSIndexPath *)indexPath {
    if (editingStyle == UITableViewCellEditingStyleDelete) {
        // Delete Item from Items
        [self.items removeObjectAtIndex:[indexPath row]];
        // Update Table View
        [tableView deleteRowsAtIndexPaths:@[indexPath] withRowAnimation:UITableViewRowAnimationRight];
        // Save Changes to Disk
        [self saveItems];
    }
}

Build and run the project to test the delete functionality. Don’t forget to quit and relaunch the application to verify that items are permanently deleted from the list.


Step 9: Editing Items

We could reuse the MTAddItemViewController class for editing items, but reusing a view controller class for both adding and editing items can often overcomplicate the implementation so much that I generally end up creating a separate UIViewController subclass for editing items. This will initially result in some overlap in terms of implementation and user interface, but it will give us more flexibility down the road.

Creating the Editing View Controller

Create a new UIViewController subclass, name it MTEditItemViewController, and tell Xcode to create a nib file for the class by checking the checkbox labeled With XIB for user interface. The header files of the MTAddItemViewController and MTEditItemViewController classes are very similar.

I have included the header file (without comments) of the MTEditItemViewController class below. After importing the headers of the UIKit framework, a forward class and protocol declaration is added. The interface of the class is similar to that of the MTAddItemViewController class. The main difference is the declaration of a custom initialization method, initWithItem:andDelegate:. Even though this isn’t strictly necessary, I would like to show you the advantages of creating custom initialization methods.

The header file ends with the declaration of the MTEditItemViewControllerDelegate protocol. The protocol declaration contains one method that is called when an item is updated. The method accepts the view controller and the updated item as its arguments.

#import <UIKit/UIKit.h>
@class MTItem;
@protocol MTEditItemViewControllerDelegate;
@interface MTEditItemViewController : UIViewController
@property IBOutlet UITextField *nameTextField;
@property IBOutlet UITextField *priceTextField;
#pragma mark -
#pragma mark Initialization
- (id)initWithItem:(MTItem *)item andDelegate:(id<MTEditItemViewControllerDelegate>)delegate;
@end
@protocol MTEditItemViewControllerDelegate <NSObject>
- (void)controller:(MTEditItemViewController *)controller didUpdateItem:(MTItem *)item;
@end

Even though we added a forward class declaration to the header file of the MTEditItemViewController class, we still need to import the header file of the MTItem class in the implementation file. In the class extension of MTEditItemViewController, we declare the item and delegate properties. The difference with the MTAddItemViewController class is that the delegate property is private in the MTEditItemViewController class.

#import "MTEditItemViewController.h"
#import "MTItem.h"
@interface MTEditItemViewController ()
@property MTItem *item;
@property (weak) id<MTEditItemViewControllerDelegate> delegate;
@end

How can we set the delegate of an instance of the MTEditItemViewController class if it is private? The item and delegate properties are assigned using the custom initialization method. Not only will this keep the code more concise and readable, it will also prevent direct access to the item and delegate properties. Let’s explore the initWithItem:andDelegate: method.

The implementation of initWithItem:andDelegate: starts by invoking initWithNibName:bundle: on super, the superclass of MTEditItemViewController. The remainder of the method implementation is trivial, that is, we set the item and delegate properties with the values passed to the method.

- (id)initWithItem:(MTItem *)item andDelegate:(id<MTEditItemViewControllerDelegate>)delegate {
    self = [super initWithNibName:@"MTEditItemViewController" bundle:nil];
    if (self) {
        // Set Item
        self.item = item;
        // Set Delegate
        self.delegate = delegate;
    }
    return self;
}

Open MTEditItemViewController.xib to create the user interface. There is no need to add a navigation bar to the view controller’s view as the view controller will be the child of a navigation controller, which means that we get the navigation bar for free. We will add a save button in the class’ viewDidLoad method a bit later.

Drag two UITextField instances from the Object Library to the view controller’s view and position them as shown in the figure below (figure 3). Select the top text field, open the Attributes Inspector, and enter Name in the Placeholder field. Select the bottom text field and, in the Attributes Inspector, set its placeholder text to Price and set the Keyboard setting to Number Pad. Select the File’s Owner object, open the Connections Inspector, and connect the nameTextField and priceTextField outlets to the corresponding text field in the user interface.

Building a Shopping List Application From Scratch - Part 2 - Creating the User Interface of the MTEditItemViewController class - Figure 3

In the view controller’s viewDidLoad method, create the save button as we did in the MTAddItemViewController class (see below).

- (void)viewDidLoad {
    [super viewDidLoad];
    // Create Save Button
    self.navigationItem.rightBarButtonItem = [[UIBarButtonItem alloc] initWithBarButtonSystemItem:UIBarButtonSystemItemSave target:self action:@selector(save:)];
}

The implementation of the save: action is very similar to the one we implemented in the MTAddItemViewController class. However, there are a few subtle differences that I want to point out. Instead of passing the name and price values to the delegate, we directly update the item and pass the updated item to the view controller’s delegate. Because the view controller is a child view controller of a navigation controller, we dismiss the view controller by popping it of the navigation stack.

- (void)save:(id)sender {
    NSString *name = [self.nameTextField text];
    float price = [[self.priceTextField text] floatValue];
    // Update Item
    [self.item setName:name];
    [self.item setPrice:price];
    // Notify Delegate
    [self.delegate controller:self didUpdateItem:self.item];
    // Pop View Controller
    [self.navigationController popViewControllerAnimated:YES];
}

Showing the Edit Item View Controller

In a few minutes, we will implement the functionality that allows the user to select items to add them to the shopping list. The user will be able to do this by tapping a row in the list view. The question then arises how the user will be able to edit an item if tapping a row is reserved for adding an item to the shopping list?

The UIKit framework provides a detail disclosure button for exactly this use case. A detail disclosure button is a small, blue chevron positioned at the right of a table view cell. To add a detail disclosure button to a table view cell, we need to revisit the tableView:cellForRowAtIndexPath: method and amend it as shown below. Every table view cell has a accessoryType property. In the implementation below, we set it to UITableViewCellAccessoryDetailDisclosureButton. As you may have noticed, the engineers at Apple don’t like short names.

- (UITableViewCell *)tableView:(UITableView *)tableView cellForRowAtIndexPath:(NSIndexPath *)indexPath {
    static NSString *CellIdentifier = @"Cell Identifier";
    [tableView registerClass:[UITableViewCell class] forCellReuseIdentifier:CellIdentifier];
    UITableViewCell *cell = [tableView dequeueReusableCellWithIdentifier:CellIdentifier forIndexPath:indexPath];
    // Fetch Item
    MTItem *item = [self.items objectAtIndex:[indexPath row]];
    // Configure Cell
    [cell.textLabel setText:[item name]];
    [cell setAccessoryType:UITableViewCellAccessoryDetailDisclosureButton];
    return cell;
}

How does the table view notify the delegate when the detail disclosure button is tapped? Unsurprisingly, the UITableViewDelegate protocol defines the tableView:accessoryButtonTappedForRowWithIndexPath: method for this purpose. Take a look at its implementation.

- (void)tableView:(UITableView *)tableView accessoryButtonTappedForRowWithIndexPath:(NSIndexPath *)indexPath {
    // Fetch Item
    MTItem *item = [self.items objectAtIndex:[indexPath row]];
    // Initialize Edit Item View Controller
    MTEditItemViewController *editItemViewController = [[MTEditItemViewController alloc] initWithItem:item andDelegate:self];
    // Push View Controller onto Navigation Stack
    [self.navigationController pushViewController:editItemViewController animated:YES];
}

The implementation of the MTEditItemViewController class is almost complete. In its viewDidLoad method, we populate the text fields with the data of the item property. Because the setText: method of a text field only accepts a NSString instance, we need to wrap the float value of the item’s price property in a string to display it in the priceTextField text field.

- (void)viewDidLoad {
    [super viewDidLoad];
    // Create Save Button
    self.navigationItem.rightBarButtonItem = [[UIBarButtonItem alloc] initWithBarButtonSystemItem:UIBarButtonSystemItemSave target:self action:@selector(save:)];
    // Populate Text Fields
    if (self.item) {
        [self.nameTextField setText:[self.item name]];
        [self.priceTextField setText:[NSString stringWithFormat:@"%f", [self.item price]]];
    }
}

Adopting the Delegate Protocol

The final piece of the puzzle is to implement the MTEditItemViewControllerDelegate protocol. Start by importing the header file of the MTEditItemViewController class at the top of the header file and add the MTEditItemViewControllerDelegate protocol inside the angle brackets after the name of the superclass (see below).

#import <UIKit/UIKit.h>
#import "MTAddItemViewController.h"
#import "MTEditItemViewController.h"
@interface MTListViewController : UITableViewController <MTAddItemViewControllerDelegate, MTEditItemViewControllerDelegate>
@end

Adopting the MTEditItemViewControllerDelegate protocol is limited to implementing the controller:didUpdateItem: method as shown below. It might surprise you that we don’t update the data source of the table view. All that we do in the delegate method is reload one row of the table view. The reason that we don’t need to update the table view’s data source, the items array, is that the updated item was passed by reference to the edit item view controller. In other words, the object that the edit item view controller updated is the same object that is contained in the items array. This is one of the nice benefits of working with objects.

- (void)controller:(MTEditItemViewController *)controller didUpdateItem:(MTItem *)item {
    // Fetch Item
    for (int i = 0; i < [self.items count]; i++) {
        MTItem *anItem = [self.items objectAtIndex:i];
        if ([[anItem uuid] isEqualToString:[item uuid]]) {
            // Update Table View Row
            NSIndexPath *indexPath = [NSIndexPath indexPathForRow:i inSection:0];
            [self.tableView reloadRowsAtIndexPaths:@[indexPath] withRowAnimation:UITableViewRowAnimationFade];
        }
    }
    // Save Items
    [self saveItems];
}

Don’t forget to save the list of items to make sure that the edits are written to disk. Build and run the project to test the editing functionality.


Step 10:
Creating the Shopping List View Controller

Before we explore the data source of the shopping list view controller, let’s create some scaffolding to work with. Create a new UITableViewController subclass and name it MTShoppingListViewController.

Open the implementation file of the new class and add two private properties of type NSArray to the class extension, (1) items, which will contain the complete list of items and (2) shoppingList, which will only contain the items of the shopping list. Since we will be overriding the setter methods of both properties, we have to declare the properties as nonatomic. Don’t worry about the exact meaning of this for now.

#import "MTShoppingListViewController.h"
@interface MTShoppingListViewController ()
@property (nonatomic) NSArray *items;
@property (nonatomic) NSArray *shoppingList;
@end

The idea is to load the list of items every time a change is made to the list and then parse the list of items and extract only those items which have their inShoppingList property set to YES. Those items will be added to the shoppingList array. Another option would be to store the shopping list in a separate file, but the downside of this approach would be that we have to keep the items displayed in the list view controller and the items in the shopping list synchronized. This is asking for trouble if you ask me.

Custom Setters

The setter methods of items and shoppingList will do most of the heavy lifting for us. Take a look at the implementation of setItems:. Whenever the _items instance variable is updated (set with a new value), the buildShoppingList method is called on the view controller. Let’s see what the buildShoppingList method looks like.

- (void)setItems:(NSArray *)items {
    if (_items != items) {
        _items = items;
        // Build Shopping List
        [self buildShoppingList];
    }
}

The buildShoppingList method populates the shoppingList array with the items that have their inShoppingList property set to YES. In the buildShoppingList method, we create a mutable array to temporarily store the shopping list items. Next, we iterate through the list of items and add every item to the mutable array that has a inShoppingList property of YES. Finally, we set the shoppingList property with the contents of the mutable array. Don’t forget to import the header file of the MTItem class at the top.

- (void)buildShoppingList {
    NSMutableArray *buffer = [[NSMutableArray alloc] init];
    for (int i = 0; i < [self.items count]; i++) {
        MTItem *item = [self.items objectAtIndex:i];
        if ([item inShoppingList]) {
            // Add Item to Buffer
            [buffer addObject:item];
        }
    }
    // Set Shopping List
    self.shoppingList = [NSArray arrayWithArray:buffer];
}
#import "MTItem.h"

We also override the setShoppingList setter to reload the table view every time the shoppingList array is changed or updated (see below).

- (void)setShoppingList:(NSArray *)shoppingList {
    if (_shoppingList != shoppingList) {
        _shoppingList = shoppingList;
        // Reload Table View
        [self.tableView reloadData];
    }
}

Displaying the Shopping List

Implementing the methods of the UITableViewDataSource protocol should be child’s play by now. Take a look at the implementation of each method below.

- (NSInteger)numberOfSectionsInTableView:(UITableView *)tableView {
    return 1;
}
- (NSInteger)tableView:(UITableView *)tableView numberOfRowsInSection:(NSInteger)section {
    return [self.shoppingList count];
}
- (UITableViewCell *)tableView:(UITableView *)tableView cellForRowAtIndexPath:(NSIndexPath *)indexPath {
    static NSString *CellIdentifier = @"Cell Identifier";
    [tableView registerClass:[UITableViewCell class] forCellReuseIdentifier:CellIdentifier];
    UITableViewCell *cell = [tableView dequeueReusableCellWithIdentifier:CellIdentifier forIndexPath:indexPath];
    // Fetch Item
    MTItem *item = [self.shoppingList objectAtIndex:[indexPath row]];
    // Configure Cell
    [cell.textLabel setText:[item name]];
    return cell;
}

Loading Items

As I explained earlier, the key advantage of using the list of items to store and build the shopping list is that the application stores each item in only one place. This makes updating items in the list and in the shopping list much less of a headache. The loadItems method is identical to the one we implemented in the MTListViewController class (see below).

- (void)loadItems {
    NSString *filePath = [self pathForItems];
    if ([[NSFileManager defaultManager] fileExistsAtPath:filePath]) {
        // self.items = [NSMutableArray arrayWithContentsOfFile:filePath];
        self.items = [NSKeyedUnarchiver unarchiveObjectWithFile:filePath];
    } else {
        self.items = [NSMutableArray array];
    }
}

Of course, the pathForItems method is identical as well since we are loading the list of items from the same file as in the MTListViewController class.

- (NSString *)pathForItems {
    NSArray *paths = NSSearchPathForDirectoriesInDomains(NSDocumentDirectory, NSUserDomainMask, YES);
    NSString *documents = [paths lastObject];
    return [documents stringByAppendingPathComponent:@"items.plist"];
}

When you find yourself duplicating code, you should hear an alarm bell ringing. Duplicating code isn’t problematic while you are implementing a new feature. Afterwards, however, you should consider refactoring your code to minimize the amount of duplication in the application’s code base. This is a very important concept in software development and it is often referred to as DRY, Don’t Repeat Yourself. Chris Peters recently wrote an article on Nettuts+ about DRY programming.

Before we put the MTShoppingListViewController class to use, we need to update the class’ initWithStyle: method. In addition to setting the title of the view controller, we also load the list of items, which automatically populates the shoppingList array as we saw earlier.

- (id)initWithStyle:(UITableViewStyle)style {
    self = [super initWithStyle:style];
    if (self) {
        // Set Title
        self.title = @"Shopping List";
        // Load Items
        [self loadItems];
    }
    return self;
}

The final step is to initialize the shopping list view controller in the application delegate’s application:didFinishLaunchingWithOptions: method, making it the root view controller of a navigation controller, and adding that navigation controller to the tab bar controller. As always, make sure to import the header file of the MTShoppingListViewController class.

- (BOOL)application:(UIApplication *)application didFinishLaunchingWithOptions:(NSDictionary *)launchOptions {
    // Seed Items
    [self seedItems];
    // Initialize List View Controller
    MTListViewController *listViewController = [[MTListViewController alloc] init];
    // Initialize Navigation Controller
    UINavigationController *listNavigationController = [[UINavigationController alloc] initWithRootViewController:listViewController];
    // Initialize Shopping List View Controller
    MTShoppingListViewController *shoppingListViewController = [[MTShoppingListViewController alloc] init];
    // Initialize Navigation Controller
    UINavigationController *shoppingListNavigationController = [[UINavigationController alloc] initWithRootViewController:shoppingListViewController];
    // Initialize Tab Bar Controller
    UITabBarController *tabBarController = [[UITabBarController alloc] init];
    // Configure Tab Bar Controller
    [tabBarController setViewControllers:@[listNavigationController, shoppingListNavigationController]];
    // Initialize Window
    self.window = [[UIWindow alloc] initWithFrame:[[UIScreen mainScreen] bounds]];
    // Configure Window
    [self.window setRootViewController:tabBarController];
    [self.window setBackgroundColor:[UIColor whiteColor]];
    [self.window makeKeyAndVisible];
    return YES;
}
#import "MTShoppingListViewController.h"

Build and run the application to see if everything is working properly. Of course, the shopping list is currently empty and we don’t have a way to add items to the shopping list. Let’s remedy this in the next step.


Step 11: Adding Items to the Shopping List

As I wrote earlier, the idea is to add an item to the shopping list when it is tapped in the list view controller. To improve the user experience, if an item is present in the shopping list, we show a green checkmark to the left of the item’s name. If an item that is already in the shopping list is tapped, then it is removed from the shopping list and the green checkmark disappears. This means that we need to take a look at the tableView:didSelectRowAtIndexPath: method of the UITableViewDelegate protocol.

Before we implement tableView:didSelectRowAtIndexPath:, download the source files of this lesson. In the folder named Resources, find the files named checkmark.png and checkmark@2x.png, and add both of these files to the project. We will need them in a few moments.

In the first line of tableView:didSelectRowAtIndexPath:, we send the table view a message of deselectRowAtIndexPath:animated: to deselect the row the user tapped. Whenever a row is tapped, it should only be highlighted for an instant hence this addition. Next, we fetch the corresponding item for the selected row and update the inShoppingList property of the item (YES becomes NO and vice versa.

Based on the value of the item’s setInShoppingList property, we either show or hide the green checkmark. We show the checkmark by setting the image property of the table view cell’s imageView property. Every UITableViewCell instance contains an image view on its left (an instance of the UIImageView class). By setting the image view’s image property to nil, the image view is blank, showing no image.

The implementation of tableView:didSelectRowAtIndexPath: ends by saving the list of items to disk to make sure that the changes are permanent.

- (void)tableView:(UITableView *)tableView didSelectRowAtIndexPath:(NSIndexPath *)indexPath {
    [tableView deselectRowAtIndexPath:indexPath animated:YES];
    // Fetch Item
    MTItem *item = [self.items objectAtIndex:[indexPath row]];
    // Update Item
    [item setInShoppingList:![item inShoppingList]];
    // Update Cell
    UITableViewCell *cell = [tableView cellForRowAtIndexPath:indexPath];
    if ([item inShoppingList]) {
        [cell.imageView setImage:[UIImage imageNamed:@"checkmark"]];
    } else {
        [cell.imageView setImage:nil];
    }
    // Save Items
    [self saveItems];
}

How does the shopping list know when an item in the list view controller is tapped by the user? The shopping list view controller will not update its table view automatically if a change was made to the list of items in the list view controller. In addition, we don’t want the list view controller and the shopping list view controller to communicate directly to one another to prevent any form of tight coupling.

One solution to this problem is the use of notifications. Whenever the list view controller makes a change to the list of items, it posts a notification with a specific name to the notification center, an object that manages notifications. Objects that are interested in certain notifications can add themselves as observers of those notifications, which means that they can respond when those notifications are posted to the notification center.

How does all this work? There are three steps, (1) the shopping list view controller starts by telling the notification center that it is interested in receiving notifications with a name of MTShoppingListDidChangeNotification, (2) the list view controller posts a notification to the notification center whenever it updates the list of items, (3) when the shopping list view controller receives the notification from the notification center, it updates its data source and table view in response.

Before we implement the three steps I just described, it is a good idea to take a closer look at the NSNotificationCenter class. In a nutshell, the NSNotificationCenter manages the broadcasting of notifications. Objects in an application can register with a notification center to receive notifications using addObserver:selector:name:object: where (1) the first argument is the object that will receive the notifications (the observer), (2) the selector is the action that will be triggered when the observer receives the notification, (3) the name is the name of the notification, and (4) the last argument is the object that sends the notification. If the last argument is set to nil, the observer receives all the notifications with the specified name.

Receiving Notifications

Revisit the initWithStyle: method of the MTShoppingListViewController class and add the view controller instance as an observer to receive notifications with a name of MTShoppingListDidChangeNotification. The action triggered when the view controller receives a notification with that name is updateShoppingList:. We set the object to nil as it doesn’t really matter which object sent the notification.

- (id)initWithStyle:(UITableViewStyle)style {
    self = [super initWithStyle:style];
    if (self) {
        // Set Title
        self.title = @"Shopping List";
        // Load Items
        [self loadItems];
        // Add Observer
        [[NSNotificationCenter defaultCenter] addObserver:self selector:@selector(updateShoppingList:) name:@"MTShoppingListDidChangeNotification" object:nil];
    }
    return self;
}

Responding to Notifications

The method that is triggered when the observer receives a notification has a specific format as you can see below. It accepts one argument, that is, the notification object which is of type NSNotification. The notification object keeps a reference to the object that posted the notification and it can also contain a dictionary with additional information. The implementation of the updateShoppingList: method is quite simple, that is, the loadItems method is called on the view controller, which means that the list of items is loaded from disk. The rest happens automatically thanks to the custom setter methods that we implemented earlier.

- (void)updateShoppingList:(NSNotification *)notification {
    // Load Items
    [self loadItems];
}

Sending Notifications

The third piece of the puzzle is posting a notification whenever the list of items is changed by the list view controller. We can do this in the saveItems method of the MTListViewController class. We first ask for a reference to the default notification center by calling defaultCenter on the NSNotificationCenter class. Next, we call postNotificationName:object: on the default notification center and pass the name of the notification, MTShoppingListDidChangeNotification, and the object posting the notification.

- (void)saveItems {
    NSString *filePath = [self pathForItems];
    [NSKeyedArchiver archiveRootObject:self.items toFile:filePath];
    // Post Notification
    [[NSNotificationCenter defaultCenter] postNotificationName:@"MTShoppingListDidChangeNotification" object:self];
}

Before you build and run the project, make sure to amend the tableView:cellForRowAtIndexPath: as shown below to display a green checkmark for items that are already present in the shopping list.

- (UITableViewCell *)tableView:(UITableView *)tableView cellForRowAtIndexPath:(NSIndexPath *)indexPath {
    static NSString *CellIdentifier = @"Cell Identifier";
    [tableView registerClass:[UITableViewCell class] forCellReuseIdentifier:CellIdentifier];
    UITableViewCell *cell = [tableView dequeueReusableCellWithIdentifier:CellIdentifier forIndexPath:indexPath];
    // Fetch Item
    MTItem *item = [self.items objectAtIndex:[indexPath row]];
    // Configure Cell
    [cell.textLabel setText:[item name]];
    [cell setAccessoryType:UITableViewCellAccessoryDetailDisclosureButton];
    // Show/Hide Checkmark
    if ([item inShoppingList]) {
        [cell.imageView setImage:[UIImage imageNamed:@"checkmark"]];
    } else {
        [cell.imageView setImage:nil];
    }
    return cell;
}

Build and run the shopping list application to give it a spin (figure 4). Have you noticed that edits to an item are automatically reflected in the shopping list?

Building a Groceries Application From Scratch - Part 2 - Giving the Shopping List Application a Spin - Figure 4

Ready for Publication?

Great. Where is the button to publish the shopping list application to the App Store? We are not quite done yet. Even though we have laid the foundation of the shopping list application, it is not ready for publication. There are also a few things to consider.

Scalability

The shopping list application is a modest implementation of a shopping list. If the application were to contain hundreds or thousands of items then it would be pertinent to add search capabilities as well as sections to sort the items alphabetically (as we did earlier in this series). It is important to realize that the list of items is written to disk in its entirety every time an item is updated. This is no problem when the list is small, but it will be if the list grows over time to hundreds or thousands of items.

Relationships

Also, users may want to save more than one shopping list. How would you deal with that? One option would be to store each shopping list in a separate file, but how would you deal with changes made to items? Are you going to update every shopping list that contains the item? When you start dealing with relationships, it is better to choose for an SQLite data store. Core Data is an great companion if you choose to go down that road. It is a powerful framework and sports a lot of features that make a lot of the code in our shopping list application obsolete. It is true that Core Data brings a bit more overhead with it so it is key to first consider if Core Data is suitable for your application, in other words, if it is worth the overhead.

Additional Features

There is also a lot of potential for additional features. The price property of the items remains unused in the current implementation of the shopping list application. Also, it would be nice if the user could check off an item from the shopping list by tapping the item. As you can see, the current implementation of the shopping list application is only a modest start.


Conclusion

Even though the shopping list application isn’t quite ready for the App Store yet, you can’t deny that it works as we planned and it has shown you a lot of new aspects of Cocoa development, such as notifications and implementing a custom delegate protocol.

You now know what to expect from the iOS SDK and what iOS development is like. It is up to you to decide if you want to continue your journey and become a skilled iOS developer. If you do choose to continue with iOS development, then I will provide you with some great resources in next and final installment of this series!

iOS 2012: A Year in Review and 2013 Predictions

$
0
0

Another year has passed and a new year is awaiting us. In this article, I want to revisit 2012 from the perspective of an iOS developer. What were the important events of 2012 and what does 2013 have in store for us?


2012 for Apple

Numbers

Analysts have been predicting a slowing down of Apple’s growth for several years, but it continues to surprise everyone with exceptional growth numbers. In September of 2012, during the iPhone 5 launch event, Tim Cook announced that Apple had sold 84 million iPads and an impressive 400 million iOS devices. This is fantastic news for iOS developers. It means that the market continues to grow and Apple continues to perform exceptionally well.

In the fall of 2012, Apple also announced that more than 1 million iOS applications had been submitted to the App Store. Despite Android’s dominance in terms of market share, Apple continues to lead the way in the mobile app space.

A less publicized but nevertheless important statistic is the amazing adoption rate of iOS 6. One month after the release of iOS 6, more than 60% of iOS devices had upgraded to iOS 6 and this number exceeded 70% in December of 2012. These numbers stand in stark contrast with the adoption rate of major OS releases on other mobile platforms, such as Android.

iOS 6

For most iOS developers, the introduction (June 2012) and release (September 2012) of iOS 6 has been one of the most important events of 2012. From a developer’s perspective, iOS 6 wasn’t the most exciting update to the iOS operating system. However, I was pleasantly surprised by the introduction of the new UICollectionView class and the much improved integration of iOS with social networks, such as Facebook.

Another key feature of iOS 6 is Auto Layout. Auto Layout and Storyboards make iOS development both faster and easier. It feels as if Apple wants to push developers more toward Interface Builder for creating user interfaces, and I have the impression that this push is working. The Storyboard feature has been well received by developers, and Auto Layout will most likely see a similar adoption.

As with most iOS updates, the real winner is the customer. Siri has been improved, Apple introduced Passbook, and iCloud gained an important update and a few additional features. Shortly after the release of iOS 6, Mark Hammonds wrote a post about the new features and API’s of iOS 6. Revisit Mark’s post for all the details.

Maps

Even though Apple’s own maps solution looks promising and offers a number of new features for developers, such as turn-by-turn directions, the general consensus has been that its current implementation falls short in many respects. It is promising and somewhat surprising to see Apple enter this space, but there is a lot of work that needs to be done.

The release of maps has been another effort by Apple to free itself from Google’s services, but it is clear that this isn’t as easy as it sounds.

iPad mini

Many pundits predicted that Apple would introduce the iPad mini “soon”, but very few, if any, expected the introduction of the iPad mini so soon after the release of the iPhone 5. I was definitely surprised, and I was even more surprised by the fact that its big brother, the iPad, received an update as well. It almost feels as if the iPad mini is more revolutionary than the iPhone 5, and the reason is simple. The form factor of the iPad mini is close to perfect. It makes a tablet device easier to use, hold, and carry with you. The iPad is great and very performant, but it often feels a bit too heavy and bulky, and this will only get worse now that the iPad mini has been released. People love the iPad mini in spite of its low resolution screen (no retina display).

The release of the iPad mini is also great news for developers. No changes are required to run existing iPad applications on the iPad mini. In addition, the number of iOS devices, iPads in particular, will skyrocket, which means that the potential userbase of iPad applications will increase substantially. Watch out for Apple’s sales figures when they are released for this holiday season. They will knock it out of the park … again!

The only caveat that developers should be wary about is the size of touch targets on the iPad Mini. The resolution of the iPad Mini is identical to that of the original iPad and the iPad 2. The display of the iPad Mini, however, is much smaller, which means that touch targets are much smaller on the mini. This is definitely something to consider if you have any iPad applications in the App Store.

iPhone 5

It has become increasingly difficult for Apple to keep new products secret until they are released. The result is that the iPhone 5 hasn’t been much of a surprise for most of us. Even though the iPhone 5 is an incredible piece of hardware, it isn’t revolutionary. The larger screen is a nice addition, but it isn’t game changing. The lightness of the device is impressive, and I find it one of the most enjoyable features of the device.

For iOS developers, the larger screen is … well … more of a curse than a blessing. For many iOS developers, game developers in particular, who work with artwork that is tailored to specific screen resolutions, the larger screen is a real pain in the neck. You may have noticed that even a few popular iOS applications haven’t been updated for the iPhone 5 just yet.

Again, the customer is the winner. The iPhone 5 is fast, looks and feels amazing, and it sports a number of new features, such as an improved camera…and a new connector.

Lightning Connector

When it comes to the new lightning connector, the customer is the loser. Sooner or later, Apple was expected to replace the bulky 30-pin connector with a slimmer alternative. The downside is that a lot of third party accessories no longer work without a suitable adapter.

For most iOS developers, the new lightning connector doesn’t change much. However, if you develop custom iOS accessories, then the new lightning connector will definitely interest you.

Scott Forstall

In October of 2012, Apple announced that Scott Forstall would be leaving the company. It also announced that Forstall would be serving in an advisory role to Tim Cook until his departure. If you have been developing for the iOS platform for any amount of time, then you have probably heard of Scott Forstall. He was the senior vice president of iOS Software under Steve Jobs and he has been instrumental to the success and growth of the iOS platform.

It will be interesting to see how things will change when Forstall no longer holds the reins of the iOS Software team. Interesting times are ahead for us, knowing that Jony Ive will provide leadership and direction for human interface across the entire company. This will probably be the first time that Jony Ive has the opportunity to not only shape Apple’s hardware, but also its software. Does this mean that we can say goodbye to the skeuomorphic interfaces on iOS?


The Competition

Google

With a market share of 75%, Google’s Android platform has triumphed over iOS in terms of market share. However, does this mean that iOS developers should shift their focus to the Android platform? Not at all. The iOS platform has never been a better place for developers. In spite of a market share of 15%, the iOS platform continues to be more profitable for developers. In addition, from a developer’s perspective, the iOS ecosystem is much more “developer friendly”. The platform doesn’t have the same problems with fragmentation, but it does have a majority of customers who are willing to pay for high quality applications.

The tension between Apple and Google increased substantially in 2012. This culminated in the removal of the native YouTube and Maps applications. Not long after the removal of the YouTube, Google released a brand new YouTube application for iOS. A few months later, Google also introduced Google Maps for iOS. Truth be told, Google Maps for iOS offers a much better experience than Apple’s native maps solution.

Samsung

The battle between Apple and Samsung hasn’t impacted iOS developers very much, but it certainly was a notable event in 2012. The legal battle between the technology giants culminated into a devastating ruling for Samsung. Samsung must pay Apple more than $1 billion in damages. Even for a multibillion dollar company like Samsung, this is hard to swallow.


What About 2013?

iOS

Even though iOS 6 has introduced many new additions and improvements to the iOS operating system, the overall look and feel of iOS is starting to seem outdated. Will Jony Ive change this and introduce a dramatic redesign of the iOS operating system in 2013? Will we finally see a redesign of the lock screen, possibly with the addition of widgets? My gut feeling tells me that 2013 will bring some major changes to the iOS platform!

Devices

With the recent introduction of the iPhone 5 and the iPad mini, I don’t expect any major redesigns of Apple’s existing iOS lineup. In 2013, Apple will most likely introduce the iPhone 5S, a device with a design identical to that of the iPhone 5, but with some improvements under the hood. The iPad won’t see a major redesign either, but the iPad mini might be upgraded with a retina display.

Television Set

Where there’s smoke, there’s fire. I think we can all agree that Apple has plans to release a television set in some form and I think it has had these plans ever since it introduced the first generation Apple TV. It feels like a difficult and crowded market to enter. In addition, it is a market that is so much different than the markets Apple is currently in. Most people don’t buy a new television set every other year.

I must admit that I am curious to see what Apple has to offer and I am especially curious to discover how they plan to change this market, because that is what they intend to do. Apple won’t simply compete with existing electronics companies. They will try to leverage every asset they have including the iOS platform and the almost 500 million iTunes accounts.


Conclusion

Even though 2012 wasn’t as spectacular as 2007 or 2010, it was a year to remember. It was the first year without Steve Jobs and so far Apple has done very well. From a developer’s perspective, what has been the most significant event of 2012 for you?

Android 2012: A Year in Review and 2013 Predictions

$
0
0

Industry gurus Shane Conder and Lauren Darcey provide a recap of the Android ecosystem in 2012 and offer predictions for how the popular mobile platform may evolve in 2013.

We saw Android mature in 2011. In 2012, Android dominated the marketplace worldwide in smartphones.
With 75% market share worldwide (http://techcrunch.com/2012/11/02/idc-android-market-share-reached-75-worldwide-in-q3-2012/), and over 500 million activated devices (http://news.cnet.com/8301-1035_3-57510994-94/google-500-million-android-devices-activated/), Android is no longer a platform developers can ignore. In the tablet space, Android has grown to 44% of the marketplace and could exceed 50% in the coming year (http://techcrunch.com/2012/11/28/ipad-and-android-tablet-market-share-margin-narrows-much-faster-than-originally-predicted/).

Despite our prediction to the contrary (http://mobile.tutsplus.com/articles/news/android-2011-a-year-in-review/), 2012 has seen continued growth in the rate of device activations, solidifying Android’s platform dominance in the mobile device marketplace. Near the beginning of the year, activations were screaming along at over 700,000 a day. As of the third quarter of 2012, though, that has almost doubled to 1,300,000 a daily. That’s over a million new potential customers. Every day. (http://www.businessinsider.com/chart-of-the-day-android-activations-per-day-2012-9) That’s approaching half a billion activations a year. We’d be surprised if this rate continued much longer, though. What is clear, is that people are taking a seriously look at Android, even if they own an iOS device. And existing users are adding secondary Android devices to their hoards.

There has been a lot of talk about how market share and download numbers don’t matter because the Apple App Store revenue greatly exceeded the Google Play Store revenue. That has been changing throughout the year. According to recent reports, the Google Play Store revenue is growing very rapidly — 311% year-to-date — compared to the Apple App Store at just under 13% for the same time period. Still, global revenue on the Google Play Store was just a quarter of that on Apple’s App Store by the third quarter of this year. (http://www.eweek.com/cloud/apple-app-store-revenue-dwarfs-android-app-store-sales-report/) What does this mean to Android developers? There’s still a lot of potential untapped revenue. That’s our take-away, at least.

On the Android SDK front, 2012 was the Year of Buttery Goodness. Jelly Bean launched in June of 2012 and incorporated a huge push by Google, called Project Butter, to really enhance performance and responsiveness across the entire operating system. With a further update in November of 2012, Jelly Bean has continued to impress.

Google has continued to work with manufacturers in creating devices around the pure Android experience. The Nexus 7, representing the 7″ tablet form-factor, and the Galaxy Nexus, representing the smartphone form factor, were the first to see Jelly Bean updates. Later in 2012, the Nexus line was rejuvenated with Jelly Bean updates as well as an updated phone, the Nexus 4, and a 10″ tablet, the Nexus 10. Representing three different manufacturers, this trio of Nexus devices provide something for everyone.

With a resolution of 2560×1600, the Nexus 10 easily surpassed our previous prediction of tablets running 1920×1080. Even the Asus Transformer Infinity, launched early in the year, met our tablet resolution predictions handily.

This past year also saw an experimental launch of the Nexus Q, a screen-less jukebox-like device for Google content with a built-in audio amplifier. The device was met with mixed reviews when it was announced at Google IO 2012, and distributed to attendees, and entered into a confused market competing with the likes of the Google TV on the software front and Sonos audio amps and speakers on the hardware front. Google pulled the Nexus Q from sale and went back to the drawing board. Later on, we saw at least one of its features on Google TVs: you can push YouTube playback from a phone or tablet to your Google TV, much like you could do with the Nexus Q when it launched. We found the Nexus Q amusing but limited and we are curious if the project will be resurrected at a later date. If so, let’s hope it has a more obvious niche.

This screen shifting isn’t the wireless display technology we had hoped to see, but it’s along similar lines. Jelly Bean (Android 4.2) also introduced some secondary screen technologies that enable developers to control what content is displayed on secondary screens that is not just be limited to screen mirroring. Still, there is evidence that standards-based screen shifting, through WirelessHD, will be coming: http://gigaom.com/mobile/gamers-rejoice-new-screen-shifting-tech-coming-to-high-end-phones/.

2012 was also the year of rapid movement towards high-end hardware. Everywhere you looked, devices were getting faster, with bigger and better screens. Phones and tablets alike have quad core processors with many core graphics accelerators. And where they don’t, companies like Intel are pushing high-end processors with fewer cores that perform very well.

We have seen Full HD 1080p resolutions phone screens with pixel densities exceeding 400 pixels per inch. Large tablets are shipping with even higher resolutions, such as the Nexus 10 with its 2560×1600 display. Even mainstream phones are running at 720p resolutions now; these HD resolutions are no longer limited to high-end phones.

Android devices from the likes of Barnes & Noble (the Nook line) and Amazon (the Kindle Fire line) were expanded this year as well. These reader-friendly devices now boast high resolution screens, multicore processors, and multiple form factors for different users. Although these two lines of devices are popular, they don’t have Google Mobile Services, such as the Google Play Store. Since they run on Android, though, supporting them is generally just a matter of supporting a different distribution method. Developers continue to need to support several third party distribution methods to be available on all Android devices. If anything, this necessity has grown throughout the year.

While devices continue to improve and evolve, we are also seeing some features being phased out. For example, glasses-free 3D screens on handsets no longer appear to be shipping, where previously both LG and HTC had them. We haven’t seen a fingerprint reader since the Atrix 4G. Motorola phased out the Lapdock, yet ASUS as the Padphone, which is similar in concept, but runs Android in all configurations, not Linux when docked as the Lapdock did. Whether this is a result of users not needing or wanting such features, developers not supporting such features, or a bit of both, the result is fewer unique device features for developers and users to dabble with.

That said, there are still some fun exceptions. Notably, Samsung has been touting its S Pen for use on the Galaxy Note line of Android devices. The S Pen has an SDK so developers can use it. Is the S Pen any different from other custom features? Does Samsung have a leg up simply because it sells so many devices? While we’re not sure, we also haven’t seen any of our daily apps advertise support for the S Pen.

Developers are likely wary of supporting such unique features when they may just vanish just as quickly as they appear and can complicate application compatibility.

In all, 2012 was yet another great year for Android, its developers and its users. There are tons of new Android devices out there and will continue to be for the foreseeable future. From huge growth for manufacturers and a smoother, more consistent experience for users, Android has become a stable and growing platform that developers can rely on for years to come.

Our predictions for Android 2013

Continued Improvements to Screens. Seven inch tablets need to catch up in both density and resolution to their phone-sized and large tablet sized siblings. We’ll see obvious improvements there, with seven inch tablets seeing at least 1080p displays, if not higher, before 2013 is gone. Pixel density will continue to improve across all display sizes. Screens are likely to continue to approach print-like resolutions of 1200 dpi. That won’t come this year, but we might see a 600 dpi screen near the end of the year, as we’re starting the year with 440dpi devices already available. Full HD (1080p) displays will become standard across all screen sizes, with more Quad HD displays coming (2560×1440) to tablets. If 2012 was the year of the “phablet,” 2013 may well be the year the bezel (the space between the screen and the physical edge) is minimized to squeeze as much display potential in a device’s physical form factor as possible. This will continue to pressure the art departments of mobile companies to create higher resolution images to cater towards the large displays and high density displays. Design will continue to be more physical-size-based rather than pixel-size-based.

Continued Hardware and Software Performance Improvements. With Intel pushing Atom processors into smaller devices, including smartphones, and ARM technology improving to outperform Atom processors on the laptop form factor, a processor tech war may be brewing. Both Android and Windows can run on Intel and ARM platforms now, further pushing Intel and the ARM platforms to compete for performance and battery-life crowns. We’ve already seen announcements for huge numbers of graphics cores coming in 2013 (72 or more!), but we doubt there will be much movement on the general purpose cores beyond four/quad. What will improve is the software, from the OS to the SDK to the apps themselves, making more efficient use of all types of cores available. This will enable Google and other developers to create truly smooth, responsive, and stutter-free applications that are a pleasure to use.

Battery Life Gains In Favor of Performance Gains. Performance of Android devices will certainly grow. But a focus on battery life will shift the marketing features of new devices, much as we saw efficiency take over as the selling feature on the desktop and laptop side of things when the “megahertz wars” fizzled. This may start creating a split between enthusiast or gaming devices, with maximum performance, and business user devices with maximum battery life. Hopefully this will come in lower power data modes and GPS modes. We find the highest battery use in apps that use both data and GPS at once — such as mapping or location-based apps and games.

On the app side, we wouldn’t be surprised to see some apps and games start offering high power modes and low battery drain modes, instead of the more traditional graphic detail settings, in order to cater to both markets without requiring that devices be plugged in.

Gaming. 2012 didn’t see the sort of hybrid, multi-device gaming we thought we would see., as it’s certainly within the realm of feasibility. Yet developers are mostly still sticking to the tried and true instead of venturing into new territory. However, with the launch of the Nintendo Wii U giving users and developers a glimpse of the potential of multi-device gaming, we could easily see that style of gaming coming to tablet+phone combinations, phone+Google TV, or even a console, such as the Ouya. It only makes sense. The latest Android SDK makes some of this easier with the ability to drive multiple displays with different content.

Android SDK. As with 2012, only one major platform update is likely to take place in 2013. This update will continue to bring to Android more of what it does best: a system with fantastic multitasking and multiple user capabilities and simple data sharing between applications and devices. We’d love to see an API for hosting a remote display and serving content to a remote display on another Android device, whether it’s on a TV, tablet, or phone. Other SDK improvements will include APIs to simplify the developers work in following programming best practices, much like the API for the ActionBar did. The Eclipse plugins will continue see updates making the secondary programming tools, like the NDK and the ADK, easier to use and more accessible to more developers. Google will continue to add features to older SDKs with the Support library, but will be pushing really hard for developers and manufacturers to move to Jelly Bean and leave Android 2.x behind.

Faster Updates, Longer Update Support. Google tried to introduce a program in 2010 that would hold manufacturers to update schedules for a certain period of time and for those updates to be timely. That was the last we heard of it. The Galaxy Nexus from 2011 was available through many carriers. However, only the unlocked GSM variants of the device have seen updates. In fact, Google dropped AOSP support for the CDMA variant early in the year (http://www.droid-life.com/2012/02/03/google-no-longer-considers-verizons-lte-galaxy-nexus-to-be-a-developer-phone/), and resumed some limited support later on (http://www.anandtech.com/show/6081/android-41-hits-aosp-verizon-galaxy-nexus-regains-aosp-support). Still, even some CDMA Nexus devices have been slow to receive updates. (Which is probably part of the “tactical” reason behind not having a CDMA version of the Nexus 4. (http://www.theverge.com/2012/10/29/3569688/why-nexus-4-does-not-have-4g-lte))

This has made it clear to everyone (the press, Google, and users) who the real update roadblocks comes from: carriers. As to the reasons? There are some legitimate ones–rolling out updates requires testing and taxes support teams. However, it also forces users who want the “latest” to upgrade their devices and service plans–carriers bread and butter. We’ll continue to see stronger push back on why some updates are extremely slow and others are not performed at all. Still, we’re disappointed that many devices aren’t updated for as long as the carrier contract for the user is active — two years, typically. For example, the Motorola Atrix 4G is no longer being updated. Yet, the device is a capable dual core handset from a manufacturer owned by Google. While the average consumer may not know or care, enough users do that we expect the issue to continue to get coverage in the tech press and, hopefully, something will be done about it, since it’s a real waste of technology and materials.

Display Shifting (the act of mirroring a device display on on screen, such as a TV, or extending the display with different content). Wireless displays didn’t come to pass in 2012, as we’d hoped. With the new features in YouTube, the features that the Nexus Q did do, and the ability to display different content on multiple connected screens in the latest update, we think Google is slowly preparing developers for a time when any Android device can output anything to a Google TV device (or something similar; like perhaps an improved Nexus Q).

Year of the Television. Google and its partners aren’t giving up on Google TV. Other devices, including game systems like the Ouya and dongles like the Cotton Candy, will put Android on the TV. LG has already announced an expanded lineup of televisions with built-in Google TV. The announcement talks of a Google TV 3.0, which we take to mean a third generation device (Google calls the current Google TV devices the second generation). Combined with display shifting (discussed earlier) and console gaming technology either through a device, like the Ouya, or a service, like OnLive, will help cement Android on home television screens in 2013. Will it take off? We don’t think so, at least not in the same way game consoles and DVRs have, but it will be popular enough to be noticed and used.

The device activation rate will level off. Yes, we said the same thing last year. We weren’t even sure an activation rate of a million a day would be reached. Yet, it reached 1.3 million a day months before the end of 2012. But we still really think it’ll have to level off this year. If it doesn’t, we’ll see over a billion activated devices before the end of the year. In fact, looking at the numbers, if the activation rate stays exactly where it is, the billion device mark could be hit as early as September of 2013. Why has the rate stayed so strong? Likely because users are actively using multiple devices – smartphones and tabs, TVs, etc.

The Android SDK will only see one major update. Again. As with our correct prediction that 2012 would only see on major update (Jelly Bean, 4.1 and 4.2), 2013 will only see on major update. We’d guess the next named version (Key Lime Pie is most often heard, but what about kettle corn? Or kruller?) will be out, although we wouldn’t factor out another minor update to Jelly Bean first. Either way, we’d expect the next update to come in the same time-frame as Google IO 2013, in May. These relatively spaced-out release roll-outs, compared to the early days of frantic back-to-back platform updates, are good for consumers, developers, and manufacturers who want stability.

Where To Go Next

$
0
0

You have learned a lot over the past five weeks, grasshopper, and you might even feel a bit overwhelmed at this point. I would like to leave you with some advice and a bunch of resources to keep you on track to become a proficient iOS developer.


Things To Consider

Even though 2007 seems like yesterday, the mobile space, and iOS in particular, has grown at an incredible pace. It is hard to imagine the mobile landscape without the iPhone, iPad, and iPod Touch. As a result of the remarkable growth and popularity of the iOS platform, there is no shortage of books, videos, courses, and blogs to guide you on your quest to become a skilled iOS developer.

The material that we covered in this series should have given you a good understanding of the iOS platform from a developer’s perspective. The first piece of advice that I’d like to give you is to continue building iOS applications. Do not wait until you think you know enough to start creating that first real iOS application. You will learn the most by creating small applications and by finding solutions to the problems that you encounter as you go. In the end, programming is all about solving problems. I find myself creating several applications each and every week. This doesn’t mean that each application is worthy of publication in the App Store – quite the opposite. I start by isolating a specific, well defined problem that is part of a larger project. I then create a new iOS project that is focused on solving that problem. When I have found and implemented a solution to the problem, I refine the solution by several steps of refactoring to prepare it for integration in the initial project. At the same time, I have created a reusable component for later use. By focusing on reusability, you are less likely to write spaghetti code and more likely to save yourself time on future projects.

This approach is also great for exploring new frameworks or for trying out a new open source library that you stumbled upon. During this series, we have created a number of iOS projects. With every new project, we learned something new and, along the way, we have become more and more familiar with Xcode. Becoming familiar with your development environment is another key element of iOS development.

My second piece of advice is to avoid copying and pasting code snippets that you find on the web. Unless you understand the snippets that you are copying, you won’t benefit from it in the long run. Sure, it may temporarily solve a problem that you are struggling with. However, by using random snippets of code that you don’t understand, you will build up technical debt. This doesn’t mean that you shouldn’t include well maintained libraries in your projects, such as AFNetworking or Magical Record. It also doesn’t mean that you should know every implementation detail of such libraries. If you face a problem that you can solve yourself by spending one or two hours coding up a solution, then that is time well spent. Software development is not only about speed and delivering results. On a personal level, software development is about becoming better at what you do, programming, and you don’t become a better programmer by copying and pasting pieces of code that you don’t fully understand. There are no shortcuts to becoming a great programmer.


Mobiletuts+

Before I dive into the list of useful resources, I want to mention that Mobiletuts+ has been around for several years and has built up an impressive collection of high quality tutorials on iOS development. Close to 200 tutorials on Mobile Tuts are specifically targeted at iOS development, ranging from beginner to advanced topics.


Where To Find Help?

Apple Developer Forums

If you are a registered iOS developer, then you have access to the Apple Developer Forums. Not only are the Apple Developer Forums active and filled with developers who know their stuff, framework and DTS (Developer Technical Support) engineers maintain and monitor the forums, which can sometimes save your day.

Google to the Rescue … or is it Stack Overflow?

Whenever you find yourself using Google to find an answer to a programming question or a solution to a problem you are having, chances are that Google will point you in the direction of Stack Overflow. It is fair to say that Stack Overflow revolutionized software development and the developer community. Stack Overflow is a great place to ask question, but also to give back to he community by helping others. No matter what language you work with or what platform you develop software for, chances are that Stack Overflow has a vibrant community centered around your interests.

GitHub

Over the past few years, social coding has become very popular and GitHub is certainly one of the driving forces behind this trend. Since you are new to iOS development, you probably won’t be able to contribute to (iOS) open source projects just yet. However, nothing stops you from exploring some open source projects and browsing their source code to see how certain things could be done. If you want to speed up your learning by exploring code written by other developers, then it is key to choose a project that is well maintained and under active development.


Books

C Programming

A good understanding of the C language is important for every Cocoa developer, but you will notice that you can get a long way by only knowing the basics of the C language. As time passes, though, you will encounter pieces of code that you won’t fully understand unless you dive deeper into the C language. The definitive guide to learning C is the book written by Brian Kernighan and Dennis Ritchie, The C Programming Language. As you might remember from the article on learning C, Dennis Ritchie was one of the creators of the C language. What better way to learn C from the person who helped creating the language? Another great book for learning C is Learning C on the Mac by Dave Mark.

Objective-C

Although Apple provides a comprehensive guide to the Objective-C programming language (Object-Oriented Programming with Objective-C), I find it not ideal for developers who are new to Objective-C and certainly not for developers new to C. One of the best books about Objective-C is the book written by Stephen Kochan, Programming in Objective-C. Make sure to pick up the most recent edition, which also discusses Objective-C 2.0.

Also of note, In 2010 Dan Walker wrote a popular series on Mobile Tuts about learning Objective-C. If you want to expand your knowledge of Objective-C, then I encourage you to take a look at this series.

More Books

Apress and O’Reilly Media are two publishers that are known for publishing high quality books on iOS development – and development in general. Two excellent Apress publications are Beginning iOS 6 Development and More iOS 6 Development. Both publications are updated with every new release of iOS. Jeff LaMarche and Dave Mark are the authors of both books and are well known in the Cocoa community.

One of the first books ever written about Cocoa development is Cocoa Programming for Mac OS X. This book is written (and updated) by Aaron Hillegass, the founder of Big Nerd Ranch. Aaron is well known in the Cocoa community and many developers have learned Cocoa development through his books, including myself.


Videos

WWDC

Apple’s World Wide Developer’s Conference (WWDC) is the highlight of they year for many Cocoa developers. Every presentation given at WWDC is recorded and soon after WWDC Apple makes the session videos available to registered iOS and Mac developers. The collection of videos goes back to WWDC 2010 so you have plenty of material to go through.

iTunes U

The past few years, a number of colleges and universities have started teaching iOS development. Some of these courses have been made available through Apple’s iTunes U program, free of charge. The best known and longest running course is CS193p at Standford University. At Madison Area Technical College, Brad Larson teaches Advanced iPhone Development, which also covers some more advanced topics. Another course on iPhone development is given by Jan Borchers at Aachen University.


Blogs

It shouldn’t surprise you when I tell you that there are hundreds if not thousands of blogs dedicated to iOS development. I have listed a few of my favorite blogs below, but there are plenty more for you to discover.

  • Jeff LaMarche‘s blog is one of the longer running blogs about Cocoa development that I know of. As I mentioned earlier, Jeff has written several books on iOS development and really knows his stuff.
  • Over the past few years, Ray Wenderlich has created an amazing team of developers who contribute to his website. As a result, Ray puts out high quality content several times a week. Together with his team of writers, Ray has also written two books on iOS development.
  • Cocoa with Love is a blog maintained by Matt Gallagher. I wouldn’t call Matt’s posts light reading by any means. Most of the articles that he writes are in-depth, packed with information, and very well written.
  • Cocoa Is My Girlfriend is another source of great, in-depth articles. The writers of Cocoa Is My Girlfriend are Marcus Zarra, Matt Long, Fraser Hess, and Saul Mora (creator of Magical Record).
  • Even though Mike Ash‘s blog isn’t the prettiest blog on the web, it is packed with great content. His Friday Q&A articles in particular are a joy to read.
  • The blog of Ole Begemann provides fresh and well written articles about iOS development and related topics.
  • NSHipster is a fairly young blog maintained by Mattt Thompson, mobile lead at Heroku and one of the creators of AFNetworking. The tagline of NSHipster reads “… a journal of the overlooked bits in Objective-C and Cocoa …”, which summarizes the content on NSHipster very well.

Newsletter

About bit over a year ago, Dave Verwer started iOS Dev Weekly, a weekly newsletter about iOS development. If you want to receive a carefully curated list of links related to iOS development, then I can highly recommend Dave’s newsletter. Did I mention that it’s free?


Who To Follow?

Twitter is an excellent medium to stay up to date about iOS and OS X development. I have compiled a short list of people in the twittersphere that you might want to follow.

Finally, you can follow me on Twitter as well. Don’t hesitate to ping me if you have a question or if you just want to say hi.


Conclusion

I hope that you have enjoyed this series on iOS development as much as I have enjoyed putting it together. If you have any questions, don’t hesitate to leave a comment or ping me on Twitter. Suggestions for future topics can also be left in the comments.

Wanted: Awesome Guest Writers

$
0
0

Mobiletuts+ is currently looking to hire guest writers to cover PhoneGap, mobile web development (e.g. JavaScript, HTML, CSS, etc.), iOS SDK development, Android SDK Development, Mobile UI/UX, and more! If you’re a talented mobile developer with tips or techniques to share, we want to hear from you!

What We’re Looking For

  • Rock solid knowledge: Mobiletuts+ strives to be a highly respected source of information. Our authors must have excellent knowledge of their topic and be willing to perform thorough research when necessary.
  • Excellent writing skills: You must be comfortable with the English language. We can proof your content, but we can’t rewrite everything for you. To put it simply, if you struggle when deciding whether to write its or it’s, this might not be the gig for you.

What’s the Pay?

  • $200 – $250 USD per full-length tutorial (depending on length/quality).
  • $50 – $150 USD per quick-tip (depending on length/quality).
  • Negotiable rates for well-known authors. Get in touch!

The exact rate is dependent on your industry experience, communication skill, and tutorial idea.


Excellent! Where Do I Sign Up?

We’ll need the following information from you:

  • Name.
  • A few sentences about your background and why you’re a good fit.
  • A single link to an article that you’ve written, helped with, or like.
  • Two ideas for tutorials you’d like to write for us.
  • Optional: E-mails with a tutorial attached will get more attention from us since this means you’re serious about the gig.


Please e-mail the above information to:

contact e-mail

We get a fair number of single line e-mails. Don’t be that person. E-mails without the required information will be discarded.

We hope to hear from you soon!

Create a Cut the Rope Inspired Game – Interface Creation

$
0
0

In this tutorial series, you’ll learn how to create a Cut the Rope inspired game. The objective of the game is to cut the rope holding the bone and feed the mascot. Read on!


Step 1: Application Overview

Using pre made graphics we will code an entertaining game using Lua and the Corona SDK API’s.

The player will be able to cut the rope holding the bone using a swipe gesture to feed the dog. You can modify the parameters in the code to customize the game.

Step 2: Target Device

The first thing we have to do is select the platform we want to run our app within, this way we’ll be able to choose the size for the images we will use.

The iOS platform has these characteristics:

  • iPad 1/2: 1024x768px, 132 ppi
  • iPad 3: 2048×1536, 264 ppi
  • iPhone/iPod Touch: 320x480px, 163 ppi
  • iPhone 4/iPod Touch: 960x640px, 326 ppi
  • iPhone 5/iPod Touch: 1136×640, 326 ppi

Because Android is an open platform, there are many different devices and resolutions. A few of the more common screen characteristics are:

  • Asus Nexus 7 Tablet: 800x1280px, 216 ppi
  • Motorola Droid X: 854x480px, 228 ppi
  • Samsung Galaxy SIII: 720x1280px, 306 ppi

In this tutorial we’ll be focusing on the iOS platform with the graphic design, specifically developing for distribution to an iPhone/iPod touch, but the code presented here should apply to Android development with the Corona SDK as well.


Step 3: Interface

A simple and friendly interface will be used, this involves multiple shapes, buttons, bitmaps and more.

The interface graphic resources necessary for this tutorial can be found in the attached download. Some of the graphics are from openclipart.org.


Step 4: Export Graphics

Depending on the device you have selected, you may need to export the graphics in the recommended PPI, you can do that in your favorite image editor.

I used the Adjust Size… function in the Preview app on Mac OS X.

Remember to give the images a descriptive name and save them in your project folder.


Step 5: App Configuration

An external file will be used to make the application go fullscreen across devices, the config.lua file. This file shows the original screen size and the method used to scale that content in case the app is run in a different screen resolution.

application =
{
    content =
    {
        width = 320,
        height = 480,
        scale = "letterbox"
    },
}

Step 6: Main.lua

Let’s write the application!

Open your prefered Lua editor (any Text Editor will work, but you won’t have syntax highlighting) and prepare to write your awesome app. Remember to save the file as main.lua in your project folder.


Step 7: Code Structure

We’ll structure our code as if it were a Class. If you know ActionScript or Java, you should find the structure familiar.

Necesary Classes
Variables and Constants
Declare Functions
    contructor (Main function)
    class methods (other functions)
call Main function

Step 8: Hide Status Bar

display.setStatusBar(display.HiddenStatusBar)

This code hides the status bar. The status bar is the bar on top of the device screen that shows the time, signal, and other indicators.


Step 9: Import Physics

We’ll use the Physics library to handle collisions. Use this code to import it:

local physics = require('physics')
physics.start()

Step 10: Background

A simple graphic is used as the background for the application interface, the next line of code stores it.

-- Graphics
-- [Background]
local bg = display.newImage('bg.png')

Step 11: Title View

This is the Title View, it will be the first interactive screen to appear in our game, these variables store its components.

-- [Title View]
local titleBg
local playBtn
local creditsBtn
local titleView

Step 12: Credits View

This view will show the credits and copyright of the game, this variable will be used to store it.

-- [CreditsView]
local creditsView

Step 13: Instructions

This image will be placed on top of our previous background. This will be our instructions message.

-- Instructions
local ins

Step 14: Dog

The dog graphic. This will be placed in the stage at the bottom-center position.

-- Dog
local dog

Step 15: Stars Shadow

The stars shadow images are used to represent how many stars are left to grab.

-- Shadow Stars
local s1
local s2
local s3

Step 16: Hanger

The hanger that holds the rope.

-- Hang
local hang

Step 17: Alert

This is the alert that will be displayed when the game is over. It will complete the level and end the game.


Step 18: Sounds

We’ll use Sound Effects to enhance the feeling of the game, you can find the sound used in this example in Soungle.com using the keyword bite.


Step 19: Variables

This are the variables we’ll use, read the comments in the code to know more about them.

-- Variables
local lastY -- used to animate the credits view
local ropeParts = display.newGroup()
local initX -- initial X position of the line drawn by the finger
local initY
local lines = display.newGroup()
local line
local collected = 0 -- current collected stars
-- Levels, dynamically created using a multidimensional table and a for loop
-- the 0's are empty spaces
-- 1 is the hanger
-- and the 2's are the stars
local l1 = {{0, 0, 0, 0, 1, 0, 0, 0, 0, 0},
			{0, 0, 0, 0, 0, 0, 0, 0, 0, 0},
			{0, 0, 0, 0, 0, 0, 0, 0, 0, 0},
			{0, 0, 0, 0, 0, 0, 0, 0, 0, 0},
			{0, 0, 0, 0, 0, 0, 0, 0, 0, 0},
			{0, 0, 0, 0, 2, 0, 0, 0, 0, 0},
			{0, 0, 0, 0, 0, 0, 0, 0, 0, 0},
			{0, 0, 0, 0, 2, 0, 0, 0, 0, 0},
			{0, 0, 0, 0, 0, 0, 0, 0, 0, 0},
			{0, 0, 0, 0, 2, 0, 0, 0, 0, 0},}

Step 19: Declare Functions

Declare all functions as local at the start.

-- Functions
local Main = {}
local startButtonListeners = {}
local showCredits = {}
local hideCredits = {}
local showGameView = {}
local loadLevel = {}
local gameListeners = {}
local drawLine = {}
local ropeCollision = {}
local starDogCollision = {}
local alert = {}

Step 20: Constructor

Next we’ll create the function that will initialize all the game logic:

function Main()
	-- code...
end

Step 21: Add Title View

Now we place the TitleView in the stage and call a function that will add the tap listeners to the buttons.

]

function Main()
	titleBg = display.newImage('titleBg.png', 40, 57)
	playBtn = display.newImage('playBtn.png', 125, 225)
	creditsBtn = display.newImage('creditsBtn.png', 115, 286)
	titleView = display.newGroup(titleBg, playBtn, creditsBtn)
	startButtonListeners('add')
end

Next Time…

In this part of the series you’ve learned the interface and the basic setup of the game. In the next and final part of the series, we’ll handle the level creation, collision detection, and the final steps to take prior to release like app testing, creating a start screen, adding an icon and, finally, building the app. Stay tuned for the final part!


Android UI Workshop: Build an Interactive Quiz App

$
0
0

Get a hand’s on, crash course in building an effective and attractive UI for your Android app, and design an interactive quiz app along the way!


Step 0: Getting Started

For the Android app developer, user interface (UI) is key. Your app may boast cutting-edge functionality, but if it’s wrapped in an unappealing UI it’s unlikely that users will stick around long enough to discover just how great your app really is.

This tutorial provides a hand’s on, crash course in building an effective UI, using the example of a simple quiz app. The app poses a question and presents the user with four possible answers, implemented as ImageButtons. ‘Correct’ and ‘Incorrect’ messages are displayed via a popup, and the user can see at a glance which version of the app they’re running.

As you build the app, we’ll cover the following:

  • RelativeLayout
  • Designing for multiple screens
  • Adding and leveraging image resources
  • String resources
  • App accessibility
  • Creating stylish text
  • Custom XML Styles
  • Making buttons ‘tappable’
  • Toast notifications

Start by creating an Android project called ‘AndroidGame’ and a new Activity (we’ll stick with the default ‘MainActivity’ filename.) Delete the ‘Hello World’ TextView that Eclipse generates automatically, along with any default parent view that has been added.

EDITOR’S NOTE: This tutorial is based on the Vectortuts+ artwork created in the tutorial “How to Create a Pub Chalkboard UI in Adobe Illustrator” by Sharon Milne.


Step 1: Define a RelativeLayout

A RelativeLayout is a flexible layout that allows you to organize UI elements in relation to one another, making it particularly useful for developers who need fine-grained control over the exact positioning of their UI components.

Create a basic RelativeLayout view group to hold all your UI elements:

<RelativeLayout xmlns:android="http://schemas.android.com/apk/res/android"
    xmlns:tools="http://schemas.android.com/tools"
    android:layout_width="match_parent"
    android:layout_height="match_parent" >
  </RelativeLayout>

Step 2: Designing for Multiple Screens: Background Image

As an open source operating system, Android crops up on all sorts of devices, and is the OS of choice for many different manufacturers – it’s no longer even restricted to smartphones! This presents both exciting opportunities and headache-inducing challenges for Android developers. When developing your UI, keep in mind that your app needs to display correctly across as many devices as possible. While designing for multiple screens is too broad a topic for this tutorial, as a starting point you should provide alternate versions of every image used in your app. These alternate images should be optimized for screens with different pixel densities. When your app launches, Android will automatically load the correct image based on the device’s display characteristics.

Open the ‘res’ folder and you will see four drawable folders that Eclipse generates by default:

  • drawable-ldpi
  • drawable-mdpi
  • drawable-hdpi
  • drawable-xhdpi

These folders target screens with different pixel densities, following a 3:4:6:8 scaling ratio (for example, if drawable-ldpi contains an image of 36 x 36 pixels, then drawable-mdpi should contain an image of 48 x 48 pixels, and so on).

Create four versions of your background image based on this ratio, and drag each version into the appropriate folder.

android UI multiple screens

Add the background image to RelativeLayout using the ‘android:background’ attribute, referring to the image resource as you would any drawable object:

<RelativeLayout xmlns:android="http://schemas.android.com/apk/res/android"
    xmlns:tools="http://schemas.android.com/tools"
    android:layout_width="match_parent"
    android:layout_height="match_parent"
    android:background="@drawable/background" >
</RelativeLayout>

Boot up the Android Emulator and take a look at your work so far.

android UI background

Step 3: Creating ImageButtons

The first step of creating an ImageButton is to add the required images to your project. Again, because you want your device to display correctly across a range of screens, you should provide four versions of each image. We’ll start with the ‘2003’ button, so drag and drop the four versions of your ‘2003’ image into the corresponding folders.

android UI ImageButtons

ImageButtons are created using the ‘ImageButton’ tag followed by the usual height/width attributes, and some RelativeLayout-specific alignment attributes.

Create your first ImageButton and tweak the alignment until you’re happy with how it’s positioned. In this example, I’m using the following:

<ImageButton
        android:id="@+id/imageButton1"
        android:layout_width="wrap_content"
        android:layout_height="wrap_content"
        android:layout_centerHorizontal="true"
        android:layout_centerVertical="true">

But your ImageButton is missing the most important part: an image! Refer to this image as a drawable resource, but this time using the ‘android:src’ property:

<ImageButton
        android:id="@+id/imageButton1"
        android:layout_width="wrap_content"
        android:layout_height="wrap_content"
        android:layout_centerHorizontal="true"
        android:layout_centerVertical="true"
        android:src="@drawable/button2003" />

Check how this appears in the emulator.

Repeat this process for the other four buttons. This is a good opportunity to experiment with the various RelativeLayout attributes (the Android docs are a great source of additional information on the different layouts.)

As you fine-tune your layout, you may find it useful to keep the emulator open, switching between it, the graphical layout editor and your XML.

Here’s the code I’m using:

<RelativeLayout xmlns:android="http://schemas.android.com/apk/res/android"
	xmlns:tools="http://schemas.android.com/tools"
	android:layout_width="match_parent"
	android:layout_height="match_parent"
	android:background="@drawable/background" >
	<ImageButton
    	android:id="@+id/imageButton1"
    	android:layout_width="wrap_content"
    	android:layout_height="wrap_content"
    	android:layout_centerHorizontal="true"
    	android:layout_centerVertical="true"
    	android:src="@drawable/button2003" />
	<ImageButton
    	android:id="@+id/imageButton2"
    	android:layout_width="wrap_content"
    	android:layout_height="wrap_content"
    	android:layout_below="@+id/imageButton1"
    	android:layout_centerHorizontal="true"
    	android:src="@drawable/button2004" />
	<ImageButton
    	android:id="@+id/imageButton3"
    	android:layout_width="wrap_content"
    	android:layout_height="wrap_content"
    	android:layout_below="@+id/imageButton2"
    	android:layout_centerHorizontal="true"
    	android:src="@drawable/button2005" />
	<ImageButton
    	android:id="@+id/imageButton4"
    	android:layout_width="wrap_content"
    	android:layout_height="wrap_content"
    	android:layout_below="@+id/imageButton3"
    	android:layout_centerHorizontal="true"
    	android:src="@drawable/button2006" />
</RelativeLayout>
android UI ImageButtons 3

The buttons may be displaying correctly in the emulator, but Eclipse is throwing multiple “Missing contentDescription attribute on image” errors. What’s this all about?


Step 4: Making Your App Accessible

The ContentDescrition attribute makes applications more accessible to users who cannot easily consume graphical content, by providing an alternate text description. This description can be used by screen readers and similar accessibility tools.

The first step is to define some new string resources. Strings are defined in the res/layout/strings.xml file, so open it and switch to the strings.xml tab if necessary.

String resources are created with the following syntax:

<string name="name">Text to display</string>

Define a string for the ContentDescription of each ImageButton:

<string name="button2003">Answer 2003</string>
<string name="button2004">Answer 2004</string>
<string name="button2005">Answer 2005</string>
<string name="button2006">Answer 2006</string>

Return to your activity_main.xml file and add a ContentDescription attribute to each ImageButton, e.g:

 android:contentDescription="@string/button2003"/> 

Step 5: Creating Stylish Text

In reality, it’s unlikely you’ll cease developing an app at Version 1.0, as you cook up new content and release fixes for any pesky bugs that users discover. Therefore, it’s handy if people can tell at a glance what version of your app they’re running. The easiest way to do this is with a TextView.

Open the strings.xml file and define the current version number as a string:

 <string name="Version">Version 1.0</string> 

You can quickly create a TextView that calls “@string/Version” but Android’s default text style isn’t particularly appealing. Thankfully, TextView has a range of attributes that can give boring old text some pizazz. You can read more about all the available attributes at the Android docs, but in this tutorial we’ll use the following:

  • android:textColor – sets the colour of your text. It can either be defined as a string resource, or as a colour value (for more information on values, see the Android Docs: Colour section.)
  • android:textSize – sets the text size, which can be given either as px (pixels) sp (scaled pixels) dp (density-independent pixels) in (inches) or mm (millimeters)
  • android:textStyle – either italic or bold.

Create your TextView, add some style attributes, and then reference the “Version” string:

<TextView
    android:id="@+id/textView1"
    android:layout_width="wrap_content"
    android:layout_height="wrap_content"
    android:layout_alignParentBottom="true"
    android:layout_alignParentLeft="true"
    android:layout_marginLeft="26dp"
    android:paddingBottom="5dp"
    android:text="@string/Version"
    android:textColor="#f7f9f6"
    android:textSize="13dp"
    android:textStyle="italic" />

This works, but if you’re planning to re-use this set of attributes elsewhere then you should define it as a custom “Style.” A style is a time-saving collection of properties (in this case font colour, font size, and the italic style) that specifies the appearance of a view, or even an entire application.

You’ll often hear ‘styles’ and ‘themes’ mentioned in a similar context. Essentially, the only difference between a style and a theme is their scope: ‘styles’ that are applied to activities become ‘themes.’

To define a custom style:

  1. Open the res/values/styles.xml file, ensure it has opening and closing ‘resource’ tags, and give your style a unique name:
  2.  <resources>
         <style name="VersionFont">
         </style>
    </resources>
    
  3. Define all the attributes that belong to this style:
     <item name="android:textSize">13dp</item> 

For this tutorial, we’ll define the following custom style:

<resources>
  <style name="VersionFont">
      <item name="android:textColor">#f7f9f6</item>
      <item name="android:textSize">13dp</item>
      <item name="android:textStyle">italic</item>
  </style>
</resources>

Applying this custom style to your TextView is easy, simply replace all the attributes defined by the VersionFont style, with: style="@style/VersionFont".

e.g:

<TextView
   android:id="@+id/textView1"
   android:layout_width="wrap_content"
   android:layout_height="wrap_content"
   android:layout_alignParentBottom="true"
   android:layout_alignParentLeft="true"
   android:layout_marginLeft="26dp"
   android:paddingBottom="5dp"
   android:text="@string/Version"
   style="@style/VersionFont" />
This custom style isn’t defined in the Android namespace, which is why we don’t need to include an “android:” reference.

Both of these methods are valid ways of styling text, but keep in mind that a custom style can speed up the coding process if you’re going to re-use the same collection of attributes across your application.


Step 6: Making Your App Interactive

Your UI may be finished, but there’s one final step: letting the user know whether they’ve selected the correct answer. The easiest way to make buttons ‘tappable’ is by implementing the android:onClick property for each button.

We’ll start by adding it to the first button:

<ImageButton
       android:id="@+id/imageButton1"
       android:layout_width="wrap_content"
       android:layout_height="wrap_content"
       android:layout_centerHorizontal="true"
       android:layout_centerVertical="true"
       android:src="@drawable/button2003"
       android:contentDescription="@string/button2003"
       android:onClick="onClick2003"   />

The name of the onClick method must correspond to a public method in the MainActivity.Java file, so add the following to your Activity:

   public void onClick2003 (View view)

Now specify the behaviour that “onClick2003″ triggers. A straightforward way of telling the user they’ve got the question wrong, is with a toast notification:

public void onClick2003 (View view)
{
    Toast.makeText(this, "Wrong! Try again", Toast.LENGTH_SHORT).show();
}

Run this updated code in the emulator and get clicking to check your toast is firing properly.

androidUI Toast

Success!

Add onClick to the other three buttons and create corresponding public methods in your Activity, with appropriate messages attached. Once you’ve finished, boot up the emulator and have a click around to check everything’s working okay.

android UI Toast 2

Conclusion

Over the course of this tutorial you’ve learned the essentials of Android UI design and created a simple, but effective UI that has some working functionality to boot! Try applying some of these techniques to your own Android projects, to ensure your UI doesn’t let your app down.

Social Framework Fundamentals

$
0
0

Learn how to tap into the power of the Social Framework with this post, taken from Chapter 11 of the Mobiletuts+ book Decoding the iOS 6 SDK!


The introduction of the Twitter framework in iOS 5 was the first step towards the integration of iOS with popular social networks. In iOS 6, Apple introduced the Social framework. Not only does the Social framework effectively replace the Twitter framework, it also extends its functionality by adding support for both Facebook and Sina Weibo.

Even though the Twitter framework has been deprecated as of iOS 6, it is fortunately a trivial task to migrate existing code from the Twitter framework to the Social framework. The API’s of the Social framework do not make mention of specific social networks. The network component has been abstracted away, which makes adding support for new social networks in the future a painless task. Bottom line: the good news for developers is that getting up and running with the Social framework is easy, especially if you are already familiar with the Twitter framework.

In this chapter, I will give you an overview of the Social framework and what it has to offer and I will show you what your options are when you want to add a social component to your applications. While this chapter will only cover the basics of the Social framework, the next chapter will talk about a more thorough integration of your application with the Social framework. As an added bonus, I will also discuss the UIActivityViewController class. This is another addition to UIKit that makes sharing content a breeze!


Theoretical Overview

Prior to iOS 6, sharing content wasn’t all that easy. If you’ve ever integrated Facebook with an iOS application, then you almost certainly have run into a number of hurdles along the way. In iOS 6, however, a number of significant improvements have been made. As of iOS 6, integration with social networks is now baked into the operating system, which makes social sharing much easier for SDK developers.

At the time of writing, the Social framework supports integration with Facebook, Sina Weibo, and Twitter. The support for Twitter is the obvious reason for the deprecation of the Twitter framework. Sina Weibo might be the odd duck in the row for some of you. Sina Weibo is an immensely popular microblogging platform in China, one of the most populous nations on earth, so it isn’t that odd to see its integration in iOS.

Sharing Content

With the above in mind, what options do you have when one of your applications needs to integrate with Facebook, Twitter, or Sina Weibo? The Social framework offers two options, using (1) the SLComposeViewController class or (2) the SLRequest class. If you have worked with the Twitter framework in iOS 5 then those class names will most certainly ring a bell.

In this chapter, I will zoom in on the SLComposeViewController class. It is an easy-to-use and elegant solution for allowing your users to share content with Twitter, Facebook, and Sina Weibo. Let’s take a look at this newcomer.

SLComposeViewController

The easiest way to share content with one of the supported social networks is by making use of the SLComposeViewController class. Its prefix, SL, indicates that it is part of the Social framework. The SLComposeViewController class is the equivalent of the TWTweetComposeViewController class of the Twitter framework. The most important difference is that SLComposeViewController is not tied to any one social network in particular.

Creating an instance of SLComposeViewController is as easy as calling composeViewControllerForServiceType: on the class and passing the service type, that is, the social network you are targeting. At the time of writing, there are three options, SLServiceTypeTwitter, SLServiceTypeFacebook, and SLServiceTypeSinaWeibo.

You can configure the SLComposeViewController instance by setting the initial text or adding an image or link. Configuring the SLComposeViewController instance is an optional step since the user will be able to modify the content of the message before sending it to the target service.

Before presenting the compose view controller to the user, it is good practice to set its completion handler (SLComposeViewControllerCompletionHandler). The latter is a block that is executed when the request to the service is finished, successfully or unsuccessfully. The block takes one parameter, the result of the request. This can be useful if you want to inform the user whether the request was successful or not.

Presenting the SLComposeViewController to the user is done by sending it a message of presentViewController:animated: just like you do with any other (modal) view controller. As I mentioned earlier, the user can still edit the message, geotag the message, or add an image or link. The options as well as the user interface of the SLComposeViewController instance depend on the service that is being targeted. If the user sends a message to Facebook, for example, the modal view of the SLComposeViewController instance is adorned with the familiar purplish color scheme.

The SLComposeViewController class has one other class method worth mentioning, isAvailableForServiceType:. The TWTweetComposeViewController has a similar class method name, canSendTweet. This method allows your application to ask the operating system whether the service you want to target is available. As with composeViewControllerForServiceType, the class method will accept a service type that indicates which service is being targeted. Even though isAvailableForServiceType: returns a YES or NO, the operating system performs a number of checks for you behind the scenes. It will verify whether the social network is reachable and, more importantly, it will check if the user has installed a valid account for the target service. Let’s take a closer look at user accounts and how they are managed by the operating system.

Social Network Accounts

The Social framework adopts a concept known as single-sign-on (SSO), and it is important to understand the implications of this design decision. Put simply, it is no longer necessary for every third party application to authenticate itself with the target service, the operating system now takes care of this for you and exposes a number of endpoints to developers through the Social framework. As you may have guessed, this means that a central location for storing the user’s accounts is necessary. That central location is of course the Settings application of iOS, and allowing users to manage their social network details from within Settings makes sharing content from within apps much more efficient.

While the iOS 6 Settings application only provides the option to manage one Facebook account, users are able to control multiple Twitter accounts. By storing the user’s accounts in one central location, third party application developers no longer need to manage this sensitive data themselves.

Social Framework Fundamentals - Figure 1
Figure 1
Social Framework Fundamentals - Figure 2
Figure 2

UIActivityViewController

UIActivityViewController is a wonderful addition to UIKit. It makes sharing content a breeze. As the class name implies, UIActivityViewController is a subclass of UIViewController. UIActivityViewController makes sharing content trivial by giving the user an array of options to choose from. The user can share content via email, Twitter, or just paste a URL to the clipboard. There are quite a few options to choose from, and the endpoints are not restricted to the three social networks supported by the Social framework. As the UIActivityViewController name implies, the class is part of UIKit, not the Social framework. In other words, there is no need to link your project against the Social framework if you only want to use the UIActivityViewController class.

Even though UIActivityViewController is not part of the Social framework, I have chosen to include it in this chapter as it shares some ground with the Social framework. In fact, you will notice in a few moments that UIActivityViewController shares quite a bit of functionality with SLComposeViewController. To better understand UIActivityViewController , you could compare it with a post office. A post office will take your message and make sure it is delivered to the address (the service or endpoint) specified by you.

Some of you may notice that it bears some resemblance with the well known open source library ShareKit. UIActivityViewController is much more powerful, because it integrates seamlessly with the operating system and its services. However, as with ShareKit, developers can add custom endpoints to the array of endpoints that UIActivityViewController integrates with and displays to the user.

Using UIActivityViewController is just as straightforward as using SLComposeViewController. The designated initializer of UIActivityViewController takes two parameters, (1) activity items and (2) application activities. Both arguments need to be instances of NSArray. The first parameter is an array of data objects you wish to share. The array can include one or more text snippets or just a single image. The type of content you can share not only depends on what type of data your application can provide, but also what type of data the endpoint accepts. The UIActivityViewController class will make sure that the data objects are processed correctly depending on the service or endpoint the user chooses.

The second parameter, application activities, is an array of services or endpoints that UIActivityViewController will present to the user. Services include email, Twitter, Facebook, printing, or copying something to the clipboard. As I mentioned earlier, developers have the option to add services as well. If application activities is set to nil, the operating system will use the default set of application activities.

After presenting the UIActivityViewController instance to the user, UIActivityViewController will take care of the rest. For example, if you have added Twitter as an application activity, UIActivityViewController will first check whether Twitter is available and if the user has installed a Twitter account on their device before presenting it as an option to the end user. UIActivityViewController saves you a lot of headaches, and it just takes of few lines of code to integrate with an application.


Tutorial Project

Project Setup

To illustrate how easy it is to use UIActivityViewController and SLComposeViewController, we are going to build a simple shoebox application to share photos. The application allows users to snap an image, add a caption, and share it with friends and family. The sample application will show you how easy it is to dynamically share content in iOS 6.

Start by creating a new project in Xcode. Select the Single View Application template from the list of templates (figure 3). Name your application Sharetastic, enter a company name and identifier, set iPhone for the device family, and check Use Automatic Reference Counting. Uncheck the remaining checkboxes for this project (figure 4). Specify where you want to save the project and click the Create button.

Social Framework Fundamentals - Figure 3
Figure 3
Social Framework Fundamentals - Figure 4
Figure 4

Adding the Social Framework

Since our application will take advantage of the Social framework, we need to add it to our project. Select the project in the Project Navigator and select the target on the right (figure 5). Select the Build Phases tab at the top, open the Link Binary With Libraries drawer, click the plus button, and choose Social.framework from the list (figure 5). Our project is now successfully linked against the Social framework.

Social Framework Fundamentals - Figure 5
Figure 5

Don’t forget to add an import statement at the top of our view controller’s header file in order to import the headers of the Social framework into your project.

#import <UIKit/UIKit.h>
#import <Social/Social.h>

Outlets and Actions

Before creating our application’s user interface, we need to add the necessary outlets and actions to the header file of our view controller. A total of four outlets need to be added, a UITextField for entering the caption of the image, a UIImageView displaying the snapped image, and two UIButton instances. Tapping the first button will send the image and caption to the user’s Facebook account. Tapping the second button brings up an instance of UIActivityViewController, presenting the user with a number of options for sharing the image and caption. As you might have guessed, each button is tied to an IBAction. The code snippet below shows how the header file of our view controller should look:

#import <UIKit/UIKit.h>
#import <Social/Social.h>
@interface RPViewController : UIViewController
@property (weak, nonatomic) IBOutlet UITextField *captionTextField;
@property (weak, nonatomic) IBOutlet UIImageView *imageView;
@property (weak, nonatomic) IBOutlet UIButton *facebookButton;
@property (weak, nonatomic) IBOutlet UIButton *shareButton;
- (IBAction)facebook:(id)sender;
- (IBAction)share:(id)sender;
@end

User Interface

It is time to head over to our view controller’s XIB file. To keep things simple, we will not be using the new iOS 6 Autolayout features in this chapter. With the view controller’s XIB file selected, open the File Inspector on the right and uncheck the Use Autolayout checkbox.

With the view controller’s XIB file selected, start by dragging a text field in the view controller’s view and position it at the very top of the view (figure 6). Configure the text field by opening the Attributes Inspector and change its placeholder text to Enter Caption. With the text field still selected, open the Connections Inspector and connect the text field’s delegate outlet to the File’s Owner object on the left. This means that the view controller will act as the text field’s delegate. The reason for doing so will become clear in just a few minutes. Make sure you have also connected the captionTextField outlet to the text field object on screen.

Social Framework Fundamentals - Figure 6
Figure 6

Drag an instance of UIImageView from the library to the view controller’s view and position it below the text field (figure 6). Modify its dimensions to 280 points by 280 points. Open the Attributes Inspector once again and change the image view’s mode (content mode) property to Aspect Fit and make sure to check User Interaction Enabled. The latter is important as we will add a tap gesture recognizer to the image view shortly. If we do not enable user interaction for the image view, the tap gesture recognizer will not work. Don’t forget to connect the view controller’s outlet with our image view. The easiest way to do this is by pressing the Ctrl key, dragging from the image view to the File’s Owner object and selecting the appropriate outlet.

To finalize our application’s user interface, add two UIButton instances to our view controller’s view and position them below the image view (figure 6). Give the top button a title of Facebook and the bottom button a title of Share. Connect the remaining outlets as I described above. In addition, connect the two actions of our view controller by pressing the Ctrl key, dragging from the File’s Owner object to each button, and then selecting the corresponding action. The user interface is ready. Now it’s time to start writing some code to make it all work!

Delegation

There is one more thing we need to add to our view controller’s header file. Since we are going to make use of UIImagePickerController to snap images, our view controller needs to conform to both the UINavigationControllerDelegate and UIImagePickerControllerDelegate protocols. In addition, as I mentioned a few moments ago, our view controller will also act as the delegate of the caption text field. This means that the view controller needs to conform to the UITextFieldDelegate protocol as well. Take a look at the updated header file of our view controller for clarification.

#import <UIKit/UIKit.h>
#import <Social/Social.h>
@interface RPViewController : UIViewController <UINavigationControllerDelegate, UIImagePickerControllerDelegate, UITextFieldDelegate>
@property (weak, nonatomic) IBOutlet UITextField *captionTextField;
@property (weak, nonatomic) IBOutlet UIImageView *imageView;
@property (weak, nonatomic) IBOutlet UIButton *facebookButton;
@property (weak, nonatomic) IBOutlet UIButton *shareButton;
- (IBAction)facebook:(id)sender;
- (IBAction)share:(id)sender;
@end

First Things First

In our view controller’s implementation file we start by extending the class definition and adding a private property. It is good practice to not expose every property of a class by declaring them in the the header file, and one way this is done is by extending the class definition in the implementation file. After the first import statement and before the @implementation directive, add the below code snippet to declare a new, private property. The property will hold a reference to the image the user snaps with the device’s camera.

@interface RPViewController ()
@property (strong, nonatomic) UIImage *image;
@end

A nice feature of Xcode 4.4+ is that you no longer need to synthesize property accessors. This is done for you behind the scenes and it follows Apple’s naming conventions. In our example, an instance variable will be created with a name of _image and the accessors for our image property are automatically synthesized for us.

View Lifecycle

I always like to start by implementing the view life cycle of a view controller. In addition, I also prefer to keep the viewDidLoad method short by adding some helper methods. One method I almost always create is setupView, which takes care of setting up and configuring the view controller’s view. Let’s take a look at the viewDidLoad and setupView methods to get an idea of what I mean.

- (void)viewDidLoad {
    [super viewDidLoad];
    // Setup View
    [self setupView];
}
- (void)setupView {
    // Add Gesture Recognizer
    UITapGestureRecognizer *tgr = [[UITapGestureRecognizer alloc] initWithTarget:self action:@selector(takeImage:)];
    [self.imageView addGestureRecognizer:tgr];
    // Update View
    [self updateView];
}

As you can see, the setupView method isn’t complex. We add a tap gesture recognizer to the image view so the user can snap an image by tapping the image view in our user interface. We first initialize a tap gesture recognizer and subsequently add it to our image view. The tap gesture recognizer sends the message snapImage: to our view controller when the user taps the image view. We will take a look at the snapImage: method in just a second.

At the end of the setupView method, we invoke the updateView method. Again, this is a helper method I use very often as it allows me to group the logic associated with updating the view. Let’s take a quick look at the updateView method.

- (void)updateView {
    BOOL sharingEnabled = self.image ? YES : NO;
    float sharingAlpha = sharingEnabled ? 1.0 : 0.5;
    self.facebookButton.enabled = sharingEnabled;
    self.facebookButton.alpha = sharingAlpha;
    self.shareButton.enabled = sharingEnabled;
    self.shareButton.alpha = sharingAlpha;
}

As the method name implies, the method simply updates the view and its subviews. We begin with verifying whether an image is available by checking if our image property is set. If we have an image to work with, we enable the Facebook and share buttons, and set their alpha values to 1.0. If an image is not available, that is, the user has not yet taken one, we disable both buttons and make them slightly transparent to indicate to the user that the buttons are disabled.

Taking an Image

By taking advantage of UIImagePickerController , snapping images is a simple and straightforward process. Let’s start by examining the snapImage: method that is invoked by the tap gesture recognizer when the user taps the image view. First, an instance of UIImagePickerController is initialized and its delegate is set to self, that is, our view controller. Next, we ask the operating system whether a camera is available by calling isSourceTypeAvailable on the UIImagePickerController class and passing it UIImagePickerControllerSourceTypeCamera as the argument. Based on the return value, we set the source type of our UIImagePickerController instance. As a failsafe, the source type is set to UIImagePickerControllerSourceTypePhotoLibrary if no camera is available for whatever reason. This means that the user can select an image from the device’s photo library. Finally, the image picker controller is presented to the user.

- (void)takeImage:(UITapGestureRecognizer *)tgr {
    // Initialize Image Picker Controller
    UIImagePickerController *ip = [[UIImagePickerController alloc] init];
    // Set Delegate
    [ip setDelegate:self];
    if ([UIImagePickerController isSourceTypeAvailable:UIImagePickerControllerSourceTypeCamera]) {
        // Set Source Type to Camera
        [ip setSourceType:UIImagePickerControllerSourceTypeCamera];
    } else {
        // Set Source Type to Photo Library
        [ip setSourceType:UIImagePickerControllerSourceTypePhotoLibrary];
    }
    // Present View Controller
    [self presentViewController:ip animated:YES completion:nil];
}

Can you guess what the next step is? We need to implement the methods of the UIImagePickerControllerDelegate protocol. The protocol has two methods, imagePickerController:didFinishPickingMediaWithInfo: and imagePickerControllerDidCancel:. Let me walk you through each method.

In imagePickerController:didFinishPickingMediaWithInfo:, we start by storing a reference to the original, unedited image. In the next few lines of code, we assign the original image to our image property and update the view. Remember that this will enable the Facebook and share buttons. Finally, we dismiss the image picker controller.

- (void)imagePickerController:(UIImagePickerController *)picker didFinishPickingMediaWithInfo:(NSDictionary *)info {
    UIImage *originalImage = [info objectForKey:UIImagePickerControllerOriginalImage];
    if (originalImage) {
        self.image = originalImage;
        // Update View
        [self updateView];
    }
    // Dismiss Image Picker Controller
    [self dismissViewControllerAnimated:YES completion:nil];
}

The second delegate method contains only one line of code. If the user taps the cancel button, the image picker controller is dismissed without further ado.

- (void)imagePickerControllerDidCancel:(UIImagePickerController *)picker {
    // Dismiss Image Picker Controller
    [self dismissViewControllerAnimated:YES completion:nil];
}

Details Matter

Before implementing the facebook: and share: actions, I want to take a slight detour. Why haven’t we assigned the newly snapped image to the image view’s image property? Assigning the newly snapped image to the image property of our image view is indeed a perfectly viable option, but I have taken a different approach. Since the introduction of the @synthesize directive, people often forget how useful setters and getters can be. Let me explain what I mean with an example.

In our sample application, I have overridden the setter of our view controller’s image property. This allows me to (1) group related code in one location and (2) only update the image view when the image changes. This might seem like a detail with very little use at this point, but it shows you how we can already start to optimize our code in subtle ways, which will impact code readability and even performance. In this particular example, it won’t affect the performance of our application, but it is good to use best practices whenever you see fit.

Add the following to the implementation file now:

- (void)setImage:(UIImage *)image {
    if (_image != image) {
        _image = image;
        // Update Image View
        self.imageView.image = _image;
    }
}

UITextFieldDelegate

Before we can start sharing images, we need to implement one delegate method of the UITextFieldDelegate protocol, that is, textFieldShouldReturn:. In this delegate method, we resign the text field as the first responder if the user taps the keyboard’s return button. This will dismiss the keyboard and reveal the share buttons beneath it.

- (BOOL)textFieldShouldReturn:(UITextField *)textField {
    // Resign First Responder
    [textField resignFirstResponder];
    return YES;
}

Let’s Share

It is time to get our hands dirty with the Social framework and UIActivityViewController. Let’s start by implementing the facebook: method. It will illustrate how to use SLComposeViewController. Take a look at its implementation below and let’s break it down step by step.

- (IBAction)facebook:(id)sender {
    if ([SLComposeViewController isAvailableForServiceType:SLServiceTypeFacebook]) {
        // Initialize Compose View Controller
        SLComposeViewController *vc = [SLComposeViewController composeViewControllerForServiceType:SLServiceTypeFacebook];
        // Configure Compose View Controller
        [vc setInitialText:self.captionTextField.text];
        [vc addImage:self.image];
        // Present Compose View Controller
        [self presentViewController:vc animated:YES completion:nil];
    } else {
        NSString *message = @"It seems that we cannot talk to Facebook at the moment or you have not yet added your Facebook account to this device. Go to the Settings application to add your Facebook account to this device.";
        UIAlertView *alertView = [[UIAlertView alloc] initWithTitle:@"Oops" message:message delegate:nil cancelButtonTitle:@"OK" otherButtonTitles:nil];
        [alertView show];
    }
}

As I mentioned earlier, it is necessary to start by asking the operating system whether the service we are targeting is available. If isAvailableForServiceType: returns NO, we display an alert view telling the user what the problem might be. If the service is available, however, we initialize an instance of SLComposeViewController by invoking the class method composeViewControllerForServiceType:. The argument we pass to the class method is SLServiceTypeFacebook, which indicates that we are targeting the Facebook platform.

Even though our user can modify the message before sending it to Facebook, we populate the message with the contents of the caption text field and attach the snapped image to the message. Finally, we present the compose view controller to the user. It is then up to the user to edit, cancel, or post the message. The user is in control. This is important to remember especially with the next chapter in mind where the user will not always know what our application does behind the scenes. At this stage, our application is ready for testing. Build and run your application on a test device and try it out for yourself!

Twitter, Facebook, or Sina Weibo

As I mentioned earlier, one of the strengths of the Social framework is how easy it is to replace one social network with another by changing the service type. Let’s try this by replacing the two instances of SLServiceTypeFacebook with SLServiceTypeTwitter. With this simple change, we can now share our images with our Twitter followers.

Sharing on Steroids

Our application isn’t quite finished yet. We still need to implement the share: method. In this method, we make use of the UIActivityViewController class to share the snapped image and associated caption. Take a look at the method’s implementation below.

- (IBAction)share:(id)sender {
    // Activity Items
    UIImage *image = self.image;
    NSString *caption = self.captionTextField.text;
    NSArray *activityItems = @[image, caption];
    // Initialize Activity View Controller
    UIActivityViewController *vc = [[UIActivityViewController alloc] initWithActivityItems:activityItems applicationActivities:nil];
    // Present Activity View Controller
    [self presentViewController:vc animated:YES completion:nil];
}

We first store the image and caption in an array. The image and caption are the so-called activityItems, which are passed as an argument to the designated initializer of UIActivityViewController. It is important to first pass the image and then the caption. Can you guess why?

The beauty of the UIActivityViewController class is that it knows how to handle the data objects in the activity items array. This will become more clear when you test the share functionality. The second parameter of the initialization method is an array containing the services we want to make available to the user. If you pass nil, the operating system will show the user every service UIActivityViewController has at its disposal. It is often better to only display the services appropriate for a particular use case.

As I mentioned in the introduction, UIActivityViewController will check for the availability of each service behind the scenes. The name Application Services might sound a bit odd or abstract, but it covers a broad array of service endpoints, such as, email, text messaging as well as social networks and printing.

At the end of our share: method, we present the instance of UIActivityViewController to the user. Build and run your application and try it out for yourself.

Additional Configuration

UIActivityViewController has two properties, completionHandler and excludedActivityTypes. By setting a completion handler, you can execute a block if the user taps the cancel button or when the sharing operation is completed. As you might have guessed, the completion handler is a block (UIActivityViewControllerCompletionHandler) and takes two parameters, (1) the activity type and (2) a boolean indicating whether the service was performed or not. The boolean value will also be set to NO if the user cancels or dismisses the UIActivityViewController instance.

SLComposeViewController has a completion handler that works much in the same way. Instead of two parameters, it accepts only the result of the operation.


Wrap Up

You should now have a good understanding of what the Social framework can offer you. We have taken a close look at SLComposeViewController as well as UIActivityViewController. Both classes are incredibly useful and yet easy to use. Sharing content used to be cumbersome and painful, but these two classes make the process much easier. I am very pleased with the introduction of the Social framework in iOS 6 as well as with the addition of UIActivityViewController to UIKit.

Hopefully I’ll see the Social framework used in your applications soon!


More iOS 6 Content?

If you enjoyed this post, be sure to check out the upcoming book Decoding the iOS 6 SDK, an anthology of iOS 6 tutorials written by top Mobiletuts+ contributors.

Decoding the iOS 6 SDK: Coming Soon!

$
0
0

Announcement time! I’m incredibly excited to let you know that the first ever Mobiletuts+ book (in conjunction with Rockable Press) is coming soon! This book covers all the most essential iOS development updates from 2012 with a non-linear format designed to get you up-and-running in no time! In addition to covering the latest SDK, the book also covers essential changes to Xcode and all the latest devices from Cupertino!

Decoding the iOS 6 SDK is a book for beginning and intermediate iOS developers who want to get up to speed with the latest changes and enhancements provided by iOS 6! Mobiletuts+ contributors Bart Jacobs, Akiel Khan, Aron Bury, Aaron Crabtree, and myself have all teamed up to teach you about the most essential aspects of the SDK. The book also covers updates to Xcode that occurred in 2012, and the very first chapter will teach you how to build a cross-device app targeted for the iPhone 5, the iPad mini, AND the third-generation iPad!

Decoding the iOS 6 SDK

The structure of Decoding iOS 6 is unique. Each chapter is divided into a “Theoretical Overview” section and a hands-on “Tutorial Project” section. By reading just the “Theoretical Overview” of each chapter, you can quickly become familiar with all the most essential concepts and changes to the iOS SDK within an evening or two. Armed with this knowledge, you can then begin diving into the tutorial projects that matter most to your own development efforts. This non-linear system makes it easier than ever to become comfortable and productive with the latest tools and hardware.


Book Contents

Part I:
What Has Changed?

  • Chapter 1: iOS 6 SDK Essentials -Mark Hammonds
  • Chapter 2: UITableView Changes & Enhancements -Aron Bury
  • Chapter 3: Data Isolation Controls -Mark Hammonds
  • Chapter 4: Apple Maps and Map Kit -Aaron Crabtree
  • Chapter 5: Reminders and Event Kit -Aaron Crabtree
  • Chapter 6: UIKit Theming Controls -Aron Bury
  • Part II
    What Is New?

  • Chapter 7: Auto Layout Fundamentals -Akiel Khan
  • Chapter 8: Advanced Auto Layout Techniques -Akiel Khan
  • Chapter 9: Collection View Fundamentals -Bart Jacobs
  • Chapter 10: Advanced Collection View Techniques -Bart Jacobs
  • Chapter 11: Social Framework Fundamentals -Bart Jacobs
  • Chapter 12: Advanced Social Framework Techniques -Bart Jacobs
  • Chapter 13: State Preservation and Restoration -Akiel Khan
  • Chapter 14: PassKit Fundamentals -Aaron Crabtree

  • Chapter 11 Sample:
    Social Framework Fundamentals

    The introduction of the Twitter framework in iOS 5 was the first step towards the integration of iOS with popular social networks. In iOS 6, Apple introduced the Social framework. Not only does the Social framework effectively replace the Twitter framework, it also extends its functionality by adding support for both Facebook and Sina Weibo.

    Even though the Twitter framework has been deprecated as of iOS 6, it is fortunately a trivial task to migrate existing code from the Twitter framework to the Social framework. The API’s of the Social framework do not make mention of specific social networks. The network component has been abstracted away, which makes adding support for new social networks in the future a painless task. Bottom line: the good news for developers is that getting up and running with the Social framework is easy, especially if you are already familiar with the Twitter framework.

    READ THE FULL CHAPTER


    Stay Tuned!

    This book was a labor of love for all the authors involved, and we’re really excited to release the finished product. I hope you’ll enjoy reading it as much we all enjoyed writing it, and we’ll be sure to let you know when it goes on sale. Stay tuned!

    Best of Tuts+ in December 2012

    $
    0
    0

    Each month, we bring together a selection of the best tutorials and articles from across the whole Tuts+ network. Whether you’d like to read the top posts from your favourite site, or would like to start learning something completely new, this is the best place to start!


    Psdtuts+ — Photoshop Tutorials

    • Create Biologically Viable Alien Concept Art in Photoshop

      Create Biologically Viable Alien Concept Art in Photoshop

      Designing a plausible alien life form represents a challenge for concept artists. The monstrous creatures used blockbuster movies and video games can be relatively easily created, as they don’t need to be functional within a real world context. To design a creature that not only meets with a clients’ requirements, but is also potentially biologically viable requires a careful balance between plausibility and visual impact, a balance aided by careful research into the way real animals look and behave. In this tutorial, Alex Ries will explain how to illustrate an alien life form that could potentially exist in real life.

      Visit Article

    • Create a Realistic Photo Composite From a Sketch – Tuts + Premium Tutorial

      Create a Realistic Photo Composite From a Sketch – Tuts + Premium Tutorial

      When mixing photos, it’s often helpful to use digital painting techniques to help improve your scene. In this Tuts+ Premium tutorial, Nat Monney will show you how to combine several photos to create a realistic scene of a locomotive passing through a desert landscape. This tutorial will begin as a sketch, we will then show you how to combine photo manipulation and digital painting techniques to create finished artwork that looks amazingly close to the original sketch. This tutorial is available exclusively to Tuts+ Premium Members.

      Visit Article

    • How to Draw a Camcorder Icon From Scratch in Photoshop

      How to Draw a Camcorder Icon From Scratch in Photoshop

      In this tutorial, we will explain how to draw a camcorder icon from scratch in Photoshop using shape layers, brushes, and layer styles. Let’s get started!

      Visit Article


    Nettuts+ — Web Development Tutorials

    • What’s Hot in 2013: Our Picks

      What’s Hot in 2013: Our Picks

      2012 was a fantastic year for new technologies, products, and frameworks in our industry. That said, 2013 is looking to be even better! Recently, I asked our Nettuts+ writing staff to compile a list of the technologies that they’ll be keeping a close eye on. Now these aren’t necessarily brand new, but we expect them to spike in popularity this year!

      Visit Article

    • Build a Twitter Clone From Scratch: The Design

      Build a Twitter Clone From Scratch: The Design

      This article represents the first in a new group effort by the Nettuts+ staff, which covers the process of designing and building a web app from scratch – in multiple languages! We’ll use a fictional Twitter-clone, called Ribbit, as the basis for this series.

      Visit Article

    • Best Practices When Working With JavaScript Templates

      Best Practices When Working With JavaScript Templates

      Maybe you don't need them for simple web apps, but it doesn't take too much complexity before embracing JavaScript templates becomes a good decision. Like any other tool or technique, there are a few best practices that you should keep in mind, when using templates. We’ll take a look at a handful of these practices in this tutorial.

      Visit Article


    Vectortuts+ — Illustrator Tutorials

    • How to Create a Realistic Reindeer with Gradient Mesh in Adobe Illustrator

      How to Create a Realistic Reindeer with Gradient Mesh in Adobe Illustrator

      Did you know Rudolph was a female? Only reindeer ladies have their horns in winter. But, it’s not why I’m here. The reason is I’d like to show you how to draw a realistic reindeer with fluffy fur, using Gradient Mesh and more, in Adobe Illustrator. Moreover, you don’t need to be a professional to learn it! Ready to try?

      Visit Article

    • How to Create a Vector Glitter Text Art Effect

      How to Create a Vector Glitter Text Art Effect

      Follow this tutorial and learn how to create a vector glitter text effect in Adobe Illustrator. The glitter is the result of three effects: Note Paper, Stained Glass and Torn Edges but then we will use Live Trace to turn the glittery texture into a vector. You can easily create other color variations in tune with the winter holidays, so let’s begin!

      Visit Article

    • How to Create a Festive Dog Illustration in Adobe Illustrator

      How to Create a Festive Dog Illustration in Adobe Illustrator

      In today’s tutorial, I’m going to take advantage of the free photo stock file of the month over on Photodune and show you how I created this festive dog illustration in Adobe Illustrator. I’ll be using the stock image loosely and showing you how to follow it to produce a stylized portrait using the Paintbrush Tool, Gradients and more. So let’s get stuck in!

      Visit Article


    Webdesigntuts+ — Web Design Tutorials


    Phototuts+ — Photography Tutorials

    • Jonathan Cherry: Cities and Photography

      Jonathan Cherry: Cities and Photography

      Jonathan Cherry is a young photographer with a passion for taking engaging photographs. His images have offered him opportunities to travel and photograph new locations and communities. He also runs the extremely popular Mull It Over blog, profiling contemporary photographers from around the world. We caught up with him recently to give him the chance to be the interviewee and find out more about his work.

      Visit Article

    • How to Create Stunning Skateboarding Photography

      How to Create Stunning Skateboarding Photography

      You’re more likely to hear skateboarding called an art or a lifestyle than a sport. Skating is creating and style earns respect. If you’re looking for a new and creative outlet to explore, then you should give skateboarding photography a go.

      Visit Article

    • The Complete Guide to Photographing Classical Musicians

      The Complete Guide to Photographing Classical Musicians

      For those of us who regularly take promotional shots of bands and fashion, it can be easy to get stuck in a rut of approaching the same clientele over and over, when actually, the skills used for those shoots can be easily transferred to allow us to broaden our client base and vary out shooting style. Ive found that working with classical musicians is an absolute pleasure, they turn up on time and more often than not, they know what they want!

      Visit Article


    Cgtuts+ — Computer Graphics Tutorials

    • Learning Autodesk Maya: A Beginners Introduction to the Software, Part 1

      Learning Autodesk Maya: A Beginners Introduction to the Software, Part 1

      If you’ve always wanted to dive into Autodesk Maya but didn’t know where to start, this new two part tutorial is for you! Besides being one of the premier software packages on the market for film, games and VFX. Maya’s seemly endless number of tools, features, and options make it extremely intimidating to learn (especially for beginners) but don’t let that stop you! Today we’re kicking off part one of Shaun Keenan’s new beginner friendly tutorial series, where he’ll take you deep into the dark depths of Maya and give you an in-depth look at many of the programs awesome features.

      Visit Article

    • Building a Complete Human Facial Rig In 3D Studio Max, Part 1: Bone Setup & Controls – Tuts+ Premium

      Building a Complete Human Facial Rig In 3D Studio Max, Part 1: Bone Setup & Controls – Tuts+ Premium

      Today we’re launching the next chapter in our epic series of character rigging tutorials for 3ds Max and Maya from author Soni Kumari. The series has so far covered everything you need to know about rigging complete characters in Maya with two fantastic, in-depth tutorials Complete Character Rig In Maya & Complete Facial Rig In Maya. And now we’re completing the series for 3D Studio Max.

      Visit Article

    • Creating an Old Weathered Low Poly Post Box in Maya, Part 1: Modeling & Mapping

      Creating an Old Weathered Low Poly Post Box in Maya, Part 1: Modeling & Mapping

      Learn how to create a low poly, highly detailed, old UK post box worn out by the weather, rusty and bitten up. A model suitable for use in the game industry or as an environment filler for your scenes. We’ll take a simple, straight forward eye-balled approach to the modeling while relying on several references images. We’ll then dive into the UVMapping and learn how to create a highly detailed PSD network shader via Maya, for the Color, Normal & Specular maps.

      Visit Article


    Aetuts+ — After Effects Tutorials

    • Quick Tip – How To Automate Simple Track Marker Removal

      Quick Tip – How To Automate Simple Track Marker Removal

      In this tutorial I will be showing you a quick and easy way to remove tracking markers. Often tracking markers are needed to achieve accurate matchmoves, however we commonly find ourselves with the laborious task of having to remove these trackers.

      Visit Article

    • How to Create the Spider-Man 2 Title Effect

      How to Create the Spider-Man 2 Title Effect

      In this tutorial we will be recreating the look and feel of the title sequence from the 2004 movie “Spider-Man 2″. First we will create the “webs” that move across the screen, then we will use expressions and masks to isolate the intermittent shapes that are formed by those webs. Finally we will use these shapes as alpha mattes for copies of our logo or text.

      Visit Article

    • 3D Building Fragmentation and Compositing – Part 1

      D Building Fragmentation and Compositing – Part 1

      We’re going to recreate the original camera from a shaky camcorder shot and make a building to line up with the one in the source plate. Using thinking particles and volume breaker to simulate it collapsing, we’ll camera map it and export the sequence for the 2nd part of this tutorial where we’ll integrate our render.

      Visit Article


    Audiotuts+ — Audio & Production Tutorials


    Wptuts+ — WordPress Tutorials


    Mobiletuts+ — Mobile Development Tutorials

    • Learn iOS SDK Development from Scratch!

      Learn iOS SDK Development from Scratch!

      Interested in learning native iOS SDK development? Now is the perfect time to get started! Mobiletuts+ is pleased to announce an in-depth, fully up-to-date session on how to become an iOS SDK developer!

      Visit Article

    • Building a Shopping List Application From Scratch – Part 1

      Building a Shopping List Application From Scratch – Part 1

      In the next two lessons, we will put the knowledge learned in this session into practice by creating a basic shopping list application. Along the way, you will also learn a number of new concepts and patterns, such as creating a custom model class and implementing a custom delegate pattern. We have a lot of ground to cover, so let’s get started!

      Visit Article

    • Creating Your First iOS Application

      Creating Your First iOS Application

      Even though we have already learned quite a bit in this series on iOS development, I am sure you are eager to start building iOS applications that do something cool or useful. In this tutorial, your wish will be granted! Using Xcode, you will create an iOS project from scratch, modify the project’s source code, and run your application on either the iOS Simulator or a physical device!

      Visit Article


    Gamedevtuts+ — Game Development

    • 40+ Fantastic Game Development Tutorials From Across the Web

      Fantastic Game Development Tutorials From Across the Web

      The indie gamedev community is awesome: so willing to share tips, tricks, advice, and even detailed tutorials explaining important concepts. Here, I’ve rounded up a few dozen of my favourite examples from around the internet, covering coding, maths, game design, and being a game developer. This is the quality of content that we aspire to achieve at Gamedevtuts+.

      Visit Article

    • Designing a Boss Fight: Lessons Learned From Modern Games

      Designing a Boss Fight: Lessons Learned From Modern Games

      Boss battles have existed since practically the beginning of gaming and they have all followed a similar idea throughout the years: a big baddie that gets in the way of some major objective. In many cases they have had an overbearing role during the game’s story, with ongoing hints of their existence or of the approaching fight with them.

      Visit Article

    • Animating With Asset Sheets: An Alternative to Blitting

      Animating With Asset Sheets: An Alternative to Blitting

      So you’ve got your awesome game in the works, it’s got all sorts of complex physics, epic enemy AI or what-have-you. But it feels lifeless. You want some OOMPH, you want some animation!

      Visit Article


    Mactuts+ — Mac & OS X

    • An In-Depth Look at iTunes 11

      An In-Depth Look at iTunes 11

      Alongside the launch of the iPhone 5, iPod Nano, and iPod Touch, Apple promised us an October release of iTunes 11; the biggest update to their all-in-one media management tool since the inclusion of a music store in 2003. As October came and went, Apple failed to deliver on time, instead pushing the release back to ’November”, and on the 29th the new iTunes finally shipped. With this major release comes a new interface, seamless iCloud integration, and a major design overhaul. In this article Ill take you in-depth into the new additions and changes to Apples Swiss Army Knife of media players.

      Visit Article

    • Dan Benjamin on Running the Best Podcast Network on The Web

      Dan Benjamin on Running the Best Podcast Network on The Web

      He created “NPR for geeks”, and with massively popular shows including Hypercritical, Build and Analyze, Back to Work, and Amplified, Dan Benjamin is perhaps one of the most prolific technology podcasters around. In addition to his personal talent, Dan’s 5by5 Network is currently home to over thirty shows, with topics ranging from health and fitness to app development. In the late summer of this year, I had a chance to talk to Dan for about an hour about his career, podcasting, and of course, his setup. This is that interview, uncut and in its entirety. Enjoy!

      Visit Article

    • Mactuts+ Quiz #2: Terminal Basics

      Mactuts+ Quiz #2: Terminal Basics

      Terminal is one of our favorite topics here at Mactuts+. It’s a truly advanced application that allows you to take control of your Mac at a level not possible with any other utility. Today we’re going to find out how much you’ve learned. Browse through our Terminal tutorials, then take the quiz below to test your knowledge!

      Visit Article


    Crafttuts+ — Craft & Handmade

    • Create a Wondrous Winter Wonderland in a Jam Jar

      Create a Wondrous Winter Wonderland in a Jam Jar

      Everyone has their own ideal winter scene that they visualise, whether it’s in the city or set in a cute little village. This tutorial shows you how to craft your own, using accessible materials such as paper and a jam jar. It’s a Christmas-themed snow globe with a difference!

      Visit Article

    • Make a Wire-Wrapped Word for Your Wall

      Make a Wire-Wrapped Word for Your Wall

      I live in an apartment with all white walls and quite a minimal style, but there’s one thing that I’m stuck with and can’t afford to change – the ugly aging beige intercom handset. I’ve given a lot of thought to how I can hide or disguise it, to no avail. So I came up with a solution: instead of trying to hide it, I decided to create this neon wrapped wire speech bubble to place right next to it. Now the handset doesn’t stick out like a sore thumb anymore, it’s become part of a fun art piece.

      Visit Article

    • Knitting Fundamentals: Learn to Purl

      Knitting Fundamentals: Learn to Purl

      Most beginner knitters learn how to cast-on and how to do the knit stitch right away. Then, when somebody mentions learning the purl stitch, they run for cover. I know, I know, you just started to feel comfortable knitting, and now people want to throw something new at you, and it’s scary. Let me put your mind at ease by saying, I promise, this stitch is not nearly as terrifying as you think. In fact, with a little bit of practice, I’m sure you’ll be purling like a professional in no time!

      Visit Article


    FreelanceSwitch — Freelance Jobs & Information

    • 7 Resources New Freelancers Can Use to Figure Out What to Charge

      7 Resources New Freelancers Can Use to Figure Out What to Charge

      It’s possibly the most baffling question that faces new freelancers: What in the heck am I supposed to charge for my work?
      You don’t have a sense of market rates yet. Your prospect doesn’t want to tell you their budget. Figuring out what to charge for your freelance services is intimidating.

      Visit Article

    • How to Get More Fans on Facebook

      How to Get More Fans on Facebook

      Now you’ve created and set-up your Facebook Page, your next step is getting people to become Facebook fans and Like your Page. In this post, I show you how to increase likes on Facebook, drive Facebook fan engagement, and overall grow the number of your Facebook page fans. Learn how to get a bunch of Likes on your freelance Facebook page.

      Visit Article

    • How to Build a Strong Yearly Marketing Plan for Your Freelancing Business

      How to Build a Strong Yearly Marketing Plan for Your Freelancing Business

      As we approach the end of the year, it’s a good time to begin thinking about next year’s goals for your freelance business.
      Maybe you’ve played your freelance marketing strategy loose so far in your freelancing business. Or maybe you have put together a roughly functional marketing plan in the past but want to improve upon those past efforts.

      Visit Article

    Create a Cut-the-Rope Inspired Game – Adding Interaction

    $
    0
    0

    This is the second installment in our Corona SDK Cut the Rope Inspired tutorial. In today’s tutorial, we’ll add to our interface and code the game interaction. Read on!


    Where We Left Off. . .

    Please be sure to check part 1 of the series to fully understand and prepare for this tutorial.


    Step 1: Start Button Listeners

    This function adds the necesary listeners to the TitleView buttons.

    function startButtonListeners(action)
    	if(action == 'add') then
    		playBtn:addEventListener('tap', showGameView)
    		creditsBtn:addEventListener('tap', showCredits)
    	else
    		playBtn:removeEventListener('tap', showGameView)
    		creditsBtn:removeEventListener('tap', showCredits)
    	end
    end
    

    Step 2: Show Credits

    The credits screen is shown when the user taps the about button. A tap listener is added to the credits view to remove it.

    function showCredits:tap(e)
    	playBtn.isVisible = false
    	creditsBtn.isVisible = false
    	creditsView = display.newImage('credits.png', 0, display.contentHeight)
    	lastY = titleBg.y
    	transition.to(titleBg, {time = 300, y = (display.contentHeight * 0.5) - (titleBg.height + 50)})
    	transition.to(creditsView, {time = 300, y = (display.contentHeight * 0.5) + 35, onComplete = function() creditsView:addEventListener('tap', hideCredits) end})
    end
    

    Step 3: Hide Credits

    When the credits screen is tapped, it’ll be tweened out of the stage and removed.

    function hideCredits:tap(e)
    	transition.to(creditsView, {time = 300, y = display.contentHeight + 25, onComplete = function() creditsBtn.isVisible = true playBtn.isVisible = true creditsView:removeEventListener('tap', hideCredits) display.remove(creditsView) creditsView = nil end})
    	transition.to(titleBg, {time = 300, y = lastY});
    end
    

    Step 4: Show Game View

    When the Start button is tapped, the title view is tweened and removed revealing the game view. There are many parts involved in this view, so we’ll split them in the next steps.

    function showGameView:tap(e)
    	transition.to(titleView, {time = 300, x = -titleView.height, onComplete = function() startButtonListeners('rmv') display.remove(titleView) titleView = nil end})
    

    Step 5: Add Instructions

    This code places the instructions image in the stage.

    -- Instructions
    ins = display.newImage('instructions.png', 205, 360)
    

    Step 6: Dog

    Next we add the Dog image and place it in the center of the stage.

    -- Dog
    dog = display.newImage('dog.png', 128, 408)
    dog.name = 'dog'
    

    Step 7: Shadow Stars

    This part creates the stars in the left corner.

    -- Shadow Stars
    s1 = display.newImage('starShadow.png', 3, 3)
    s2 = display.newImage('starShadow.png', 33, 3)
    s3 = display.newImage('starShadow.png', 63, 3)
    

    Step 8: Physics

    Now we add physics to the Dog and call the functions that will load the level and add the game listeners.

    -- [Set Dog Physics]
    physics.addBody(dog, 'static', {radius = 14})
    dog.isSensor = true
    loadLevel(1)
    gameListeners('add')
    

    Step 9: Load Level

    The following code uses a double for and a two dimensional table to place the level in the stage. First we check every item in the table to see if it’s a 1 which represents the hanger. Next we chek for 2‘s which represents the stars. In true, a variable is created and physics is added to the body.

    function loadLevel(n)
    	for i = 1, 10 do
    		for j = 1, 10 do
    			if(l1[j][i] == 1) then
    				hang = display.newImage('hang.png', i*31, j*32)
    				physics.addBody(hang, 'static', {radius = 8})
    				bone = display.newImage('bone.png', i*29.5, j*32 + (90))
    				physics.addBody(bone, 'dynamic', {shape = {-21.5, -5.5, 18.5, -12.5, 20.5, 2.5, -18.5, 11.5}})
    			elseif(l1[j][i] == 2) then
    				local star = display.newImage('star.png', i*29, j*28)
    				star.name = 'star'
    				physics.addBody(star, 'static', {radius = 15})
    				star.isSensor = true
    			end
    		end
    	end
    

    Step 10: Add Rope

    Another for is used to add the rope. It is composed of 8 parts that are stored in a display Group.

    	-- Add Rope
    	for k = 1, 8 do
    		local ropePart = display.newImage('rope.png', hang.x - 3, (hang.y-3) + k*10) --10 = rope part height
    		ropePart.name = 'rope'
    		physics.addBody(ropePart)
    		ropeParts:insert(ropePart)
    

    Step 11: Joints

    In this part we use physics joints to "glue" the parts of the rope, the rope to the hanger and the rope to the bone.

    		-- Hang joint
    		if(k == 1) then
    			local hangJoint = physics.newJoint('pivot', hang, ropePart, hang.x - 3, hang.y)
    		end
    		-- Rope Joints
    		if(k > 1) then
    			local joint = physics.newJoint('pivot', ropeParts[k-1], ropeParts[k], hang.x - 3, ropePart.y)
    		end
    		-- Bone joint
    		if(k == 8) then
    			local boneJoint = physics.newJoint('pivot', ropePart, bone, hang.x - 3, ropePart.y)
    		end
    	end
    end
    

    Step 12: Game Listeners

    This function adds the necessary listeners to start the game logic.

    function gameListeners(action)
    	if(action == 'add') then
    		bone:addEventListener('collision', starBoneCollision)
    		bg:addEventListener('touch', drawLine)
    	else
    		bone:removeEventListener('collision', starBoneCollision)
    		bg:removeEventListener('touch', drawLine)
    	end
    end
    

    Step 13: Draw Line

    This function uses the touch event and its phases to create a line in the stage when its swiped. It calculates the starting points in the began phase, draws when the finger is moved, and stops when it is lifted.

    function drawLine(e)
    	if(e.phase == 'began') then
    		initX = e.x
    		initY = e.y
    	elseif(e.phase == 'moved') then
    		line = display.newLine(initX, initY, e.x, e.y)
    		physics.addBody(line, 'static')
    		line.isSensor = true
    		line:addEventListener('collision', ropeCollision)
    		line.width = 5
    		lines:insert(line)
    	elseif(e.phase == 'ended') then
    		display.remove(lines)
    		lines = nil
    		lines = display.newGroup()
    	end
    end
    

    Step 14: Rope Collision

    When the line collides with the rope, a part is removed, breaking the joint and making the bone fall.

    function ropeCollision(e)
    	if(e.other.name == 'rope') then
    		display.remove(e.other)
    	end
    end
    

    Step 15: Star-Bone Collision

    This function checks if the bone touches a star, fills a shadow star and plays a sound when true.

    function starBoneCollision(e)
    	if(e.other.name == 'star') then
    		display.remove(e.other)
    		audio.play(starSnd)
    		collected = collected + 1
    		if(collected == 1) then
    			local s1 = display.newImage('star.png', -10, -10)
    		elseif(collected == 2) then
    			local s2 = display.newImage('star.png', 21, -10)
    		elseif(collected == 3) then
    			local s3 = display.newImage('star.png', 51, -10)
    		end
    

    Step 16: Bone-Dog Collision

    A sound plays and an alert is called when the dog catches the bone.

    	elseif(e.other.name == 'dog') then
    		display.remove(e.target)
    		audio.play(bite)
    		alert()
    	end
    end
    

    Step 17: Alert

    This function will stop the game and display the Level Complete message by using the alert background and tweening it.

    function alert()
    	gameListeners('rmv')
    	alert = display.newImage('alert.png', (display.contentWidth * 0.5) - 105, (display.contentHeight * 0.5) - 55)
    	transition.from(alert, {time = 300, xScale = 0.5, yScale = 0.5})
    	-- Wait 1 second to stop physics
    	timer.performWithDelay(1000, function() physics.stop() end, 1)
    end
    

    Step 18: Call Main Function

    In order to start the game, the Main function needs to be called. With the above code in place, we’ll do that here:

    Main()
    

    Step 19: Loading Screen

    The Default.png file is an image that will be displayed right when you start the application while the iOS loads the basic data to show the Main Screen. Add this image to your project source folder, it will be automatically added by the Corona compliler.


    Step 20: Icon

    Using the graphics you created before, you can now create a nice and good looking icon. The icon size for the non-retina iPhone icon is 57x57px, but the retina version is 114x114px and the iTunes store requires a 512x512px version. I suggest creating the 512×512 version first and then scaling down for the other sizes.

    It doesn’t need to have the rounded corners or the transparent glare; iTunes and the iPhone will do that for you.


    Step 21: Testing in the Simulator

    It’s time to do the final test. Open the Corona Simulator, browse to your project folder, and then click open. If everything works as expected, you are ready for the final step!


    Step 22: Build

    In the Corona Simulator, go to File > Build and select your target device. Fill the required data and click build. Wait a few seconds and your app will be ready for device testing and/or submission for distribution!


    Conclusion

    Experiment with the final result and try to make your custom version of the game!

    I hope you liked this tutorial series and find it helpful. Thank you for reading!

    Debugging in iOS – Essential Tips

    $
    0
    0

    Whether you are trying to figure out why your array has 3 objects instead of 5 or why your game plays backward since the new guy started, debugging is an essential part of the development process. At the end of this article, you’ll have an understanding of the most important debugging facilities available to you and how to use them to help squash your bugs in less time.

    We will be covering how to:

    • Inspect your applications state using the console
    • Perform logging, and move beyond NSLog
    • Track memory usage by following object life-cycles

    Inspection Using the Console

    That little black box at the bottom of Xcode should be your best friend when it comes to debugging. It outputs log messages, error messages and all sorts of other useful things that will help you track errors down. In addition to reading output directly from the log, we can also stop at a given point in our program and inspect various parts of our application.

    Breaking Conditionally

    I’m going to assume that you know how breakpoints work (and if you don’t, not to worry, you’ll pick it up by the end of this!). Breakpoints are invaluable in seeing where our application is at a given point in time, but it can be a pain to step through a loop or recursive function after triggering a breakpoint until our object equals a certain value. Enter conditional breakpoints!

    Conditional breakpoints are breakpoints that will only break when a certain condition is met. Imagine that we only want to break when an object is in a certain state, or on the ‘nth’ iteration of a loop. Add a breakpoint to your code by clicking on the ‘gutter’ of the Xcode editor, right click on the breakpoint, and then select ‘edit breakpoint’ to set special conditions.

    conditional breakpoints

    You can provide a condition (eg. i == 12) or the number of times the breakpoint should be ignored. You can also add actions that occur automatically upon the break, for example a debugger command that prints a value.

    Tip: The keyboard shortcut for adding/removing a breakpoint is command+\

    Another important breakpoint trick to implement is adding the ‘exception breakpoint’. Ever noticed that 99% of the time when we hit an exception, Xcode takes us to the autorelease pool in our main method?

    unhelpful_break
    Thanks Xcode… really helpful!

    By setting an exception breakpoint, you can go the exact line of code that caused the exception with a breakpoint. To do so, open the exceptions breakpoint tab (command+6). At the bottom left of the window, there is a “+” button. Select this to add an ‘exception breakpoint’. Now when Xcode encounters an exception, it will break where in the code it occurred.

    Exception breakpoint

    Manually Printing From the Console

    If we have broken at a specific point in our app generally speaking it’s because we want to see what state our objects are in. Xcode provides us the ‘variables view’ which is that view at the bottom of Xcode next to the console. In theory it displays the current state of all the values relevant in the current context. In practice, this sometimes proves to be a little buggy. Sometimes it won’t list values or not update them when you step through.

    The variables view

    Luckily, we can inspect specific objects ourselves using some very useful console commands. Typing ‘po’ into the console allows us to get instant detail about a given object (when dealing with scalar values we use ‘p’).

    pring from the console

    This can be useful for seeing if an object already exists (this will print nil if it does not), determining the value of an object, finding out what an array/dictionary contains at run-time, and even comparing two objects. Because this command prints out the memory address of the relevant object, you can print out two objects that you think should be the same and see if they have the same memory address to be sure.

    Another useful but hidden command that you can use to easily inspect your views is the recursiveDescription command. Call this on a view to get a print out of its view hierarchy.

    inspecting a view

    Effective Logging

    There are certain times when debugging our program we want to log a certain message to the console. The ‘NSLog’ function allows us to print any output we want to the console. This can be important if we want to follow certain pathways through our application or test what a value equals without having to explicitly place break points at every possible line. NSLog follows the same format as [NSString StringWithFormat] method (as you can see in the below shortcut).

    Use and output of NSLog
    Tip: New to formatting strings in Objective-C? Check out Apples String Programming Guide

    Getting Smart With NSLog

    While NSLog is useful, we need to be smart about how we implement it. Anything that is printed out from NSLog goes into production code, and is therefore visible to anyone. If someone was to plug the device into the organiser and look at the console, they could see every single log message. As you can imagine, that could have some serious implications! Imagine if you printed out some secret algorithm logic or the user’s password to the console! Because of this, apps will sometimes get rejected if Apple detects too much output to the console in a production build.

    NSLog security issues

    Luckily, there is a better way to do logging. Depending on how much effort you want to put in, there are several ways to go about this. Perhaps the easiest way is to use a macro that only includes NSLog in debug builds. Including this in a globally accessible header file means you can put as many logs as you like into your code or none of it will enter production (provided you don’t modify the default pre-processor macro values, and if you don’t know what those are, don’t worry).

    #ifdef DEBUG
    #define DMLog(...) NSLog(@"%s %@", __PRETTY_FUNCTION__, [NSString stringWithFormat:__VA_ARGS__])
    #else
    #define DMLog(...) do { } while (0)
    

    Now if you use DMLog (or whatever you choose to call yours) it will only print this out during a debug build. Any production builds will do nothing. __PRETTY_FUNCTION__ also helps out by printing the name of the function that the logging is coming from.

    Taking the Next Step

    While NSLog is great, it has a number of limitions:

    • It only prints locally
    • You cannot give a log a ‘level’. (For example critical, warning, all, etc)
    • NSLog is slow. It can slow down your program dramatically when performing a large amount of processing

    For those that want to get hardcore about logging, there are frameworks out there that overcome some or all of these limitions depending on how much effort you want to put in. I’d recommend looking at the following tools:

    • Cocoa LumberJack – One of the well known and versatile logging frameworks for Cocoa. A bit of a learning curve but it is very powerful
    • SNLog – A drop in replacement for NSLog

    Following Object Life-Cycles

    Although the introduction of Automatic Reference Counting (ARC) has ensured that memory management is not the massive time vampire it used to be, it is still important to track important events in our object’s life-cycles. After all, ARC does not eliminate the possibility of memory leaks or trying to access a released object (it simply makes this harder to do). To this end, we can implement a number of processes and tools to help us keep an eye on what our objects are doing.

    Logging important events

    The two most important methods in an Objective-C object’s life-cycle are the init and dealloc methods. It’s a great idea to log these events to your console so you can watch when your objects come to life and, more importantly, make sure they go away when they are supposed to.

    - (id)init
    {
        self = [super init];
        if (self)
        {
            NSLog(@"%@: %@", NSStringFromSelector(_cmd), self);
        }
        return self;
    }
    - (void)dealloc
    {
        NSLog(@"%@: %@", NSStringFromSelector(_cmd), self);
    }
    

    While typing this code might seem tedious to start off, there are ways to automate the process and make this easier. I can guarantee it will come in handy when your application behaves in ways it shouldn’t. You can also utilize a few tricks you learned in the logging section so this isn’t printed out in a production build (or even better, create a macro for it yourself!).

    The Static Analyzer and the Inspector

    There are two tools that come with Xcode that we can use to clean up our code and make our code less error prone. The Static Analyzer tool is a nifty way for Xcode to recommend improvements to our code, from unused objects to potentially under or over released objects (still an issue on ARC for Core Foundation objects). To see these recommendations, go to Product and select ‘Anlayze’.

    Analyse

    The inspector is a powerful tool that allows us to closely ‘inspect’ various aspects of our application to do with memory usage, activity on the file system, and it even provides ways to automate UI interaction. To ‘inspect’ your application select ‘Profile’ in the ‘Product’ drop down menu.

    This will open up the Instruments window where you can select a profile template to run. The most common ones to run are zombies (we’ll discuss this later), activity monitor, and leaks. Leaks is perhaps the most useful template to run to hunt down any memory leaks that may be present in your application.

    Profile Options

    Zombies Are Your Friend

    Although it is much harder to run into the dreaded EXC_BAD_ACCESS error now that ARC is in place, it can still happen under certain circumstances. When dealing with UIPopoverController or core foundation objects, we can still attempt to access an over released object. Normally, when we release an object in memory it is gone forever. However, when Zombies are enabled, the object is only marked as released but stays around in memory. That way when we access a Zombie object, Xcode can let us know that you tried to access an object that normally wouldn’t be there. Because it still knows what it is, it can let you know where and when it happened.

    You can hunt down Zombies using two methods. Either by using the inspector and running a Zombie profile template, or by enabling it as a diagnostic option within the ‘Run’ build option. Right next to the stop button, click the scheme name, then click ‘Edit Scheme’ and under run click the diagnostic tab and select ‘Enable Zombie Objects’. Note that debugging in Zombie mode is only available when debugging in the simulator, you cannot do it on an actual device.

    Braiiiinsssssszzzz

    Conclusion

    Hopefully the above gave you a few insights into how to debug your applications more effectively. It’s all about finding ways to reduce time spent bug fixing so we can spend more time doing what’s important, building great apps!

    This is by no means a comprehensive list. There are many other techniques that haven’t been discussed here such as debugging issues in production, remote bug reporting, crash reporting, and more. Do you have a technique that you want to share? Maybe you’ve got a question related to one the above points? Post it below in the comments!

    Happy Programming!

    Android SDK: Implementing Drag-and-Drop Functionality

    $
    0
    0

    The drag-and-drop facility on the Android SDK is an interaction feature many apps can benefit from and getting started is straightforward. In this tutorial, we will implement a basic drag-and-drop operation, making clear what additional options you have for your own projects!

    The simple app we will build is going to allow the user to drag a list of items into order of preference. To the user it will appear that a visible UI item is being dragged to a different location. However, in reality the data associated with one Android View is being moved to another View. You are of course free to use the code in any app you are working on, but you will need to set a minimum SDK version of 11 to use the drag and drop processing.


    Step 1: Create and Design the App

    Create a new Android project in Eclipse. Enter the application settings of your choice, being sure to create a blank Activity and layout for it. Before we get started on the drag and drop functionality let’s get the layout sorted. We won’t be spending much time on the design so that we can focus on the functional part of the app.

    In the layout file you specified when creating the project, enter a Linear Layout outline, replacing any existing content:

    <LinearLayout xmlns:android="http://schemas.android.com/apk/res/android"
    	android:layout_width="fill_parent"
    	android:layout_height="wrap_content"
    	android:orientation="vertical"
    	android:padding="10dp"
    	android:paddingLeft="50dp"
    	android:paddingRight="50dp" >
    </LinearLayout>
    

    Inside the Linear Layout, begin with a small informative Text View:

    <TextView
    	android:layout_width="fill_parent"
    	android:layout_height="wrap_content"
    	android:gravity="center"
    	android:paddingBottom="10dp"
    	android:text="@string/intro" />
    

    Add the specified string to your application “res/values/strings.xml” file:

    <string name="intro">Place these foods in your order of preference.</string>
    

    While you have the strings file open, add the following three items:

    <string name="option_1">Apple</string>
    <string name="option_2">Cake</string>
    <string name="option_3">Cheese</string>
    

    These strings will be displayed on the items users will drag. There will be three slots for users to drag them onto, so add strings for labels on those next:

    <string name="choice_1">Most favorite</string>
    <string name="choice_2">-</string>
    <string name="choice_3">Least favorite</string>
    

    As you can imagine, in a real app these data items may be read in from a source or stored as XML resources, we are only including them “hard-coded” in this way for demonstration. Back in the layout file, add the first set of Text Views to represent the draggable items:

    <TextView
    	android:id="@+id/option_1"
    	android:layout_width="fill_parent"
    	android:layout_height="wrap_content"
    	android:layout_margin="5dp"
    	android:background="@drawable/option"
    	android:gravity="center"
    	android:text="@string/option_1"
    	android:textStyle="bold" />
        <TextView
    	android:id="@+id/option_2"
    	android:layout_width="fill_parent"
    	android:layout_height="wrap_content"
    	android:layout_margin="5dp"
    	android:background="@drawable/option"
    	android:gravity="center"
    	android:text="@string/option_2"
    	android:textStyle="bold" />
        <TextView
    	android:id="@+id/option_3"
    	android:layout_width="fill_parent"
    	android:layout_height="wrap_content"
    	android:layout_margin="5dp"
    	android:background="@drawable/option"
    	android:gravity="center"
    	android:text="@string/option_3"
    	android:textStyle="bold" />
    

    Each of these has an ID so that we can refer to it in the Activity class. We also use the strings we defined. We will create the background drawable soon. Next add the three Text Views onto which the draggable items can be dropped:

    <TextView
    	android:id="@+id/choice_1"
    	android:layout_width="fill_parent"
    	android:layout_height="wrap_content"
    	android:layout_margin="5dp"
    	android:background="@drawable/choice"
    	android:gravity="center"
    	android:text="@string/choice_1" />
        <TextView
    	android:id="@+id/choice_2"
    	android:layout_width="fill_parent"
    	android:layout_height="wrap_content"
    	android:layout_margin="5dp"
    	android:background="@drawable/choice"
    	android:gravity="center"
    	android:text="@string/choice_2" />
        <TextView
    	android:id="@+id/choice_3"
    	android:layout_width="fill_parent"
    	android:layout_height="wrap_content"
    	android:layout_margin="5dp"
    	android:background="@drawable/choice"
    	android:gravity="center"
    	android:text="@string/choice_3" />
    

    These also use IDs and string resources. In your application “res/drawables” folder, or folders, create the first background drawable we specified for the draggable Text Views. Select the drawables folder(s) and choose “File”, “New”, “File” – enter “option.xml” as the file name to match what we included in the layout. Insert the following code into the drawables file, defining the background shape:

    <shape xmlns:android="http://schemas.android.com/apk/res/android"
    	android:dither="true" >
    	<solid android:color="#ff00ccff" />
    	<corners android:radius="2dp" />
    	<stroke
    		android:width="2dp"
    		android:color="#ff0099cc" />
    	<padding
    		android:bottom="5dp"
    		android:left="10dp"
    		android:right="10dp"
    		android:top="5dp" />
    </shape>
    

    Now create another drawables file, naming it “choice.xml”, this time and entering the following shape:

    <shape xmlns:android="http://schemas.android.com/apk/res/android"
    	android:dither="true" >
    	<solid android:color="#ffffff99" />
    	<corners android:radius="2dp" />
    	<stroke
    		android:dashGap="4dp"
    		android:dashWidth="2dp"
    		android:width="2dp"
    		android:color="#ffffff00" />
    	<padding
    		android:bottom="5dp"
    		android:left="5dp"
    		android:right="5dp"
    		android:top="5dp" />
    </shape>
    

    You can of course change any aspects of the user interface design to suit yourself.

    App Initial Screen

    Step 2: Setup the Activity

    Let’s turn to the app functionality – open your Activity class. Your class will need the following imports, added before the opening class declaration line:

    import android.os.Bundle;
    import android.app.Activity;
    import android.content.ClipData;
    import android.graphics.Typeface;
    import android.view.DragEvent;
    import android.view.MotionEvent;
    import android.view.View;
    import android.view.View.DragShadowBuilder;
    import android.view.View.OnDragListener;
    import android.view.View.OnTouchListener;
    import android.widget.TextView;
    

    Inside the class declaration, before the onCreate method (which Eclipse should have automatically filled in for you), add some instance variables:

    private TextView option1, option2, option3, choice1, choice2, choice3;
    

    These will allow us to refer to the Text Views we created. Inside the onCreate method, after the existing code, retrieve these UI items as follows:

    //views to drag
    option1 = (TextView)findViewById(R.id.option_1);
    option2 = (TextView)findViewById(R.id.option_2);
    option3 = (TextView)findViewById(R.id.option_3);
    //views to drop onto
    choice1 = (TextView)findViewById(R.id.choice_1);
    choice2 = (TextView)findViewById(R.id.choice_2);
    choice3 = (TextView)findViewById(R.id.choice_3);
    

    We use the ID attributes included in the layout XML.


    Step 3: Create a Touch Listener Class

    To use drag and drop within the Activity, we will create two inner classes. These classes will implement the Android interfaces required for dragging and dropping. Start by creating a class declaration outline for a Touch Listener, after the Activity onCreate method:

    private final class ChoiceTouchListener implements OnTouchListener {
    }
    

    This class will allow the app to detect users touching particular Views, treating a touch as the beginning of a drag operation. Inside the class, add the onTouch method:

    public boolean onTouch(View view, MotionEvent motionEvent) {
    }
    

    Next check what Motion Event has triggered the onTouch method:

    if (motionEvent.getAction() == MotionEvent.ACTION_DOWN) {
    	//setup drag
    	return true;
    }
    else {
    	return false;
    }
    

    We are only interested in cases where the user has touched the View to drag it, so inside the if statement we will setup the drag operation. Before the “return true” statement, prepare the drag as follows:

    ClipData data = ClipData.newPlainText("", "");
    DragShadowBuilder shadowBuilder = new View.DragShadowBuilder(view);
    

    This code is pretty standard, as we only need default behavior. However, you can amend this to tailor various aspects of the drag if you need to. You can alter the shadow builder code to set the appearance of the View during the drag. You can also alter the Clip Data if you need finer control over the data being dragged between Views. Now we can start the drag using these details:

    //start dragging the item touched
    view.startDrag(data, shadowBuilder, view, 0);
    

    If you only need a basic drag and drop process you do not need to worry too much about the details of the Touch Listener.


    Step 4: Create a Drag Listener Class

    We’ve created the listener class for dragging, now we need one for dropping. After the Touch Listener class, add a Drag Listener class declaration:

    private class ChoiceDragListener implements OnDragListener {
    }
    

    Add the onDrag method inside this new class:

    @Override
    public boolean onDrag(View v, DragEvent event) {
    	//handle drag events
    	return true;
    }
    

    This is where we respond to drag events. The Drag Listener can be used to detect and respond to various stages of the drag, each handled within a switch/case statement. Add it inside the onDrag method, before the return statement as follows:

    switch (event.getAction()) {
    	case DragEvent.ACTION_DRAG_STARTED:
    		//no action necessary
    		break;
    	case DragEvent.ACTION_DRAG_ENTERED:
    		//no action necessary
    		break;
    	case DragEvent.ACTION_DRAG_EXITED:
    		//no action necessary
    		break;
    	case DragEvent.ACTION_DROP:
    		//handle the dragged view being dropped over a drop view
    		break;
    	case DragEvent.ACTION_DRAG_ENDED:
    		//no action necessary
    		break;
    	default:
    		break;
    }
    

    Most of the drag events are not relevant to this app, however you can use them if you need more detailed control. We will add to the ACTION_DROP section later.


    Step 5: Add Listeners to the Text Views

    We have Touch and Drag Listener classes defined, now we need to add instances of them to the Views we are dragging and dropping with. Back in the onCreate method, after the existing code, first add Touch Listeners to the three Text Views users will be able to drag:

    //set touch listeners
    option1.setOnTouchListener(new ChoiceTouchListener());
    option2.setOnTouchListener(new ChoiceTouchListener());
    option3.setOnTouchListener(new ChoiceTouchListener());
    

    Now add Drag Listeners to the three Views dragged items will be able to be dropped on:

    //set drag listeners
    choice1.setOnDragListener(new ChoiceDragListener());
    choice2.setOnDragListener(new ChoiceDragListener());
    choice3.setOnDragListener(new ChoiceDragListener());
    

    We implement an instance of the Touch or Drop classes we created for each of the Text Views. Users will be able to drag any of the top three Text Views onto any of the bottom three.

    App While Dragging

    Step 6: Handle Drops

    Now we have the app setup for users to drag and drop items, we just have to define what should happen when an item is dropped on one of the bottom three Views. Back in your Drag Listener class, in the ACTION_DROP case statement (before the break), first get a reference to the View being dropped:

    //handle the dragged view being dropped over a target view
    View view = (View) event.getLocalState();
    

    This represents whichever one of the top three Text Views the user has dragged. Since they have successfully dropped it onto one of the bottom three Views, we can stop displaying it in its original position:

    //stop displaying the view where it was before it was dragged
    view.setVisibility(View.INVISIBLE);
    

    The onDrag method also receives a parameter representing the target View that the dragged item is being dropped on, so cast it as a Text View:

    //view dragged item is being dropped on
    TextView dropTarget = (TextView) v;
    

    Let’s also cast the dropped View to a Text View:

    //view being dragged and dropped
    TextView dropped = (TextView) view;
    

    We can now use these to update the text displayed in the bottom area:

    //update the text in the target view to reflect the data being dropped
    dropTarget.setText(dropped.getText());
    

    Now the text from the dragged View is displayed within the View it was dropped onto. Let’s make it bold to distinguish it from the still vacant spots:

    //make it bold to highlight the fact that an item has been dropped
    dropTarget.setTypeface(Typeface.DEFAULT_BOLD);
    

    This is how the app appears after the user drags the “Apple” item to the bottom position in the list:

    App After Drag and Drop

    Step 7: Handle Duplicate Drops

    The basic functionality is now complete, but let’s enhance this a little by handling cases in which the user drops more than one item onto the same slot.

    We can keep a record of which item is currently dropped into each View in the bottom section using tags. When an item is dropped onto one of the target Views, we can set a tag representing the ID of the View being dropped. Each time we go to drop an item, we can first check whether the target View has a tag representing a View already dropped there. If there is one there, we can simply set its original View back to visible in the top section so that the user can drag it over again, since it is being replaced in the bottom list.

    Still inside the ACTION_DROP section, check whether the current target View has a tag set:

    //if an item has already been dropped here, there will be a tag
    Object tag = dropTarget.getTag();
    

    We only want to reset one of the original Views back visible if there is a tag set:

    //if there is already an item here, set it back visible in its original place
    if(tag!=null)
    {
    	//the tag is the view id already dropped here
    	int existingID = (Integer)tag;
    	//set the original view visible again
    	findViewById(existingID).setVisibility(View.VISIBLE);
    }
    

    Now we can update the tag to represent the new View data that has been dropped here:

    //set the tag in the target view to the ID of the view being dropped
    dropTarget.setTag(dropped.getId());
    

    This allows the user to change their mind by dropping items on top of existing items and still make a selection for the items previously dropped.

    App After Completion of Drag and Drop

    Conclusion

    That’s our basic app complete. There are lots of ways in which you could enhance this app. For example, you could also allow users to drag Views from the bottom section after they have been dropped there, either to a different position in the bottom section or back to a position in the top section. To do this you would need to add both Touch and Drag Listeners to all Text Views in the top and bottom sections, so the logic is a little more complex. You could also enhance the app by reading the data in dynamically, or by creating custom designs for different stages of the drag and drop process. Whatever you do, make sure you test your drag and drop operations thoroughly.


    Using ScrollStyle with UIPageViewController

    $
    0
    0

    One of the changes introduced with iOS 6 is the ability to use the UIPageViewController to use a scrolling animation instead of the standard page turning style. Read on to learn how we can use this to easily create a paginated scroll view effect!

    To explore these changes we will be creating an “image rater” application where users can swipe through different pictures and give a rating to each one. Although the premise is basic, it will give you a good chance to start using the UIPageControl with the new style.


    Step 1: Setting Up

    Before we begin, we’ll need some pictures. Jump into Wikipedia and download 5 different pictures that are licensed under a creative commons. Create a new Xcode project with an empty template. Name it “ImageRater” or something equivalent. Also make sure that the targeted device is set to iPad, storybording is off, and ARC is on.

    This project is going to be designed to be used in landscape orientation only. Before we start, open up the project settings and select only the landscape orientations.


    Step 2: Create The Image Model and View Controller

    Next, we need to create the model object and view controller responsible for displaying the image. Create a new class called “ImageModel” inheriting from NSObject. This will be a simple model class that contains a string representing the image file name and an integer that represents the image “rating”:

    ImageModel.h

    @interface ImageModel : NSObject
    - (id)initWithImageName:(NSString *)imageName;
    @property (nonatomic, strong) NSString *imageName;
    @property (nonatomic) NSInteger rating;
    @end
    

    We have also created a custom init method that will make creating these with an image name easier. In the .m file implement, the init method like so:

    ImageModel.m

    @implementation ImageModel
    - (id)initWithImageName:(NSString *)imageName
    {
        self = [super init];
        if (self)
        {
            _imageName = imageName;
            _rating = 0;
        }
        return self;
    }
    

    The view controller that will display the image will also be very simple. Create a new class called ImageViewController (inheriting UIViewController) and give it the following properties (as well as importing ImageModel.h):

    ImageViewController.h

    #import "ImageModel.h"
    @interface ImageViewController : UIViewController
    @property (nonatomic, strong) UIImageView *imageView;
    @property (nonatomic, strong) UILabel *label;
    @property (nonatomic, strong) ImageModel *model;
    @end
    

    And in the .m file, add the following code:

    ImageViewController.m

    - (void)viewDidLoad
    {
        [super viewDidLoad];
        [self.view setBackgroundColor:[UIColor whiteColor]];
        CGRect insetFrame = CGRectMake(20, 80, self.view.frame.size.width - 40, self.view.frame.size.height - 100);
        _imageView = [[UIImageView alloc] initWithFrame:insetFrame];
        _imageView.backgroundColor = [UIColor clearColor];
        [_imageView setAutoresizingMask:UIViewAutoresizingFlexibleWidth | UIViewAutoresizingFlexibleHeight];
        [_imageView setImage:[UIImage imageNamed:_model.imageName]];
        [[self view] addSubview:_imageView];
    }
    

    When the view loads, we will set the views background color and set up the imageView.


    Step 3: Set Up the PageViewController

    Create a new class called “RootViewController” (inheriting from UIViewController). This will be where the action happens. It will contain the PageViewController, the label that shows the name and ranking of the image, as well as a stepper that allows the user to set the rating for the picture.

    Once you’ve created the class, open the app delegates header file, import the RootViewController class, and set it as a property:

    AppDelegate.h

    #import "RootViewController.h"
    @interface AppDelegate : UIResponder <UIApplicationDelegate>
    @property (strong, nonatomic) UIWindow *window;
    @property (strong, nonatomic) RootViewController *viewController;
    @end
    

    And in the implementation file set it as the the root view controller:

    AppDelegate.m

    - (BOOL)application:(UIApplication *)application didFinishLaunchingWithOptions:(NSDictionary *)launchOptions
    {
        self.window = [[UIWindow alloc] initWithFrame:[[UIScreen mainScreen] bounds]];
        // Override point for customization after application launch.
        self.viewController = [[RootViewController alloc] init];
        self.window.rootViewController = self.viewController;
        [self.window makeKeyAndVisible];
        return YES;
    }
    

    Open the .h file of the RootViewController and give it the following properties and make it conform to the UIPageViewControllerDataSource and Delegate methods:

    RootViewController.h

    @interface RootViewController : UIViewController <UIPageViewControllerDataSource, UIPageViewControllerDelegate>
    @property (nonatomic, strong) UIPageViewController *pageViewController;
    @property (nonatomic, strong) NSMutableArray *modelArray;
    @property (nonatomic) NSInteger vcIndex;
    @property (nonatomic, strong) UIStepper *rateStepper;
    @property (nonatomic, strong) UILabel *imageLabel;
    - (void)stepperValueChanged:(id)sender;
    @end
    

    The pageViewController will be responsible for displaying the ImageViewControllers and the model array will be responsible for storing the imageModel objects. The vcIndex will be responsible for keeping track of the current page index. RateStepper will allow the user to rate an image up or down. The imageLabel will display the name and rating of the current image.

    The stepperValueChanged method will update the relevant image model setting its rating up or down.

    In the .m file of the RootViewController import the ImageViewController and set up the view controllers for the page view controller:

    RootViewController.m

    #import "ImageViewController.h"
    @implementation RootViewController
    - (void)viewDidLoad
    {
        [super viewDidLoad];
        [[self view] setBackgroundColor:[UIColor blackColor]];
        _modelArray = [NSMutableArray arrayWithObjects:[[ImageModel alloc] initWithImageName:@"cat.jpg"],
                       [[ImageModel alloc] initWithImageName:@"DawnFlight.jpeg"],
                       [[ImageModel alloc] initWithImageName:@"James.jpg"],
                       [[ImageModel alloc] initWithImageName:@"MOS_KIM.jpg"],
                       [[ImageModel alloc] initWithImageName:@"Pterophorus.jpg"],
                       nil];
        _pageViewController = [[UIPageViewController alloc] initWithTransitionStyle:UIPageViewControllerTransitionStyleScroll
                                                              navigationOrientation:UIPageViewControllerNavigationOrientationHorizontal
                                                                            options:[NSDictionary dictionaryWithObject:[NSNumber numberWithFloat:50.0f] forKey:UIPageViewControllerOptionInterPageSpacingKey]];
        _pageViewController.delegate = self;
        _pageViewController.dataSource = self;
    

    There are a few things going on here. First, we set our background color to black. Second, we alloc init our pageViewController with the scollStyle transition, the horizontal navigation orientation, and a dictionary for our options. The dictionary contains an NSNumber that states there should be a spacing of 50 points between each viewController. We then proceed to set ourself as the delegate and datasource for the pageViewController.

    Next, we need to set up an initial viewController to start off with:

    RootViewController.m

     _pageViewController.delegate = self;
        _pageViewController.dataSource = self;
        ImageViewController *imageViewController = [[ImageViewController alloc] init];
        imageViewController.model = [_modelArray objectAtIndex:0];
        NSArray *viewControllers = [NSArray arrayWithObject:imageViewController];
        [self.pageViewController setViewControllers:viewControllers
                                      direction:UIPageViewControllerNavigationDirectionForward
                                       animated:NO
                                     completion:nil];
        [self addChildViewController:_pageViewController];
        [self.view addSubview:_pageViewController.view];
        [_pageViewController didMoveToParentViewController:self];
        CGRect pageViewRect = self.view.bounds;
        pageViewRect = CGRectInset(pageViewRect, 40.0, 80.0f);
        self.pageViewController.view.frame = pageViewRect;
        self.view.gestureRecognizers = _pageViewController.gestureRecognizers;
    

    Here we create a new content view controller, add it to an array, and then set that array as the viewControllers property for our pageController. Next, we add the pageViewController as our childViewController and then the pageViewControllersView to our own. We then give it a bit of an inset so that it doesn’t take up the entire view and set our gesture recognizers to that of the pageViewControllers so everything is in sync.

    Finally, to finish the view we need to add the stepper and label that describes the picture:

    RootViewController.m

        self.view.gestureRecognizers = _pageViewController.gestureRecognizers;
        _rateStepper = [[UIStepper alloc] initWithFrame:CGRectMake(40, 680, 40, 30)];
        [_rateStepper addTarget:self action:@selector(stepperValueChanged:) forControlEvents:UIControlEventValueChanged];
        [_rateStepper setMinimumValue:0];
        [_rateStepper setMaximumValue:10];
        [_rateStepper setIncrementImage:[UIImage imageNamed:@"arrowup"] forState:UIControlStateNormal];
        [_rateStepper setDecrementImage:[UIImage imageNamed:@"arrowdown"] forState:UIControlStateNormal];
        [[self view] addSubview:_rateStepper];
        _imageLabel = [[UILabel alloc] initWithFrame:CGRectMake(0, 0, self.view.frame.size.width, 40)];
        _imageLabel.backgroundColor = [UIColor clearColor];
        _imageLabel.textColor = [UIColor whiteColor];
        [_imageLabel setFont:[UIFont boldSystemFontOfSize:20]];
        [_imageLabel setAutoresizingMask:UIViewAutoresizingFlexibleWidth];
        [_imageLabel setTextAlignment:NSTextAlignmentCenter];
        ImageModel *model = [_modelArray objectAtIndex:0];
        _imageLabel.text = [NSString stringWithFormat:@"%@ - Rating: %d", model.imageName, model.rating];
        [[self view] addSubview:_imageLabel];
    }
    

    Most of this should be fairly straightforward. The main thing to pay attention to here is where we set the “increment” and “decrement” images for the stepper control. You will need to find your own images for this, but it should be easy to make or find some free icons on google. If you can’t do this, you can simply skip customizing the stepper.

    If we build and run our app now, it should look something like this:

    Incomplete App

    This is a good start, but the images don’t scroll yet and the stepper crashes the app. We are also missing the page indicators. Let’s fill in those blanks:


    Step 4: Completing the PageViewController

    We need to implement the datasource methods that tell the pageViewController which view controllers should be loaded before and after the current one:

    RootViewController.m

    #pragma mark -
    #pragma mark - UIPageViewControllerDelegate Method
    - (UIViewController *)pageViewController:(UIPageViewController *)pageViewController viewControllerBeforeViewController:(UIViewController *)viewController
    {
        ImageViewController *contentVc = (ImageViewController *)viewController;
        NSUInteger currentIndex = [_modelArray indexOfObject:[contentVc model]];
        _vcIndex = currentIndex;
        [_rateStepper setValue:[[contentVc model] rating]];
        ImageModel *model = [_modelArray objectAtIndex:_vcIndex];
        [_imageLabel setText:[NSString stringWithFormat:@"%@ - Rating: %d", model.imageName, model.rating]];
        if (currentIndex == 0)
        {
            return nil;
        }
        ImageViewController *imageViewController = [[ImageViewController alloc] init];
        imageViewController.model = [_modelArray objectAtIndex:currentIndex - 1];
        return imageViewController;
    }
    - (UIViewController *)pageViewController:(UIPageViewController *)pageViewController viewControllerAfterViewController:(UIViewController *)viewController
    {
        ImageViewController *contentVc = (ImageViewController *)viewController;
        NSUInteger currentIndex = [_modelArray indexOfObject:[contentVc model]];
        _vcIndex = currentIndex;
        [_rateStepper setValue:[[contentVc model] rating]];
        ImageModel *model = [_modelArray objectAtIndex:_vcIndex];
        [_imageLabel setText:[NSString stringWithFormat:@"%@ - Rating: %d", model.imageName, model.rating]];
        if (currentIndex == _modelArray.count - 1)
        {
            return nil;
        }
        ImageViewController *imageViewController = [[ImageViewController alloc] init];
        imageViewController.model = [_modelArray objectAtIndex:currentIndex + 1];
        return imageViewController;
    }
    

    Both of these methods are quite similar. First, we get the relevant viewController before or after the current one (and cast it to an ImageViewController). We then look to find where the index of that viewController’s model is in relation to our model array. Once found, we set our current vcIndex value to the currentIndex. We also make sure to update the stepper’s current value and update the label string to display the current image name and rating value.

    If the index would be out of bounds (determined by equalling 0 or the count of the model array – 1), then we do not return a new view controller. If there is a model to be loaded, we create a new ImageViewController, set it’s model to the relevant model in the array, and return the viewController.

    If you build and run now, the pages will scroll, however we are still missing the page indicator view. We only need to implement the following dataSource methods as below:

    RootViewController.m

    #pragma mark -
    #pragma mark - UIPageViewControllerDataSource Method
    - (NSInteger)presentationCountForPageViewController:(UIPageViewController *)pageViewController
    {
        return _modelArray.count;
    }
    - (NSInteger)presentationIndexForPageViewController:(UIPageViewController *)pageViewController
    {
        return 0;
    }
    

    It’s that easy. For the count method, we simply return the count of the model array and for the current Index we simply return what it needs to start at, which is 0.


    Step 5: Rating the Images

    All the hard work has been done! To rank the images, simply implement our “stepperValueChanged” method and add the below code:

    RootViewController.m

    #pragma mark -
    #pragma mark - Private Methods
    - (void)stepperValueChanged:(id)sender
    {
        ImageModel *model = [_modelArray objectAtIndex:_vcIndex];
        [model setRating:[_rateStepper value]];
        [_imageLabel setText:[NSString stringWithFormat:@"%@ - Rating: %d", model.imageName, model.rating]];
    }
    

    We simply get the model at the current index, update its rating based on the steppers rating, and then update the label text.

    Build and run your application now and it should look something like this:

    Finished App

    Wrap Up

    We’ve covered how to set up a very simple PageViewController using the new scroll transition style without the use of a xib or storyboard. This should give you a solid understanding of how the PageViewController works and allow you to modify it to work in your own applications!

    Understanding Objective-C Blocks

    $
    0
    0

    The aim of this tutorial is to give a gentle introduction to Objective-C blocks while paying special emphasis to their syntax, as well as exploring the ideas and implementation patterns that blocks make possible.

    In my opinion, there are two main stumbling blocks (pun intended!) for beginners when attempting to truly understanding blocks in Objective-C:

    1. Blocks have a somewhat arcane and “funky” syntax. This syntax is inherited from function pointers as part of the C roots of Objective-C. If you haven’t done a lot of programming in pure C, then it’s likely you haven’t had occasion to use function pointers, and the syntax of blocks might seem a bit intimidating.
    2. Blocks give rise to “programming idioms” based on the functional programming style that the typical developer with a largely imperative programming-style background is unfamiliar with.

    In simpler words, blocks look weird and are used in weird ways. My hope is that after reading this article, neither of these will remain true for you!

    Admittedly, it is possible to utilize blocks in the iOS SDK without an in-depth understanding of their syntax or semantics; blocks have made their way into the SDK since iOS 4, and the API of several important frameworks and classes expose methods that take blocks as parameters: Grand Central Dispatch (GCD), UIView based animations, and enumerating an NSArray, to name a few. All you need to do is mimic or adapt some example code and you’re set.

    However, without properly understanding blocks, you’ll be limited in your use of them to this method-takes-block-argument pattern, and you’ll only be able to use them where Apple has incorporated them in the SDK. Conversely, a better understanding of blocks will let you harness their power and it will open the door to discovering new design patterns made possible by them that you can apply in your own code.


    Running the Code Samples

    Since in this tutorial we’ll be discussing the core concepts of blocks, which apply to recent versions of both Mac OS X and iOS, most of the tutorial code can be run from a Mac OS X command-line project.

    To create a command line project, choose OS X > Application from the left-hand pane and choose the “Command Line Tool” option in the window that comes up when you create a new project.

    newproject

    Give your project any name. Ensure that ARC (Automatic Reference Counting) is enabled!

    ARC

    Most of the time code will be presented in fragments, but hopefully the context of the discussion will make it clear where the code fragment fits in, as you experiment with the ideas presented here.

    The exception to this is at the end of the tutorial, where we create an interesting UIView subclass, for which you obviously need to create an iOS project. You shouldn’t have any problem writing a toy app to test out the class, but regardless, you’ll be able to download sample code for this project if you’d like.


    The Many Facets of Blocks

    Have you ever heard of a strange animal called the platypus? Wikipedia describes it as an “egg-laying, venomous, duck-billed, beaver-tailed, otter-footed mammal”. Blocks are a bit like the platypus of the Objective-C world in that they share aspects of variables, objects, and functions. Let’s see how:

    A “block literal” looks a lot like a function body, except for some minor differences. Here’s what a block literal looks like:

    ^(double a, double b) // the caret represents a block literal. This block takes two double parameters. Note we don't have to explicitly specify the return type
    {
       double c = a + b;
       return c; //
    }
    

    So, syntax-wise, what are the differences in comparison with function definitions?

    • The block literal is “anonymous” (i.e. nameless)
    • The caret (^) symbol
    • We didn’t have to specify the return type – the compiler can “infer” it. We could’ve explicitly mentioned it if we wanted to.

    There’s more, but that’s what should be obvious to us so far.

    Our block literal encapsulates a bunch of code. You might say this is what a function does too, and you’d be right, so in order to see what else blocks are capable of, read on!

    A block pointer lets us handle and store blocks, so that we can pass around blocks to functions or have functions return blocks – stuff that we normally do with variables and objects. If you’re already adept with using function pointers, you’ll immediately remark that these points apply to function pointers too, which is absolutely true. You’ll soon discover that blocks are like function pointers “on steroids”! If you aren’t familiar with function pointers, don’t worry, I’m actually not assuming you know about them. I won’t go into function pointers separately because everything that can be achieved with function pointers can be achieved with blocks – and more! – so a separate discussion of function pointers would only be repetitive and confusing.

    double(^g)(double, double) = ^(double a, double b)
    {
        double c = a + b; return c;
    };
    

    The above statement is key and deserves a thorough examination.

    The right-hand side is the block literal that we saw a moment ago.

    On the left side, we’ve created a block pointer called g. If we want to be pedantic, we’ll say the ‘^’ on the left signifies a block pointer, whereas the one on the right marks the block literal. The block pointer has to be given a “type”, which is the same as the type of the block literal it points to. Let’s represent this type as double (^) (double, double). Looking at the type this way, though, we should observe that the variable (f) is “ensconced” within its type, so the declaration needs be read inside out. I’ll talk a bit more about the “type” of functions and blocks a bit later.

    The “pointing” is established through the assignment operator, “=”.

    The above line is like a typical C statement – note the semicolon in the end! We’ve just defined a block literal, created a block pointer to identify it, and assigned it to point to the block. In that sense, it’s similar to a statement of the following type:

    char ch                // ch identifies a variable of type char
            =              // that we assigned
              'a'          // the character literal value 'a'.
                 ;         // semicolon terminates the statement
    

    Of course, the above statement doesn’t involve pointers, so beware of this when drawing semantic comparisons.

    I want to “milk” the previous comparison a bit more, just so you that you begin to see blocks in the same light as our humble char ch = 'a' statement:

    We could split the block pointer declaration and the assignment:

    double (^g)(double, double); // declaration
    g = ^(double m, double n) { return m * n; };
    // the above is like doing:
    // char ch;
    // ch = 'a';
    

    We could reassign g to point to something else (although this time the analogy is with a pointer or reference to an object instance):

    double (^g)(double, double);
    g = ^(double m, double n) { return a + b; };
    // .. later
    g = ^(double x, double y) { return x * y; }; // g reassigned to point to a new block; same type, so no problem
    // but not:
    // g = ^(int x) { return x + 1; }; // types are different! The literal on the right has type int(^)(int), not double(^) (double, double)!
    double (^h)(double, double) = g; // no problem here! h has the correct type and can be made to point to the same block as g
    // compare with:
    int i = 10, j = 11; // declaring a coupling of integers
    int *ptrToInt; // declaring a pointer to integers
    ptrToInt = &i; // ptrToInt points to i
    // later...
    ptrToInt = &l // ptrToInt now points to j
    float f = 3.14;
    // ptrToInt = &f; // types are different! technically can be done, but compiler will warn you of the type difference. And typically you don't want to do this!
    int *anotherPtrToInt;
    anotherPtrToInt = ptrToInt; // both pointers point to the same integer's location in memory
    

    Another key difference between ordinary functions and blocks is that functions need to be defined in the “global scope” of the program, meaning a function can’t be defined inside the body of another function!

    int sum(int, int); // This is a declaration: we tell the compiler about a function sum that takes two ints and returns an int (but will be defined somewhere else).
    //...
    int main()
    {
       //...
    // we are *inside* main. Can't define a function here!
       int s = sum(5, 4); // sum function being invoked (called). This must happen inside another function! (except for main() itself)
    }
    int sum(int a, int b) // This is the function definition. It must be outside any function!
    {
       int c = a + b;
       return c;
    // we're *inside* the function body for sum(). We can't define a new function here!
    }
    

    A lot of the power of blocks comes from the fact that they can be defined anywhere a variable can! Compare what we just saw with functions to what we can do with blocks:

    int main()
    {
    // inside main(). Block CAN be defined here!
       int (^sum)(int, int) = ^(int a, int b) { return a + b; }; // the point here is that we're doing this inside the function main()!
    }
    

    Again, it helps to recall the char ch = 'a' analogy here; a variable assignment would ordinarily happen within the scope of a function. Except if we were defining a global variable, that is. Although we could do the same with blocks – but then there wouldn’t be any practical difference between blocks and functions, so that’s not very interesting!

    So far, we’ve only looked at how blocks are defined and how their pointers are assigned. We haven’t actually used them yet. It is important that you realise this first! In fact, if you were to type in the above code into Xcode, it would complain that the variable sum is unused.

    The invocation of a block – actually using it – looks like a normal function call. We pass arguments to them through their pointers. So after the line of code we just saw, we could go:

    #import <Foundation/Foundation.h>
    int main()
    {
       int (^sum)(int, int) = ^(int a, int b) { return a + b; }; // point here is that we're doing this inside main()!
       double x = 5.1, y = 7.3;
       double s = sum(5.1, 7.3); // block invoked. Note we're passing arguments (x,y) whose type matches the block's parameters. Return type matches assigned variable (s) as well
       NSLog(@"the sum of %f and %f is %f", x, y, s);
    }
    

    Actually, we can do even better than that: we could define and invoke our block all in one go.

    Observe the following:

    #import <Foundation/Foundation.h>
    int main()
    {
       double x = 5.1, y = 7.3;
       double s = ^(double x, double y) { return x + y; }(x, y); // we're applying the arguments directly to the block literal!
       NSLog(@"the sum of %f and %f is %f", x, y, s);
    }
    

    Perhaps the last one looked a bit like a “parlor trick” – flashy but not terribly useful – but in fact the ability to define blocks at the point of their use is one of the best things about them. If you’ve ever called block-accepting methods in the SDK, you’ve probably already encountered this use. We’ll talk about this in more detail, shortly.

    Let’s exercise our block syntax writing skills first. Can you declare a block pointer for a block that takes a pointer to an integer as a parameter and then returns a character?

       char(^b)(int *); // b can point to a block that takes an int pointer and returns a char
    

    OK, now how about defining a block that takes no parameters, and returns no value, and encapsulates code to print “Hello, World!” to the console (upon invocation)? Assign it to a block pointer.

    void (^hw)(void) = ^{NSLog(@"hello, world!"); };
    // block literal could also be written as ^(void){ NSLog(@"hello, world!"); };
    

    Note that for a block literal that takes no parameters, the parantheses are optional.

    Question: Will the above line actually print anything to the console?

    Answer: No. We would need to call (or invoke) the block first, like this:

    hw();
    

    Now, let’s talk about functions that can take blocks as parameters or return blocks. Anything we say here applies to methods that take and return blocks, too.

    Can you write the prototype of an ordinary function that takes a block of the same type as the “Hello, world” block we defined above, and returns nothing? Recall that a prototype just informs the compiler about the signature of a function whose definition it should expect to see at some later point. For example, double sum(double, double); declares a function sum taking two double values and returning a double. However, it is sufficient to specify the type of the arguments and return value without giving them a name:

    void func(void (^) (void));
    

    Let’s write a simple implementation (definition) for our function.

    void func(void (^b) (void)) // we do need to use an identifier in the parameter list now, of course
    {
       NSLog(@"going to invoke the passed in block now.");
       b();
    }
    

    At the risk of repeating myself too many times, func is an ordinary function so its definition must be outside the body of any other function (it can’t be inside main(), for instance).

    Can you now write a small program that invokes this function in main(), passing it our “Hello, World” printing block?

    #include <Foundation/Foundation.h>
    void func(void (^b) void) // if the function definition appears before it is called, then no need for a separate prototype
    {
       NSLog(@"going to invoke the passed in block now.");
       b();
    }
    int main()
    {
       void (^hw)(void) = ^{NSLog(@"hello, world!"); };
       func(hw); // Note the type of hw matches the type of b in the function definition
    }
    // The log will show:
    // going to invoke the passed in block now.
    // hello, world!
    

    Did we have to create a block pointer first only so we could pass the block in?
    The answer is a resounding no! We could’ve done it inline as follows:

    // code in main():
    func(^{NSLog(@"goodbye, world!"); }); // inline creation of block!
    

    Question: ff is a function whose prototype or definition you haven’t seen, but it was invoked as follows. Assume that the right kind of arguments were passed in to the function. Can you guess the prototype of ff?

    int t = 1;
    int g = ff(^(int *x) { return ((*x) + 1); }, t);
    

    This is an exercise in not getting intimidated by syntax! Assuming no warnings are generated, ff has a return type int (because its return value is being assigned to g, which is an int). So we have int f(/* mystery */) What about the parameters?

    Notice that the function is invoked with an inline block which is where the scariness comes from. Let’s abstract this out and represent it by “blk”. Now the statement looks like int g = ff(blk, t); Clearly, ff takes two parameters, the second one being an int (since t was an int). So we say tentatively, int ff(type_of_block, int) where we only have to work out the type of the block. To do that, recall that knowing the block type entails knowing the types of its parameters and its return type (and that’s all). Clearly, block takes one parameter of type int * (pointer to int). What about the return type? Let’s infer it, just like the compiler would: *x is dereferencing a pointer to an int, so that yields an int, adding one to which is also an int.

    Make sure you don’t get mixed up between the meaning of * in int *x and the meaning of * in the expression *x. In the former, it means "x is a pointer to an int variable" in the context of a type declaration, while the latter retrieves the int value stored at the address x.

    So, our block returns an int. The type_of_block is thus int(^)(int *), meaning ff's prototype is:

    int ff(int (^) (int *), int);
    

    Question: Could we have passed in the "hello, world" printing block we created a while ago to ff?

    Answer: Of course not, its type was void(^)(void)), which is different from the type of the block that ff accepts.

    I want to digress briefly and talk a bit more about something we've been using implicitly: the "type" of a block. We defined the type of a block to be determined by the types and number of its arguments and the type of its return value. Why is this a sensible definition? First, keep in mind that a block is invoked just like a function, so let's talk in terms of functions.

    A C program is just a pool of functions that call each other: from the perspective of any function, all other functions in the programs are "black boxes". All that the calling function needs to concern itelf with (as far as syntactical correctness is concerned) is the number of arguments the "callee" takes, the types of these arguments, and the type of the value returned by the "callee". We could swap out one function body with another having the same type and the same number of arguments and the same return type, and then the calling function would be none the wiser. Conversely, if any of these were different, then we won't be able to substitute one function for another. This should convince you (if you needed convincing!) that our idea of what constitutes the type of a function or a block is the right one. Blocks reinforce this idea even more strongly. As we saw, we could pass an anonymous block to a function defined on the fly, as long as the types (as we defined them!) match.

    We could now talk about functions that return blocks! This is even more interesting. If you think about it, essentially you're writing a function that is returning code to the caller! Since the "returned code" will be in the form of a block pointer (which would be invoked exactly as a function) we'd effectively have a function that could return different functions (blocks, actually).

    Let's write a function that takes on options integer representing different types of binary operations (like addition, subtraction, multiplication, etc.) and returns a "calculator block" that you can apply to your operands in order to get the result of that operation.

    By a binary operation, we simply mean an operation that operates on two values, known as the "operands".

    Suppose we're dealing with double operands. Our calculations also return a double. What's the type of our binary operation block? Easy! It would be double(^) (double, double).

    Our function (let's called it "operation_creator") takes an int which encodes the type of operation we want it to return. So, for example, calling operation_creator(0) would return a block capable of performing addition, operation_creator(1) would give a subtraction block, etc. So operation_creator's declaration looks like return-type operation_creator(int). We just said that return-type is double (^)(double, double). How do we put these two together? The syntax gets a little hairy, but don't panic:

    double (^operation_creator(int)) (double, double);
    

    Don't let this declaration get the better of you! Imagine you just came across this declaration in some code and wanted to decipher it. You could deconstruct it like this:

    1. The only identifier (name) is operation_creator. Start with that.
    2. operation_creator is a function. How do we know? It's immediately followed by an opening paranthesis (. The stuff between it and the closing paranthesis ) tells us about the number and types of parameters this function takes. There's only argument, of type int.
    3. What remains is the return type. Mentally remove operation_creator(int) from the picture, and you're left with double (^) (double, double). This is just the type of a block that takes two double values and returns a double. So, what our function operation_creator returns is a block of this type. Again, make a mental note that if the return type is a block, then the identifier is "ensconced" in the middle of it.

    Let's digress with another practice problem for you: Write the declaration of a function called blah that takes as its only parameter a block with no parameters and returns no value, and returns a block of the same type.

    void(^blah(void(^)(void)))(void);
    

    If you had difficulty with this, let's break down the process: we want to define a function blah() that takes a block that takes no parameters and returns nothing (that is, void), giving us blah(void(^)(void)). The return value is also a block of type void(^)(void) so ensconce the previous bit, starting immediately after the ^, giving void(^blah(void(^)(void)))(void);.

    OK, now you can dissect or construct complex block and function declarations, but all these brackets and voids are probably making your eyes water! Directly writing out (and making sense of) these complex types and declarations is unwieldy, error prone, and involves more mental overhead than it should!

    It's time to talk about using the typedef statement, which (as you hopefully know), is a C construct that lets you hide complex types behind a name! For example:

    typedef int ** IntPtrPtr;
    

    Gives the name IntPtrPtr to the type "pointer to pointer to int". Now you can substitute int ** anywhere in code (such as a declaration, a type cast, etc.) with IntPtrPtr.

    Let's define a type name for the block type int(^)(int, int). You can do it like this:

    typedef int (^BlockTypeThatTakesTwoIntsAndReturnsInt) (int, int);
    

    This says that BlockTypeThatTakesTwoIntsAndReturnsInt is equivalent to int(^)(int, int), that is, a block of the type that takes two int values and returns an int value.

    Again, notice that the identifier (BlockTypeThatTakesTwoIntsAndReturnsInt) in the above statement, which represents the name we want to give the type we're defining, is wrapped up between the details of the type being typedef'd.

    How do we apply this idea to the blah function we just declared? The type for the parameter and the return type is the same: void(^)(void), so let's typedef this as follows:

    typedef void(^VVBlockType)(void);
    

    Now rewrite the declaration of blah simply as:

    VVBlockType blah(VVBlockType);
    

    There you go, much nicer! Right?

    At this point, it's very important that you are able to distinguish between the following two statements:

    typedef double (^BlockType)(double); // (1)
    double(^blkptr)(double); // (2)
    

    They look the same, barring the typedef keyword, but they mean very different things.

    With (2), you've declared a block pointer variable that can point at blocks of type double(^)(double).

    With (1), you've defined a type by the name BlockType that can stand in as the type double (^)double. So, after (2), you could do something like: blkptr = ^(double x){ return 2 * x; };. And after (1), you could've actually written (2) as BlockType blkptr;(!)

    Do not proceed unless you've understood this distinction perfectly!

    Let's go back to our operation function. Can you write a definition for it? Let's typedef the block type out:

    typedef double(^BinaryOpBlock_t)(double, double);
    BinaryOpBlock_t operation_creator(int op)
    {
       if (op == 0)
          return ^(double x, double y) { return x + y; }; // addition block
       if (op == 1)
          return ^(double x, double y) { return x * y; }; // multiplication block
    // ... etc.
    }
    int main()
    {
       BinaryOpBlock_t sum = operation_creator(0); // option '0' represents addition
       NSLog(@"sum of 5.5 and 1.3 is %f", sum(5.5, 1.3));
       NSLog(@"product of 3.3 and 1.0 is %f", operation_creator(1)(3.3, 1.0)); // cool, we've composed the function invocation and the block invocation!
    }
    
    For a cleaner implementation, you'd probably want to define an enumeration (enum type) to represent the options integer that our function accepts.

    Another example. Define a function that takes an array of integers, an integer representing the size of the array, and a block that takes an int and returns an int. The job of the function will be to apply the block (which we imagine represents a mathematical formula) on each value in the array.

    We want the type of our block to be int(^)(int). Let's typedef and then define our function:

    typedef int(^iiblock_t)(int);
    void func(int arr[], int size, iiblock_t formula)
    {
       for ( int i = 0; i < size; i++ )
       {
          arr[i] = formula(arr[i]);
       }
    }
    

    Let's use this in a program:

    int main()
    {
       int a[] = {10, 20, 30, 40, 50, 60};
       func(a, 6, ^(int x) { return x * 2; }); // after this function call, a will be {20, 40, 60, 80, 100, 120}
    }
    

    Isn't that cool? We were able to express our mathematical formula right where we needed it!

    Add the following statements after the function call in the previous code:

    // place the following lines after func(a, 6, ^(int x) { return x * 2; });
       int n = 10; // n declared and assigned
       func(a, 6, ^(int x) { return x - n; } ); // n used in the block!
    } // closing braces of main
    

    Did you see what we did there? We used the variable n which was in our block's lexical scope in the body of the block literal! This is another a tremendously useful feature of blocks (although in this trivial example it might not be obvious how, but let's defer that discussion).

    A block can "capture" variables that appear in the lexical scope of the statement calling the block. This is actually a read-only capture, so we couldn't modify n within the block's body. The value of the variable is actually copied by the block at the time of its creation. Effectively, this means if we were to change this variable at some point after the creation of the block literal but before the block's invocation, then the block would still use the "original" value of the variable, that is, the value held by the variable at the time of the block's creation. Here's a simple example of what I mean, based on the previous code:

    int n = 5;
    iiblock_t b = ^(int r) { return r * n; }; // created block, but haven't invoked it yet
    // .. stuff
    n = 1000; // we've the value of n, but that won't affect the block which was defned previously
    func(a, 6, b); // after this block gets invoked, each element in the array is multiplied by 5, not 1000!
    

    So, how is this ability of blocks useful? In high-level terms, it allows us to use "contextual information" in an inline block from the scope where the block is defined. It might not make sense to pass this information as a parameter to the block as it is only important in certain contexts, yet in those particular situations we do want to utilize this information in the implementation of our block.

    Let's make this idea concrete with an example. Suppose you're working on an educational app about the countries of the world, and as part of the app you want to be able to rank (i.e. sort) countries with respect to different metrics, such as population, natural resources, GDP, or any complex formula you come up with combining data you have about these countries. There are different sorting algorithms available, but most of them work on the principle of being able to compare two entities and decide which one is greater or smaller.
    Let's say you come up with the following helper method in one of your classes:

    -(NSArray *) sortCountriesList:(NSArray *)listOfCountries
               withComparisonBlock: BOOL(^cmp) (Country *country1, Country *country2)
    {
        // Implementation of some sorting algorithm that will make several passes through listOfCountries
        // whatever the algorithm, it will perform several comparisons in each pass and do something based on the result of the comparison
        BOOL isGreater = comp(countryA, countryB); // block invoked, result is YES if countryA is "greater" than countryB based on the passed in block
        if (isGreater) // do something, such as swapping the countries in the array
        // ...
    }
    

    Note that before this example we only talked about blocks taken or returned by functions, but it's pretty much the same with Objective-C methods as far as the block syntax and invocation is concerned.

    Again, you should appreciate that the ability to "plug in code" to our method in the form of a comparison block gives us the power to sort the countries according to some formula we can specify on-the-spot. All well and good. Now suppose you realise it would also be great if we could also rank the countries from lowest rank to highest. This is how you could achieve this with blocks.

    // Inside the body of some method belonging to the same class as the previous method
    bool sortInAscendingOrder = YES;
    // calling our sorting method:
    NSArray *sortedList = [self sortCountriesList:list withComparisonBlock:^(Country *c1, Country *c2) {
                             if (c1.gdp > c2.gdp ) // comparing gdp for instance
                             {
                                if (sortInAscendingOrder) return YES;
                                else return NO;
                             }
    }];
    

    And that's it! We used the flag sortInAscendingOrder that carried contextual information about how we wanted the sort to be carried out. Because this variable was in the lexical scope of the block declaration, we were able to use its value within the block and not have to worry about the value changing before the block completes. We did not have to touch our -sortCountriesList: withComparisonBlock: to add a bool parameter to it, or touch its implementation at all! If we'd used ordinary functions, we would be writing and rewriting code all over the place!

    Let's end this tutorial by applying all we've learned here with a cool iOS application of blocks!

    If you've ever had to do any custom drawing in a UIView object, you know you have to subclass it and override its drawRect: method where you write the drawing code. You probably find it to be a chore, create an entire subclass even if all you're wanting to do is draw a simple line, plus having to look into the implementation of drawRect: whenever you need to be reminded of what the view draws. What a bore!

    Why can't we do something like this instead:

    [view drawWithBlock:^(/* parameters list */){ // drawing code for a line, or whatever }];
    

    Well, with blocks, you can! Here, view is an instance of our custom UIView subclass endowed with the power of drawing with blocks. Note that while we're still having to subclass UIView, we only have to do it once!

    Let's plan ahead first. We'll call our subclass BDView (BD for "block drawing"). Since drawing happens in drawRect:, we want BDView's drawRect: to invoke our drawing block!. Two things to think of: (1) how does BDView hold on to the block? (2) What would be the block's type?

    Remember I mentioned way at the beginning that blocks are also like objects? Well, that means you can declare block properties!

    @property (nonatomic, copy) drawingblock_t drawingBlock;
    

    We haven't worked out what the block type should be, but after we do we'll typedef it as drawingblock_t!

    Why have we used copy for the storage semantics? Truthfully, in this introductory tutorial we haven't talked about what happens behind the scenes, memory-wise, when we create a block or return a block from a function. Luckily, ARC will do the right thing for us under most circumstances, saving us from having to worry about memory maangement, so for our purposes now it is enough to keep in mind that we want to use copy so that a block gets moved to the heap and doesn't disappear once the scope in which it was created ends.

    What about the type of the block? Recall that the drawRect: method takes a CGRect parameter that defines the area in which to draw, so our block should take that as a parameter. What else? Well, drawing requires the existence of a graphics context, and one is made available to us in drawRect: as the "current graphics context". If we draw with UIKit classes such as UIBezierPath, then those draw into the current graphics context implicitly. But if we choose to draw with the C-based Core Graphics API, then we need to pass in references to the graphics context to the drawing functions. Therefore, to be flexible and allow the caller to use Core Graphics functions, our block should also take a parameter of type CGContextRef which in BDView's drawRect: implementation we pass in the current graphics context.

    We're not interested in returning anything from our block. All it does is draw. Therefore, we can typedef our drawing block's type as:

    typedef void (^drawingblock_t)(CGContextRef, CGRect);
    

    Now, in our -drawWithBlock: method we'll set our drawingBlock property to the passed in block and call the UIView method setNeedsDisplay which will trigger drawRect:. In drawRect:, we'll invoke our drawing block, passing it the current graphics context (returned by the UIGraphicsGetCurrentContext() function) and the drawing rectangle as parameters. Here's the complete implementation:

    //BDView.h
    #import <UIKit/UIKit.h>
    typedef void (^drawingblock_t)(CGContextRef, CGRect);
    @interface BDView : UIView
    - (void)drawWithBlock:(drawingblock_t) blk;
    @end
    
    // BDView.m
    #import "BDView.h"
    @interface BDView ()
    @property (nonatomic, copy) drawingblock_t drawingBlock;
    @end
    @implementation BDView
    - (void)drawWithBlock:(drawingblock_t)blk
    {
        self.drawingBlock = blk; // copy semantics
        [self setNeedsDisplay];
    }
    - (void)drawRect:(CGRect)rect
    {
        if (self.drawingBlock)
        {
            self.drawingBlock(UIGraphicsGetCurrentContext(), rect);
        }
    }
    @end
    

    So, if we had a view controller whose view property was an instance of BDView, we could call the following method from viewDidLoad (say) to draw a line that ran diagonally across the screen from the top-left corner to the bottom right corner:

    - (void)viewDidLoad
    {
        [super viewDidLoad];
        BDView *view = (BDView *)self.view;
        [view drawWithBlock:^(CGContextRef context, CGRect rect){
            CGContextMoveToPoint(context, rect.origin.x, rect.origin.y);
            CGContextAddLineToPoint(context, rect.origin.x + rect.size.width, rect.origin.y + rect.size.height);
            CGContextStrokePath(context);
        }];
    }
    

    Brilliant!


    More to Learn

    In this introductory tutorial on blocks, we've admittedly left out a few things. I'll mention a couple of these here, so you can look into them in more advanced articles and references:

    • We haven't talked much about memory semantics of blocks. Although automatic reference counting relieves us of a lot of burden in this regard, in certain scenarios more understanding is required.
    • The __block specifier that allows a block to modify a variable in its lexical scope.

    Conclusion

    In this tutorial, we had a leisurely introduction to blocks where we paid special attention to the syntax of block declaration, assignment, and invocation. We tried to leverage what most developers already know from C regarding variables, pointers, objects, and functions. We ended with an interesting practical application of blocks that should get the wheels in your head turning and get you excited about using blocks effectively in your own code. Proper use of blocks can improve code understandability and sometimes offer very elegant solutions to problems.
    I also recommend you take a look at BlocksKit, which includes many interesting utilities of blocks that can make your life as an iOS developer easier. Happy coding!

    Android SDK: Creating Custom Views

    $
    0
    0

    The Android platform provides an extensive range of user interface items that are sufficient for the needs of most apps. However, there may be occasions on which you feel the need to implement a custom user interface for a project you are working on. In this tutorial we will work through the process of creating a custom View.
    To create and use our custom View, we will extend the View class, define and specify some custom attributes, add the View to our layout XML, override the onDraw method to tailor the View appearance and manipulate it from our app’s main Activity.


    Step 1: Create an Android Project

    Create a new Android project in Eclipse. You can choose whatever settings you like as long as your app has a main Activity class and a layout file for it. We do not need any amendments to the Manifest file. In the source code download file the main Activity is named “LovelyActivity” and the layout file is “activity_lovely.xml” – alter the code to suit your own names if necessary. We will be creating and adding to a few additional files as we go along.


    Step 2: Create a View Class

    Our custom View can extend any of the existing Android View classes such as Button or TextView. However, we will create a direct subclass of View. Extending an existing class allows you to use the existing functionality and styling associated with that class, while providing processing to suit your own additional needs.

    Create a new class in your application by selecting the app’s main package in Eclipse and choosing “File”, “New”, “Class”. Enter a name of your choice and click “Finish”. The tutorial code uses the class name “LovelyView” – you will need to alter it in all of the below code if you choose a different name. Make your new class extend View by adding to its opening declaration line:

    public class LovelyView extends View {
    

    Add the following import statements above this:

    import android.content.Context;
    import android.content.res.TypedArray;
    import android.graphics.Canvas;
    import android.graphics.Paint;
    import android.graphics.Paint.Style;
    import android.util.AttributeSet;
    import android.view.View;
    

    Step 3: Create Attribute Resources

    In order to use our custom View as we would use a standard View (i.e. set its attributes in layout XML and refer to them in our Java code), we will declare attribute resources. In Eclipse, create a new file in your project “res/values” folder by selecting it and choosing “File”, “New”, “File”. Enter “attrs.xml” as the file name and click “Finish”.

    In the attributes file we first need to indicate that we are listing resources, so add the following parent element:

    <resources>
    </resources>
    

    Inside this element, we are going to declare three attributes for the View that will allow us to style it. Let’s keep things relatively simple – the View is going to display a circle with some text in the middle. The three attributes will be the circle color, the text String, and the text color. Add the following inside your resources element:

    <declare-styleable name="LovelyView">
    	<attr name="circleColor" format="color" />
    	<attr name="circleLabel" format="string"></attr>
    	<attr name="labelColor" format="color"></attr>
    </declare-styleable>
    

    The declare-styleable element specifies the View name. Each attribute has a name and format. We will be able to specify these attributes in the layout XML when we add the custom View and also retrieve them in the View class. We will also be able to retrieve and set the attributes from our Java Activity class. The values provided for each attribute will need to be of the type listed here as format.


    Step 4: Add the View to the Layout

    Let’s add an instance of the custom View to our app’s main layout file. In order to specify the custom View and its attributes, we need to add an attribute to the parent layout element. In the source download, it is a RelativeLayout but you can use whichever type you prefer. Add the following attribute to your layout’s parent element:

    xmlns:custom="http://schemas.android.com/apk/res/your.package.name"
    

    Alter “your.package.name” to reflect the package your app is in. This specifies the namespace for our app, allowing us to use the attributes we defined within it. Now we can add an instance of the new View. Inside the layout, add it as follows:

    <your.package.name.LovelyView
    	android:id="@+id/custView"
    	android:layout_width="fill_parent"
    	android:layout_height="fill_parent"
    	android:layout_margin="5dp"
    	custom:circleColor="#ff0099"
    	custom:circleLabel="Hello"
     	custom:labelColor="#ffff66" />
    

    Again, alter the package name to suit your own, and the class name if necessary. We will use the ID to refer to the View in our Activity code. Notice that the element lists standard View attributes alongside custom attributes. The custom attributes are preceded by “custom:” and use the names we specified in our attributes XML file. Note also that we have specified values of the types we indicated using the format attributes in the “attrs.xml” file. We will retrieve and interpret these values in our View class.


    Step 5: Retrieve the Attributes

    Now let’s turn back to the View class we created. Inside the class declaration, add some instance variables as follows:

    //circle and text colors
    private int circleCol, labelCol;
    //label text
    private String circleText;
    //paint for drawing custom view
    private Paint circlePaint;
    

    We will use the first three of these to keep track of the current settings for color and text. The Paint object is for when we draw the View. After these variables, add a constructor method for your class:

    public LovelyView(Context context, AttributeSet attrs){
    	super(context, attrs);
    }
    

    As we are extending the View class, the first thing we do is call the superclass method. After the super call, let’s extend the method to setup the View. First instantiate the Paint object:

    //paint object for drawing in onDraw
    circlePaint = new Paint();
    

    Now let’s retrieve the attribute values we set in XML:

    //get the attributes specified in attrs.xml using the name we included
    TypedArray a = context.getTheme().obtainStyledAttributes(attrs,
    	R.styleable.LovelyView, 0, 0);
    

    This typed array will provide access to the attribute values. Notice that we use the resource name we specified in the “attrs.xml” file. Let’s now attempt to retrieve the attribute values, using a try block in case anything goes wrong:

    try {
    	//get the text and colors specified using the names in attrs.xml
    	circleText = a.getString(R.styleable.LovelyView_circleLabel);
    	circleCol = a.getInteger(R.styleable.LovelyView_circleColor, 0);//0 is default
    	labelCol = a.getInteger(R.styleable.LovelyView_labelColor, 0);
    } finally {
    	a.recycle();
    }
    

    We read the attributes into our instance variables. Notice that we use the names we listed for each in “attrs.xml” again. The colors are retrieved as integer values and the text label as a String.

    That’s the constructor method complete – by the time it has executed, the class should have retrieved the selected View attributes we defined in the attribute resources file and set values for in the layout XML.


    Step 6: Draw the View

    Now we have our View attributes in the class, so we can go ahead and draw it. To do this, we need to override the onDraw method. Add its outline after your constructor method as follows:

    @Override
    protected void onDraw(Canvas canvas) {
    	//draw the View
    }
    

    Since we’re going to draw a circle, let’s get some information about the available space, inside the onDraw method:

    //get half of the width and height as we are working with a circle
    int viewWidthHalf = this.getMeasuredWidth()/2;
    int viewHeightHalf = this.getMeasuredHeight()/2;
    

    Now we can calculate the circle radius:

    //get the radius as half of the width or height, whichever is smaller
    //subtract ten so that it has some space around it
    int radius = 0;
    if(viewWidthHalf>viewHeightHalf)
    	radius=viewHeightHalf-10;
    else
    	radius=viewWidthHalf-10;
    

    Now let’s set some properties for painting with:

    circlePaint.setStyle(Style.FILL);
    circlePaint.setAntiAlias(true);
    

    Now we will use the selected circle color as stored in our instance variable:

    //set the paint color using the circle color specified
    circlePaint.setColor(circleCol);
    

    This means that the circle will be drawn with whatever color we listed in the layout XML. Let’s draw it now using these details:

    canvas.drawCircle(viewWidthHalf, viewHeightHalf, radius, circlePaint);
    

    Now let’s add the text. First set the color using the value retrieved from the layout XML:

    //set the text color using the color specified
    circlePaint.setColor(labelCol);
    

    Now set some more properties:

    //set text properties
    circlePaint.setTextAlign(Paint.Align.CENTER);
    circlePaint.setTextSize(50);
    

    Finally we can draw the text, using the text string retrieved:

    //draw the text using the string attribute and chosen properties
    canvas.drawText(circleText, viewWidthHalf, viewHeightHalf, circlePaint);
    

    That’s onDraw complete.

    App Initial Appearance

    Step 7: Provide Get and Set Methods

    When you create a custom View with your own attributes, it is recommended that you also provide get and set methods for them in your View class. After the onDraw method, first add the get methods for the three customizable attributes:

    public int getCircleColor(){
    	return circleCol;
    }
    public int getLabelColor(){
    	return labelCol;
    }
    public String getLabelText(){
    	return circleText;
    }
    

    Each method simply returns the value requested. Now add the set methods for the color attributes:

    public void setCircleColor(int newColor){
    	//update the instance variable
    	circleCol=newColor;
    	//redraw the view
    	invalidate();
    	requestLayout();
    }
    public void setLabelColor(int newColor){
    	//update the instance variable
    	labelCol=newColor;
    	//redraw the view
    	invalidate();
    	requestLayout();
    }
    

    These methods accept int parameters representing the color to set. In both cases we update the instance variable in question, then prompt the View to be redrawn. This will make the onDraw method execute again, so that the new values affect the View displayed to the user. Now add the set method for the text:

    public void setLabelText(String newLabel){
    	//update the instance variable
    	circleText=newLabel;
    	//redraw the view
    	invalidate();
    	requestLayout();
    }
    

    This is the same as the other two set methods except for the String parameter. We will call on these methods in our Activity class next.


    Step 8: Manipulate the View from the Activity

    Now we have the basics of our custom View in place, let’s demonstrate using the methods within our Activity class. In the app’s main Activity class, add the following import statements:

    import android.graphics.Color;
    import android.view.View;
    

    Before the onCreate method, inside the class declaration, add an instance variable representing the instance of the custom View displayed:

    private LovelyView myView;
    

    Inside the onCreate method, after the existing code, retrieve this using its ID as included in the XML layout file:

    myView = (LovelyView)findViewById(R.id.custView);
    

    To demonstrate setting the View attribute values from the Activity, we will add a simple button. Open your layout file and add it after the custom View element:

    <Button
    	android:layout_width="wrap_content"
    	android:layout_height="wrap_content"
    	android:layout_centerHorizontal="true"
    	android:onClick="btnPressed"
    	android:text="@string/btn_label" />
    

    We specify a method to execute on user clicks – we will add this to the Activity class. First add the String to your “res/values/strings” XML file:

    <string name="btn_label">Press Me</string>
    
    App with Button

    Now go back to the Activity class and add the method listed for clicks on the button:

    public void btnPressed(View view){
    //update the View
    }
    

    Let’s use the set methods we defined to update the custom View appearance:

    myView.setCircleColor(Color.GREEN);
    myView.setLabelColor(Color.MAGENTA);
    myView.setLabelText("Help");
    

    This is of course just to demonstrate how you can interact with a custom View within your Activity code. When the user clicks the button, the appearance of the custom View will change.

    App After Pressing Button

    Conclusion

    In general, it’s advisable to use existing Android View classes where possible. However, if you do feel that you need a level of customization beyond the default settings, creating your own custom Views is typically straightforward. What we have covered in this tutorial is really just the beginning when it comes to creating tailored Android user interfaces. See the official guide for information on adding interactivity and optimization to your customizations.

    Announcing the Mobile Bundle!

    $
    0
    0

    If you love building for Mobile then you’ll love the Mobile Bundle! We’ve filled it with 39 items across all of our marketplaces, and we’ve knocked down the price to $20 for 7 days only!

    The Mobile Bundle Is Now on Sale

    This bundle includes more than $500 worth of highly rated items from ThemeForest, GraphicRiver, VideoHive, PhotoDune, 3DOcean, and CodeCanyon. All of the items were selected by either our review team or by the marketplace community with a single goal in mind: To help us all build better websites and apps for mobile phones.

    Grab these 39 files. They’ll only be around as a bundle until the 31st of January AEDT.

    3

    Due to the exclusive nature of the Birthday Bundle, the Bundle items are purchased ‘as-is’, meaning no Bundle files are eligible for item support.

    Get the Bundle Here!

    Create a Retro Racing Game – Tuts+ Premium

    $
    0
    0

    In this tutorial series, you’ll learn how to create a Retro Racing game. The objective of the game is to get to the finish line without hitting an obstacle. Read on!


    Tutorial Teaser

    Step 1: Application Overview

    Using pre-generated graphics we will code an entertaining game using Lua and the Corona SDK API’s.

    The player will be able to control a racing car to avoid obstacles, you can modify the parameters in the code to customize the game.

    Step 2: Target Device

    The first thing we have to do is select the platform we want to run our app within, this way we’ll be able to choose the size for the images we will use.

    The iOS platform has these characteristics:

    • iPad 1/2/Mini: 1024x768px, 132 ppi
    • iPad Retina: 2048×1536, 264 ppi
    • iPhone/iPod Touch: 320x480px, 163 ppi
    • iPhone/iPod Retina: 960x640px, 326 ppi
    • iPhone 5/iPod Touch: 1136×640, 326 ppi

    Because Android is an open platform, there are many different devices and resolutions. A few of the more common screen characteristics are:

    • Asus Nexus 7 Tablet: 800x1280px, 216 ppi
    • Motorola Droid X: 854x480px, 228 ppi
    • Samsung Galaxy SIII: 720x1280px, 306 ppi

    In this tutorial, we’ll be focusing on the iOS platform with the graphic design, specifically developing for distribution to an iPhone/iPod touch, but the code presented here should apply to Android development with the Corona SDK as well.

    Step 3: Interface

    A simple and friendly interface will be used that involves multiple shapes, buttons, bitmaps and more.

    The interface graphic resources necessary for this tutorial can be found in the attached download.

    Step 4: Export Graphics

    Depending on the device you have selected, you may need to export the graphics in the recommended PPI. You can do that in your favorite image editor.

    I used the Adjust Size… function in the Preview app on Mac OS X.

    Remember to give the images a descriptive name and save them in your project folder.

    Step 5: App Configuration

    An external file will be used to make the application go fullscreen across devices, the config.lua file. This file shows the original screen size and the method used to scale that content in case the app is run in a different screen resolution.

    application =
    {
        content =
        {
            width = 320,
            height = 480,
            scale = "letterbox"
        },
    }
    

    Step 6: Main.lua

    Let’s write the application!

    Open your prefered Lua editor (any Text Editor will work, but you won’t have syntax highlighting) and prepare to write your awesome app. Remember to save the file as main.lua in your project folder.

    Step 7: Code Structure

    We’ll structure our code as if it were a Class. If you know ActionScript or Java, you should find the structure familiar.

    Necessary Classes
    Variables and Constants
    Declare Functions
        contructor (Main function)
        class methods (other functions)
    call Main function
    

    Step 8: Hide Status Bar

    display.setStatusBar(display.HiddenStatusBar)
    

    This code hides the status bar. The status bar is the bar on top of the device screen that shows the time, signal, and other indicators.


    Get the Full Series!

    This tutorial series is available to Tuts+ Premium members only. Read a preview of this tutorial on the Tuts+ Premium web site or login to Tuts+ Premium to access the full content.


    Joining Tuts+ Premium. . .

    For those unfamiliar, the family of Tuts+ sites runs a premium membership service called Tuts+ Premium. For $19 per month, you gain access to exclusive premium tutorials, screencasts, and freebies from Mobiletuts+, Nettuts+, Aetuts+, Audiotuts+, Vectortuts+, and CgTuts+. You’ll learn from some of the best minds in the business. Become a premium member to access this tutorial, as well as hundreds of other advanced tutorials and screencasts.

    Viewing all 1836 articles
    Browse latest View live