Quantcast
Channel: Envato Tuts+ Code - Mobile Development
Viewing all 1836 articles
Browse latest View live

Testing with TestFlight

$
0
0

Testing an application is indispensable if you plan to deliver a robust and reliable product to your customers. This article will take a closer look at beta testing iOS applications with TestFlight, a free web service that makes it easy to distribute Ad Hoc builds and monitor beta testing usage.


Introduction

Testing software isn’t limited to beta testing. There are several techniques to test software, such as unit testing, integration testing, stress testing, etc. Each of these methodologies has its benefit and place in the development cycle. Beta testing is a process in which a pre-release or beta version is distributed to a limited audience that is not part of the development team.

In the early days of iOS development, it wasn’t trivial to distribute test builds, gather feedback, and collect crash reports. However, in recent years a handful of services have emerged that make beta testing not only easier, but trivial. In this article, I will discuss one such service: TestFlight. TestFlight allows developers to distribute test builds over-the-air. Fiddling with .ipa files and provisioning profiles is a thing of the past if you decide to team up with TestFlight.

The ease of Ad Hoc distribution is not the only advantage of TestFlight. TestFlight also offers an SDK that gives you a number of great features with surprisingly little overhead. With the SDK installed and configured, crash reports are sent to TestFlight and automatically symbolicated. Another great feature of the TestFlight SDK is checkpoints. You can set checkpoints at specific locations in your application to see if a particular feature is actually used. Checkpoints tie in neatly with sessions. Whenever a user opens the application, a session is automatically started. The TestFlight dashboard shows how long a session lasts and which checkpoints the tester passed during a session. The list of features doesn’t stop there. A few other useful features include: in-app feedback, in-app updates, and remote logging.


Step 1: Getting Started

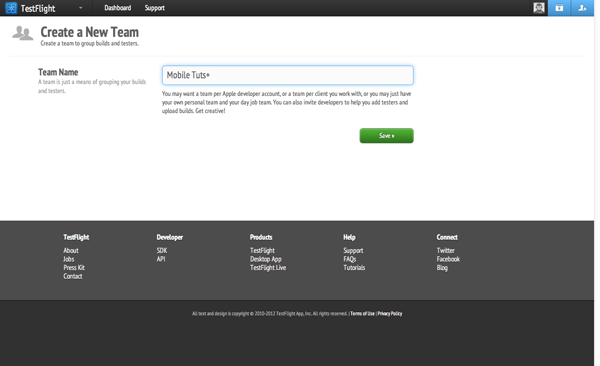
To follow the steps in this tutorial, you will need a TestFlight account. Head over to the TestFlight website and sign up for a free account. After signing in to your TestFlight account for the first time, you are asked to create a team. What are teams? A team is just a categorization for grouping builds and testers. Chances are that you work on several applications for different clients or projects. A team allows you to group the builds and testers for each application or client easily. In other words, it is a convenient way to keep the builds and testers of different projects separated and organized.
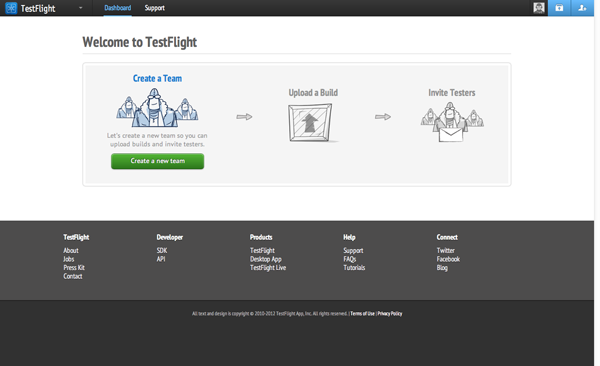
Testing with TestFlight: Welcome to TestFlight - Figure 1
Testing with TestFlight: Create a New Team - Figure 2

The next step is to upload a test build to TestFlight. However, before we do that, we need to create an application that is properly set up and configured for TestFlight. This includes integrating the TestFlight SDK to take advantage of the features I described earlier.

Of course, TestFlight really shines if you have a group of committed testers (preferably people that are not part of the development team). Adding testers to TestFlight is as simple as sending an invitation. With TestFlight, it is no longer cumbersome to obtain a device’s UDID as you will see a bit later. I explain how to invite beta testers a bit later in this tutorial.


Step 2: Create a New Project

The application that we are about to build will be simple. The primary goal of this tutorial is show you how to get up to speed with TestFlight and not so much building a feature rich application. The features of the application are simple, (1) implement TestFlight checkpoints, (2) ask the user for feedback while using the application, and (3) crashing the application and let TestFlight collect the crash report.

Create a new project in Xcode by selecting the Single View Application template from the list of templates (figure 3). Name your application Take-Off, enter a company identifier, set iPhone for the device family, and check Use Automatic Reference Counting. Make sure to uncheck the remaining checkboxes for this project. Tell Xcode where you want to save your project and hit the Create button (figure 4).
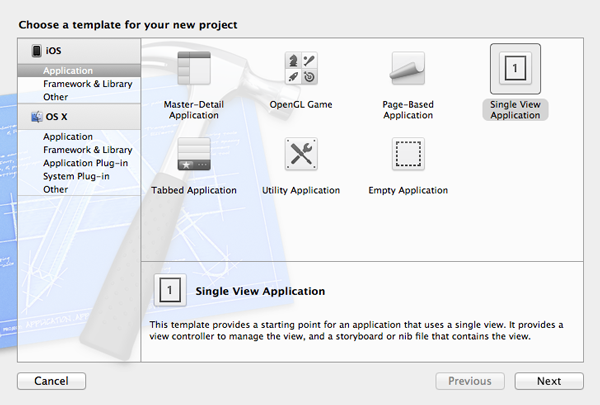
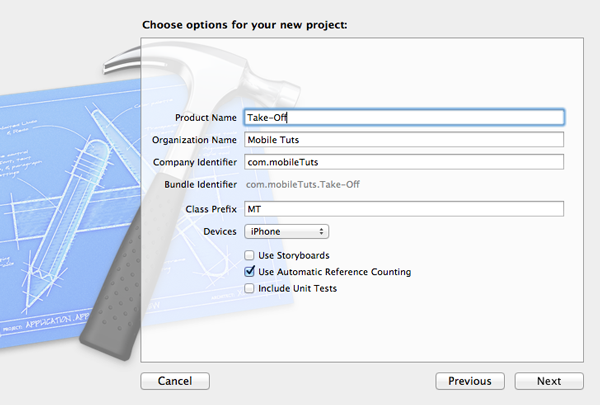
Testing with TestFlight: Project Setup - Figure 3
Testing with TestFlight: Project Setup - Figure 4

Step 3: Add the TestFlight SDK

Start by downloading the latest stable release of the TestFlight SDK (1.1 at the time of writing). Extract the archive and add libTestFlight.a and TestFlight.h, located in the TestFlightx.x folder, to your project. Make sure to copy both files to your project by checking the checkbox labeled Copy items into destination group’s folder (if needed) and don’t forget to add both files to the Take-Off target (figure 5). To keep everything organized, place libTestFlight.a and TestFlight.h in a separate group named TestFlight.
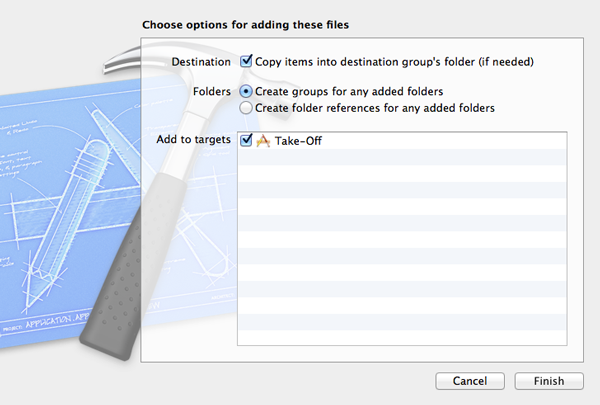
Testing with TestFlight: Add the TestFlight SDK to the Xcode Project - Figure 5

A few more steps are necessary to finalize the integration with TestFlight. Select your project in the Project Navigator and click the Take-Off target in the list of targets. Select the Build Phases tab at the top and open the Link Binary With Libraries drawer. If all went well, libTestFlight.a should be present in the list of libraries. Drag libTestFlight.a into the list of linked libraries if it isn’t present in the list (figure 6).
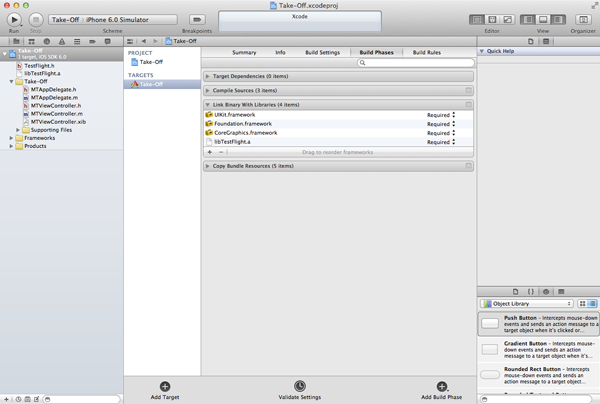
Testing with TestFlight: Link the Xcode Project Against the Required Libraries - Figure 6

TestFlight also makes use of the libz library to do some of its work so we need to link the project against this library as well. Click the plus button at the bottom of the list of libraries, search for libz.dylib, and add it to the list of linked libraries.
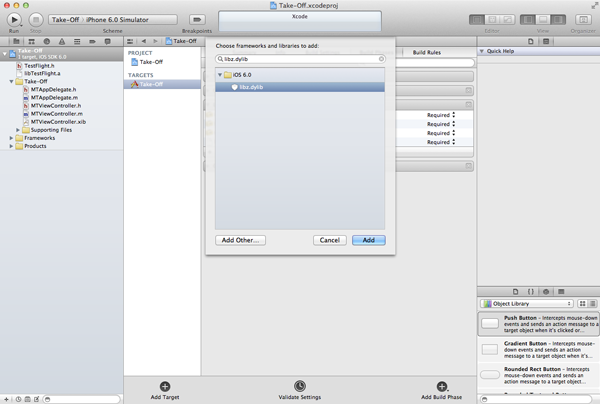
Testing with TestFlight: Link the Xcode Project Against the libz Library - Figure 7

The next step is optional, but recommended if you plan to use TestFlight throughout your application. Instead of importing TestFlight.h in every file that makes use of the TestFlight SDK, it is more convenient to add it to the project’s Prefix.pch file. Take a look at the complete Prefix.pch file below for clarification.

//
// Prefix header for all source files of the 'Take-Off' target in the 'Take-Off' project
//
#import <Availability.h>
#ifndef __IPHONE_4_0
#warning "This project uses features only available in iOS SDK 4.0 and later."
#endif
#ifdef __OBJC__
    #import <UIKit/UIKit.h>
    #import <Foundation/Foundation.h>
    #import "TestFlight.h"
#endif

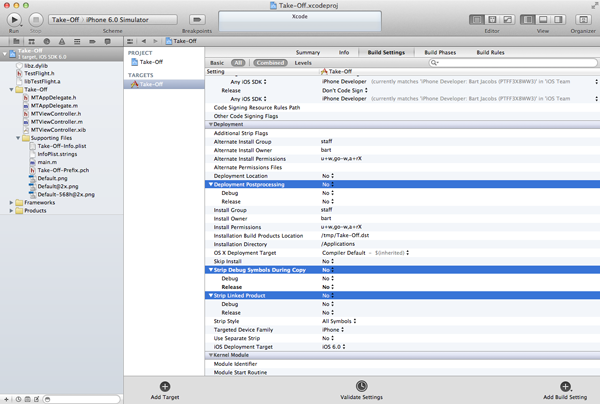
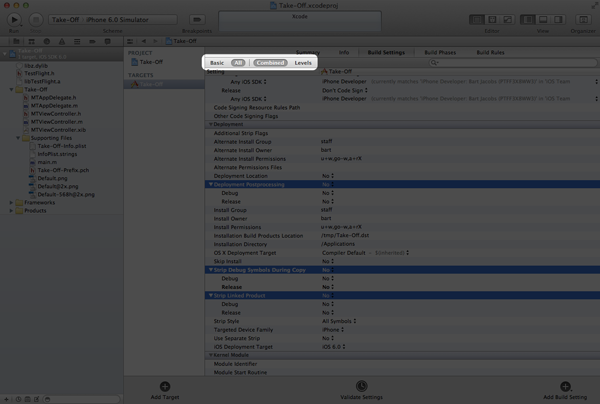
TestFlight installs an uncaught exception handler to report crashes and collect crash reports. If you want to make use of this feature then it is recommended to slightly modify the build settings of your project. Select your project from the Project Navigator and choose the Take-Off target from the list of targets. Select the Build Settings tab and scroll to the Deployment settings (figure 8). Three deployment settings need to be set to NO.

  1. Deployment Postprocessing
  2. Strip Debug Symbols During Copy
  3. Strip Linked Product
Testing with TestFlight: Modify Build Settings - Figure 8

Settings in bold indicate that the default value is overridden. You can revert any changes you made by selecting a bold setting and hitting backspace on your keyboard. Make sure that the effective value of the build setting is set to Combined (figure 9).
Testing with TestFlight: Modify Build Settings - Figure 9

Step 4: Setup TestFlight

TestFlight doesn’t do anything in your application just yet. To make use of its features, we need to initialize TestFlight when the application launches. The ideal place for setting up TestFlight is in the application delegate’s application:didFinishLaunchingWithOptions: method. Setting up TestFlight is surprisingly easy. All we need to do is call takeOff: on the TestFlight class and pass the team token of the team we set up earlier in this tutorial.

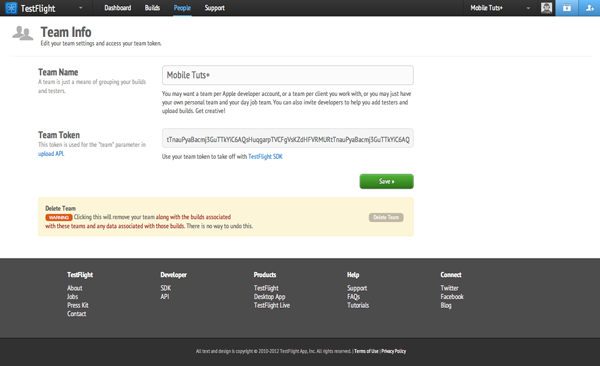
To find your team token, head over to TestFlight’s Dashboard, select the correct team from the dropdown menu at the top right, and choose Edit Info from that same menu. Copy the team token and pass it as the parameter in the takeOff: method.
Testing with TestFlight: Copy and Paste the Team Token - Figure 10
- (BOOL)application:(UIApplication *)application didFinishLaunchingWithOptions:(NSDictionary *)launchOptions {
    // Initialize View Controller
    self.viewController = [[MTViewController alloc] initWithNibName:@"MTViewController" bundle:nil];
    // Initialize Window
    self.window = [[UIWindow alloc] initWithFrame:[[UIScreen mainScreen] bounds]];
    [self.window setRootViewController:self.viewController];
    [self.window makeKeyAndVisible];
    // Initialize TestFlight
    [TestFlight takeOff:@"TEAM_TOKEN_GOES_HERE"];
    return YES;
}

Step 5: Upload a Build

TestFlight is now set up, but we still need to upload a build to TestFlight. The following steps are no different than the steps you would normally take to prepare a test or ad hoc build for an application. I have listed the necessary steps below.

  1. Create Distribution Certificate in iOS Provisioning Portal
  2. Create App ID in iOS Provisioning Portal
  3. Add Devices in iOS Provisioning Portal
  4. Create Provisioning Profile in iOS Provisioning Portal
  5. Create Ad Hoc Configuration in Xcode
  6. Create Ad Hoc Scheme in Xcode
  7. Archive Build for Ad Hoc Distribution in Xcode
  8. Upload Ad Hoc Build to TestFlight
  9. Distribute Ad Hoc Build to Testers in TestFlight

This might seem like a lot of work, but most of these steps only need to be done once for a new application. In addition, much of this can be automated. In addition to TestFlight’s SDK, TestFlight also has an upload API that allows developers to automatically upload builds to TestFlight. I won’t cover the upload API in this tutorial as this is a more advanced topic.

Since you are reading this tutorial, I will assume that you are already familiar with beta testing and the steps involved to prepare a test build for ad hoc distribution. In this article, I will limit myself to the steps that involve TestFlight.

When distributing builds using TestFlight, it is important to properly version your builds. By doing so, keeping track of different test builds will become much easier.

Before uploading your application, make sure to set the version number of your application to 0.1.0 to indicate that this is a a pre-release version. Take a look at this question on Stack Overflow for more information about version numbers.

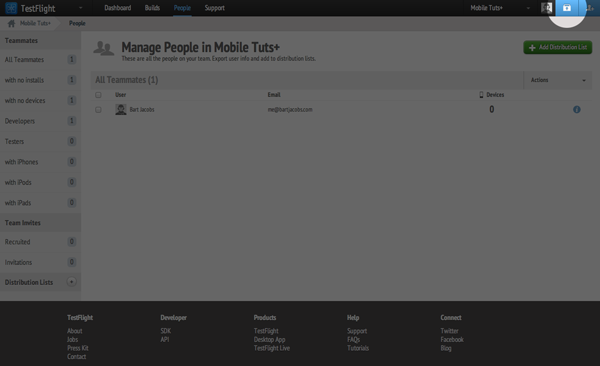
To manually upload a build to TestFlight, click the second button from the right at the top of the TestFlight Dashboard.
Testing with TestFlight: Upload a Build to TestFlight - Figure 11

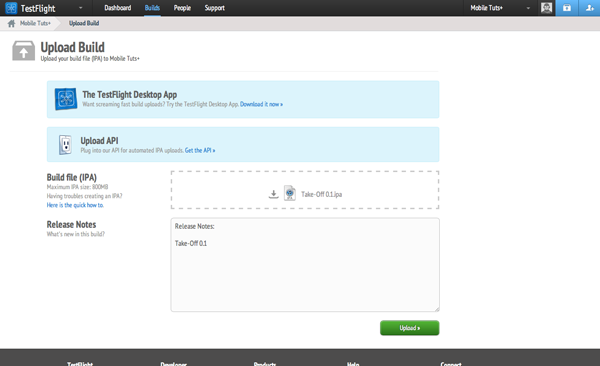
Adding a new build is as easy as dragging the .ipa file into the appropriate field, adding a short description, also known as release notes, and clicking the Upload button. Release notes are much more useful than most people think. Release notes should contain information about the changes made to the test build, but they should also contain known bugs (if necessary) and potential workarounds.
Testing with TestFlight: Upload a Build to TestFlight - Figure 12

After uploading a build of your application, you are taken to the Permissions view of your new test build. The permissions of a build determine who has access to the new test build, that is, who can install the test build on their device(s). For example, if you want to test a critical build only internally and prevent external testers from accessing the build then you can restrict the permissions of that build to only include members of your development team.

To make the distribution of test builds easier, TestFlight has a feature appropriately named distribution lists. A distribution list is a list or group of people within a TestFlight team. Instead of manually selecting members of a TestFlight team every time you upload a new build, you tell TestFlight which distribution lists have access to the new build.


Step 6: Crash Reports, Checkpoints, and Feedback

One of the best features of TestFlight is the ability to collect and automatically symbolicate crash reports. Implementing checkpoints and asking for user feedback is easy as well. Let’s modify the project to see how all this works.

Open your Xcode project and head over to the view controller’s implementation file (MTViewController.m). In the viewDidLoad method, create three buttons as shown below. The code shouldn’t be difficult to grasp.

- (void)viewDidLoad {
    [super viewDidLoad];
    // Create Crash Button
    UIButton *crashButton = [[UIButton alloc] initWithFrame:CGRectMake(20.0, 20.0, 280.0, 44.0)];
    [crashButton setTitle:@"Crash" forState:UIControlStateNormal];
    [crashButton setBackgroundColor:[UIColor blueColor]];
    [crashButton addTarget:self action:@selector(crash:) forControlEvents:UIControlEventTouchUpInside];
    [self.view addSubview:crashButton];
    // Create Checkpoint Button
    UIButton *checkpointButton = [[UIButton alloc] initWithFrame:CGRectMake(20.0, 72.0, 280.0, 44.0)];
    [checkpointButton setTitle:@"Checkpoint" forState:UIControlStateNormal];
    [checkpointButton setBackgroundColor:[UIColor blueColor]];
    [checkpointButton addTarget:self action:@selector(checkpoint:) forControlEvents:UIControlEventTouchUpInside];
    [self.view addSubview:checkpointButton];
    // Create Feedback Button
    UIButton *feedbackButton = [[UIButton alloc] initWithFrame:CGRectMake(20.0, 124.0, 280.0, 44.0)];
    [feedbackButton setTitle:@"Feedback" forState:UIControlStateNormal];
    [feedbackButton setBackgroundColor:[UIColor blueColor]];
    [feedbackButton addTarget:self action:@selector(feedback:) forControlEvents:UIControlEventTouchUpInside];
    [self.view addSubview:feedbackButton];
}

The idea is simple. The application should crash when the user taps the first button. Crashing an application is easy. Right? Take a look at the implementation of the crash: method to see how it is implemented. We create an array with one element and then ask for the second object in the array. This throws an NSRangeException since there is only one element in the array.

- (void)crash:(id)sender {
    NSArray *array = @[@"one"];
    NSLog(@"%@", [array objectAtIndex:1]);
}

The implementation of the checkpoint: method is surprisingly easy thanks to the TestFlight SDK. As I mentioned earlier, checkpoints are a means to track if certain features of your application are used by your testers. In other words, checkpoints tell you when a user has done something that is of interest to you. As I said, checkpoints tell you (among other things) which features are used and, even more important, which features are not. Some features are difficult to find even though this might not be obvious to the developer.

- (void)checkpoint:(id)sender {
    [TestFlight passCheckpoint:@"User did click checkpoint button."];
}

There are various ways to collect feedback from your testers. The easiest way to collect feedback, however, is to use TestFlight’s feedback integration. Take a look at the implementation of the feedback: method to see how this works. When the user taps the feedback button, a modal view shows up and lets the user enter feedback (figure 13).

- (void)feedback:(id)sender {
    [TestFlight openFeedbackView];
}
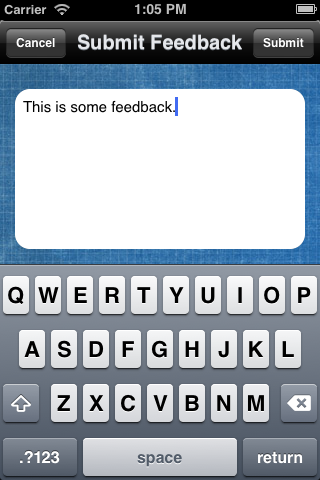
Testing with TestFlight: Give Users a Chance to Send Feedback - Figure 13

After adding these changes to your application, update the version number of your application to 0.2.0 and archive the project. It is good practice to always clean your project before you prepare a build for distribution, for the App Store as well as for ad hoc distribution. Upload the new .ipa file to TestFlight, set the appropriate permissions, and update the installation on your device with the new build by visiting the TestFlight dashboard on your device. If you followed the steps, you should see the three buttons and tapping each button will trigger the functionality in the application.

TestFlight sends information to the TestFlight servers whenever it can, that is, if a network connection is available and the operating system doesn’t kill the application before it is finished sending the data to the TestFlight servers. This means that TestFlight is a great tool to collect live data from your testers. You can try this yourself by tapping the three buttons in your application and taking a look at the TestFlight dashboard a few minutes later.

TestFlight shows you which testers installed the update and on what device. It shows you the number of sessions, which checkpoints they passed, and how many crashes occurred. As I mentioned earlier, the crash reports are automatically symbolicated, which is one of the features I love most.

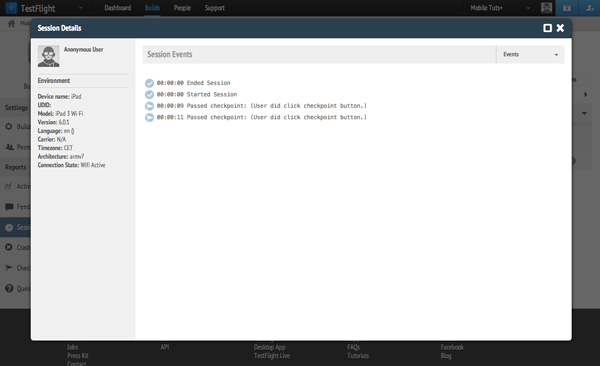
It is also possible to explore individual sessions by clicking the sessions tab on the left (figure 14), selecting a user from the list, and clicking on one of the sessions. This gives you a detailed outline of the session of the respective user (figure 15).
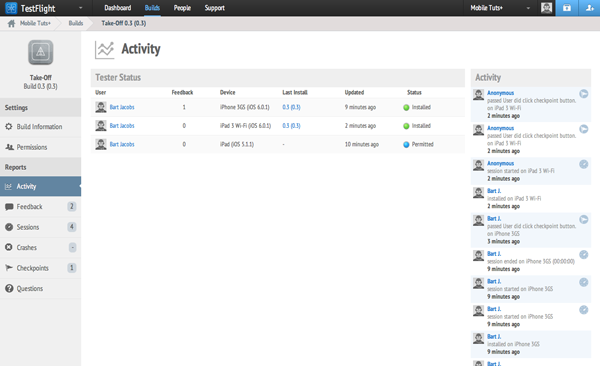
Testing with TestFlight: Detailed Information about Each Build - Figure 14
Testing with TestFlight: A Detailed View of a Session - Figure 15

Step 7: Adding Additional Testers

Beta testing is only useful if you can rely on a group of committed testers who truly want to put your application through its paces. Adding testers to TestFlight can be done in two ways. (1) Open the TestFlight dashboard of the team to which you’d like to add a new tester. Click the button with the tiny plus sign in the top right corner and fill out the form. It is recommended that the user clicks the accept link on the test device. Even though this isn’t strictly necessary, it makes the process much easier, because the device the user is using will be automatically added to their account as a test device.

(2) A second option to add testers, is to use a recruitment URL. This is a form that allows anyone to sign up as a tester. This makes it easier if you have a fairly large group of testers you’d like to add to TestFlight.


More?

A few months ago, TestFlight was acquired by Burstly and this has resulted in the creation of TestFlight Live. TestFlight Live is another addition to the TestFlight platform and it gives developers the means to not only use TestFlight for development and testing, but also when the application is live in the App Store. You can read more about it on TestFlight’s blog.


Conclusion

Even though the idea behind TestFlight is simple, over-the-air distribution of beta versions, TestFlight has a lot more to offer. After having used TestFlight for a few weeks, you will notice that the team behind TestFlight has done a great job in terms of which features to include and how all the different pieces fit together.

There are many more features that I did not discuss in this article so I encourage you to visit TestFlight’s website and browse the outstanding documentation. TestFlight is still growing rapidly and I am curious to see how it continues to evolve and improve.


Mobile Web: Create an SVG Loading Spinner

$
0
0

This tutorial will guide you through the development of a simple SVG loading spinner for use on mobile web sites. Visual indicators like the spinner built in this tutorial are used to indicate background-thread activity and are a crucial part of strong user experience design!


Prerequisites

This tutorial is assumes that you already have basic knowledge in Scalable Vector Graphics (SVG), HTML, CSS, JavaScript, and jQuery. However, the content is presented in a step-by-step fashion that should be easy enough to follow along.

What about Raphaël? We will use the Raphaël project for performing the SVG drawing in this tutorial. To quote from the official Raphaël project web site:

Raphaël uses the SVG W3C Recommendation and VML as a base for creating graphics. This means every graphical object you create is also a DOM object, so you can attach JavaScript event handlers or modify them later. Raphaël’s goal is to provide an adapter that will make drawing vector art compatible cross-browser and easy.

To use Raphaël in your project, you just need to follow these steps:

  1. Import the library into your webpage.
  2. Create the raphael object, passing the id of the div where your SVG will be drawn, like so:
    var paper = Raphael(divID, width, height);
  3. Create the elements you need into the recently created raphael object, for example:
    // Creates circle at x = 50, y = 40, with radius 10
    var circle = paper.circle(50, 40, 10);
    // Sets the fill attribute of the circle to red (#f00)
    circle.attr("fill", "#f00");
    

Enough theory! Let’s start coding!


Step 1: Page Creation with HTML

Let’s start by first building our demo page in HTML. It should look like the following:

<!DOCTYPE html><html><head><meta charset="utf-8"><meta name="viewport" content="width=device-width, initial-scale=1.0"><title>Loading Spinner Example</title><!-- CSS --><link href="spinner/spinner.css" rel="stylesheet"></head><body><p><a id="createSpinner" href="">Unleash</a> the power of the loading spinner.</p><!-- SPINNER --><div id="spinnerFullScreen"><div id="floater"><div id="spinner"></div></div></div><!-- Placed at the end of the document so the pages load faster and without blocking --><script src="https://ajax.googleapis.com/ajax/libs/jquery/1.8.2/jquery.min.js"
type="text/javascript"></script><script src="https://cdnjs.cloudflare.com/ajax/libs/raphael/2.1.0/raphael-min.js"
type="text/javascript"></script><script src="spinner/spinner.js" type="text/javascript"></script></body></html>

Last, but not the least, we add a link where you can click to “unleash” the spinner (i.e. begin the spinning animation).

<a id="createSpinner">Unleash</a> the power of the loading spinner.

Step 2: CSS Styling

Now that we have our markup ready, we need to begin filling in the missing style.

In terms of CSS, the outermost div (i.e. id=”spinnerFullScreen”) must be black and occupy the whole screen on top of all elements that don’t belong to the spinner.

The other two divs (i.e. id=”floater” and id=”spinner”) uses a slight “hack” in order to properly center the spinner in the middle of the screen no matter what the screen size is or where the scroll is set. I will not explain it on this tutorial since the CSS only relates to a “dummy” demo page, not the central purpose of this tutorial.

In the end, the spinner.css file should look like this:

#spinnerFullScreen {
    display: none;
    width: 100%;
    height: 100%;
    position: fixed;
    top: 0px;
    left: 0px;
    background-color: black;
    opacity: 0;
    z-index: 9999998;
}
#floater {
    display: table;
    width: 100%;
    height: 100%;
}
#spinner {
    display: table-cell;
    vertical-align: middle;
    text-align: center;
    z-index:9999999;
}

Step 3: Adding Behavior with JavaScript

In theory, our spinner is composed of a certain number of sectors (8 in the image) that have a length (“sectorLength”) and a width (“sectorWidth”). Of course, these sectors have a distance to the center as well (“centerRadius”).

Spinner math

But is this static? And what about the animation? Well, the animation is just a little trick: having all the sector opacities ranging from 0.0 to 1.0, we continuously change the opacity of each sector to be equal to the opacity of the next sector. Confused? It will likely become more transparent once you see the implementation in JavaScript.

In order to create a reusable library, we will use an Object Oriented paradigm implemented in JavaScript. The library is built around a constructor (function Spinner(data)) and two distinct functions:

  • create– using the instance variables defined in the constructor, it builds the SVG spinner and animates it as well.
  • destroy– destroys the SVG spinner and hides the full screen view.

In the spinner.js file created previously, we first create the constructor of the Spinner, enabling the user of the library to set some values like the number of sectors, the distance of the sectors to the center, and so forth.

/**
 * creates the object Spinner with data values or default values in the case they are missing
 * @param data
 * @constructor
 */
function Spinner(data) {
    //number of sectors of the spinner - default = 12
    this.sectorsCount = data.sectorsCount || 12;
    //the distance from each sector to the center - default = 70
    this.centerRadius = data.centerRadius || 70;
    //the length/height of each sector - default = 120
    this.sectorLength = data.sectorLength || 120;
    //the width of each sector of the spinner - default = 25
    this.sectorWidth = data.sectorWidth || 25;
    //color of the spinner - default = white
    this.color = data.color || 'white';
    //the opacity of the fullScreen
    this.fullScreenOpacity = data.fullScreenOpacity;
    //array of spinner sectors, each spinner is a svg path
    this.sectors = [];
    //array with the opacity of each sector
    this.opacity = [];
    //the raphael spinner object
    this.spinnerObject = null;
    //id of the timeout function for the rotating animation
    this.spinnerTick = null;
}

Now on to the biggest method of the spinner object, the create method. This method is called every time the user wants to show the spinner. Note the use of jQuery to select our elements. This is where the id’s we talked about above come in:

Spinner.prototype.create = function() {
    //shows the full screen spinner div
    $('#spinnerFullScreen').show();
    //animates the opacity of the full screen div containing the spinner from 0 to 0.8
    $('#spinnerFullScreen').animate({
        opacity: this.fullScreenOpacity
    }, 1000, function() {
    });

Continuing along with the create method, we do some initial calculations, like the total size of the spinner, and prepare the Raphael object to draw the sections:

    //center point of the canvas/spinner/raphael object
    var spinnerCenter = this.centerRadius + this.sectorLength + this.sectorWidth;
    //angle difference/step between each sector
    var beta = 2 * Math.PI / this.sectorsCount;
    //params for each sector/path (stroke-color, stroke-width, stroke-linecap)
    var pathParams = {"stroke": this.color,"stroke-width": this.sectorWidth,"stroke-linecap": "round"
    };
    /**
     * creates the Raphael object with a width and a height
     * equals to the double of the spinner center
     * “spinner” is the id of the div where the elements will be drawn
     */
    var paperSize = 2 * spinnerCenter;
    this.spinnerObject = Raphael('spinner', paperSize, paperSize);

Next is the drawing of the cycle and the building of an array with the current opacity of each sector:

    //builds the sectors and the respective opacity
    for (var i = 0; i < this.sectorsCount; i++) {
        //angle of the current sector
        var alpha = beta * i;
        var cos = Math.cos(alpha);
        var sin = Math.sin(alpha);
        //opacity of the current sector
        this.opacity[i] = 1 / this.sectorsCount * i;
        /**
         * builds each sector, which in reality is a SVG path
         * note that Upper case letter means that the command is absolute,
         * lower case means relative to the current position.
         * (http://www.w3.org/TR/SVG/paths.html#PathData)
	   * we move the "cursor" to the center of the spinner
	   * and add the centerRadius to center to move to the beginning of each sector
		 * and draws a line with length = sectorLength to the final point
		 * (which takes into account the current drawing angle)
        */
        this.sectors[i] = this.spinnerObject.path([
            ["M", spinnerCenter + this.centerRadius * cos, spinnerCenter + this.centerRadius * sin],
            ["l", this.sectorLength * cos, this.sectorLength * sin]
        ]).attr(pathParams);
    }

Now that we have our spinner built and displayed, we need to animate it. This is the last part of the create method:

    /**
     * does an animation step and calls itself again
     * @param spinnerObject this param needs to be passed
     * because of scope changes when called through setTimeout function
     */
    (function animationStep(spinnerObject) {
        //shifts to the right the opacity of the sectors
        spinnerObject.opacity.unshift(spinnerObject.opacity.pop());
        //updates the opacity of the sectors
        for (var i = 0; i < spinnerObject.sectorsCount; i++) {
            spinnerObject.sectors[i].attr("opacity", spinnerObject.opacity[i]);
        }
        /**
         * safari browser helper
         * There is an inconvenient rendering bug in Safari (WebKit):
         * sometimes the rendering should be forced.
         * This method should help with dealing with this bug.
         * source: http://raphaeljs.com/reference.html#Paper.safari
         */
        spinnerObject.spinnerObject.safari();
        /**
         * calls the animation step again
         * it's called in each second, the number of sectors the spinner has.
         * So the spinner gives a round each second, independently the number of sectors it has
         * note: doesn't work on IE passing parameter with the settimeout function :(
         */
        spinnerObject.spinnerTick = setTimeout(animationStep, 1000 / spinnerObject.sectorsCount, spinnerObject);
    })(this);
};//end of the create method

Finally, the destroy method of our spinner:

/**
 * destroys the spinner and hides the full screen div
 */
Spinner.prototype.destroy = function() {
    //stops the animation function
    clearTimeout(this.spinnerTick);
    //removes the Raphael spinner object
    this.spinnerObject.remove();
    this.spinnerObject = null;
    //animates the opacity of the div to 0 again and hides it (display:none) in the end
    $('#spinnerFullScreen').animate({
        opacity: 0
    }, 2000, function() {
        $('#spinnerFullScreen').hide();
    });
};

Step 4: Unleash the power!

With the spinning code in place, it’s now time to attach an event to the link, so that when the user clicks it, we show the spinner for a 6 second interval. Personally, I use this for asynchronous requests to the server, and when the request is over I simply remove the spinner.

Note that this code can only be used after all the libraries that the spinner depends on are loaded. You can add this code in the end of the spinner.js file or in another JavaScript file if you want to keep the spinner.js file independent and reusable for other projects.

$(document).ready(function() {
    $('#createSpinner').click(unleashSpinner);
});
function unleashSpinner() {
    var data = {};
    data.centerRadius = 35;
    data.sectorLength = 50;
    data.sectorsCount = 10;
    data.sectorWidth = 20;
    data.color = 'white';
    data.fullScreenOpacity = 0.8;
    var spinner = new Spinner(data);
    spinner.create();
    setTimeout(function(){spinner.destroy();}, 6000);
    return false;
}

We can reuse the spinner variable as many times as we want.


Wrap Up

The spinner demonstrated in this tutorial can be used in web pages designed not only for mobile devices, but also for “normal” web pages. I already tried this with both methods, and it worked just fine!

In order to test your knowledge, you can work on improving the current spinner implementation in a few unique ways. For instance, you could try changing the format/shape of the sections, enabling clockwise or anti-clockwise movement, or enable a developer to pick any id for the spinner in order to avoid id clashes.

That’s it for this time. I hope you enjoyed this tutorial!


Learn iOS SDK Development from Scratch!

$
0
0

Interested in learning native iOS SDK development? Now is the perfect time to get started! Mobiletuts+ is pleased to announce an in-depth, fully up-to-date session on how to become an iOS SDK developer!

During the next four weeks, I will be your guide to the iOS SDK as I teach you what you need to know to become a beginning iOS developer! Even though native iOS development can seem daunting at first, you will be pleasantly surprised to find out how easy it is to get up and running.


Why iOS?

You might be wondering why you should even consider developing for the iOS platform when the App Store can seem so crowded and Android has become a dominant player in the mobile space. While Android may have a larger install base, the brand strength of iOS remains very strong and many developers believe a greater financial incentive exists within Apple’s App Store. In addition, user engagement and adoption rates for iOS are astounding when compared to the Android and Windows Phone platforms. In the first post in this series, I will go into more detail on the merits of the iOS ecosystem, so be sure to check it out!


Session Outline

Over the course of four weeks, I will teach you what it takes to start developing for the iOS platform with approximately 15 different in-depth articles and tutorials. Each post will tackle a different subject, from setting up the development environment to the ins-and-outs of table views. Keep checking the site because several posts will go live each week for the entire month of December!

At the end of these four weeks, you will have a good understanding of what it takes to be an iOS developer and you will be capable of creating your own applications from scratch. Are you excited?! I know I am!


Prerequisites & Requirements

This series is aimed at readers who are new to iOS development, but it is essential that you have at least some prior programming experience. Perhaps you’ve worked with PHP, Ruby, or JavaScript? Great, you should fit right in! I hope to show you that C and Objective-C aren’t as difficult as you may have been led to believe.

Keep in mind that you will also need a Mac running OS X 10.7.4 or later in order to follow along. Unfortunately, this is a requirement of the latest versions of the iOS SDK and Xcode.


Bookmark This Page

Feel free to bookmark this page. It will be updated whenever a new post is published, and will therefore be an ideal reference for keeping tabs on the series!

Understanding the iOS Ecosystem

$
0
0

Before you begin building iOS applications, it’s crucial that you first understand the ecosystem. This article will examine the fundamentals of the iOS operating system, the various iOS devices available, and the Apple App Store. Read on!


Why iOS?

Prior to the arrival of Android and Windows Phone, Apple was the dominant player in the mobile space, rivaled only by Nokia and Research in Motion (RIM). With the emergence of new mobile platforms, it has become more and more important to ask yourself which platform is best suited for you. In spite of Apple’s head start in 2007, Android has surpassed iOS in market share. What does that mean for iOS? Is it still a platform worth developing for? Of course! There are many great reasons to get started with iOS development, including:

  • Strong Financial Incentives: People spend more money on Apple’s App Store than on any other mobile platform. Despite the fact that Android has become the dominant player in the mobile space, the iOS platform remains more lucrative for developers.
  • Walled Garden: Even though Apple’s App Store has received a lot of criticism from developers and customers, especially Apple’s review process, it is clear that this policy has led to an App Store in which the quality of the average application is higher than in any other mobile store available. Customers also tend to feel much safer when purchasing applications from the App Store than they do on other more open platforms, such as Google Play.
  • Community and Support: The iOS developer community is a great community to be part of. There is an almost unlimited supply of articles, tutorials, and documentation to help you out when you find yourself stuck with a problem. In addition, Apple’s documentation of the iOS SDK is superb, not to mention the hundreds of WWDC videos available to every registered iOS developer.

People often forget or don’t know that Android and iOS are very different platforms. Even though both platforms were designed for the mobile space, the iOS ecosystem differs in many respects from Google’s Android ecosystem. From a development perspective, most people seem to find it easier to develop for the iOS platform than for Android. Don’t misunderstand me, I am not referring to the technology stack that each platform uses, nor am I referring to the available tools for each platform. Two reasons are at the foundation of the chasm between iOS and Android: fragmentation and adoption rate.

Fragmentation

One of Android’s core strengths is at the same time one of its principal weaknesses. As most of you know, the Android operating system is released as an open source project, and can therefore be used and modified by anyone. Numerous hardware manufacturers saw the potential of Android especially since it was backed by Google. Android quickly gained in popularity as a result. The problem is that each hardware manufacturer has modified Android to fit their needs and a wide variety of form factors have emerged since Android’s introduction.

Even though Android’s market share might seem like a big pot of honey, it is a pain to create software that runs on each version of Android that is on in the market. Testing software on hardware is no trivial task either due to the thousands of different devices that run Android. As you can imagine, support and compatibility become a real challenge.

Adoption Rate

Traditionally, in many countries, the wireless market is under tight control by cellular carriers. From the very beginning, Apple knew it needed to be in control of its mobile devices to provide the best user experience. In other words, customers can upgrade their iOS devices to the latest version of iOS the same day it is released to the public. This is another major advantage of the iOS platform and he result is substantial. Less than a month after the release of iOS 6, over 60% of iOS devices had been upgraded to iOS 6.

Let’s compare this with Android. In October 2012, less than 25% of Android users had upgraded their devices to Ice Cream Sandwich (released in October 2011) and less than 2% had upgraded to Jelly Bean (released in June 2012). Half of the users were still using Gingerbread, which was released in December 2010.

The reason for bringing up these numbers is not to downplay the Android platform or any other mobile platform. What I want to emphasize is the impact the adoption rate has on the application ecosystem of these platforms. The slower users adopt a new release of an operating system, the longer developers are forced to support older versions of the operating system and it becomes less appealing to adopt new technologies that can only be used by a fraction of the users available.

Monetization

Even though Android is catching up, iOS is still by far the best platform in terms of monetization. During this year’s WWDC (2012), Apple announced that customers had downloaded more than 30 billion applications and that Apple had paid more than $5 billion to iOS developers. One of the key ingredients of this success are the 400 million active iTunes accounts. Last September (2012), Apple announced that they had sold more than 400 million iOS devices. If you are thinking about developing for a mobile platform, then iOS is an excellent choice and the financial incentive for doing so is unlikely to change anytime soon.


Why Native?

If you are a frequent reader of Mobiletuts+, than you may have heard of cross-platform frameworks like PhoneGap or Titanium Mobile. You might be wondering why you should go through the trouble of learning Objective-C when you can create iOS applications using JavaScript. Let me give you a brief rundown of your options if you decide to develop iOS applications.

  • Web Applications: A web application is your first option, and this was in fact the only option prior to the introduction of the native iOS SDK in 2008. The upside of web applications is that they don’t have to deal with the App Store or Apple’s review process. Why is that? A Web Application is a fancy name for a website that acts and behaves like an application. All you need is a browser, such as Mobile Safari or Google Chrome.
    Web applications have clear advantages. They are cross-platform by default since the application will run within a browser. Another advantage is the learning curve to create web applications. If you are familiar with web development, then you will be up and running in no time.
    Of course, the downsides of web applications can’t be ignored. A web application has limited access to the capabilities of the devices they run on. Mobile web applications are quite powerful thanks to HTML5 and JavaScript. However, there are distinct restrictions in terms of what they can do. You won’t be able to use all the cool features of the iPad and iPhone. Also, web applications typically require a network connection to work, although there are exceptions to this rule. However, perhaps the biggest downside to exclusively building web applications is that, in general, they will feel significantly slower than native applications. The responsiveness of web apps is constantly improving, but the inherited delay added by the browser should not be overlooked or ignored.
  • Mobile Cross-Platform Frameworks: The promise of a cross-platform framework is that developer can write an application that can be deployed to multiple mobile devices while using just one code base. This is accomplished with a number of different approaches. Some frameworks use the native SDK of the platform to create a web view in which the application is embedded (i.e. PhoneGap). As with web applications, this imposes limitations in terms of functionality. The primary advantage is that the application feels like a native application in terms of user experience and that it can be distributed through the platform’s store.

    Even though mobile development frameworks might seem like the holy grail for mobile development, there are a number of downsides that need to be considered. The most important downside is that your application depends on a third party framework. In other words, your entire codebase becomes dependent on the company that provides the cross-platform SDK. If that company goes broke or is slow to implement changes made to the native SDK, you could be forced to start over from scratch!

  • iOS SDK: Choosing to develop with the native SDK is the best choice if you want to create applications that stand out and take full advantage of the device’s capabilities. Opting for a native application also means that you will work in a robust development environment and that you can rely on Apple’s development tools, utilities, and support.

iOS Ecosystem

One of the most appealing aspects of the iOS ecosystem is its simplicity. The list of devices capable of running iOS is surprisingly short when compared with Android or Windows Phone. This means that testing iOS applications is much less cumbersome than the process required for other mobile platforms.

As stated earlier, Android has surpassed iOS in terms of market share, but this is only part of the story. The iOS platform accounts for more than 60% of web usage by mobile devices. What does this tell us about the mobile space? It tells us that iOS remains the most used operating system (at least online) in the mobile space despite Android’s higher market share.

Devices

There are essentially two device families within the iOS ecosystem: the iPhone device family, which also includes the iPod Touch, and the iPad device family. For a complete overview, I recommend that you take a look at this list.

The primary differences in the iPhone device family are hardware capabilities and screen size. The iPhone 5 and the 5th generation iPod Touch both have a larger 4″ screen, whereas the previous models come with the more familiar 3.5″ screen. The difference in screen size does impact development, but it doesn’t add much overhead for most applications. I will talk more about this in the course of the series.

The iPad family was recently expanded with the introduction of the 4th generation iPad and the iPad Mini. Even though the introduction of the iPad Mini caused a ripple in the technology industry, it has little impact for iOS developers. The screen of the iPad Mini is significantly smaller than that of the 10″ iPad, but the resolution is identical to the resolution of the original iPad and the iPad 2. Due to the iPad Mini’s smaller screen, the average size of the touch targets is smaller as well, and this might pose a problem for some existing applications.

iOS

Apple traditionally releases a new version of its mobile operating system every year. To date, Apple has released six major versions of its mobile operating system with the most recent release being iOS 6. Device support is an aspect of iOS that people often overlook. Take the iPhone 3GS, for example. The iPhone 3GS was released in 2009 and is still capable of running iOS 6. There is no mobile platform that comes even close to this in terms of device support.

App Store

One of the key reasons to develop for the iOS platform is the unprecedented success of the App Store. Selling software has never been easier thanks to both the iOS App Store and the Mac App Store. Apple recently announced that the App Store has surpassed the milestone of 1 million applications. It is getting a bit crowded in the App Store, but keep in mind that the number of iOS devices also continues to grow exponentially.

The mobile space is still in its infancy and there is still so much potential that is waiting to be uncovered. Just like it was with the web in the late nineties, the mobile space will continue to grow at a fast pace and the amount of money that can be made increases with every new smartphone or tablet sold.


Conclusion

You now have a clear picture of the iOS ecosystem and I hope that I was able to convince you to get started with iOS development! In the next post, I will show you how to get started with the native SDK by setting up the development environment. You will be surprised how easy this is!

Tuts+ Jobs: Dream Jobs for Web & Creative Professionals

$
0
0

We’ve been building something really awesome over the last couple of months, and it’s finally time reveal it! We’re extremely excited to announce the launch of the Tuts+ Jobs.

Tuts+ Jobs is a job board for full time, part time and casual employment opportunities for web and creative professionals. A brand new site to go alongside the Tuts+ Educational Network and the Envato Marketplaces, all run by Envato. Read on to find out more!


Earn and Learn

Envato is committed to helping people earn and learn online. We provide a wealth of educational material through Tuts+ and Tuts+ Premium, alongside the Envato Marketplaces to help you benefit from the creative skills you learn.

Tuts+ Jobs furthers this vision perfectly. With Tuts+ you can learn the skills you need to become a creative professional, and with Tuts+ Jobs you can find an amazing job that uses those skills. Our goal here is to take the hassle out of finding a job, so we’ve made the process as simple as can be!

Tuts+ Jobs

Finding a Job

Tuts+ JobsWith Tuts+ Jobs we’re committed to making every step of the job-finding process more intuitive, simpler and more efficient. We don’t want to stand between you and a great opportunity.

It’s totally free to sign up and start applying for jobs, and if nothing matches your initial search you can receive notifications when jobs come up that match your criteria. We will have full time, part time and casual listings from all around the world. Check the listing to find out where the job is based, as some jobs may offer remote opportunities.


Posting a Job


If you have a position that you need to fill, or a great part/full-time opportunity, then Tuts+ Jobs is the best way to find a talented and creative individual to do that job. Each 30-day listing costs just $99, regardless of the type of job you’re posting.

Your job listing will be promoted across the entire Tuts+ network. With exposure to our ten million visitors over the course of 30 days, it’s a brilliant way to reach exactly the type of audience you’re looking for.

We’re so confident you’ll find the person you’ve been looking for that if, at the end of the 30 days, you haven’t found the right person you can re-list your job for free or get a full refund under our money back guarantee.


What About FreelanceSwitch Jobs?

At present Tuts+ Jobs doesn’t offer freelance opportunities, it’s for part/full-time jobs only, but we still have our sister site, FreelanceSwitch, for freelance work.

We will be merging both of these sites in the future so Tuts+ Jobs will cover every type of opportunity — from temporary freelance gigs, to high-level full-time positions. In the meantime, FreelanceSwitch is the place to go for smaller freelance projects!


Sign Up, Explore, and Subscribe

We’ll be posting plenty of exciting job positions over the next few weeks, so now is the best time to head over to the site and subscribe to a job search that interests you. That way you’ll be the first to know when any new listings show up that match your skill set and requirements.

Check out Tuts+ Jobs

Subscribe to a Job

Getting Started with the iOS SDK Development Environment

$
0
0

Before we can start creating iOS applications, we need to set up the development environment. This tutorial will show you how to register as an Apple developer and install the development tools you’ll need to get started!


Requirements & Prerequisites

The primary focus of this tutorial is on getting setup with Xcode. Xcode is an outstanding Integrated Development Environment (IDE) made by Apple, and the vast majority of both iOS and Mac developers rely on Xcode when building applications.

Xcode is only compatible with Apple’s OS X, and I am therefore assuming that you have a Mac capable of installing the software. I will be using Xcode 4.5 throughout this series. This particular version of Xcode requires OS X 10.7.4 or higher. Even though it is possible to create iOS applications with an older version of Xcode, I recommend that you also use the latest Xcode release to make sure that you don’t run into unexpected issues along the way.


Step 1: Join the iOS Developer Program

Registering as an Apple Developer is free. However, if you plan to run applications on a physical device or if you want to submit your applications to the App Store, you are required to enroll for the paid iOS Developer Program. The iOS Developer Program has four enrollment types, individual, company, enterprise, and university. The individual and company enrollment types cost $99 per year, whereas the enterprise program costs $299 per year. The enterprise program is aimed at companies and organizations who intend to deploy in-house applications, that is, applications that are not available on the App Store. Visit this link for more information about the iOS Developer Program. You can complete this series without enrolling for the iOS Developer Program, but keep in mind that you won’t be able to run applications on a physical device or submit applications to the App Store should you choose to do so.

If you aren’t a registered Apple developer yet, you’ll need to signup in order to follow along. To start the registration process, head over to the iOS Dev Center (figure 1). Creating an Apple developer account only takes a few minutes, so go get started!

iOS Development Environment - Apple Developer Registration - Figure 1

If you choose to enroll in the paid iOS Developer Program, then you will have to take a few extra steps. You can find the necessary information at the iOS Dev Center. The process can take a few days to complete since Appple manually approves each application. For more information, visit Apple’s developer support center.


Step 2: Install Xcode

The name Xcode can be somewhat confusing at first. The name Xcode is often used to refer to the entire toolset for iOS and OS X development, and that toolset includes the Xcode IDE, the iOS Simulator for running applications, and the actual iOS and OS X SDKs. However, it’s important to understand that the Xcode application itself is just an IDE, and when I use the term I’m typically referring to just that.

You can download Xcode in one of two ways: through the iOS Dev Center or through the Mac App Store. The advantage of the Mac App Store is that updating Xcode is much easier (and faster thanks to delta updates). The advantage of downloading Xcode through the iOS Dev Center is that you can download developer previews. If you like living on the edge, than you will like working with the developer previews. However, because you are new to iOS development, I suggest that you download and install Xcode through the Mac App Store in order to work with the most stable release. To do so, search for Xcode in the Mac App Store and start the installation process. Xcode is several gigabytes in size, so you might want to grab a cup of coffee or (even better) take a walk.


Step 3: Create Your First Application

You have barely touched your computer and we are already set up and ready to create iOS applications. Those of you familiar with the process for setting up the Android SDK should appreciate this simplicity. :) With Xcode installed, it is time to launch the application for the first time. If all went well, you should see the Welcome to Xcode window (figure 2), which contains a few useful links and helps you create a new application. To create your first iOS application, select Create a new Xcode project from the list of options (figure 2). What is an Xcode project? An Xcode project is a folder or package that contains all the necessary files and components to manage and build your application.

iOS Development Environment - Xcode Welcome Window - Figure 2

Xcode makes it easy to create a new Xcode project by offering a handful of useful project templates. The Single View Application template is a good choice for your first application. Select it from the list of templates and click Next (figure 3). The next window lets you configure your Xcode project. Fill in the fields as shown in the figure below (figure 4) and then click Next. In an upcoming article in this session, I will explain each of the configuration options shown in more detail. However, the focus of this article is getting your first application up and running in the iOS Simulator, so we can skip this for now.

iOS Development Environment - Choose an Xcode Project Template - Figure 3
iOS Development Environment - Configure the Xcode Project Template - Figure 4

In the final step, Xcode asks you to specify a location where it can save your new project (figure 5). It doesn’t really matter where you save your project as long as you can find it later. You will also notice that Xcode offers the possibility to create a local git repository for your project. I highly recommend that you use source control for any type of development. Git is an excellent choice and it is the most popular Source Control Management (SCM) system in use by the iOS and Mac development community.

iOS Development Environment - Save Your Xcode Project - Figure 5

It is important to get familiar with source control management if this is new to you. Source control is indispensable in software development for various reasons. To begin using Git, you can visit the Git website or read its Wikipedia article. There is also an excellent book by Scott Chacon that discusses Git in greater detail.

In the rest of this series on iOS development, I won’t bother you with source control management. Even though source control is important, I don’t want to overcomplicate this series by adding an extra layer of complexity.


Step 4: Build and Run

You have successfully set up your first Xcode project (figure 6). Believe it or not, running your application in the iOS Simulator is only one click away. On the far left of the Xcode toolbar, you can see a large Play/Run button.

iOS Development Environment - Your First Xcode Project - Figure 6

Before you run your application, make sure that the active scheme is set to iPhone 6.0 Simulator (figure 7). We will cover schemes in more detail later on in the series.

iOS Development Environment - Build and Run Your First Application - Figure 7

Are you ready to build and run your very first iOS application? Click the button labeled Run to build and run your application in the iOS Simulator. Alternatively, you can press Command + R or select Product from the Xcode menu and choose Run. If all went well, you should see the iOS Simulator running your application. Of course, your application doesn’t do anything useful just yet. We will fix that later in the series.


iOS Simulator

The iOS Simulator is a valuable tool in your arsenal. Building and running an iOS application in the simulator is faster than deploying an application on a physical device. There is one caveat, however. The iOS Simulator doesn’t perfectly mimic an iOS device for various reasons. For example, the iOS Simulator doesn’t have a camera or an accelerometer. Its GPS capabilities are limited to a list of predefined locations and routes and user interaction is limited to gestures that require one or two fingers. Also keep in mind that the iOS Simulator draws power and resources from the Mac it runs on, which means that the simulator isn’t ideal for testing application reponsiveness and performance.

The bottom line is that you should always test an applications on a physical device before submitting it to the App Store or distributing it to testers. Even if you only have one device to test with, it is critical to test your applications on a physical device instead of relying solely on the iOS Simulator.

In spite of its shortcomings, the iOS Simulator is a very capable tool. Select the iOS Simulator and take a look at its menu and the various options the menu provides. The simulator is perfectly suited for testing user interfaces on different form factors, mimicking simple gestures, simulating memory warnings, or taking screenshots for the App Store. I am sure that you will find it a very useful tool for iOS development.


Physical Devices

As I mentioned earlier, running an application on a physical device is only possible if you sign up for the iOS Developer Program. In addition, running an application on a physical device involves a few extra steps. These steps include configuring your project and setting up the device you plan to test with. Because this is a fairly complex topic, especially if you are new to iOS development, I will thoroughly explain how to do this in a separate article in this session.


Third Party Development Tools

I would like to end this article by listing a handful of third party tools that make iOS development easier and more enjoyable. Note that these applications are by no means required for iOS development, but becoming aware of them now may save you a lot of frustration in the future!

  • Tower: Tower is one of the best Mac applications for working with Git. Git is a command line tool and some people prefer to use a graphical user interface over the command line. If you are not a command line superhero, then you will definitely appreciate what Tower has to offer.
  • Dash: Dash is a superb documentation browser and code snippet manager. For some mysterious reason, Xcode’s built-in documentation browser is slow. Dash is a great alternative and supports dozens of languages and frameworks, which means that you can use it for almost any type of development.
  • TextExpander: TextExpander is a popular utility for managing text snippets linked to custom keyboard shortcuts. Many developer use it for development, but you can use it wherever you like. It also supports placeholders for even more customizability.
  • TestFlight: TestFlight is a great service for distributing test builds to a team of beta testers. It does a lot more than that, though. It collects crash reports, user feedback, and keeps track of user sessions. For more information about TestFlight, check out this Mobiletuts+ tutorial. There are also a few alternatives, such as HockeyApp that you may want to look into as well.

Conclusion

I hope you agree that setting up the development environment for iOS development is easy. With Xcode installed, we can start exploring the iOS SDK! That will be the focus of the rest of this session.

How to Test Your Apps on Physical iOS Devices

$
0
0

Provisioning an application for testing on either a physical device or for App Store distribution can be a nightmare for beginners. However, every iOS developer has to tackle this hurdle at some point. In this article, I hope to give you a good understanding of how to properly provision an application for testing on a physical device.


Step 1: iOS Developer Program

As I mentioned in a previous tutorial in this session, if you plan to run development code on a physical device or you intend to publish an application on the App Store, you will first need to enroll for the iOS Developer Program. To do so, open a new browser window and go to the iOS Dev Center. Sign in with your Apple developer account and click the Learn More link in the iOS Developer Program section on the right (figure 1). On the next page, click the Enroll Now button (figure 2) and follow the steps to complete the enrollment.

Certificates and Provisioning Profiles - The iOS Dev Center - Figure 1
Certificates and Provisioning Profiles - Enroll for The iOS Developer Program - Figure 2

Keep in mind that it can take several days for your application to be accepted. Apple manually approves each application, which means that you won’t have access to the iOS Developer Program until you get the green light from Apple.


Step 2: Create a Certificate Signing Request

After enrolling for the iOS Developer Program, you will notice that the iOS Dev Center has a slightly different interface (figure 3). In the iOS Developer Program section on the right, you no longer see the Learn More link you clicked to enroll for the program. Instead, you see links to the iOS Provisioning Portal, iTunes Connect, Apple Developer Forums, and the Developer Support Center. In this article, we will be working in the iOS Provisioning Portal. Click the link of the iOS Provisioning Portal on the right.

Certificates and Provisioning Profiles - The iOS Dev Center after Signing Up for The iOS Developer Program - Figure 3

The provisioning process starts with the creation of an iOS Development Certificate. A certificate is an electronic document that links your digital identity with other information, such as your name, email, and company information. A development certificate consists of a secret private key and a shared public key. If you are familiar with SSL certificates for securing a website, then you probably already know what a certificate is and how it generally works. Xcode uses the private key of the certificate to cryptographically sign your application binary.

To obtain a development certificate, we first need to create a certificate signing request (CSR). You can create a CSR using OS X’s Keychain Access utility. You can find this utility in the Utilities folder in your Applications folder. Open the Keychain Access menu, select Certificate Assistant and choose the option labeled Request a Certificate From a Certificate Authority…. Fill out the form by entering your name and the email address with which you signed up for your Apple developer account (figure 4). Leave the certificate authority email address (CA Email Address) blank and make sure to select the option labeled Saved to disk to save the certificate signing request to your system. Leave the checkbox labeled Let me specify key pair information unchecked (figure 4).

Certificates and Provisioning Profiles - Creating a Certificate Signing Request - Figure 4

Click Continue and specify a location to save the CSR, and then click Save. Browse to the location you specified to make sure the CSR was generated. In Keychain Access, under the Keys category, you can see that the private and public keys have been added to your login keychain (figure 5).

Certificates and Provisioning Profiles - Public and Private Key Pair - Figure 5

Step 3: Create a Development Certificate

Head back to the iOS Provisioning Portal and select the Certificates tab on the left. Click the Request Certificate button on the right (figure 6) and upload the CSR we generated in the previous step by clicking the Choose File button at the bottom, selecting the CSR, and clicking the submit button at the bottom of the page (figure 7). You will notice that the status of the new certificate is set to Pending Issuance (figure 8). After refreshing the page once or twice, the status should change to issued and a download button should appear on the right (figure 9). Click the download button to download your brand new iOS development certificate.

Certificates and Provisioning Profiles - Request a Certificate - Figure 6
Certificates and Provisioning Profiles - Upload the Certificate Signing Request - Figure 7
Certificates and Provisioning Profiles - Certificate Pending Issuance - Figure 8
Certificates and Provisioning Profiles - Certificate Issued - Figure 9

Double-click the iOS development certificate to add it to your login keychain (figures 10 and 11).

Certificates and Provisioning Profiles - Add the Certificate to Login Keychain - Figure 10
Certificates and Provisioning Profiles - Certificate Added to Login Keychain - Figure 11

Step 4: Adding a Device

You cannot run an iOS application on a random device. You need to specify on which devices your iOS application should run by adding one or more iOS devices to the iOS Provisioning Portal. Browse to the iOS Provisioning Portal, click the Devices tab on the left, and click the Add Devices button on the right. To add a device, enter a descriptive device name and enter the device ID (figure 12). The device ID, also known as the UDID, is an identifier that uniquely identifies an iOS device. Note that the UDID is not the same as the device’s serial number.

Certificates and Provisioning Profiles - Adding a New Device in the Provisioning Portal - Figure 12

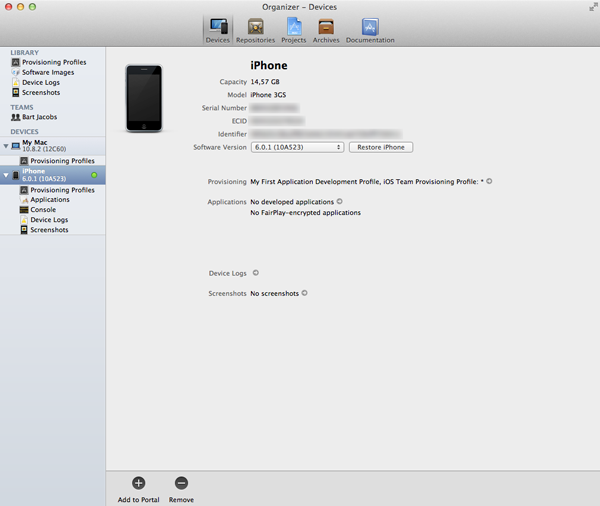
You can find the UDID of a device by connecting the device with your machine and launching Xcode’s Organizer. You can open the Organizer by selecting Window from the Xcode menu and choosing Organizer. Select the Devices tab at the top and select the device you are interested in. The 40 character alphanumeric string next to the label Identifier is the device ID or UDID.

Certificates and Provisioning Profiles - Finding the Device ID - Figure 13

If you need the UDID of a device and you don’t have Xcode installed, then iTunes is your friend. Connect the device with a Mac or PC that has iTunes installed on it. Launch iTunes and select the device from the list of devices on the left. Under the device’s Summary tab, you should see the device’s serial number. Click the serial number once to reveal the device’s UDID. To copy the UDID sequence to the clipboard, you need to double-click the serial number and then press Command + C. However odd, it seems to be the only way to copy the UDID using iTunes. Jeff LaMarche offers an alternative approach using OS X’s System Information utility. The article is slightly outdated since Jeff refers to the System Profiler instead of the System Information utility.

The first time you connect an iOS device to your Mac and you view the device in Xcode’s Organizer, you should see a button labeled Use for Development (figure 14).

Certificates and Provisioning Profiles - Setting a Device Up For Development - Figure 14

When you click this button, Xcode will ask for your Apple developer credentials as it want to connect to the iOS Provisioning Portal (figure 15). Xcode will then prepare your device for development by downloading all the provisioning profiles that contain the device, more about this later (figure 16). The long and the short of it is that it used to be a pain to prepare devices for development. Xcode has made this much easier by asking the iOS Provisioning Portal for the necessary data behind the scenes.

Certificates and Provisioning Profiles - Setting a Device Up For Development - Figure 15
Certificates and Provisioning Profiles - Setting a Device Up For Development - Figure 16

Step 5: Create an App ID

An app ID is an identifier that uniquely identifies an application in iOS. It is much like the device ID, which uniquely identifies a device. The app ID is used by the operating system for security reasons and it is an essential component of Apple’s Push Notification and iCloud services, among others.

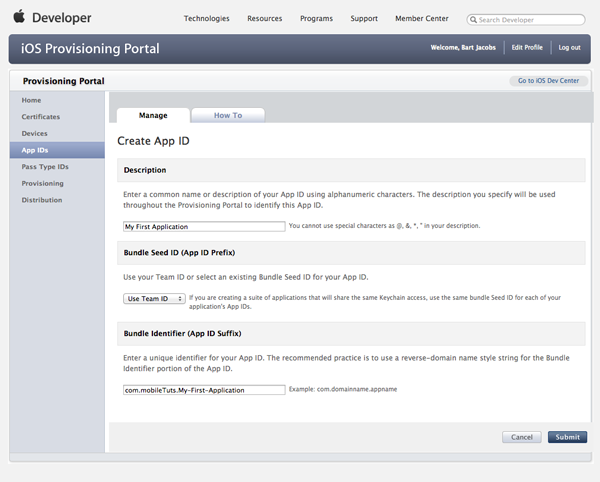
The app ID of an application consists of (1) your application’s bundle identifier prefixed with (2) a unique 10 character bundle seed ID generated by Apple. What is a bundle identifier? Do you remember when you set up your first application? Even though I didn’t cover the bundle identifier in detail, you implicitly specified a bundle identifier for your project by giving your application a name and specifying a company identifier. By default, the bundle identifier is your application’s name prefixed with your project’s company identifier. However, you can change the bundle identifier to whatever you like. It is often recommended to adopt the reverse-domain naming convention, for example, com.mobiletuts.My-First-Application. The complete app ID would then be XXXXXXXXXX.com.mobileTuts.My-First-Application.

For more information about app ID’s, visit the iOS Provisioning Portal, click the tab labeled App IDs on the left, and select the How To tab at the top. To create a new app ID in the iOS Provisioning Portal, click the App IDs tab on the left and click the New App ID button on the right (figure 17). Give the new app ID a descriptive name so you can easily find it later. Specify the bundle seed ID (app ID prefix) and enter your application’s bundle identifier (app ID suffix).

Certificates and Provisioning Profiles - Creating a New App ID in the Provisioning Portal - Figure 17

Alternatively, you can replace the application name in the bundle identifier by an asterisk, for example, com.mobileTuts.*. This is useful if you intend to create a suite of applications that need to be able to share keychain access or don’t require keychain access at all. The asterisk or wild-card character needs to be the last component of the bundle identifier.


Step 6: Create a Provisioning Profile

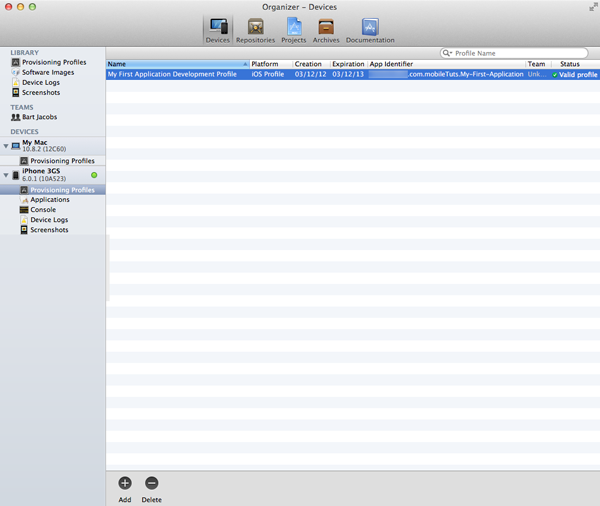
With the development certificate and the app ID in place, it is time to create a provisioning profile for your application. Before we start, it might be useful to explain what a provisioning profile is exactly, because this is something that confuses a lot of new iOS developers. To quote Apple’s documentation, a provisioning profile is a collection of assets that uniquely ties developers and devices to an authorized iOS Development Team and enables a device to be used for testing. In other words, a provisioning profile contains the information that the operating system needs to verify whether an application is permitted to run on a specific device. This implies that the provisioning profile needs to be installed on each device that the application needs to be able to run on.

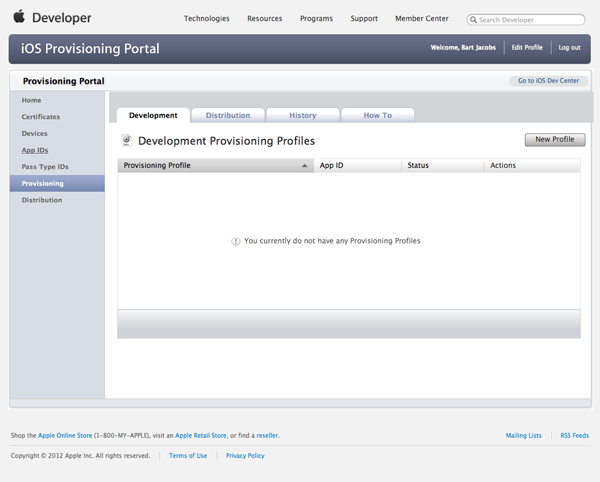
It will become more clear if we create a provisioning profile for your application, so let’s do just that. In the iOS Provisioning Portal, select the Provisioning tab on the left and click the Development tab at the top. To create a new profile, click the New Profile tab on the right (figure 18).

Certificates and Provisioning Profiles - Creating a New Provisioning Profile in the Provisioning Portal - Figure 18

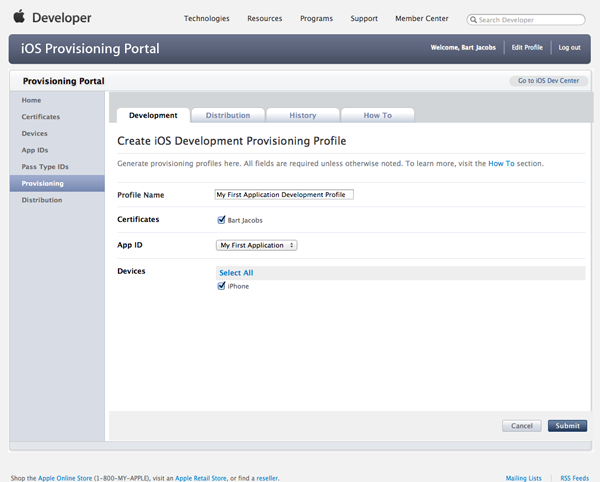
Start by giving the new provisioning profile a name so you can easily identify it later. As time passes, you will accumulate a fair number of provisioning profiles and it is therefore important to properly name each profile. As I mentioned earlier, each provisioning profile is associated with one or more certificates. Select the development certificate we created earlier. Set the app ID to the app ID we created a few minutes ago and select the devices you intend to run your application on. Submit the form to create the provisioning profile (figure 19).

Certificates and Provisioning Profiles - Configure the New Provisioning Profile - Figure 19

If you wish to add more devices to an already existing provisioning profile, than you can do so by editing the provisioning profile in the iOS Provisioning Portal. All you need to do is download the new profile and install it on all the devices you wish to test with. In other words, you don’t need to create a new provisioning profile if all you want to do is add or remove devices.

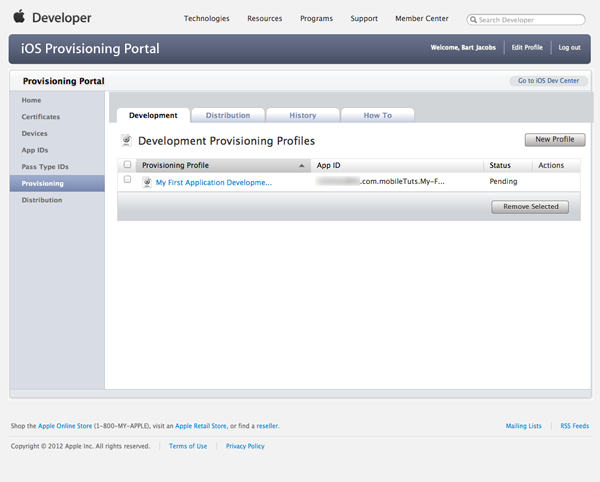
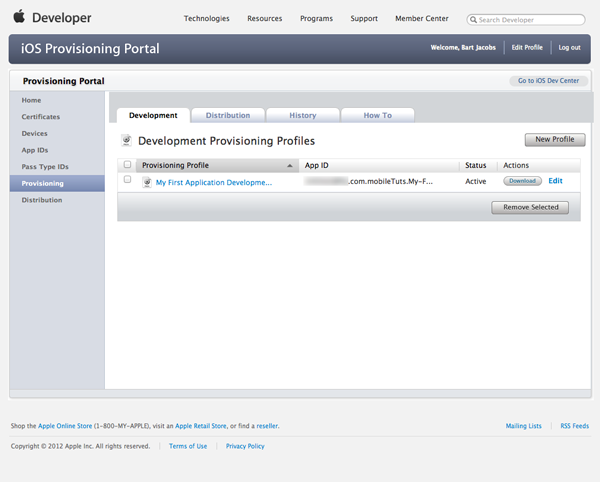
As with the creation of certificates, it takes a few seconds for the new provisioning profile to show up. Refresh the browser window to update the status of the profile and download the provisioning profile to your Mac (figures 20 and 21).

Certificates and Provisioning Profiles - The Provisioning Profile in the Provisioning Portal - Figure 20
Certificates and Provisioning Profiles - The Provisioning Profile in the Provisioning Portal - Figure 21

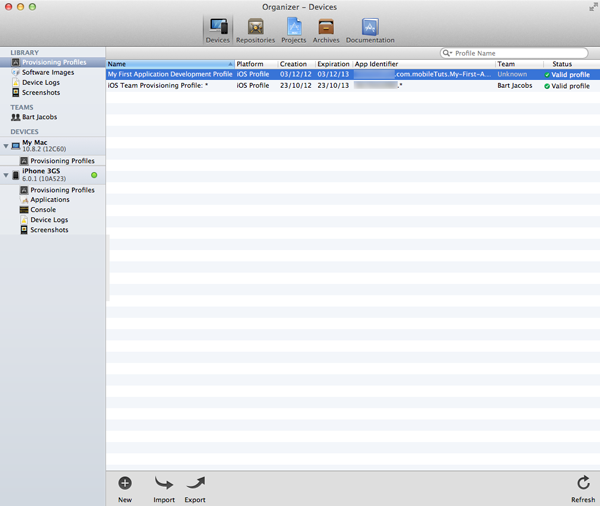
By double-clicking the provisioning profile, Xcode will automatically install the provisioning profile and open the Xcode Organizer (figure 22). Xcode will also install the provisioning profile on any device that you added to the profile if it is connect to your Mac (figure 23).

Certificates and Provisioning Profiles - Install the Provisioning Profile - Figure 22
Certificates and Provisioning Profiles - Xcode Installs the Provisioning Profile on the Test Device - Figure 23

Step 7: Configuring the Project

Before you can build and run your application on your device, you need to configure the build settings of your Xcode project. Open the Xcode project that you created during the previous tutorial and select the project from the Project Navigator on the left (figure 24). Select the only item in the list of targets and then click the tab labeled Build Settings at the top (figure 24).

Certificates and Provisioning Profiles - Configuring the Xcode Project - Figure 24

Don’t let yourself get overwhelmed by all the build settings. Scroll through the build settings and search for the section titled Code Signing. In this section, search for the subsection titled Code Signing Identity and set the Debug configuration to match your new provisioning profile (figure 25). I hope you understand that it is important to properly name your provisioning profile as things can get messy when you are dealing with a lot provisioning profiles.

Certificates and Provisioning Profiles - Configuring the Code Signing Identities - Figure 25

Step 8: Build and Run

If you followed the steps correctly, you should now be able to build and run your application on your device. Before running your application, make sure that you properly set the active scheme by selecting your device from the drop down menu (figure 26).

Certificates and Provisioning Profiles - Updating the Active Scheme - Figure 26

Conclusion

Creating and managing certificates, provisioning profiles, app IDs, and test devices can be a daunting task – and it often is for most developers. I hope that this article has given you a sturdy foundation. Don’t hesitate to read this article a few times to really understand how all the different pieces fit together. It will make debugging issues related to provisioning much easier and I can guarantee you that you will run into such issues!

Creating Your First iOS Application

$
0
0

Even though we have already learned quite a bit in this series on iOS development, I am sure you are eager to start building iOS applications that do something cool or useful. In this tutorial, your wish will be granted! Using Xcode, you will create an iOS project from scratch, modify the project’s source code, and run your application on either the iOS Simulator or a physical device!


Colorific

Colorific is the name of the application that we are about to build. The idea behind Colorific is simple. Every time the user touches the screen of the device, the color of the screen will change. Even though the concept is basic, Colorific is perfect for getting started and exploring the ins and outs of iOS development.


Step 1: Create a New Xcode Project

As we saw earlier in this series, every iOS application goes through life as an Xcode project. What is an Xcode project? An Xcode project is a container or repository that contains the files, assets, and information that are required to build one or more products. Note that this isn’t limited to a project’s source code and assets, such as images and other media. A project also keeps track of the connections between its various elements and it knows how to build the final products from its elements.

Fire up Xcode and create a new Xcode project by opening Xcode’s File menu. Select New from the list of options and choose Project… (figure 1). An alternative option is pressing Shift + Command + N.

In case Xcode’s welcome window pops up when you launch Xcode, I advise to close it so you learn how to create a new project using the Xcode menu.

Creating Your First iOS Application - Creating a New Xcode Project - Figure 1

Step 2: Choose an Application Template

Getting started with a new application or project is easy in Xcode thanks to the application templates that ship with it. For the application that we are about to create, we need the Single View Application template (figure 2). Feel free to take a look at the other application templates, but make sure to choose the Single View Application template for Colorific.

Creating Your First iOS Application - Chooosing an Application Template - Figure 2

Step 3: Configure the Project

After selecting the Single View Application template and clicking the Next button, Xcode presents you with a list of options that allows you to configure your new project (figure 3). Let’s take a look at the various options.

Creating Your First iOS Application - Configuring the Xcode Project - Figure 3
  • Product Name: The product name will be the name of your application. I have named our application Colorific, but feel free to name your application whatever you would like.
  • Organization Name: The organization name can be your own name or the name of your company. Xcode uses the organization name for various purposes, such as adding copyright notices to each source file.
  • Company Identifier: The company identifier is a unique string, which Xcode uses (together with the product name) to create the application’s bundle identifier. Apple recommends adopting the reverse-domain naming convention in an attempt to make this unique. Note that the domain that you use has no tie to the DNS system or Internet domain names. For example, my company is named Code Foundry and is located in Belgium, which means that my company identifier is be.codefoundry. However, I could just as well use be.code-foundry or com.codefoundry.
  • Bundle Identifier: Even though you cannot specify the bundle identifier when creating a new Xcode project, you can change it once you have created your project. By default, the bundle identifier is the combination of the company identifier and the product name. Keep in mind that spaces in the product name are replaced with dashes in the bundle identifier, because the bundle identifier musn’t contain whitespace.
  • Class Prefix: When creating custom classes in your project, it is important that the class names don’t collide with existing class names. By specifying a class prefix, Xcode will prefix new classes with this custom class prefix to make sure that naming collisions are averted. A common approach is to use your initials, BJ in my case, or a combination that refers to your company or organization.
  • Devices: In the current version of Xcode (4.5 at the time of writing), the devices drop down menu contains three options, (1) iPad, (2) iPhone, and (3) Universal. This configuration option tells Xcode which devices your project targets. By selecting the last option, Universal, your project targets both the iPad and iPhone device family. The iPod Touch is a member of the iPhone device family as you might have guessed.
  • Use Storyboards: Check this option if you plan to use storyboards in your project. To not overcomplicate our project, we will not be using Storyboards.
  • Use Automatic Reference Counting: If you are new to iOS development, then I strongly recommend that you use automatic reference counting (ARC) in your project. Automatic reference counting became available with the introduction of iOS 5 in 2011. It rids developers of having to manage memory manually. Prior to iOS 5, developers had to manually keep track of objects and memory. Don’t worry about ARC and memory management for now. I will explain these topics in more detail at a later point in this series.
  • Include Unit Tests: Testing is a key component of iOS development. As with storyboards, I don’t want to overwhelm you too much right now, so we won’t be using unit testing in this project.

You should now have a good grasp of the different configuration options when setting up a new Xcode project. For this project, I recommend that you use the options as shown in figure 3. Note that most options can easily be changed after you have created your project. Click the Next button when you are finished configuring your project.


Step 4: Save the Project

In the next step, Xcode asks where you want to save your new project (figure 4). You may have noticed the little checkbox at the bottom of the window labeled Create a local git repository for this project. The gray text below the checkbox reads Xcode will place your project under version control. As I mentioned earlier in this series, source control is indispensable in software development. This series will not cover this topic in detail, but if you are serious about software development, then I highly recommend reading up on source control. Git is the most popular SCM (Source Code Management) system in the iOS (and OS X) community. It is perfectly possible to use a different SCM system, such as SVN or Mercurial, if you prefer.

Creating Your First iOS Application - Save Your New Project - Figure 4

Tell Xcode where you want to save your project, check the checkbox to authorize Xcode to create a git repository for the project, and click the Create button.


Step 5: Exploring Xcode’s User Interface

Before we move on, I want to take a few minutes to explore Xcode’s user interface (figure 5). You can see four distinct areas, (1) a toolbar at the top, (2) a sidebar on the left, (3) a main view in the center, (4) and a sidebar at the right. Let’s briefly explore each area.

Creating Your First iOS Application - The Default User Interface of Xcode - Figure 5

Toolbar

The toolbar at the top contains the buttons and menus that you will find yourself using often (figure 6). As we saw earlier in this series, the buttons to run and stop an application live in the toolbar. The display in the center of the toolbar is similar to the display you find in iTunes. It displays information about your project’s state, for example, it will tell you when a build succeeds or fails. The button on the far right brings up Xcode’s Organizer. The two segmented controls on the right of the toolbar can be used to customize Xcode’s user interface. Play around with the various controls to find out how each of them changes Xcode’s user interface.

Creating Your First iOS Application - Xcode's Toolbar - Figure 6

Navigator

The main purpose of the left sidebar is for navigation and it is often referred to as Xcode’s navigator (figure 7). It has different tabs with the Project Navigator at the far left. The selection in the left sidebar determines what is show in Xcode’s main view.

Creating Your First iOS Application - Left Sidebar or Navigator - Figure 7

Main View

The main view is the area where you will spend most of your time (figure 8). It is the Xcode’s workhorse and displays whatever is selected in the navigator.

Creating Your First iOS Application - Xcode's Main View - Figure 8

Inspector

While the the left sidebar controls what is being displayed in Xcode’s main view, the contents of the right sidebar reflect what is being displayed or selected in the main view (figure 9). The right sidebar, also known as the inspector, adapts itself to whatever the user selects in the main view.

Creating Your First iOS Application - Xcode's Main View - Figure 9

Step 6: Exploring the Project

It is time to take a look at the project itself. The project’s contents are displayed in the Project Navigator, the first tab of the left sidebar. Select the first item in the Project Navigator to see the project details in the main view (figure 10).

Creating Your First iOS Application - Xcode's Main View Showing the Project's Details - Figure 10

The main view is composed of two sections, (1) a sidebar on the left and (2) a detail view on the right. In the sidebar, you see two items, (1) your project with one item and (2) targets with one item. It is good to know early on what the difference is between a project and a target. As I mentioned earlier, a project is a repository for the files, assets, and data that are required to build one or more products. A target, however, refers to one of those products. A target contains the necessary instructions to build a product with the project’s resources. This means that a project can contain multiple targets to build multiple products. As you can see, an Xcode project is more than just a folder with a bunch of files in it.


Step 7: Build and Run: Take 1

Before we start modifying the source code of the project, it is interesting to build and run your new project to see what the application template has given us for free. Click the Run button in the top left and make sure that the active scheme is configured to run the application in the iOS Simulator by selecting iPhone 6.0 Simulator.

If all went well, the iOS Simulator should launch your application and display a gray view.

Creating Your First iOS Application - Build and Run: Take 1 - Figure 11

Step 8: Modify the User Interface

Let’s get our hands dirty and modify the application’s user interface. Open the Project Navigator and select the file named MTViewController.xib. A file with a .xib extension is a user interface file and can be edited with Xcode’s Interface Builder hence the last two letters of the .xib extension.

Creating Your First iOS Application - The Application's User Interface - Figure 12

After selecting MTViewController.xib, you should see the gray screen you saw a few moments ago in the iOS Simulator. The main view is composed of a sidebar showing a section labeled Placeholders and a section labeled Objects (figure 12). The largest part of the main view contains the user interface. Select the object named View in the sidebar and see how the right sidebar updates its contents. A bunch of tabs appear at the top of the right sidebar. Each of the tabs contains a collection of attributes related to the object named View (figure 12).

The lower half of the right sidebar contains a section with four tabs. The third tab is represented by an image of a three dimensional box (figure 13). This box is how objects are commonly displayed in Xcode. Click on the tab with the box icon and scroll through the list that appears. The list is referred to as the Object Library and contains various user interface elements, such as buttons, sliders, and switches (figure 13).

Creating Your First iOS Application - The Object Library - Figure 13

At the start of this tutorial, I told you we were going to create an application with some user interactivity. The user should be able to touch the screen to change its color. Detecting touches in an iOS application can be done several ways. One solution is to use a button. The second item in the Objects Library is the button that we need. Click and drag a Round Rect Button from the Object Library to the gray view in Xcode’s main view.

Creating Your First iOS Application - Drag a Button from the Object Library to the Main View - Figure 14

The user should be able to touch any part of the screen, which means that the button should cover the entire screen. Have you noticed the six, tiny squares at the button’s edges? By dragging the tiny squares, you can modify the button’s dimensions (figure 15). Adjust the size of the button to make it cover the entire screen (figure 16). Don’t worry about the black status bar at the top of the screen. The status bar shouldn’t be covered by the button.

Creating Your First iOS Application - Resize the Button to Cover the Entire View - Figure 15
Creating Your First iOS Application - The Button Covers the Entire view - Figure 16

The view behind the button is the view that will change color when the user touches the screen. At the moment, the button is blocking the view from the user’s view so we need to slightly modify the button’s attributes. You may have noticed that the button has been added to the list of objects in the left sidebar, below the object named View. Select the button from the list of objects and select the Attributes Inspector in the right sidebar (fourth tab from the left). We only need to make two simple tweaks.

Start by changing the type of the button from Rounded Rect to Custom (figure 17). This will make the button transparent and remove its rounded corners.

Creating Your First iOS Application - Modify the Button Type - Figure 17

The second change we need to make is telling the user what to do by changing the button title. The text field next to the label Title currently reads Button. Change this to something like Tap to Change Color.

Creating Your First iOS Application - Modify the Button Title - Figure 18

Step 9: Add an Action to the View Controller

If you are familiar with the MVC (Model-View-Controller) pattern, then you have a head start learning iOS development. The MVC pattern is a pattern found in many languages and frameworks, such as Ruby on Rails and CodeIgniter. The view in our user interface falls in the V category in the MVC pattern. A view is controlled by a controller. Take a look at the file names in the Project Navigator on the left. The files represent a view controller that control the view in our user interface.

What does a view controller do? A view controller can do whatever you want, but it is in the first place responsible for handling everything that happens in the view that it manages. This includes, for example, touches from the user. If the user touches the button in the view, it is the controller’s responsibility to handle the touch event.

How do we handle a touch event? In the case of our button, we add an action to the view controller. An action is a fancy name for a method. What is a method? A method is at its core a C function. Wait. What? Don’t worry about the terminology too much at this point. The next two posts will cover C and Objective-C in more detail. What you need to remember is that a method is like a method in Ruby and PHP, or a function in JavaScript. If you invoke a method of a controller, it will do something in response. In other words, if a user touches the button and we connect a method to that touch event, then the controller will do something in response to that touch event.

To add an action to the view controller that manages the view in our user interface, we need to make some changes to the file named MTViewController.h. Files with a .h extension are header files. A view controller’s header file contains information about the view controller (the view controller class, to be precise). We only need to add one line of code to the header file. Take a look at how I modified the view controller’s header file.

//
//  MTViewController.h
//  Colorific
//
//  Created by Bart Jacobs on 04/12/12.
//  Copyright (c) 2012 Mobile Tuts. All rights reserved.
//
#import <UIKit/UIKit.h>
@interface MTViewController : UIViewController
- (IBAction)changeColor:(id)sender;
@end

Even though we won’t focus on the syntax in this tutorial, it is fairly easy to understand what is going on. The name of the action or method is changeColor and it has one argument, sender. The type of the argument is id, which means any object. What are objects again? Patience, grasshopper. The action ends with a semicolon.


Step 9: Implement the Action

We have added an action to the view controller, but the action doesn’t do much. What we have done is declare an action. This simply means that any part of the application that takes a peak at the view controller’s header file also knows that it has an action named changeColor. It is like a restaurant that offers you a menu. You can see what it has to offer, but it doesn’t show you what each item on the menu looks or tastes like. What we need to do is implement the action and we do that in the view controller’s implementation file. That is right. The file with the .m extension is the implementation file. Select the file named MTViewController.m and have a look at its contents.

Did you expect it to be empty? Xcode has given us some boilerplate code that is common for view controllers. The nice thing about Objective-C is that it has very readable method names. Developers often complain that the method names are long, but the advantage is that you know what a method does just by looking at the its name. To implement the changeColor: action, we copy what we wrote in the header file and replace the trailing semicolon with an opening and a closing curly brace.

//
//  MTViewController.m
//  Colorific
//
//  Created by Bart Jacobs on 04/12/12.
//
#import "MTViewController.h"
@interface MTViewController ()
@end
@implementation MTViewController
- (void)viewDidLoad
{
    [super viewDidLoad];
  // Do any additional setup after loading the view, typically from a nib.
}
- (void)didReceiveMemoryWarning
{
    [super didReceiveMemoryWarning];
    // Dispose of any resources that can be recreated.
}
- (IBAction)changeColor:(id)sender {
}
@end

I have posted the contents of the complete implementation file so you can see where you should add the method implementation. It needs to be after @implementation MTViewController and before the last @end. Also note that it cannot be nested in another method implementation.

It is time to do something useful in our action. I am not going to explain each line of code in detail, but I will give you the gist of what is happening. As you may know, it is possible to break a color down into the three primary colors, red, green, and blue. In our action, we generate three random numbers between 0 and 255, and use these numbers to create a random color. Again, the method we use to create the color is very descriptive, colorWithRed:green:blue:alpha:. In the last line of our action, we set the background color of the view in our user interface to this new, randomly generated color. The word self refers to the view controller. Don’t worry if none of this makes sense. It will become more clear once we have covered the basics of C and Objective-C.

- (IBAction)changeColor:(id)sender {
    int r = arc4random() % 255;
    int g = arc4random() % 255;
    int b = arc4random() % 255;
    UIColor *color = [UIColor colorWithRed:(r/255.0) green:(g/255.0) blue:(b/255.0) alpha:1.0];
    [self.view setBackgroundColor:color];
}

Comments are important when writing code. Did you spot the comments I added to the implementation of changeColor:? Single line comments start with two forward slashes (//), whereas multiline comments start with /* and end with */.


Step 10: Connecting the Action

The method is implemented, but nothing spectacular will happen when we build and run the application. Give it a try if you don’t believe me. What is missing is a connection between the button and the view controller’s action. How should the view controller know that the changeColor: action needs to be triggered when the button is tapped?

Making this connection is simple. Open the view controller’s xib file by selecting the file named MTViewController.xib. In the main view’s sidebar (on the left), select the object named File’s Owner in the section named Placeholders. As the name somewhat implies, the File’s owner is the object that owns the objects in the user interface file, including the view in which the button resides.

With the File’s Owner object selected, open the Connections Inspector in the right sidebar (first tab from the right). If you have followed the steps correctly, you should see our new action in the section labeled Received Actions (figure 19). You should see an empty circle on the right of the changeColor: action. Click and drag from the circle to the button in our user interface (figure 19). A menu will pop up when you stop release the mouse (figure 20). The pop up menu contains a list of touch event types. The touch event that we are interested in is named Touch Up Inside. This event is triggered when a user touches the button and lifts her finger. This is the most common behavior of most buttons.

Creating Your First iOS Application - Making the Connection: Part 1 - Figure 19
Creating Your First iOS Application - Making the Connection: Part 2 - Figure 20

After connecting the button and the action, you should see that the right sidebar reflects the connection you just made (figure 20). Great. You have successfully completed your first (real) application!

Creating Your First iOS Application - The Connection is Made - Figure 21

Step 11: Build and Run: Take 2

Build and run your application in the iOS Simulator and start tapping the simulator’s screen. Every time you tap the screen, its color should change to a new, random color. How cool is that?


Conclusion

We have covered a lot of ground in this tutorial. Even though this post was quite lengthy, we didn’t actually do very much. If you know the theory, you can create Colorific in less than five minutes. In the next two posts, I will cover the basics of C and Objective-C. This will prepare you for the interesting stuff in the rest of the series.


Learning C: A Primer

$
0
0

You may have heard that you need to be familiar with Objective-C if you plan to develop iOS applications. While Objective-C is indeed an important component of iOS development, people tend to forget that Objective-C is a strict superset of C. In other words, it is also important to be familiar with the fundamentals of C as an iOS developer. Don’t worry -if you already know the basics of programming, C will not be too difficult to pick up!


Prerequisites

It is not possible to cover the basics of programming and learn C in one article. I am therefore assuming that you already have some programming experience. Ruby, PHP, or JavaScript are good starting points for learning C and Objective-C, so if you come from a web development background you shouldn’t have problems learning the basics of C by reading this article.

In this article, I will focus on what makes C unique or different from other programming languages. This means that I won’t cover basic programming concepts and patterns, such as variables and loops. What I will cover is how variables are declared in C and what pointers are. In other words, the focus lies on the things you need to know to become familiar with C.


Introduction

Dennis Ritchie started developing C in the late 1960′s while working at AT&T Bell Labs. Thanks to its widespread use and simplicity of design, C can be used on almost any platform. It is not tied to any one operating system or platform. If you have explored a number of programming languages, then you might have noticed that they share a lot of similarities. Many languages have been inspired by C, such as C#, Java, PHP, and Python.

Dennis Ritchie named his new language C because he took some inspiration from a prior language developed by Ken Thompson called B. Despite the fact that C is inspired by typeless languages (Martin Richards’s BCPL and Ken Thompson’s B), C is a typed language. I will cover typing in more detail later in this article.

It doesn’t take long to learn the basics of C, because it is a fairly small language with only a small set of keywords. You could say that C is very bare bones and only offers what is really necessary. Other functionality, such as input/output operations are delegated to libraries. Heap and garbage collection are absent in C and only a basic form of modularity is possible. However, the small size of the language has the benefit that it can be learned quickly.

Despite the fact that C is a low level language, it is not difficult to learn or use. Many iOS and Mac developers have become so used to Objective-C and its object oriented design that they are afraid to try working with “straight” C or C libraries. Objective-C is a strict superset of C and nothing more than a layer on top of C.


Practice Makes Perfect

A programming language is best learned by practicing, so let’s create a new project in Xcode and write a few lines of C to get to know the language. Launch Xcode and create a new project by selecting New from the File menu and choosing Project… from the submenu (figure 1).

Learning C: A Primer - Creating a New Xcode Project - Figure 1

We won’t be creating an iOS application like we did earlier in this series. Instead, we will create an OS X project. Select Application in the section labeled OS X and choose Command Line Tool form the list of templates on the right. Click the Next button to continue.

Learning C: A Primer - Choosing the Command Line Tool Template - Figure 2

Name your project C Primer and give it an organization name and company identifier as we saw previously. Set the Type drop down menu to C and check the checkbox labeled Use Automatic Reference Counting. The only configuration that really matters for this tutorial is the type. Don’t worry about the other options for now. Click the Next button to continue.

Learning C: A Primer - Configuring the Project - Figure 3

Tell Xcode where you want to save the new Xcode project. It isn’t necessary to create a git repository for this project. We will only be using this project for learning C instead of creating a useful command line tool.

Learning C: A Primer - Specifying a Location to Save the Project - Figure 4

Project Overview

In comparison with the iOS application that we created earlier in this series, this project is surprisingly minimal. In fact, it only contains two source files, main.c and C_Primer.1. For the purposes of learning C, only main.c is of interest to us. The file’s extension, .c, indicates that it is a C source file.

Learning C: A Primer - An Overview of the Project - Figure 5

Before we build and run the command line tool, let’s take a look at the contents of main.c. Apart from a few comments at the top of the file and a function named main at the bottom, the source file doesn’t contain much. The file also contains an include statement that I will talk about more a bit later in this article.

//
//  main.c
//  C Primer
//
//  Created by Bart Jacobs on 06/12/12.
//  Copyright (c) 2012 Mobile Tuts. All rights reserved.
//
#include <stdio.h>
int main(int argc, const char * argv[])
{
    // insert code here...
    printf("Hello, World!\n");
    return 0;
}

A closer look at the main function reveals a few interesting characteristics of the C programming language. I mentioned earlier that C is a typed language, which means that variables as well as functions are typed. The implementation of the main function starts by specifying the return type of the function, an int. Also note that the arguments of the function are typed. The keyword function, which is common in many other languages, is absent in C.

The body of the main function starts with a comment (single line comments start with //). The second line of the function’s body is another function, which is part of the C standard library, hence the #include statement at the top of the file. The printf function send some output to the standard output, “Hello, World!\n”, in this case. The \n specifies a new line. In Xcode, however, the output is redirected to the Xcode Console, which I will talk about more in a bit.

The main function ends by returning 0. When a program returns 0, it means that it terminated successfully. That is all that happens in the main function. Don’t mind the arguments of the main function as this is beyond the scope of this tutorial.


Build and Run

Now that we know what the main function does, it is time to build and run the command line tool. By building the application, the code in main.c is compiled into a binary, which is then executed. Build and run the command line tool by clicking the Run button in the top left.

If all went well, Xcode should show the debug area at the bottom of the window. You can show and hide the debug area by clicking the middle button of the View control in the toolbar at the top (figure 5). The debug area has two sections. On the left is the Variables window and on the right is the Console window. In the Console, you should see the words Hello, World!.

Learning C: A Primer - How to Show and Hide the Debug Area in Xcode - Figure 6
Learning C: A Primer - The Project Window with the Debug Area Visible - Figure 7

In a Nutshell

In the rest of this article, I will cover the most important characteristics of C. What is covered in this tutorial is limited to what you need to know to get started with iOS development. In the next article of this series, I will cover Objective-C.

In contrast to interpreted languages, such as Ruby, PHP, and JavaScript, C is a compiled language. The source code of a program written in a compiled language is first compiled into a binary that is specific to the machine it was compiled on. The compilation process reduces the source code to instructions that can be understood by the machine it runs on. This also means that an application compiled on one machine is not guaranteed to run on another machine.

It goes without saying that programs written in interpreted languages also need to be reduced to instructions that the target machine can understand. This process, however, takes place during runtime. The result is that, generally speaking, programs written in a compiled language are faster when executed than those written in an interpreted language.


Data Types

Another important difference with languages like PHP, Ruby, and JavaScript is that C is a typed language. What this means is that the data type a variable can hold needs to be explicitly specified. In C, the fundamental data types are characters (char), integers (int), and floating-point numbers (float). From these fundamental types, a number of additional types are derived, such as double (double precision floating-point number), long (integer that can contain larger values), and unsigned int (integer that can only contain positive values and therefore larger values). For a complete list of the basic C data types, I recommend taking a look at the Wikipedia page about C data types.

Have you noticed that strings weren’t mentioned in the list of basic C data types? A C string is stored as an array of chars. A char can store one ASCII character, which means that an array of chars can store a string. Take a look at the following example to see what this means in practice. The square brackets immediately after the variable name indicate that we are dealing with an array of chars. A C string is zero terminated, which means that the last character is 0.

char firstName[] = "Bart";

Let’s explore typing in more detail by comparing two code snippets. The first code snippet is written in JavaScript, whereas the second snippet is written in C. In JavaScript, a variable is generally declared with the var keyword. C doesn’t have a keyword to declare variables. Instead, a variable in C is declared by prefixing the variable with a data type, such as int or char.

var a = 5;
var b = 13.456;
var c = 'a';
int a = 5;
float b = 13.456;
char c = 'a';

Let’s introduce some variables in the main function that we saw earlier. Change the body of the main function to look like the code snippet below. To print the variables using the printf function, we use format specifiers. For a more complete list of available format specifiers, visit this link.

int main(int argc, const char * argv[])
{
    // insert code here...
    printf("Hello, World!\n");
    // Variables
    int a = 5;
    float b = 6.3;
    char c = 'r';
    printf("this is an int: %i\n", a);
    printf("this is a float: %f\n", b);
    printf("this is a char: %c\n", c);
    return 0;
}

As we saw earlier, in C, typing isn’t limited to variables. Functions also need to specify the type they return as well as the type of the arguments they accept. Let’s see how this works.


Functions

I am assuming that you are already familiar with functions. As in other languages, a C function is a block of code that performs a specific task. Let’s make main.c more interesting by introducing a function. Before the main function, we added a function prototype. It tells the compiler about the function, what type it returns, and what arguments it accepts. At the bottom of main.c, we added the implementation of that function. All the function does is multiply the argument that is passed to the function by five and return the result.

#include <stdio.h>
int multiplyByFive(int a); // Function Prototype
int main(int argc, const char * argv[])
{
    // insert code here...
    printf("Hello, World!\n");
    // Variables
    int a = 5;
    float b = 6.3;
    char c = 'r';
    printf("this is an int > %i\n", a);
    printf("this is a float > %f\n", b);
    printf("this is a char > %c\n", c);
    // Functions
    printf("Five multiplied by five is %i\n", multiplyByFive(5));
    return 0;
}
int multiplyByFive(int a) {
    return a * 5;
}

We also updated the main function, by using the multiplyByFive function. Note that a function prototype is not strictly necessary on the condition that the implementation of the function is placed before it is called for the first time. However, using function prototypes is useful as it allows developers to spread source code over multiple files and thereby keeping a project organized.

If a function doesn’t return a value, then the return type is declared as void. In essence, this means that no value is returned by the function. Take a look at the following example. Note that the function doesn’t accept any arguments. The parentheses after a function’s name are required even if the function doesn’t accept any arguments.

// Function Prototype
void helloWorld();
// Function Implementation
void helloWorld() {
  printf("Hello, World!\n");
}

Before we move on, I want to mention that the C language doesn’t have a function keyword for declaring a function like in JavaScript or PHP. The parentheses after the function name indicate that helloWorld is a function. The same is true for variables as I mentioned earlier. By prefixing a variable name with a type, the compiler knows that a variable is being declared.

You might be wondering what the benefits are of a typed language, such as C. For programmers coming from Ruby or PHP, learning a typed language might be confusing at first. The main advantage of typing is that you are forced to be explicit about the behavior of the program. Catching errors at compile time is a major advantage as we will see later in this series. Even though C is a typed language, it is not a strongly typed language. Most C compilers provide implicit conversions (e.g., a char that is converted to an int).

Structures

What is a structure? Allow me to quote Kernighan and Ritchie. A structure is a collection of one or more variables, possibly of different types, grouped together under a single name for convenient handling. Let’s look at an example to see how structures work. Add the following code snippet to right before the main function’s return statement.

// Structures
struct Album {
    int year;
    int tracks;
};
struct Album myAlbum;
struct Album yourAlbum;
myAlbum.year = 1998;
myAlbum.tracks = 20;
yourAlbum.year = 2001;
yourAlbum.tracks = 18;
printf("My album was released in %i and had %i tracks.\n", myAlbum.year, myAlbum.tracks);
printf("Your album was released in %i and had %i tracks.\n", yourAlbum.year, yourAlbum.tracks);

We start by declaring a new structure type and we give it a name of Album. After declaring the new type, we use it by specifying that the variable we are about to declare is a struct and we specify the struct’s name, Album. The dot-notation is used to assign values to and read the values from the variables of a struct.

Pointers

Pointers are often a bit of a stumbling block for people who want to learn C. The definition of a pointer is very simple, though. A pointer is a variable that contains a memory address. Keep in mind that a pointer is just another C data type. Pointers are best understood by inspecting an example. Paste the following code right before the return statement of the main function.

// Pointers
int d = 5;
int *e = &d;
printf("d has a value of %i\n", d);
printf("e has a value of %p\n", e);
printf("the object that e points to has a value of %i\n", *e);

We start by declaring an int and assigning a value to it. In the following line, we declare a pointer to int named e by prefixing the variable name with an asterisk. The ampersand before the variable d is a unary operator (a fancy name for an operator that has one operand) that is know as the address-of operator. In other words, by placing prefixing the variable d with an ampersand, our pointer e is given not the value of d, but the address in memory where the value of d is stored. Remember the definition of a pointer, it is a variable that contains the address of a variable.

The print statements after the variable declarations will make this example clearer. Build and run the example and inspect the output in the console. The value of d is 5 as we expect. The second print statement might surprise you. The pointer named e contains a memory address, the place in memory where the value of d is stored. In the final statement, we use another unary operator, the dereferencing or indirection operator. What this operator does, is accessing the object that is stored at the location the pointer is pointing to. In other words, by using the dereferencing operating we retrieve the value of d.

Remember that when a variable is declared in the C programming language, a block of memory is allocated to that variable. A pointer simply points to that block of memory. In other words, it holds a reference to the variable that is stored in the block of memory. Make sure that you understand the concept of pointers before moving on to the next article in which we take a look at Objective-C. Pointers are used all the time when working with objects.

Don’t worry if pointers don’t make sense after reading this article. It often takes some time to really grasp the concept. There is an excellent post written by Peter Hosey that I cannot recommend enough.

Mind the Semicolon

It seems as if semicolons are no longer hip. Ruby isn’t fond of semicolons and the new cool kid in town, CoffeeScript, doesn’t like them either. In C and Objective-C, semicolons are required at the end of every statement. The compiler is not very forgiving as you will notice.


Conclusion

There is more to the C programming language than what I described in this article. In the next article, however, I will talk about Objective-C and it will gradually improve your understanding with C. Once we start working with the iOS SDK, you will get the hang of working with variables, objects, and pointers in no time.

Getting Started with Objective-C

$
0
0

With the basics of C still fresh in your memory, it is time to become familiar with Objective-C. The key difference with C is that Objective-C is an object oriented programming language, whereas C is a procedural programming language. This means that we first need to understand objects and how they relate to classes. Other key concepts that we will explore in this article are object messaging, encapsulation, and inheritance.


The Origins of Objective-C

Objective-C and Cocoa are two key components of the iOS platform. Despite the fact that the iOS platform is still relatively young, Objective-C was created in the early 1980′s at StepStone by Brad Cox and Tom Love. The language was created in an effort to combine the robust and agile C programming language with the elegant Smalltalk language. Objective-C is a strict superset of C and, in contrast to C, it is a high level programming language. The key difference between C and Objective-C is that Objective-C is an object oriented programming language, whereas C is a procedural programming language.
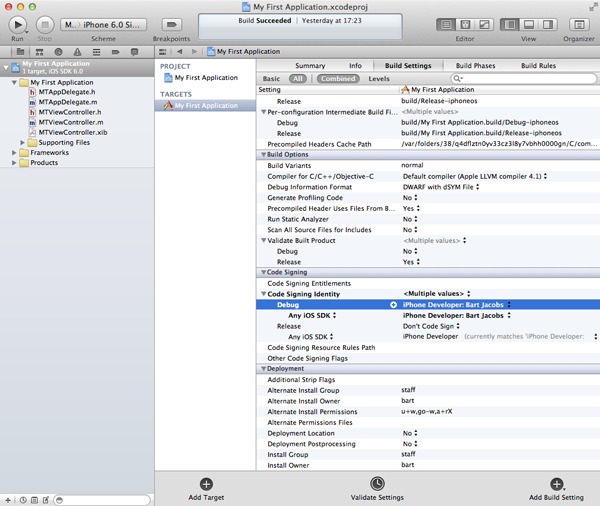
How did iOS end up using a language that was developed in the 1980′s? Shortly after NeXT was founded by Steve Jobs, it licensed Objective-C from StepStone. NeXT created NeXTSTEP, a user interface toolkit for the NeXT operating system and developed in Objective-C. Even though NeXTSTEP provided a revolutionary set of tools, the NeXT operating system gained only little traction in the market. In 1996, Apple acquired NeXT and NeXTSTEP was renamed to Cocoa. The latter went mainstream with the introduction of OS X in March 2001 and later with the release of the iPhone and the iOS operating system.


Object Oriented Programming

In procedural programming, a program consists of a series of procedures or routines that are executed to reach a particular state. In object oriented programming, however, a collection of objects interact and work together to complete a task. Even though the end result can be identical, the methodology and underlying paradigms are substantially different. Modularity and code reusability are two of the primary advantages of object oriented programming languages as we will see soon.


Objective-C, Cocoa, and Cocoa Touch

Developers new to the iOS and OS X ecosystems often get confused by the relationship between Objective-C, Cocoa (OS X), and Cocoa-Touch (iOS). What is Cocoa-Touch and how does it relate to Objective-C? Cocoa-Touch is Apple’s native application programming interface (API) for the iOS and OS X platforms. Objective-C is the language that powers Cocoa-Touch. While this article focuses primarily on the Objective-C programming language, we will take a closer look at the Cocoa and Cocoa-Touch API’s later in this series.


Classes, Objects, and Instances

Another stumbling block for developers new to object oriented programming is the distinction between classes, objects, and instances. A class is a cast or blueprint for creating objects, whereas instances are unique occurrences of a class. An object is a data structure that has a state and behavior. In spite of the subtle difference between objects and instances, both terms are often used interchangeably.

Let’s take a look at an example: toasters. Before a toaster is manufactured, engineers create a blueprint, which is the equivalent of a class. Each toaster created from the blueprint is an instance or a unique occurrence of the class. Even though each toaster is created from the same blueprint (class), they each have their own state (color, number of slots, etc.) and behavior.

Instance Variables and Encapsulation

The state of an instance is stored in and defined by its instance variables, or the object’s attributes if you will. This brings us to another key pattern of object oriented programming: encapsulation. Encapsulation means that the internal representation of an object is private and only known to the object itself. This might seem like a severe restriction at first glance. However, the result is modular and loosely coupled code.

Let’s illustrate encapsulation with another example. The speed of a car is measured by the car’s internals, yet the driver knows the speed of the car by looking at the speedometer. The driver doesn’t need to know about or understand the car’s internals to know the speed of the car. Similarly, the car’s driver doesn’t need to understand how engines work to be able to drive the car. The details of how a car works are hidden from the driver. The state and behavior of the car is hidden from the driver and is accessible through the car’s interface (steering wheel, brake pedal, dashboard, etc.).

Inheritance

Another powerful paradigm of object oriented programming is class inheritance. When class A is a subclass of class B, class A inherits the attributes and behavior of class B. Class B is said to be the parent class or superclass of class A. Inheritance also promotes code reusability and modularity.

Methods and Properties

Methods are subroutines associated with a class and they define the behavior of a class and its instances. The methods of a class have access to the internals of an instance and can thereby modify the state of the instance. In other words, the state of an instance (i.e. the instance variables) is controlled by the methods of an instance (i.e. the instance methods).

Due to the encapsulation pattern, the instance variables of a class instance cannot be accessed freely. Instead, they are accessed through getters and setters, methods with the sole purpose of getting and setting instance variables. Properties are a feature of Objective-C that make the creation of accessors (getters and setters) trivial. Despite the usefulness of accessors, it quickly becomes cumbersome to write accessor methods for every instance variable. We will explore properties in more detail later in this article. For now, consider properties as wrappers around instance variables that make it easier to work with instance variables through getters and setters.


Learning by Example

Let’s put our knowledge into practice by creating a new Xcode project to work with. Create a new project in Xcode by opening the File menu, selecting New and choosing Project… from the submenu (figure 1). As we did in the previous article, select the Command Line Tool project template in the Application category under the OS X section (figure 2).

Getting Up To Speed With Objective-C - Creating a New Project - Figure 1
Getting Up To Speed With Objective-C - Choosing the Project Template - Figure 2

Set the Product Name to Books and give the project an organization name and company identifier. For this project, it is important to set the project type to Foundation (figure 3). The reason behind this choice will become clear later in this article. Also make sure to enable Automatic Reference Counting (ARC) for this project (figure 3).

Getting Up To Speed With Objective-C - Configuring the Project - Figure 3

Tell Xcode where you want to save the project and click the Create button (figure 4). You may notice that the project looks different than the project we created for learning C (figure 5). Let’s take a moment to see what the differences are.

Getting Up To Speed With Objective-C - Specify a Location to Save the Project - Figure 4
Getting Up To Speed With Objective-C - Project Overview - Figure 5

Project Overview

The project contains a few more files and folders than the command line tool we created in the previous article. In addition to main.m and Books.1, there are two new folders, Supporting Files and Frameworks, each containing one item.

Supporting Files contains a file named Books-Prefix.pch. The .pch file extension tells us that this is a precompiled header file. Its purpose will become clear later in this series.

The Frameworks folder contains the frameworks that the project is linked against. What is a framework? A framework is a bundle or directory that contains a library including its resources, such as images and header files. The concept of a header file will become clear in just a minute. The Frameworks folder currently contains one item, Foundation.framework. While creating the project, you set the project type to Foundation, which means that the project is linked against the Foundation framework. The Foundation framework is a fundamental set of Objective-C Classes. Later in this series, we will take a closer look at the Foundation framework.


Create a Class

It is time to create your first class. Whenever you create a new file (File > New > File…), you are presented with a list of file templates. Choose Cocoa Touch from the OS X section and select the Objective-C class template to create a new Objective-C class. Click Next to continue.

Getting Up To Speed With Objective-C - Creating a New Objective-C Class - Figure 6

Give the new class a name of Book and set its subclass to NSObject (figure 7). As we saw earlier, by making the new class a subclass of NSObject, the new class will inherit the attributes and behavior of NSObject. This means that the new Book class gets some functionality for free. Click Next to continue and tell Xcode where you want to save the new class. Make sure to save the new class somewhere in the Xcode project (figure 8).

Getting Up To Speed With Objective-C - Assigning a Name to the Class - Figure 7
Getting Up To Speed With Objective-C - Tell Xcode Where to Save the Class - Figure 8

Xcode has added two new files to the project, Book.h and Book.m. Book.h is the header file of the Book class and exposes the class interface as we saw earlier. A class interface contains the properties and methods of the class, and it also specifies the class’ superclass. Book.m is the implementation file of the class and defines its behavior by implementing the methods declared in class header file.

Header File

Open Book.h and explore its contents. Apart from some comments at the top, the header file contains only three lines of code. The first line imports the header file of the Foundation framework. This ensures that the Book class has access to the classes and protocols declared in the Foundation framework.

#import <Foundation/Foundation.h>

The second and third line form a pair. In Objective-C, every class interface begins with @interface and ends with @end, which are both compiler directives, that is, commands or instructions for the compiler. The @interface directive is followed by the name of the class, a colon, and the class’ superclass (if applicable). As we saw earlier, the parent class or superclass is the class from which it inherits attributes and behavior.

@interface Book : NSObject
@end

NSObject is the root class of the majority of Objective-C classes. The first two letters, NS, refer to its origins, NeXTSTEP, as we saw earlier in this article. By inheriting from NSObject, classes behave like Objective-C classes and inherit a basic interface to the runtime system.

Implementation File

Before we make modifications to the Book class, let’s take a quick peak at Book.m, the class’ implementation file. Instead of importing the Foundation framework, the implementation file imports the header file of the Book class. Why is this necessary? The implementation file needs to know what properties and methods are declared in the header file before it can implement the behavior (i.e. methods) of the class. The import statement is followed by the implementation of the class, indicated by @implementation and @end.

Adding Properties and Methods

The book class isn’t very useful in its current implementation. Head over to the header file and add three properties year, title, and author, and add a method named bookInfo. Properties are declared with the @property keyword and can be declared anywhere in the class’ @interface block. The @property keyword is followed by the type and the name of the property. Don’t forget the asterisk in front of the title and author properties, because a Cocoa object is always referenced as a pointer.

The method declaration slightly resembles a function prototype, but there are a number of key differences. The method declaration starts with a minus sign indicating that this is an instance method. Class methods are prefixed with a plus sign. The minus sign is followed by the return type of the method between parentheses, an instance of NSString, and the name of the method. The method declaration ends with a semicolon.

#import <Foundation/Foundation.h>
@interface Book : NSObject
@property int year;
@property NSString *title;
@property NSString *author;
- (NSString *)bookInfo;
@end

I am sure you are wondering what NSString is and why it needs to be referenced as a pointer. The NSString class is a member of the Foundation framework. It declares the interface for an object that manages an immutable string. In the previous article, we saw that a string in C can be represented by an array of characters and that is exactly what the NSString class does, it manages an array of characters under the hood. The advantage of using NSString is that it make working with strings much easier.

Implementing bookInfo

Now that we have declared the bookInfo method in the class’s header file, it is time to implement it in the class’ implementation file. Open Book.m and add the following code snippet somewhere in the @implementation block. Before we break the implementation of bookInfo down, it is time to take a look at object messaging.

- (NSString *)bookInfo {
    NSString *bookInfo = [NSString stringWithFormat:@"%@ was written by %@ and published in %i", self.title, self.author, self.year];
    return bookInfo;
}

Object Messaging

We already know that the behavior of a class is defined through its methods. To call a method on an object, a message is sent to the object. Inspect the following code snippet to understand this concept. Let’s break it down line by line. In the first line, we declare a new string and assign it a constant string by wrapping the string in double quotes and preceding it with an @ sign.

NSString *string = @"This is a string of characters.";
int length = [string length];
NSLog(@"The length of the string is %i.\n" length);

In the second line, we send a message of length to the string instance. In other words, we call the method length on the string instance and the method returns an integer. The integer is assigned to the length variable of type int. In the last line, we log the length variable to the console by calling the NSLog function as we saw in the previous article.

Sending messages to objects is something you will do a lot, so it is important to understand the syntax. Even though the syntax looks odd if you are new to Objective-C, it is not that hard to understand. Between square brackets is the object on the left and the message or method name on the right.

[object message];

Methods that accept arguments look a bit different, but the general syntax is identical. The NSString class, for example, has another method named substringFromIndex:. The colon at the end of the name indicates that this method accepts an argument. Calling this method on a string looks like this:

NSString *substring = [string substringFromIndex:5];

Objective-C is known for its long and verbose method names. Take a look at the following example, which includes a method name with multiple arguments. You have to admit that the name of the method clearly states what the method does. The method name is split into chunks with each chunk accepting an argument. Object messaging will really sink in once we start working with the iOS SDK.

NSString *anotherString = [string stringByPaddingToLength:5 withString:@"some string" startingAtIndex:2];

Before we move on, we need to revisit the implementation of bookInfo. The method implementation starts by repeating the method declaration. The trailing semicolon is replaced with a pair of curly braces, which wrap around the implementation of the method. We first declare a new string, bookInfo, and assign to it a new string, created with the attributes of our book instance (title, author, and year). At the end of the bookInfo method, we return the new string (bookInfo), because that is what the method expects, a string as the return type.

Three things require some clarification. First, the method stringWithFormat: is a class method and not an instance method. We know this because the method is called on the class itself, NSString, not on an instance of the class. Class methods are common in object oriented programming languages. Second, the format specifier for an object is represented by the @ symbol (preceded by the percent sign). Both title and author are objects (strings to be precise). Third, the self keyword always references the class instance. In this case, self refers to the Book instance to which the method bookInfo belongs.

Accessors Revisited

If you have worked with other object oriented languages, accessing instance variables in Objective-C might be confusing. We do not directly access an instance variable when we write self.title. This is nothing more than a shortcut for [self title]. The latter means that we use the getter method to ask the instance for the instance variable named title. The same is true for setting an instance variable. Take a look at the following code snippet. As you can see, the use of self.title is nothing more than syntactic sugar.

// This assignment ...
self.title = @"The Hobbit";
// ... is equivalent to ...
[self setTitle:@"The Hobbit"];

id, nil, and NULL

Before we start using the Book class, I want to talk about a few keywords that confuse people from time to time. Whenever you want to store an object without explicitly defining the type of that object, you use the id data type, which is also the default type for return and argument declarations for Objective-C methods. The power and usefulness of the id data type goes much further, though. The id data type is a key component of Objective-C’s dynamic typing and dynamic binding. It is important to understand that the id data type does not hold any information about the object itself other than that it is an object. In Objective-C, every object knows what class it belongs to (through an isa variable) and this is critical. Why is that? One of the strengths of Objective-C is its dynamic typing, which means that type checking is performed at runtime instead of compile time. However, since the id data type does not tell the compiler anything about the class the object belongs to, the object itself needs to provide this information to the compiler.

Keep in mind that it is perfectly acceptable to statically type an object in Objective-C by explicitly specifying an object’s class instead of using the id data type.

This brings us to another vital component of the Objective-C runtime, dynamic binding. In Objective-C, an important difference between functions and messages is that a message and the receiving object aren’t joined together until runtime. What does this mean and why is this important? This means that the method invoked in response to a message sent to an object is determined at runtime when both the message and the object are known. This is what is known as dynamic binding.

In Objective-C, the keyword nil is defined as a null object, that is, an id with a value of 0. Under the hood, there is no difference between nil, Nil, and NULL, and it is possible to send messages to each of them without an exception being thrown. The convention is to use nil for objects, Nil for classes, and NULL otherwise. Being able to send messages to nil, Nil, and NULL has benefits but it also has downsides. For more information about nil, NULL, and Nil, take a look at this question of Stack Overflow.


Creating Objects

Open main.m and add an import statement to import the header file of the Book class. Instead of using angle brackets, we use double quotes to import the header file of the Book class. Double quotes are used for local files, whereas angle brackets are used for global includes (using the project’s include path).

#import <Foundation/Foundation.h>
#import "Book.h"

Immediately after the NSLog call, add the following snippet to create an instance of the Book class. In the first line, we declare a variable of type Book and initialize it. This is a good example to illustrate nested method calls. The first method called on the Book class is alloc. The details of this call are not important. The gist is that memory is allocated for the new object and the object is created. Due to the nesting of the calls, the init method is called on the new object that was created by the alloc method. The init method initializes the new object, that is, setting up the object and making it ready for use. The init method returns the instance and, in our example, assigns it to the book1 variable.

Book *book1 = [[Book alloc] init];
book1.title = @"The Hobbit";
book1.author = @"JRR Tolkien";
book1.year = 1937;

The next three lines should be familiar by now, we set the title, author, and publication year of the new book. Let’s create another book and add both books to an Objective-C array. The creation of the second book isn’t new. The only difference is that we have made explicit use of the class’ setters to set the instance variables of the new instance.

In the last line, we create an instance of NSArray, another class of the Foundation framework. The NSArray class is an array that can store an ordered list of objects. Just like we did with the book instances, we allocate memory and initialize the new array. However, instead of calling init, we call initWithObjects:. initWithObjects: is a designated initializer. It simply means that this is an init method with some extra bells and whistles to facilitate object initialization. initWithObjects: accepts any number of objects that you wish to store in the array. The list of objects should always end with nil.

Book *book2 = [[Book alloc] init];
[book2 setTitle:@"The Fellowship of the Ring"];
[book2 setAuthor:@"JRR Tolkien"];
[book2 setYear:1954];
NSArray *books = [[NSArray alloc] initWithObjects:book1, book2, nil];

Mixing C and Objective-C

I have mentioned several times that Objective-C is a strict superset of C and that we can freely combine C and Objective-C. Let’s see how this works. We start by using a simple if/else statement to verify that the array contains any objects. By sending the array a message of count, it will return the number of objects it contains.

If the array does contain objects, we use a simple for loop to iterate over the objects in the array. During each iteration, we ask the array for the object at index i and send the object (an instance of the Book class) a message of bookInfo. As we saw earlier, bookInfo returns an instance of NSString, which we log to the console.

if ([books count] > 0) {
    for (int i = 0; i < [books count]; i++) {
        Book *aBook = [books objectAtIndex:i];
        NSLog(@"%@", [aBook bookInfo]);
    }
}

Conclusion

I am sure that you are a little overwhelmed by Objective-C. This is normal. Even though Objective-C is nothing more than a thin layer on top of the C language, there is quite a lot going on. While there is more to Objective-C than discussed in this article, you now know the basics and are ready to start working with the iOS SDK. In the next article, we will take a look at the iOS SDK and explore its various components.

Best of Tuts+ in November 2012

$
0
0

Each month, we bring together a selection of the best tutorials and articles from across the whole Tuts+ network. Whether you’d like to read the top posts from your favourite site, or would like to start learning something completely new, this is the best place to start!


Psdtuts+ — Photoshop Tutorials


Nettuts+ — Web Development Tutorials


Vectortuts+ — Illustrator Tutorials


Webdesigntuts+ — Web Design Tutorials


Phototuts+ — Photography Tutorials

  • The Basics of Better Moon Photography

    The Basics of Better Moon Photography

    It controls the tides and even some people’s moods. It watches over us at night and sometimes makes a guest appearance during the day. It’s our only non-man-made satellite and some people still think it is made of cheese.

    Visit Article

  • Your Guide to Stunning Surf Photography

    Your Guide to Stunning Surf Photography

    A surfer performing a maneuver on a beautiful wave is always a photographic inspiration. Every wave is different and every surfer has his or her own unique style. As a photographer, the elements of surfing make it both enjoyable and exciting to capture.

    Visit Article

  • How to Shoot a Professional, Creative Low-Key Self Portrait

    How to Shoot a Professional, Creative Low-Key Self Portrait

    Sometimes when looking at a beautiful black and white portrait, you think to yourself, “what a shot, I wish I could have one!” In fact, you do not have to be a professional photographer or use a professional service to have stunning shots. You can do it by yourself and all you need is some creativity, a little ingenuity and artistry.

    Visit Article


Cgtuts+ — Computer Graphics Tutorials

  • Modeling, Texturing & Rendering for Production: Part 1 Concept Design – Tuts+ Premium

    Modeling, Texturing & Rendering for Production: Part 1 Concept Design – Tuts+ Premium

    In production, speed is everything. Artists need to adapt tools and techniques that allow for a workflow that’s not only fast and efficient, but one that yields excellent results at the same time. In our latest Tut+ Premium series Modeling, Texturing & Rendering for Production you’ll follow profession CG artist Mile Eror as he shares his personal workflow and discusses the tools, techniques and general approach he takes when working on a project.

    Visit Article

  • Building a Steampunk Inspired Light Saber in 3ds Max, Part 1

    Building a Steampunk Inspired Light Saber in 3ds Max, Part 1

    In this tutorial we are going to create a stylized high poly model of a steampunk light saber. We are going to use a ton of different modeling techniques to create the different shapes of the model, as well as some techniques that will allow us to group and connect the different elements together into single pieces of geometry.

    Visit Article

  • Working with Advanced Reflections in UDK

    Working with Advanced Reflections in UDK

    In this tutorial we’ll learn how to setup both a Dynamic (realtime) and a Static reflection material in Unreal Development Kit, and create a Parameter Switch to switch from Dynamic to Static reflections, or vice versa in UDK. For the tutorial I’ll be using the February 2011 version of UDK.

    Visit Article


Aetuts+ — After Effects Tutorials


Audiotuts+ — Audio & Production Tutorials

  • Quick Tip: How To Sound Like Minimalist Composer Steve Reich

    Quick Tip: How To Sound Like Minimalist Composer Steve Reich

    This quick tip describes the common composing techniques, provides links to examples and gives suggestions on how you can do it yourself.

    Visit Article

  • Editing And Using .REX Files

    Editing And Using .REX Files

    Would you like to edit clean transients in a flexible, non-destructive way? In this video tutorial, Mo Volans teaches you how to use .REX files in Propellerhead’s ReCycle to do just that. You’ll also learn how easy it is to graphically edit your loops in Reason’s Dr.Octo Rex. Enjoy!

    Visit Article

  • Quick Tip: 10 Quick Editing Tips

    Quick Tip: 10 Quick Editing Tips

    Usually, editing is overlooked as a part of audio production. It’s not that engineers don’t know what it is, it’s just that it’s looked at the same way a chef would look at doing the dishes. It’s boring. It’s tedious and tiresome to go through each and every track to spot the glitches, pops and abnormal volume changes.

    Visit Article


Wptuts+ — WordPress Tutorials


Mobiletuts+ — Mobile Development Tutorials


Gamedevtuts+ — Game Development


Mactuts+ — Mac & OS X

  • How to Upgrade Your MacBook Pro to an SSD

    How to Upgrade Your MacBook Pro to an SSD

    Following on from the previous post on upgrading your MacBook Pros RAM, today we have a tutorial on how to fit your Mac with a speedy Solid-State Drive (SSD). Upgrading RAM was a relatively cheap way to increase the speed of your Mac – it did so by making your Mac run smoother if you have multiple applications open at the same time and generally allowing your Mac to do more without slowing it down – but adding an SSD will be make your laptop run faster than it ever has. The difference can be so large, youd be forgiven for thinking youve got a whole new machine.

    Visit Article

  • How to Own Apple Products Without Getting Screwed

    How to Own Apple Products Without Getting Screwed

    Have you ever purchased an awesome new Apple product only to find out almost immediately that there’s a newer and better version right around the corner, or worse, already announced? Doesn’t it make you want to pull your hair out when you fork over hundreds or even thousands of your hard earned dollars and still quickly find yourself a generation of technology behind? Today, we’re going to look at a few simple strategies that you can use to avoid that “screwed over” feeling that seems inherent in owning Apple products.

    Visit Article

  • How to Increase the Performance of Your Wireless Network

    How to Increase the Performance of Your Wireless Network

    Wireless networks are so ubiquitous that many of us rarely pay any attention to their setup. For a lot of us, as long as we can get on the Internet, then thats all we need. However, its likely that your wireless network isnt anywhere near as good as it can be. With some simple tweaking, and some great utilities from the Mac App Store, we can make sure it’s the best in the neighborhood!

    Visit Article


Crafttuts+ — Craft & Handmade

  • Knitting Fundamentals: How to Cast-On

    Knitting Fundamentals: How to Cast-On

    Knitting has been gaining quite a bit popularity over the past few years. Knitting enthusiasts are no longer just grandmothers who make sweaters for Christmas (although those gals are out there too, love you Granny!). It’s true, knitting is now common amongst women and men of almost all age ranges, and many of those who don’t know how to knit are starting to express an interest in learning.

    Visit Article

  • Make Your Own Hobbiton Miniature Garden

    Make Your Own Hobbiton Miniature Garden

    Lord of the Rings fans rejoice; the world premiere of The Hobbit: An Unexpected Journey screened in Wellington today and its only a matter of weeks before the rest of us get to see it for ourselves. Ive always wanted to make a themed miniature garden, so I thought I might get my Tolkien geek on for Craftuts+ and make a Hobbiton-themed miniature garden.

    Visit Article

  • Make a Colourful Christmas Wreath and Garland With Fabric Strips

    Make a Colourful Christmas Wreath and Garland With Fabric Strips

    Here’s a Christmas craft where you can use all those tiny bits of fabric you have left over from other craft projects. Gather all your pieces together and use them to make a festive wreath and garland decoration for your home.

    Visit Article


FreelanceSwitch — Freelance Jobs & Information

  • Facebook for Freelancers: Groups, Pages or Profiles?

    Once you’ve decided Facebook is right for you as a freelancer, you’re ready to put together an action plan on how you’ll use it to promote your business and market your services.
    Your next step is to decide whether to promote your business with a Profile, a Group or a Page. These are the three set-ups Facebook offers, and each has its advantages and disadvantages.

    Visit Article

  • 15 Ways New Freelancers Can Use Social Media to Boost Business

    Social media is a great way to connect with new people, including potential freelance clients. Having a presence on one of the hugely trafficked social-media platforms can also help your own freelancer website rank better in search and help you get found by prospects.

    Visit Article

  • How to Craft Your Portfolio to Your Target Market

    Your portfolio may be the first introduction potential clients have to you: it tells them what type of projects you do well at and what kind of work you want to land — even if that’s not the message you intended to convey. At the most basic level, the people who view your portfolio will assume that you don’t do anything beyond what is included in that portfolio.

    Visit Article

Android SDK: Using Fragments

$
0
0

The notion of fragments was introduced in Android 3.0, API Level 11. Since then, the Android community has seen six major platform releases. Still, more than half of the active Android devices don’t have this feature available to them natively. Developers must instead use the Android Support library if they are to use fragments with these devices. Learn how to create a basic fragment-based app using the Android Support library in this tutorial.

Step 0: Getting Started

This tutorial is for the Android developer who needs to target the vast majority of Android devices currently in users’ hands and wants to leverage the Fragment API, which simplifies support for a variety of screen sizes. You should be comfortable with Java, Eclipse, and be familiar with Android basics.

This tutorial is also for those who need more detailed instructions than what our other fragment tutorial gave or those who need a fresh take on fragments.

In order to fully see the effects and differences of a responsive, well-designed fragment screen design, you’ll need two devices (or configured emulators): one with a regular phone-size screen and another with a tablet-sized screen.

Note that this code is based off the best-practices code created by the New Android Application wizard within Eclipse. The project can be downloaded and browsed at Google code hosting, as can the installable binary.

Step 1: Classic Two-Pane View

The example here will be the classic fragment example, also known as a “master-detail” flow. We start with a list of “things” (items, they could be songs, movies, pets, whatever) and, when a “thing” is clicked on, we display the details for that specific “thing”. If the device’s screen size can accommodate showing both the list and the details, two fragments will be used. Otherwise, just one is used and the user must click to drill down to the details.

Here is a figure showing the typical screen organization before fragments, or when the screen isn’t large enough to handle so much information side-by-side:

Single Pane Fragments

And here is the screen design when done with fragments as it would display on a large or wide screened device like a tablet:

Dual Pane Fragments

Fragments don’t remove the need for activities. And, in fact, you’ll still need two activities: one activity will handle the case where both fragments are displayed (two pane mode) and another to handle the detail view when only the list was displayed on the first screen because the device screen size was small. Through the use of appropriately organized resources, the first activity will adjust dynamically in response to the screen width. Internally, this activity must know if it’s in two pane mode or not so it can correctly place the detail fragment or spawn the detail activity as necessary, which will contain just the detail fragment.

To simplify: You will need to implement two Activity classes and two Fragment classes to handle these cases. The Activity classes are fairly simple, since they just display the correct fragment or fragments and control the app flow. For our example here we use the following Activity classes: the main class, CircleListActivity, the sometimes used detail class, CircleDetailActivity. We also have the two Fragment classes that actually perform layout and drawing: CircleListFragment and CircleDetailFragment. Yes, we’re talking about circles. Circles are just things. No need to be concerned with the “thing” we’ve chosen.

Step 2: Creating the Primary Activity

The primary activity, CircleListActivity, is the starting point for loading either one or both fragments for the screen.

import android.content.Intent;
import android.os.Bundle;
import android.support.v4.app.FragmentActivity;
public class CircleListActivity extends FragmentActivity {
	private boolean mTwoPane;
	@Override
	protected void onCreate(Bundle savedInstanceState) {
		super.onCreate(savedInstanceState);
		setContentView(R.layout.activity_circle_list);
		if (findViewById(R.id.circle_detail_container) != null) {
			mTwoPane = true;
			((CircleListFragment) getSupportFragmentManager().findFragmentById(
					R.id.circle_list)).setActivateOnItemClick(true);
		}
	}
}

Note that we use the Android Support FragmentManager, not the one introduced in Android 3.0.

Yet, the Activity class does very little. All the main logic happens automatically because the Android operating system will load the correct layout resource version for the device when the setContentView() method call is made. This means you just need to focus your attention on the resources in question. How does the resource correctly choose to use one fragment or two?

Step 3: Defining the Layouts for the Screens

Pop Quiz: How many layouts do we need to display both fragments?

Answer: 3, but that doesn’t include the layout of each fragment.

We need one layout that will display both the list fragment and the detail fragment. We need another layout that will just show the list fragment. Finally, we need a third layout that will show just the detail fragment.

Layouts can use a fragment tag to indicate a specific fragment to load. However, this only works for fixed fragments. For dynamic fragments, such as the detail fragment that will display different information based on what was chosen, we use a container view to indicate where the fragment should go in the layout. The most common container to use is a FrameLayout, as it only contains one child element and can then be positioned as a block anywhere in the containing layout.

To start, we’ll create the two single fragment layouts.

First, the layout that will display just the list fragment:

&lt;fragment xmlns:android=&quot;http://schemas.android.com/apk/res/android&quot;
    android:id=&quot;@+id/circle_list&quot;
    android:name=&quot;com.mamlambo.circlesfragmentexample.CircleListFragment&quot;
    android:layout_width=&quot;match_parent&quot;
    android:layout_height=&quot;match_parent&quot;
    android:layout_marginLeft=&quot;16dp&quot;
    android:layout_marginRight=&quot;16dp&quot;
/&gt;

Now the layout that displays just the details fragment:

&lt;FrameLayout xmlns:android=&quot;http://schemas.android.com/apk/res/android&quot;
    android:id=&quot;@+id/circle_detail_container&quot;
    android:layout_width=&quot;match_parent&quot;
    android:layout_height=&quot;match_parent&quot;
 /&gt;

If these look pretty simple, it’s because they are. To reiterate, these are the layouts that dictate where the fragments will be, not that the fragments look like.

Finally, let’s combine them into a layout that will display both fragments:

&lt;LinearLayout xmlns:android=&quot;http://schemas.android.com/apk/res/android&quot;
    android:layout_width=&quot;match_parent&quot;
    android:layout_height=&quot;match_parent&quot;
    android:layout_marginLeft=&quot;16dp&quot;
    android:layout_marginRight=&quot;16dp&quot;
    android:orientation=&quot;horizontal&quot;
    android:showDividers=&quot;middle&quot;
    &gt;
    &lt;fragment
        android:id=&quot;@+id/circle_list&quot;
        android:name=&quot;com.mamlambo.circlesfragmentexample.CircleListFragment&quot;
        android:layout_width=&quot;0dp&quot;
        android:layout_height=&quot;match_parent&quot;
        android:layout_weight=&quot;1&quot;/&gt;
    &lt;FrameLayout
        android:id=&quot;@+id/circle_detail_container&quot;
        android:layout_width=&quot;0dp&quot;
        android:layout_height=&quot;match_parent&quot;
        android:layout_weight=&quot;3&quot; /&gt;
&lt;/LinearLayout&gt;

Now that you know what the layouts look like, you still might be wondering how the correct one gets chosen programmatically.

Step 4: Organizing the Layouts for Different Scenarios

You know that the Android operating system will choose appropriate resources based on current device characteristics. So, at first glance, you may start placing layouts in folders like layout-land, layout-large, layout-small, and so on. You’d name the single list fragment layout the same as the dual fragment layout and put them both in a variety of different folders. This might even work, but this method will be hard to maintain, with several different files for several identical layouts.

Instead, you can use references to refer to a particular item in Android from a particular resource folder. It’s best to see an example of this. We’ll name our three Activity-based layouts (as opposed to the individual fragments contained within): activity_circle_detail, activity_circle_list, and activity_circle_twopane. Then we’ll put all three in the standard layout folder. You’ve already seen in the code, from Step 2 that we only ever load the activity_circle_list layout. Or do we?

Now let’s add some references. A good way to determine if the screen is suitable for two side-by-side panes is by the width, in dp units. Let’s say our dual-pane layout requires at least 850dp units of screen width. Let’s create a folder called values-w850dp. That should cover high density 7″ tablets and medium density 10″ tablets in landscape mode, but it won’t include xhdpi phones and will generally exclude portrait mode on most devices, except for some with very high resolution screens. In this folder, create a file called refs.xml and place the following inside it:

&lt;resources&gt;
    &lt;item name=&quot;activity_circle_list&quot; type=&quot;layout&quot;&gt;@layout/activity_circle_twopane&lt;/item&gt;
&lt;/resources&gt;

How does this work? When the width is 850dp or greater, this reference will be used to load the layout. That means the dual-pane layout will be used instead of the individual panes being displayed separately. As this resource qualifier (folder naming convention) wasn’t introduced until API Level 13, we’d also want to include this same reference in another suitable folder qualifier that has been around a lot longer, such as values-xlarge-land. Extra large is defined as at least 960dp by 720dp, so we also need to make sure it would only be shown in landscape mode by including the land qualifier.

With the layouts organized, it’s time to turn our focus back to the Java code. While the right layout will draw on the screen when the list activity is first launched, what happens when one of the list items is tapped?

Step 5: Defining the List Fragment

The list fragment handles displaying our array of things (circles, in this case). It’s not unlike a ListActivity in that it provides some handling of routine list tasks to simplify your own coding. The list needs to contain all of the circles from the data source (a mock data source, in this case), and it also needs to handle taps on specific items to show the details. However, since a fragment isn’t an activity, it should pass up events that might potentially change the screen to the controlling Activity class. A tap that occurs in dual pane mode will load a fragment in the other pane on the same screen whereas a tap in single pane mode should load a new activity with the detail fragment. However, the fragment doesn’t, and shouldn’t, know about these configuration details.

You must, however, create a consistent way to pass this information to the containing or controlling activity, which does, and should, know about these details. Most commonly, this communication is managed through an interface class defined in the fragment that must be implemented by any activity that uses it — a typical method of doing callbacks.

Here is the entire code for the CircleListFragment class, including a safe callback mechanism and the tap handling that calls the callback method to pass the workflow handling up to the controlling Activity.

import android.app.Activity;
import android.os.Bundle;
import android.support.v4.app.ListFragment;
import android.view.View;
import android.widget.ArrayAdapter;
import android.widget.ListView;
import com.mamlambo.circlesfragmentexample.dummy.DummyContent;
public class CircleListFragment extends ListFragment {
	private static final String STATE_ACTIVATED_POSITION = &quot;activated_position&quot;;
	private Callbacks mCallbacks = sDummyCallbacks;
	private int mActivatedPosition = ListView.INVALID_POSITION;
	public interface Callbacks {
		public void onItemSelected(String id);
	}
	private static Callbacks sDummyCallbacks = new Callbacks() {
		@Override
		public void onItemSelected(String id) {
		}
	};
	public CircleListFragment() {
	}
	@Override
	public void onCreate(Bundle savedInstanceState) {
		super.onCreate(savedInstanceState);
		setListAdapter(new ArrayAdapter&lt;DummyContent.DummyItem&gt;(getActivity(),
				android.R.layout.simple_list_item_activated_1,
				android.R.id.text1, DummyContent.ITEMS));
	}
	@Override
	public void onViewCreated(View view, Bundle savedInstanceState) {
		super.onViewCreated(view, savedInstanceState);
		if (savedInstanceState != null
				&amp;&amp; savedInstanceState.containsKey(STATE_ACTIVATED_POSITION)) {
			setActivatedPosition(savedInstanceState
					.getInt(STATE_ACTIVATED_POSITION));
		}
	}
	@Override
	public void onAttach(Activity activity) {
		super.onAttach(activity);
		if (!(activity instanceof Callbacks)) {
			throw new IllegalStateException(
					&quot;Activity must implement fragment's callbacks.&quot;);
		}
		mCallbacks = (Callbacks) activity;
	}
	@Override
	public void onDetach() {
		super.onDetach();
		mCallbacks = sDummyCallbacks;
	}
	@Override
	public void onListItemClick(ListView listView, View view, int position,
			long id) {
		super.onListItemClick(listView, view, position, id);
		mCallbacks.onItemSelected(DummyContent.ITEMS.get(position).id);
	}
	@Override
	public void onSaveInstanceState(Bundle outState) {
		super.onSaveInstanceState(outState);
		if (mActivatedPosition != ListView.INVALID_POSITION) {
			outState.putInt(STATE_ACTIVATED_POSITION, mActivatedPosition);
		}
	}
	public void setActivateOnItemClick(boolean activateOnItemClick) {
		getListView().setChoiceMode(
				activateOnItemClick ? ListView.CHOICE_MODE_SINGLE
						: ListView.CHOICE_MODE_NONE);
	}
	private void setActivatedPosition(int position) {
		if (position == ListView.INVALID_POSITION) {
			getListView().setItemChecked(mActivatedPosition, false);
		} else {
			getListView().setItemChecked(position, true);
		}
		mActivatedPosition = position;
	}
}

Other than the previously described functionality, there is some ListView management so that the tapped on list item shows as selected when in dual-pane mode and some basic fragment lifecycle management. As before, we are using the Support Fragment version so that we are backwards compatible with older devices. Make sure to import the correct package in the support library (import android.support.v4.app.ListFragment).

Now we need to return to the controlling Activity class so that it candle handle the callback.

Step 6: Updating the Primary Activity

Add the callback support to the primary Activity class, CircleListActivity, by having it implement the CircleListFragment.Callbacks interface created earlier. Then implement the onItemSelected() method to branch app behavior based on whether the device can handle two pane mode or not. Here is the fully updated class:

import android.content.Intent;
import android.os.Bundle;
import android.support.v4.app.FragmentActivity;
public class CircleListActivity extends FragmentActivity implements
		CircleListFragment.Callbacks {
	private boolean mTwoPane;
	@Override
	protected void onCreate(Bundle savedInstanceState) {
		super.onCreate(savedInstanceState);
		setContentView(R.layout.activity_circle_list);
		if (findViewById(R.id.circle_detail_container) != null) {
			mTwoPane = true;
			((CircleListFragment) getSupportFragmentManager().findFragmentById(
					R.id.circle_list)).setActivateOnItemClick(true);
		}
		// TODO: If exposing deep links into your app, handle intents here.
	}
	@Override
	public void onItemSelected(String id) {
		if (mTwoPane) {
			Bundle arguments = new Bundle();
			arguments.putString(CircleDetailFragment.ARG_ITEM_ID, id);
			CircleDetailFragment fragment = new CircleDetailFragment();
			fragment.setArguments(arguments);
			getSupportFragmentManager().beginTransaction()
					.replace(R.id.circle_detail_container, fragment).commit();
		} else {
			Intent detailIntent = new Intent(this, CircleDetailActivity.class);
			detailIntent.putExtra(CircleDetailFragment.ARG_ITEM_ID, id);
			startActivity(detailIntent);
		}
	}
}

Using the flag to determine if the dual-pane view is showing, the onItemSelected() method either starts a new Activity or replaces any current Fragment found in R.id.circle_detail_container with a new instance of the CircleDetailFragment class. For this sort of design, little more is needed. The identifier of which circle the user tapped on is either passed to the new Fragment instance via arguments or to the new Activity where it will turn the identifier into arguments, as well.

At this point, we need to implement both the CircleDetailActivity class for the single-pane case and implement the CircleDetailFragment class.

Step 7: Defining the Single Pane Detail Activity

Recall the simplicity of the layout for this Activity class. The layout is simply a placeholder for the detail Fragment class. All this Activity needs to do is get the identifier passed to it, turn that into a Fragment argument, then add the Fragment to the container.

package com.mamlambo.circlesfragmentexample;
import android.os.Bundle;
import android.support.v4.app.FragmentActivity;
public class CircleDetailActivity extends FragmentActivity {
	@Override
	protected void onCreate(Bundle savedInstanceState) {
		super.onCreate(savedInstanceState);
		setContentView(R.layout.activity_circle_detail);
				if (savedInstanceState == null) {
			Bundle arguments = new Bundle();
			arguments.putString(CircleDetailFragment.ARG_ITEM_ID, getIntent()
					.getStringExtra(CircleDetailFragment.ARG_ITEM_ID));
			CircleDetailFragment fragment = new CircleDetailFragment();
			fragment.setArguments(arguments);
			getSupportFragmentManager().beginTransaction()
					.add(R.id.circle_detail_container, fragment).commit();
		}
	}
}

If it sounded straightforward, you can now see that it is. The final piece we need to get to is the detail fragment itself.

Step 8: Show the Detail Fragment

The detail Fragment class needs to see what circle data should be loaded and displayed. Then, it needs to load and, well, display that data. The class will load a layout. The layout design can be generic, but should consider the fact that, as a fragment, it may or may not be full screen. In other words, as usual, don’t make assumptions about the device screen size. Of course, also as usual, you can create multiple layouts based on resource qualifiers. Keep in mind these will be loaded based on overall device screen characteristics and not based on the display area characteristics (pane modes).

In this example, there’s no further navigation, so no callback is needed as there was with the list fragment.

Without further ado, here’s the entire code for the CircleDetailFragment class:

import android.os.Bundle;
import android.support.v4.app.Fragment;
import android.view.LayoutInflater;
import android.view.View;
import android.view.ViewGroup;
import android.widget.ImageView;
import android.widget.TextView;
import com.mamlambo.circlesfragmentexample.dummy.DummyContent;
public class CircleDetailFragment extends Fragment {
	public static final String ARG_ITEM_ID = &quot;item_id&quot;;
	private DummyContent.DummyItem mItem;
	public CircleDetailFragment() {
	}
	@Override
	public void onCreate(Bundle savedInstanceState) {
		super.onCreate(savedInstanceState);
		if (getArguments().containsKey(ARG_ITEM_ID)) {
			mItem = DummyContent.ITEM_MAP.get(getArguments().getString(
					ARG_ITEM_ID));
		}
	}
	@Override
	public View onCreateView(LayoutInflater inflater, ViewGroup container,
			Bundle savedInstanceState) {
		View rootView = inflater.inflate(R.layout.fragment_circle_detail,
				container, false);
		if (mItem != null) {
			((TextView) rootView.findViewById(R.id.circle_detail))
					.setText(mItem.content);
			((ImageView) rootView.findViewById(R.id.circle_view))
					.setImageResource(mItem.resourceId);
		}
		return rootView;
	}
}

Although all of the code is basically the same as a non-Support fragment, note the proper import for android.support.v4.app.Fragment to be sure to use the right Android Support class.

Step 9: Updating the Android Manifest File for Fragments

Now we need to add the fragments to the manifest file, right? Actually, no. Unlike Activity classes, Fragments are not registered in the manifest file. So, simply add the activity classes to the manifest file and you’re good to go.

Here’s the sample manifest file for your viewing pleasure:

&lt;?xml version=&quot;1.0&quot; encoding=&quot;utf-8&quot;?&gt;
&lt;manifest xmlns:android=&quot;http://schemas.android.com/apk/res/android&quot;
    package=&quot;com.mamlambo.circlesfragmentexample&quot;
    android:versionCode=&quot;1&quot;
    android:versionName=&quot;1.0&quot; &gt;
    &lt;uses-sdk
        android:minSdkVersion=&quot;8&quot;
        android:targetSdkVersion=&quot;16&quot; /&gt;
    &lt;application
        android:allowBackup=&quot;true&quot;
        android:icon=&quot;@drawable/ic_launcher&quot;
        android:label=&quot;@string/app_name&quot;
        android:theme=&quot;@style/AppTheme&quot; &gt;
        &lt;activity
            android:name=&quot;com.mamlambo.circlesfragmentexample.CircleListActivity&quot;
            android:label=&quot;@string/app_name&quot; &gt;
            &lt;intent-filter&gt;
                &lt;action android:name=&quot;android.intent.action.MAIN&quot; /&gt;
                &lt;category android:name=&quot;android.intent.category.LAUNCHER&quot; /&gt;
            &lt;/intent-filter&gt;
        &lt;/activity&gt;
        &lt;activity
            android:name=&quot;com.mamlambo.circlesfragmentexample.CircleDetailActivity&quot;
            android:label=&quot;@string/title_circle_detail&quot;
            android:parentActivityName=&quot;.CircleListActivity&quot; &gt;
            &lt;meta-data
                android:name=&quot;android.support.PARENT_ACTIVITY&quot;
                android:value=&quot;.CircleListActivity&quot; /&gt;
        &lt;/activity&gt;
    &lt;/application&gt;
&lt;/manifest&gt;

Note the wide range of Android SDK versions that can be supported with this approach by using the Support library Fragment functionality.

Step 10: Running the App

While we have not presented the complete source code pasted within this tutorial and resources to the application, you can fill in those details yourself. Or you can download the code (see Step 0), compile and run it. Or you can download the pre-compiled binary and install it.

However you get to it, when running in a device configuration with 850 dp wide or the screen is extra large (at least 960×640 dp), you’ll see this screen design (a 1920×1200 pixel screen at 10″):

And when the screen width is less than 850dp, the layout reverts to single pane mode, such as this 1280px wide phone display in landscape mode:

Or this 768 pixel wide portrait phone:

Or this 1200px wide portrait display on a tablet:

Due to the use of abstracted measurements, such as the use of dp units, you could see the two different layouts on a screen with identical pixel resolutions, yet different pixel densities. This helps keep the information density (more pixels doesn’t always mean your users want more data) from being too high on physically small screens and is one of the great things about the Android resource system.

Conclusion

You’ve learned the basics of using the Android Fragment API available within the Android Support library. While there is much, much more to fragments, this tutorial gives you a starting point for a very common use-case that can dramatically improve the look and feel of many applications or portions of applications, regardless of what version of Android they are running with or screens they are being displayed upon.

About the Authors

Mobile developers Lauren Darcey and Shane Conder have coauthored several books on Android development: an in-depth programming book entitled Android Wireless Application Development (now in it’s third edition as a two-volume set), Sams Teach Yourself Android Application Development in 24 Hours, and Learning Android Application Programming for the Kindle Fire: A Hands-On Guide to Building Your First Android Application. When not writing, they spend their time developing mobile software at their company and providing consulting services. They can be reached at via email to androidwirelessdev+mt@gmail.com, via their blog at androidbook.blogspot.com, and on Twitter @androidwireless.

Need More Help Writing Android Apps? Check out our Latest Books and Resources!

Buy Android Wireless Application Development, 3rd Edition, Volume 1  Buy Sam's Teach Yourself Android Application Development in 24 Hours, 2nd Edition  Mamlambo code at Code Canyon

Exploring the iOS SDK

$
0
0

A good understanding of the iOS SDK is key when developing native iOS applications. Not only will it help you choose the right tools to tackle a particular problem, it will also make sure that you don’t get lost in the dozens of frameworks that are included in the iOS SDK. In this article, we zoom in on the iOS architecture and find out what powers iOS applications under the hood.


What is the iOS SDK?

I am pretty sure that even a few experienced iOS developers would have a hard time defining the iOS SDK in one sentence. The acronym SDK stands for Software Development Kit. The iOS SDK contains the tools and resources to develop native iOS applications, which means that the SDK allows developers to develop, install, run, and test applications in the iOS Simulator and on physical devices.

The two driving forces powering native iOS applications are Objective-C and the native iOS system frameworks. In the previous article, we explore the Objective-C programming language. In this article, I want to explore the frameworks that power native iOS applications. This includes high level frameworks, such as the UIKit and Map Kit frameworks, but also frameworks that are closely tied to the hardware, such as the Accelerate and Core Location frameworks.


What is a native iOS application?

You now know what the iOS SDK is, but what makes an application qualify as a native iOS application? The simple answer is that an iOS application is an application that runs on an iOS device. However, this is only half the truth. What about web applications that run in the Safari browser? An iOS application is a Cocoa application developed for the iOS platform. Great. What is a Cocoa application? A Cocoa application is a bit harder to define. Is it the language in which the application is written? Not really. Is it the tools with which a Cocoa application is built? No. It is possible, although tedious, to develop a Cocoa application without the help of Xcode.

Apple defines a Cocoa application as an application (1) that is composed of objects that ultimately inherit from NSObject, a root class declared in the Foundation framework, and (2) that is based upon the Objective-C runtime. In this article, I want to focus on the frameworks that are used to create native iOS applications. If you are interested in learning more about the Objective-C runtime, I recommend taking a look at Apple’s Objective-C Runtime Reference or read the Objective-C Runtime Programming Guide.

The Foundation framework provides a second root class, NSProxy. However, you will rarely, if ever, use it in any of your projects.


The iOS Architecture

Another difference with web applications running in the Safari browser is that native applications interact directly with the iOS operating system and the native iOS system frameworks. The operating system acts as a mediator between the application and the underlying hardware. A key advantage of this mediation or abstraction is that native applications don’t need to worry about future hardware changes or device specifications. The operating system provides applications with the necessary information about the hardware capabilities (e.g. Does the device have a camera?) and device specifications (e.g. Is the application running on an iPhone or an iPad?).

The iOS architecture can be broken down into four distinct layers, (1) Cocoa Touch, (2) Media, (3) Core Services, and (4) Core OS (figure 1). This layered architecture illustrates that level of abstraction, with the higher level layers more abstracted and the lower level layers more fundamental and closely tied to the hardware. It goes without saying that the higher level layers rely on the lower level layers for some of their functionality. Apple recommends using the higher level frameworks as much as possible, because they are often object oriented abstractions of the lower level frameworks. In other words, the higher level layers interact indirectly with the hardware through the lower level layers, which are inherently more complex. Of course, it is still possible to fall back to the lower level frameworks if the higher level frameworks don’t meet your needs.

Exploring Cocoa and the iOS SDK - The iOS Architecture - Figure 1

As a reminder, a framework is a directory that contains a dynamic shared library and the resources associated with it, such as header files, images, etc. Frameworks are the access points to various system interfaces, such as the iOS address book, the device’s camera roll, and the music library.

Cocoa Touch Layer

In the previous article, I wrote about Cocoa Touch and its relation to Objective-C. In this article, I would like to discuss Cocoa Touch from a more functional standpoint, that is, how applications rely on the Cocoa Touch layer and what its role is in the iOS architecture.

The Cocoa Touch layer is the topmost layer of the iOS architecture. It contains some of the key frameworks which native iOS applications rely upon, with the most prominent being the UIKit framework. The Cocoa Touch layer defines the basic application infrastructure and provides a number of vital technologies, such as multitasking and touch-based input.

As I mentioned, iOS applications rely heavily on the UIKit framework. Native iOS applications cannot operate if they are not linked against the UIKit and the Foundation frameworks (figure 1). The UIKit framework is tailored to the iOS platform. There is an equivalent framework for the OS X platform named the Application Kit or AppKit framework. The UIKit framework provides the infrastructure for graphical, event driven iOS applications. However, it also takes care of other core aspects that are specific to the iOS platform, such as multitasking, push notifications, and accessibility.

The Cocoa Touch layer provides developers with a large number of high level features, such as auto layout, printing, gesture recognizers, and document support. In addition to the UIKit framework, it contains the Map Kit, Event Kit, and Message UI frameworks, among others. For a complete list of all the frameworks of the Cocoa Touch layer, I would like to refer to the iOS Technology Overview guide.

Media Layer

Graphics, audio, and video are handled by the Media layer. This layer contains a number of key technologies, such as Core Graphics, OpenGL ES and OpenAL, AV Foundation, and Core Media. The Media layer contains a large number of frameworks including the Assets Library framework to access a device’s photos and videos, the Core Image framework for image manipulation through filters, and the Core Graphics framework for 2D drawing. For a complete list of all the frameworks of the Media layer, I would like to refer to the iOS Technology Overview guide.

Core Services layer

The Core Services layer is in charge of managing the fundamental system services that native iOS applications use. The Cocoa Touch layer relies heavily on the Core Services layer for some of its functionality. The Core Services layer also provides a number of indispensable features, such as block objects, Grand Central Dispatch, In-App Purchase, and iCloud Storage.

One of the most welcomed additions to the Core Services layer is ARC or Automatic Reference Counting. What is ARC? It is a compiler-level feature, introduced in 2001 with the release of iOS 5, by simplifying the process of memory management in Objective-C. Memory management is a topic we haven’t covered in this series, but it is important that you understand the basics of memory management when developing Cocoa applications. Automatic Reference Counting is a great addition, but it is important that you know what it does for you. You can read more about memory management in The Objective-C Programming Language guide.

The Foundation framework is another essential framework for iOS and OS X applications. In the next article, we will explore this framework in more detail. The Foundation framework is more than a collection of useful classes, such as NSArray, NSDictionary, and NSDate. It provides the NSObject root class, which provides a basic interface to the Objective-C runtime, and it also introduces several paradigms, such as policies for object ownership. Like the Core Foundation framework (see below), the Foundation framework makes it possible for the different libraries and frameworks to easily share data and code.

Another important framework of the Core Services layer and closely tied to the Foundation framework is the C-based Core Foundation framework. Like the Foundation framework, it enables the various libraries and frameworks to share data and code. The Core Foundation has a feature referred to as toll-free bridging, which enables the substitution of Cocoa objects for Core Foundation objects in function parameters and vice versa.

For a complete list of all the frameworks of the Core Services layer, I would like to refer to the iOS Technology Overview guide.

Core OS Layer

Most of the functionality provided by the three higher level layers is built upon the Core OS layer and its low level features. The Core OS layer provides a handful of frameworks that your application can use directly, such as the Accelerate and the Security frameworks. The Core OS layer also encapsulates the kernel environment and low level UNIX interfaces to which your application has no access for obvious security reasons. However, through the libSystem library, which is C-based, many low level features can be accessed directly, such as BSD sockets, POSIX threads, and DNS services.


Documentation

Your closest ally when developing native iOS applications is the documentation included with the iOS SDK. For the most part, the documentation is outstanding and it will help you get up to speed with a new technology or framework with little effort. Even though the documentation is available online, most developers use the documentation browser that is included in Xcode’s Organizer (figure 2).

Exploring Cocoa and the iOS SDK - Browsing the Documentation Using Xcode's Organizer - Figure 2

Since you will be using the documentation extensively, you might want to learn a few shortcuts to find what you are looking for in the documentation. As I mentioned in the previous paragraph, the Organizer provides easy access to the documentation browser. Open the Organizer by clicking the rightmost button in the Xcode toolbar (or press Shift + Command + 2) and select the documentation tab on the far right.

While writing code in Xcode’s code editor, it can quickly become cumbersome to switch back and forth between the code editor and the Organizer every time you need to look up a class or method in the documentation. There are two solutions for efficiently browsing the documentation. Whenever you place your cursor on a class or method name in Xcode’s code editor, the Quick Help Inspector in the right sidebar shows a summary of the respective class or method (figure 3). The summary contains several useful links that take you to the documentation browser in the Organizer.

Exploring Cocoa and the iOS SDK - Browsing the Documentation Using the Quick Help Inspector - Figure 3

Because I usually hide the right sidebar when I am working in the code editor, I use an alternative method to show the documentation of a class or method. Whenever you press the Option key and hover over a class or method name, the cursors changes to a question mark and the class or method name is highlighted. By clicking a class or method name with the question mark, a new window pops up containing the same summary as the Quick Help Inspector. Clicking one of the links in the window takes you to the documentation browser in the Organizer. This is a fast and convenient way to switch between the code editor and the documentation browser, especially when working with two monitors.

Exploring Cocoa and the iOS SDK - Efficiently Browsing the Documentation Using Mouse and Keyboard - Figure 4

Conclusion

You should now have a good understanding of the iOS SDK and the various layers of the iOS architecture. The two core frameworks of an iOS application, the UIKit and Foundation frameworks, are the focus of the next two installments of this series. Not only are these frameworks indispensable for every iOS application, they contain dozens of classes that you will find yourself using often when developing native iOS applications.

Exploring the Foundation Framework

$
0
0

The Foundation framework is the bread and butter in the toolbox of an iOS developer. It provides the NSObject root class and a large number of fundamental building blocks for iOS development, from classes for numbers and strings, to arrays and dictionaries. The Foundation framework might seem a bit dull at first, but it harnesses a lot of power and is indispensable when developing iOS applications.


A Word About Core Foundation

In the previous article, I briefly mentioned the Core Foundation framework and its relation to the Foundation framework. Even though we will not explicitly use the Core Foundation framework in the rest of this series, it is a good idea to be familiar with it and to know how it differs from the Foundation framework, which you will use extensively.

While the Foundation framework is implemented in Objective-C, the Core Foundation framework is based on the C language. Despite this difference, the Core Foundation framework does implement a limited object model. This object model allows for the definition of a collection of opaque types that are often referred to as objects – despite the fact that they are, strictly speaking, not objects.

The primary goal of the both frameworks is very similar, that is, enabling sharing of data and code between the various libraries and frameworks. The Core Foundation framework includes support for internationalization. A key component of this support is provided through the CFString opaque type, which efficiently manages an array of Unicode characters.

As I mentioned previously, toll-free bridging literally bridges the gap between both frameworks by enabling the substitution of Cocoa objects for Core Foundation objects in function parameters and vice versa.

It is important to note that Automatic Reference Counting (ARC) does not manage Core Foundation “objects”, which means that you are responsible for managing memory when working with Core Foundation “objects”. There is a great article by Mike Ash about Automatic Reference Counting and how to use ARC with Core Foundation and toll-free bridging.

Visit the Mac Developer Library for a complete list of the opaque types included in the Core Foundation framework.


Practice, Practice, Practice

Learning a new skill is best done through practice so create a new project in Xcode (figure 1) and select the Command Line Tool project template as we did earlier in this series (figure 2). The Command Line Tool template can be found in the Application category in the OS X section (figure 2). Click Next to continue.

Exploring the Foundation Framework - Creating a New Project - Figure 1
Exploring the Foundation Framework - Choosing the Project Template - Figure 2

Name the new project Foundation and enter an organization name and company identifier. For this project, it is key to set the project type to Foundation and make sure to enable Automatic Reference Counting for the project (figure 3). Tell Xcode where you want to save the project and hit Create (figure 4).

Exploring the Foundation Framework - Configuring the Project - Figure 3
Exploring the Foundation Framework - Specify a Location to Save the Project - Figure 4

Test Drive

Our playground for the rest of this article will be main.m and the Xcode console window. Open main.m by selecting it in the Project Navigator in the left sidebar and make sure that the console window is visible by clicking the middle button of the View control in the Xcode toolbar (figure 5). Click the Run button in the top left to build and run the current scheme. If all went well, you should see Hello, World! appear in the console window (figure 6).

Exploring the Foundation Framework - Show/Hide the Console Window in Xcode - Figure 5
Exploring the Foundation Framework - Build and Run the Current Scheme - Figure 6

The Foundation Framework

The Foundation framework is much more than a collection of classes for working with numbers, strings, and collections (arrays, dictionaries, and sets). It also defines dozens of protocols, functions, data types, and constants. In the rest of this article, I will primarily focus on the classes that you will use most often when developing iOS applications. However, I will also briefly talk about three key protocols defined by the Foundation framework, NSObject, NSCoding, and NSCopying.

Header Files

As you already know, the header file of a class defines its interface. Does that mean that you have to import the header file of each Foundation class that you plan to use? The answer is yes and no. It is indeed necessary to import the header file of a class before you can use it. You do so by adding an import statement as we saw earlier in this series. However, the Foundation framework provides a convenient way to facilitate this process. The only file you need to import is Foundation.h like shown in the following code fragment.

#import <Foundation/Foundation.h>;

Behind the scenes, the Foundation framework imports all the necessary header files to give you access to every class, protocol, function, data type, and constant of the framework.

When you create a new project in Xcode and you set the project type to Foundation, Xcode will automatically (1) link the project against the Foundation framework and (2) add the above import statement to main.m and the project’s precompiled header file (<PROJECT>-Prefix.pch). Open main.m to verify this and expand the frameworks folder in the Project Navigator by clicking the small triangle on its left. I will revisit the precompiled header file and its purpose when we take a look at the UIKit framework.


Protocols

Several languages, such as Perl, Python, and C++, provide support for multiple inheritance, which means that a class can descend – be a subclass of – more than one class. Even though Objective-C does not provide support for multiple inheritance, it does support multiple inheritance through specification in the form of protocols. What does this mean? Instead of inheriting from a class, a protocol defines a list of methods that classes implement if they conform to the protocol. A protocol can have required and optional methods. If a class does not implement all the required methods of a protocol, the compiler will throw an error.

The benefits of protocols are manifold. When a class adopts or conforms to a protocol, the class is expected to implement the (required) methods declared in the protocol. Objective-C protocols are very similar to interfaces in Java. This means that a protocol can be used to declare the interface to an object without revealing the class of the object.

Multiple inheritance has its benefits, but it most certainly has its downsides. The advantage of protocols is that unrelated classes can still share similar behavior through the use of protocols.

NSObject

In addition to the NSObject root class, the Foundation framework also defines a NSObject protocol. Objects conforming to the NSObject protocol can be asked about their class and superclass, can be compared with other objects, and respond to self as we saw in the article about Objective-C. This is only a small subset of the behavior added to objects conforming to the NSObject protocol.

NSCoding

Objects conforming to the NSCoding protocol can be encoded and decoded. This is necessary for objects that need to be archived or distributed. Object archival takes place when an object or object graph is stored to disk, for example.

NSCopying

The NSCopying protocol declares only one method, copyWithZone:. If a class is to support copying objects, it needs to conform to the NSCopying protocol. Copying an object is done by sending it a message of copy (or copyWithZone:).


NSObject

The NSObject class is the root class of the vast majority of the Objective-C class hierarchies. Do you remember that we instantiated an instance of the Book class earlier in this series? We sent the Book class a message of alloc and we sent the resulting object a message of init. Both of these methods are declared in the NSObject class. By inheriting from NSObject, objects know how to behave as Objective-C objects and how to interface with the Objective-C runtime. It shouldn’t be a surprise that NSObject conforms to the NSObject protocol that we saw earlier.

Remove the NSLog statement in main.m and paste the following code snippet in its place.

NSObject *myFirstObject = [[NSObject alloc] init];
NSLog(@"Class > %@", [myFirstObject class]);
NSLog(@"Superclass > %@", [myFirstObject superclass]);
NSLog(@"Conforms to Protocol > %i", [myFirstObject conformsToProtocol:@protocol(NSObject)]);

We start by instantiating an instance of NSObject and store a reference to it in the myFirstObject variable. In the second line, we log the class name of the new object to the console. The class method, returns an instance of NSString, a string object, which is the reason that we use the %@ format specifier in the NSLog statement. Next, we ask myFirstObject for its superclass and end by verifying that myFirstObject conforms to the NSObject protocol. Are you confused by @protocol(NSObject)? This is nothing more than a reference to the NSObject protocol.

Click Run and inspect the output in the console window. Are you surprised by the output? Because NSObject is a root class, it doesn’t have a superclass.


NSNumber

The NSNumber class is a utility class that manages any of the basic numeric data types. It is a subclass of the NSValue class, which provides an object oriented wrapper for scalar types as well as pointers, structures, and object id’s. The NSNumber class defines methods for retrieving the value it stores, for comparing values, and also for retrieving a string representation of the stored value.

Keep in mind that the value retrieved from an NSNumber instance needs to be consistent with the value that was stored in it. The NSNumber class will attempt dynamically convert the stored value to the requested type, but it goes without saying that there are limitations inherent to the data types that NSNumber can manage. Let me illustrate this with an example. Add the following code fragment to main.m.

NSNumber *myNumber = [NSNumber numberWithDouble:854736e+13];
NSLog(@"Double Value    > %f", [myNumber doubleValue]);
NSLog(@"Float Value     > %f", [myNumber floatValue]);
NSLog(@"Int Value       > %i", [myNumber intValue]);

We start by creating a new NSNumber instance by passing a double value to numberWithDouble:. Next, we retrieve the stored value using three different NSNumber methods. The results don’t reflect the value stored in myNumber for obvious reasons. The message is to be consistent when using NSNumber by keeping track of the type that is stored in the NSNumber instance.


NSString

Instances of the NSString class manage an array of unichar characters forming a string of text. The subtle but important difference with a regular C string, which manages char characters, is that a unichar character is a multibyte character. As its name implies, a unichar character is ideally suited for handling Unicode characters. Due to this implementation, the NSString class provides out-of-the-box support for internationalization.

I want to emphasize that the string managed by a NSString instance is immutable. This means that once the string is created, it cannot be modified. Developers coming from other languages, such as PHP, Ruby, or JavaScript, might be confused by this behavior. The Foundation framework also defines a mutable subclass of NSString, NSMutableString, which can be modified after it has been created.

There are various ways to create string objects. The simplest way to create a string object is by calling the string method on the NSString class, which returns an empty string object. Take a look at the class reference of NSString for a complete list of initializers.

Another common path for creating string objects is through string literals as shown in the example below. In this example, a literal string is assigned to the someString variable. At compile time, the compiler will replace the string literal with an instance of NSString.

NSString *string1 = @"This is a string literal.";

The NSString class has a multitude of instance and class methods for creating and manipulating strings and you will rarely, if ever, feel the need to subclass NSString. Let’s explore NSString and its mutable subclass, NSMutableString, by adding the following code fragment to main.m.

NSString *string1 = @"This is a string literal.";
NSString *string2 = [[NSString alloc] initWithFormat:@"Strings can be created many ways."];
NSMutableString *mutableString = [[NSMutableString alloc] initWithString:string1];
[mutableString appendFormat:@" %@", string2];
NSLog(@"%@", mutableString);

We start by creating a string object using a string literal as shown above. In the second line, we create a second string by using one of the specialized initializers that NSString provides. A mutable string is then created by passing the first string as an argument. To illustrate that mutable strings can be modified after creation, string2 is appended to the mutable string and logged to the console window.


NSArray and NSSet

The NSArray class manages an immutable, ordered list of objects. The Foundation framework also defines a mutable subclass of NSArray, NSMutableArray. The NSArray class behaves very much like a C array with the difference that an instance of NSArray manages objects. In addition, NSArray declares a wide range of methods that facilitate working with arrays, such as methods for finding and sorting objects in the array.

It is important to understand that instances of NSArray, NSSet, and NSDictionary can only store objects. This means that it is not possible to store scalar types, pointers, or structures in any of these collection classes (or their subclasses), the compiler will throw an error if you do. The solution is to wrap scalar types, pointers, and structrues in an instance of NSValue or NSNumber as we saw earlier in this article.

Add the following code snippet to main.m to explore NSArray and its mutable counterpart, NSMutableArray. In the first line, we create an array by using the arrayWithObjects: class method. This method accepts a variable number of arguments (objects) with the last argument being nil (which is not included in the array). In the second and third line, we query the array for the number of objects in the array and the object stored at index 2, respectively.

NSArray *myArray = [NSArray arrayWithObjects:@"Bread", @"Butter", @"Milk", @"Eggs", nil];
NSLog(@"Number of Elements  > %li", [myArray count]);
NSLog(@"Object at Index 2   > %@", [myArray objectAtIndex:2]);
NSMutableArray *myMutableArray = [NSMutableArray arrayWithObject:[NSNumber numberWithInt:265]];
[myMutableArray addObject:[NSNumber numberWithInt:45]];
NSLog(@"Mutable Array       > %@", myMutableArray);

Because NSMutableArray inherits from NSArray, it behaves in much the same way as NSArray. The main difference is that objects can be added and removed from the array after it has been created.

Before moving on, I want to say a few words about NSSet. This class is similar to NSArray, but the key difference is that the collection of objects that an instance of NSSet manages is unordered. The advantage of NSSet is that querying its list of objects is faster if you only need to know if an object is contained in the set. The Foundation framework also defines NSOrderedSet. Instances of this class have the benefits (speed) of NSSet, but also keep track of the position of each object.


NSDictionary

Like arrays, dictionaries are a common concept in most programming languages. In Ruby, for example, they are referred to as hashes. The basic concept is easy, a dictionary manages a static collection of key-value pairs or entries. As in Ruby hashes, the key of an entry doesn’t need to be a string object per se. It can be any type of object that conforms to the NSCopying protocol as long as the key is unique in the dictionary. However, in the majority of use cases it is recommended to use string objects as keys. Like arrays, dictionaries cannot hold a null value. If you want to represent a null value, then you can use NSNull.

The NSNull class defines a singleton object that is used to symbolize null values in arrays, dictionaries, and sets. The singleton pattern is an important pattern in many programming languages. It limits the instantiation of a class to one object. You will deal with singleton objects frequently when developing iOS applications.

Like NSArray, the Foundation framework defines a mutable subclass of NSDictionary, NSMutableDictionary. There are various ways to instantiate a dictionary. Take a look at the following code snippet. We first declare two separate string objects containing the same string. In the third line, we instantiate a dictionary by calling the dictionaryWithObject:forKey: method on the NSDictionary class. Next, we ask the dictionary for the object associated with the contents of keyB and log it to the console.

NSString *keyA = @"myKey";
NSString *keyB = @"myKey";
NSDictionary *myDictionary = [NSDictionary dictionaryWithObject:@"This is a string literal" forKey:keyA];
NSLog(@"%@", [myDictionary objectForKey:keyB]);

It is important to pay attention to the details. Even though we used keyA as the key of the key-value pair and keyB as the key to fetch the value or object of the key-value pair, the dictionary gave us the correct object. The NSDictionary class is smart enough to know that we want the object associated with string myKey. What does this mean? Even though the objects keyA and keyB are different, the string that they contain is the same and that is precisely what the NSDictionary class uses to reference the object.

The following code fragment shows that a dictionary can contain another dictionary (or array) and it also shows how to work with mutable dictionaries.

NSMutableDictionary *myMutableDictionary = [NSMutableDictionary dictionary];
[myMutableDictionary setObject:myDictionary forKey:@"myDictionary"];
NSLog(@"%@", myMutableDictionary);

Objective-C Literals

Earlier in this article, I introduced you to Objective-C string literals, such as @"This is a string literal.". They take the form of a C string literal prefixed with an @ sign. As you probably know by now, the @ sign indicates that we are entering Objective-C territory. An Objective-C literal is nothing more than a block of code that references an Objective-C object. With the release of Xcode 4.5, you can now also use Objective-C literals for NSNumber, NSArray, and NSDictionary. Take a look at the following code fragment to see how this works.

NSNumber *oldNumber1 = [NSNumber numberWithBool:YES];
NSNumber *newNubmer1 = @YES;
NSNumber *oldNumber2 = [NSNumber numberWithInt:2147];
NSNumber *newNubmer2 = @2147;
NSArray *oldArray = [NSArray arrayWithObjects:@"one", @"two", @"three", nil];
NSArray *newArray = @[@"one", @"two", @"three"];
NSDictionary *oldDictionary = [NSDictionary dictionaryWithObject:[NSNumber numberWithInt:12345] forKey:@"key"];
NSDictionary *newDictionary = @{@"key": @12345};

Not only are Objective-C literals cool and sexy, they also make your code more readable. A few months ago, Mark Hammonds wrote a tutorial about Objective-C literals. Read Mark’s post for a more complete overview of Objective-C literals.


Logging with NSLog

In this article, we have repeatedly used the NSLog function, which is defined by the Foundation framework. NSLog accepts a variable number of arguments with the first argument being a string literal. The string literal can contain format specifiers that are replaced by the extra arguments passed to the NSLog function.

NSLog(@"%@ - %i - %f", @"an object", 3, 3.14);

Visit the Mac Developer Library for a complete list of the format specifiers that can be used.


Conclusion

Even though we have covered a lot of ground in this article, we have barely scratched the surface of what the Foundation framework has to offer. It isn’t necessary to know the details of every class or function defined in the Foundation framework to get started with iOS development, though. You will learn more about the Foundation framework as you explore the iOS SDK. In the next article, we will explore the UIKit framework and I will also discuss the ins and outs of an iOS application.

Build an Apple Catcher Game – Tuts+ Premium

$
0
0

In this tutorial series, you’ll learn how to create an Apple Catcher game. The objective of the game is to grab the apples that fall on the screen by dragging the basket. Read on!


Tutorial Teaser

Step 1: Application Overview

Using pre-made graphics, we will code an entertaining game using Lua and the Corona SDK API’s.

The player will be able to catch the apples by dragging the basket on the screen. You can modify the parameters in the code to customize the game.


Step 2: Target Device

The first thing we have to do is select the platform we want to run our app within, that way we’ll be able to choose the size for the images we will use.

The iOS platform has these characteristics:

  • iPad 1/2: 1024x768px, 132 ppi
  • iPad 3: 2048×1536, 264 ppi
  • iPhone/iPod Touch: 320x480px, 163 ppi
  • iPhone 4/iPod Touch: 960x640px, 326 ppi
  • iPhone 5/iPod Touch: 1136×640, 326 ppi

Because Android is an open platform, there are many different devices and resolutions. A few of the more common screen characteristics are:

  • Asus Nexus 7 Tablet: 800x1280px, 216 ppi
  • Motorola Droid X: 854x480px, 228 ppi
  • Samsung Galaxy SIII: 720x1280px, 306 ppi

In this tutorial, we’ll be focusing on the iOS platform with the graphic design, specifically developing for distribution to an iPhone/iPod touch, but the code presented here should apply to Android development with the Corona SDK as well.


Step 3: Interface

A simple and friendly interface will be used, involving multiple shapes, buttons, bitmaps and more.

The interface graphic resources necessary for this tutorial can be found in the attached download. The graphics are from openclipart.org.


Step 4: Export Graphics

Depending on the device you have selected, you may need to export the graphics in the recommended PPI, you can do that in your favorite image editor.

I used the Adjust Size… function in the Preview app on Mac OS X.

Remember to give the images a descriptive name and to save them in your project folder.


Step 5: App Configuration

An external file will be used to make the application go fullscreen across devices, the config.lua file. This file shows the original screen size and the method used to scale that content in case the app is run in a different screen resolution.

application =
{
    content =
    {
        width = 320,
        height = 480,
        scale = "letterbox"
    },
}

Step 6: Main.lua

Let’s write the application!

Open your prefered Lua editor (any Text Editor will work, but some may not provide Lua syntax highlighting) and prepare to write your awesome app. Remember to save the file as main.lua in your project folder.


Get the Full Series!

This tutorial series is available to Tuts+ Premium members only. Read a preview of this tutorial on the Tuts+ Premium web site or login to Tuts+ Premium to access the full content.


Joining Tuts+ Premium. . .

For those unfamiliar, the family of Tuts+ sites runs a premium membership service called Tuts+ Premium. For $19 per month, you gain access to exclusive premium tutorials, screencasts, and freebies from Mobiletuts+, Nettuts+, Aetuts+, Audiotuts+, Vectortuts+, and CgTuts+. You’ll learn from some of the best minds in the business. Become a premium member to access this tutorial, as well as hundreds of other advanced tutorials and screencasts.


First Steps with UIKit

$
0
0

UIKit is the framework that you will find yourself use most often. It defines the core components of an iOS application, from labels and buttons to table views and navigation controllers. In this article, not only will we start our exploration of the UIKit framework, we will also explore the internals of an iOS project and the basic building blocks of iOS applications.


What is the UIKit framework?

While the Foundation framework defines classes, protocols, and functions for both iOS and OS X development, the UIKit framework is exclusively geared towards iOS development. It is the equivalent of the Application Kit or AppKit framework for OS X development.

Like Foundation, UIKit defines classes, protocols, functions, data types, and constants. It also adds additional functionality to various Foundation classes, such as NSObject, NSString, and NSValue through the use of Objective-C categories.

Objective-C categories are a convenient way to add extra methods to existing classes without the need for subclassing. Read this tutorial by Aaron Crabtree if you want to learn more about Objective-C categories.

Instead of exploring the key classes of UIKit as we did for the Foundation framework, we will create and journey through a new iOS project and explore the classes we encounter. By taking this approach, it will quickly become clear in what context a class is used and how each class fits in the broader scheme of an iOS application and what role it plays.


A New Beginning

Launch Xcode and create a new project (File > New > Project…). In the iOS section on the left, select the Application category. From the list of project templates, choose the Single View Application template. This project template contains that basic building blocks of an iOS application and is therefore a good place to start our journey.

Exploring the UIKit Framework - Creating a New Project - Figure 1
Exploring the UIKit Framework - Choosing the Project Template - Figure 2

Name the project UIKit and enter an organization name and company identifier. Enter a class prefix, as I explained earlier in this series, set Devices to iPhone, and enable Automatic Reference Counting (ARC). For this project, we will not be using Storyboards or Unit Tests.

Exploring the UIKit Framework - Configuring the Project - Figure 3

Tell Xcode where you want to save the new project and make sure to put the project under version control. Revisit this article for more information about version control and its benefits.

Exploring the UIKit Framework - Specify a Location to Save the Project - Figure 4

Files and Folders

We have learned quite a few new things since the last time we created an iOS project from scratch so it might be a good idea to explore the various files and folders of our new project to see if they are familiar to you.

In the Project Navigator, you should see three folders at the root of the project (figure 5), (1) Products, (2) Frameworks, and (3) a folder with your project’s name. Let’s take a look at the contents of each of these folders.

Exploring the UIKit Framework - Project Overview - Figure 5

Products

The Products folder currently contains one item. The item bears the name of our project and has an extension of .app. The Products folder contains the application – or applications – created by the project after compilation of the source code.

Have you noticed that the name of the product is highlighted in red? Whenever Xcode is unable to locate a file, it highlights the file in red. Because the project hasn’t been compiled yet, Xcode hasn’t created the product yet.

Frameworks

The Frameworks folder contains the frameworks your project is linked against. In the previous article, our project was only linked against the Foundation framework. This project, however, is based on an iOS application template and therefore linked against three frameworks, (1) Foundation, (2) UIKit, and (3) Core Graphics. You might remember the Core Graphics framework from earlier in this series. The framework contains the interfaces for the (Quartz) 2D drawing API.

There is one other location in our project that specifies which frameworks the project is linked against. Select your project in the Project Navigator, choose the only item in the Targets section on the left, and open the Build Phases tab at the top. By opening the Link Binary with Libraries drawer, you are presented with the same list of frameworks that we saw in the Frameworks folder (figure 6). Linking our project against another iOS system framework is as easy as clicking the plus button at the bottom of the list and selecting a framework from the list.

Exploring the UIKit Framework - Link Binary with Libraries - Figure 6

Project Folder

Most of your time is spent in the project folder, which currently contains five files and one folder named Supporting Files. Let’s start by taking a look at the contents of the folder.

  • <PROJECT>-Info.plist: This file, commonly referred to as the “info-dot-plist” file of a project, is a property list that contains various configuration settings. Most of these settings can also be modified by selecting the project in the Project Navigator, choosing the target in the Targets list, and opening the Summary tab.
  • InfoPlist.strings: If Info.plist contains values that need to be localized, then you can do so by specifying them in InfoPlist.strings. Application localization is something we won’t cover in this series.
  • main.m: This file should be familiar by now. When creating iOS applications, however, you will rarely modify the contents of main.m. It contains the application’s main function, which is where all the magic starts. Even though we won’t be modifying main.m, it is critical to your application.
  • <PROJECT>-Prefix.pch: This is the project’s precompiled header file, which we already encountered earlier in this series. As its name implies, the header files listed in the precompiled header file are precompiled by Xcode, which brings down the time it takes to compile your project. The Foundation and UIKit frameworks don’t change very often so there is no need to compile them every time you compile your project. In addition to precompiling the header files listed in the precompiled header file, each source file in your project is prefixed with the listed header files.
  • Launch Images: The final three files in the Supporting Files folder are the launch images for the project. Launch images are the images that the operating system displays while your application is loading. Why does our project contain three launch images? The image named Default.png is used for iPhone and iPod touch devices that don’t have a retina screen, whereas Default@2x.png targets devices with a retina screen. The third launch image, Default-568@2x.png, targets iPhone and iPod Touch devices with a 4″ screen. Note that our project currently only targets the iPhone device family. If we were to create a Universal application, targeting both the iPhone and iPad device families, our project would need to include five launch images.

Application Components

Now that we know what the different files and folders in our project are for, it is time to explore the different components of an iOS application. As we continue our journey, we will come across several classes that belong to UIKit. Each class that belongs to the UIKit framework starts with the class prefix UI. Remember that Foundation classes have NS as class prefix.


The Model-View-Controller Pattern

Before we start exploring the UIKit framework, I want to talk about the Model-View-Controller (MVC) pattern. The MVC pattern is one of the most widespread patterns in object oriented programming. It promotes code reusability and has close ties with the concept of separation of responsibilities or concerns. One of the main objectives of the MVC pattern is the separation of an application’s business logic from its representation.

Cocoa Touch embraces the MVC pattern and it is therefore important to understand what it is and how it works. In other words, by understanding the MVC pattern, it will be much easier to grasp how the different components of an iOS application work together. In the MVC pattern, a model is in control of the business logic of an application. Interacting with a database, for example, is the responsibility of the model. The view presents the data that is managed by the model to the user. The view manages the user interface and user input.

The controller is the glue between the model and the view. While the model and the view don’t know about each other’s existence, the controller knows about both the model and the view. Because the controller knows about both model and view, it is often the least reusable piece of an application. The less an object knows about its environment and the objects it interacts with, the higher its reusability will be in future projects.


UIApplication

Even though the UIApplication class is a key component of every iOS application, you won’t interact with it very often and you will rarely, if ever, have the need to subclass UIApplication. When an application launches, a singleton of this class is created. Do you remember what a singleton object is? It means that only one object instance of the UIApplication class is created during an application’s life cycle.

The UIApplication instance is the entry point for user interaction and it dispatches events to the appropriate target objects. The exact meaning of this will become clear in a few minutes when we take a look at view controllers.

In most iOS applications, the UIApplication instance has a delegate object associated with it. Whenever you create an iOS project using one of the provided templates, Xcode will create an application delegate class for you. Take a look at the names of the source files in the project folder in the Project Navigator. The first two files are named MTAppDelegate. The instance of this class is the delegate of the UIApplication singleton. Before taking a closer look at the MTAppDelegate class, we need to understand what the delegate pattern is.

Ole Begemann wrote an excellent article about the launch sequence of a typical iOS application. In this article, he talks about the various components involved and their role during the application launch. I highly recommend reading this article if you want to get a better understanding of the role of the UIApplication class as well as the mysterious main() function in main.m.


The Delegate Pattern

The delegate pattern is used extensively in Cocoa and Cocoa Touch. In the next article of this series, in which we explore the ins and outs of a table view, you will find out that table views rely heavily on the delegate (and data source) pattern. Like the MVC pattern, delegation is common in object oriented programming. The delegate pattern in Cocoa Touch, however, is slightly different, because it makes use of a delegate protocol to define the behavior of the delegate object.

Let’s jump ahead and take a look at table views. If you have spent any amount of time with an iPhone or iPad, then the UITableView class should be familiar to you. It presents an ordered list of data to the user and it does this job very well. How does a table view know what to do when a row is tapped? Is this behavior included in the UITableView class? Certainly not, because this behavior varies from application to application. If we were to include this behavior in the UITableView class, it would not be very reusable.

The table view outsources this responsibility to a delegate object. Put differently, it delegates this task to another object, a delegate object. Take a moment to inspect the class reference of the UITableView class. It has two instance variables named dataSource and delegate. The delegate object is notified by the table view whenever a user taps a row. It is the responsibility of the delegate object to respond to the user’s tap.

The data source of the table view is similar in terms of behavior. The main difference is that the table view asks the data source object for something -the data that it needs to display.

Delegate and data source objects, such as the table view’s delegate and dataSource objects, are almost always custom classes, classes that you create, because their implementation is application specific.

Before we take a look at the MTAppDelegate class, it is important to understand that a delegate object conforms to a delegate protocol. In the previous article, we already learned about protocols in Objective-C and how they define behavior by defining a list of methods for its adopters to implement.


The Application Delegate

Now that we know what delegation is, it is time to explore the MTAppDelegate class that Xcode created for us. At application launch, the application creates an instance of the MTAppDelegate class. You typically never need to explicitly instantiate an application delegate object. Open the header file of the MTAppDelegate class (MTAppDelegate.h) to examine its contents.

If we ignore the comments at the top, the first line imports the header files of the UIKit framework so we can work with its classes and protocols.

#import <UIKit/UIKit.h>

The second line is a forward class declaration. A forward class declaration is nothing more than a message to the compiler to tell it that the MTViewController class exists. You could consider it as a promise to the compiler. If you were to remove the forward class declaration, the compiler will throw an error when you try to compile the project.

@class MTViewController;

The next line should be familiar. This is the start of the interface of the MTAppDelegate class as denoted by the @interface directive. It specifies the name of the class and the class’s superclass, UIResponder. Between angle brackets are the protocols the class conforms to. The MTAppDelegate class conforms to one protocol, the UIApplicationDelegate protocol.

@interface MTAppDelegate : UIResponder <UIApplicationDelegate>

The next two lines are property declarations, which should look familiar. The first property, window, is an instance of UIWindow (a subclass of UIView) and the second property, viewController, is an instance of MTViewController. The words between parentheses, strong and nonatomic, are optional property attributes that specify the storage semantics and behavior of the property. You can ignore them for now.

@property (strong, nonatomic) UIWindow *window;
@property (strong, nonatomic) MTViewController *viewController;

The most interesting part of the interface of the MTAppDelegate class is the UIApplicationDelegate protocol. Take a look at the reference of the UIApplicationDelegate protocol for a complete list of the methods the protocol defines.

The protocol defines dozens of methods and I encourage you to explore a few of them to get an idea of the protocol’s capabilities. The method that is most interesting to us at this point is application:didFinishLaunchingWithOptions:. When the UIApplication instance has finished preparing the application for launch, it will notify the delegate, our MTAppDelegate instance, that the application will finish launching – but that it hasn’t yet. Why does it notify the application delegate of this event? The UIApplication instance notifies its delegate about this event so that it has an opportunity to prepare for application launch. Head over to the implementation file of MTAppDelegate to see what I mean. The first method in the implementation file is application:didFinishLaunchingWithOptions: and it should more or less look like the one pasted below.

- (BOOL)application:(UIApplication *)application didFinishLaunchingWithOptions:(NSDictionary *)launchOptions {
    self.window = [[UIWindow alloc] initWithFrame:[[UIScreen mainScreen] bounds]];
    // Override point for customization after application launch.
    self.viewController = [[MTViewController alloc] initWithNibName:@"MTViewController" bundle:nil];
    self.window.rootViewController = self.viewController;
    [self.window makeKeyAndVisible];
    return YES;
}

The application:didFinishLaunchingWithOptions: method provides a reference to the UIApplication instance and a dictionary with options, which are of no interest to us at this point. In the first line of the method implementation, an instance of UIWindow is created and assigned to the window property of the application delegate. Every iOS application has exactly one window. In this window, all the content of the application is displayed.

self.window = [[UIWindow alloc] initWithFrame:[[UIScreen mainScreen] bounds]];

On the third line (ignore the comment), the second property of the application delegate is set, an instance of the MTViewController class. This is the other class that Xcode generated for us when creating the project. The view controller instance is created by sending an alloc message to the class followed by initWithNibName:bundle:. The nib name specified is identical to the file named MTViewController.xib in the Project Navigator. I will talk more about nib files in a few moments.

self.viewController = [[MTViewController alloc] initWithNibName:@"MTViewController" bundle:nil];

Next, the rootViewController property of the window property is set to the viewController property. What? Take a long look at that line of code and read the previous sentence again. A window instance doesn’t display anything by default. It is nothing more than a blank canvas (so to speak). We need to provide it with some initial content in the form of a rootViewController. I will talk more about view controllers in a few moments.

self.window.rootViewController = self.viewController;

You can understand the last two lines just by reading them. We send the window a message of makeKeyAndVisible to tell the window to prepare itself to become visible (to the user). In the last line, we return YES, because the method expects us to return a boolean – YES or NO value.

How do we know what the window is going to display and how can we control this? We have set the rootViewController property of the window instance to the application delegate’s rootViewController property. We need to learn more about view controllers to understand the rest of the story.


UIViewController

If you open MTViewController.h, you will notice that the MTViewController class is a subclass of UIViewController. Like MTAppDelegate, the UIViewController class is a subclass of UIResponder. View controllers, or subclasses thereof, fall in the controller category of the MVC pattern. As the name implies, they control a view, an instance of the UIView class, which falls in the view category of the MVC pattern.

The view of the view controller is usually created by invoking the view controller’s initWithNibName:bundle: method, which was invoked by the application delegate in the application:didFinishLaunchingWithOptions: method. The initWithNibName:bundle: method loads the file named MTViewController.xib. Despite its .xib extension, MTViewController.xib is a nib file.

A nib file is a file that stores a part of the user interface of the application. Instead of using Xcode’s code editor, a nib file is edited using Interface Builder, an application built into Xcode. Select MTViewController.xib to open the nib file (figure 7). At its core, a nib file is nothing more than an object graph (a group of objects that are linked to one another through direct or indirect references). The nib file is loaded when the view controller invokes initWithNibName:bundle:.

Exploring the UIKit Framework - Editing a nib File in Interface Builder - Figure 7

When you open a nib file, you see (1) a sidebar with two sections, Placeholders and Objects, and (2) a workspace at the center. The workspace displays all the objects listed in the Objects section. At the moment, only one object is listed, an instance of UIView. The placeholders are objects that are not part of the object graph of the nib file. Instead, they are references to objects that live outside of the nib file. The most important placeholder is File’s Owner. As the name implies, File’s Owner is the owner of the nib file, that is, the object that owns the object graph. Can you guess which object that is? In iOS development, File’s Owner often refers to a view controller and this is also true in our example. You can verify this by selecting the File’s Owner object and opening the Identify Inspector in the Inspector on the right (figure 8). The class of File’s Owner is MTViewController as we expected.

Exploring the UIKit Framework - The Identify Inspector in Interface Builder - Figure 8

A view controller manages a view – and the view’s subviews as we will see later. To do this, the view controller needs to know about (read: have a reference to) the view. Our view controller, the File’s Owner object, does have a reference to the view in the object’s section. You can verify this by opening the Connections Inspector in the Inspector on the right (figure 9). Don’t forget to select the File’s Owner object first.

Exploring the UIKit Framework - The Connections Inspector in Interface Builder - Figure 9

In the Connections Inspector, you should see a section named Outlets. The term outlet is a fancy word for a property that Interface Builder knows about and the value of which can be set in Interface Builder. Hover with your mouse over the outlet named view and observe how the view in the workspace is highlighted. That is the connection between the view controller and the view.


UIView

Even though your application can have only one instance of UIWindow, it can have many views. The UIView class is an important component of the UIKit framework as many classes inherit from it, either directly or indirectly. With the view controller’s nib file still open, you should see the Object Library (figure 10) at the bottom of the Inspector. Drag a label and a button to the gray view in the workspace. It doesn’t matter where you position them in the view as long as they are in the gray view (figure 10).

Exploring the UIKit Framework - The Object Library - Figure 10

You will have noticed that three new objects have been added to the Objects section on the left (figure 11). You can ignore the Constraints object for now. Both the label (UILabel) and the button (UIButton) inherit from UIView. Did you notice that the Label and Button objects are slightly indented compared to the View object? This indicates that the Label and Button objects are subviews of the View object. A view can have one or more subviews that it manages.

Exploring the UIKit Framework - The Main View and Its Subviews - Figure 11

As I already mentioned, the UIView class is an important component of UIKit. A view manages a rectangular area or frame on the screen. It manages the contents of the area, the subviews, and any interactions with the view’s contents. The UIView class is a subclass of UIResponder. You will learn much more about views over the course of this series.


Outlets

Let’s take a look at an example to illustrates the relationship between the nib file, the view it contains, and the view controller. These three components are important and I want to make sure that you understand just how they work together.

Earlier in this article, you added a label and a button. How does the view controller know about these objects? At the moment, they don’t appear in the Connections Inspector, but we can change that by telling the view controller about them. Open the view controller’s header file (MTViewController.h) and add a property for the label and for the button (see below). By adding the IBOutlet keyword to the property declaration, Interface Builder (the IB in IBOutlet) knows about these properties.

@property IBOutlet UILabel *myLabel;
@property IBOutlet UIButton *myButton;

Head back to the view controller’s nib file (MTViewController.xib), select the File’s Owner object, and open the Connections Inspector. The new properties are now listed in the list of Outlets. However, the view controller hasn’t yet made the connection between the new properties and the objects in the nib file. This is easy to remedy. Drag from the empty circle on the left of the myLabel outlet to the label in the workspace (figure 12). This will make that all-important connection so that the view controller knows about it. Do the same for the button.

Exploring the UIKit Framework - Connecting the Dots in Interface Builder - Figure 12

Even though we can change the text of the label in Interface Builder, let’s do this in the view controller to illustrate that the view controller has access to the label and button in the nib file. Open the view controller’s implementation file (MTViewController.m) and look for the viewDidLoad method. Modify the viewDidLoad method to reflect the implementation below. The comments have been omitted for clarity.

- (void)viewDidLoad {
    [super viewDidLoad];
    [self.myLabel setText:@"This is an instance of UILabel"];
}

We can send messages to the label property by asking the view controller, self, for its myLabel property. By sending the myLabel property a message of setText: and passing a string literal, we update the label’s text. Note that setText: is an accessor (setter). Even though it is possible to use Objective-C’s dot notation (see below), it is better to use the more traditional syntax as it better shows you what is actually happening.

self.myLabel.text = @"This is an instance of UILabel";

Run your application in the iOS Simulator by clicking the Run button in the top left and notice that the label’s text is indeed updated.


Actions

We have seen a lot of new things in this article. I want to end this article by talking about actions. Just like outlets, actions are nothing more than methods that Interface Builder knows about. Let’s see how this works. Open the view controller’s header file (MTViewController.h) and add the following method declaration somewhere in the view controller’s interface block.

- (IBAction)changeColor:(id)sender;

Don’t be confused by the IBAction keyword. IBAction is identical to void, which means that the method simply returns no value. By taking a closer look at the method declaration, we see that it takes one argument of type id, a reference to an Objective-C object. As the argument name implies, the argument of the method or action is the object that sent the message to the view controller. I will explain this in more detail in just a bit.

Open the view controller’s nib file (MTViewController.xib) once more, select the File’s Owner object, and open the Connections Inspector. A new section has appeared in the Connections Inspector named Received Actions and the action we just added is listed in this section. Drag from the empty circle on the left of the action to the button in the workspace. A small window with a list of options should appear (figure 13). The list contains all the possible events that the button can respond to. The one that interests us is Touch Up Inside (figure 14). This event is triggered when a user touches the button and lifts her finger while still inside the button.

Exploring the UIKit Framework - Connecting the Action in Interface Builder - Figure 13
Exploring the UIKit Framework - Choosing an Event to Connect the Action To - Figure 14

Build and run your application once again and tap the button. Did the application crash for you as well? How did this happen? When you tapped the button, it sent a message of changeColor: to the view controller. Even though the view controller declares a changeColor: method, it does not implement this method yet. Whenever a message is sent to an object that does not implement a corresponding method, an exception is raised and the application crashes if the exception isn’t caught. You can verify this by running the application once more, tapping the button, and inspecting the output in the console window.

To remedy this, we need to implement the changeColor: method. Open the view controller’s implementation file (MTViewController.m) and add the following method implementation somewhere in the implementation block. The implementation of the changeColor: method is identical to the one we used earlier in this series. However, I have added two extra NSLog calls to its implementation to show you that the sender of the message is indeed the button that we added to the nib file in Interface Builder.

- (IBAction)changeColor:(id)sender {
    NSLog(@"Sender Class > %@", [sender class]);
    NSLog(@"Sender Superclass > %@", [sender superclass]);
    int r = arc4random() % 255;
    int g = arc4random() % 255;
    int b = arc4random() % 255;
    UIColor *color = [UIColor colorWithRed:(r/255.0) green:(g/255.0) blue:(b/255.0) alpha:1.0];
    [self.view setBackgroundColor:color];
}

The method itself is pretty simple. We generate three random integers between 0 and 255, pass these values to colorWithRed:green:blue:alpha: to generate a random color, and update the background color of the view controller’s view with the randomly generated color. Note that self.view references the view that the view controller manages and that we saw earlier in the nib file.

Build and run your application one more time, tap the button, and don’t forget to inspect the output in Xcode’s console window. You will notice that the sender is not an instance of UIButton, but a subclass of UIButton. The UIRoundedRectButton is a private UIKit class. This is just an implementation detail that shouldn’t concern you at this time.


Conclusion

In this article, we have explored a few classes of the UIKit framework and we took a close look at the various components of an iOS application. We will explore and work with the UIKit framework in more detail in the rest of this series. If you don’t fully understand the various concepts and patterns, then I am sure that you will as the series progresses. Don’t hesitate to leave a comment if you have question about this article.

Table View Basics

$
0
0

Table views are among the most used components of the UIKit framework and are an integral part of the user experience on the iOS platform. Table views do one thing and they do it very well: present an ordered list of items. The UITableView class is a good place to continue our journey through the UIKit framework as it combines several key concepts of Cocoa Touch and UIKit, including views, protocols, and reusability.


Introduction

The UITableView class, one of the key components of the UIKit framework, is highly optimized for displaying an ordered list of items, both small and large. Table views can be customized and adapted to a wide range of use cases, but the fundamental idea remains unaltered, presenting an ordered list of items.

The Ins and Outs of Table Views - Table Views Present an Ordered List of Items  - Figure 1

The UITableView class is only responsible for presenting data as a list of rows. The data that is being displayed is managed by the table view’s dataSource object. The dataSource object can be any object that conforms to the UITableViewDataSource protocol. The table view’s data source object is often the view controller that manages the view the table view is a subview of as we will see later in this article.

Similarly, the table view is only responsible for detecting touches in the table view. It is not responsible for responding to the touches. In addition to the table view’s dataSource object, the table view has a delegate object. Whenever the table view detects a touch event, it notifies its delegate object of the touch event. It is the responsibility of the table view’s delegate object to respond to the touch event.

By having a data source object managing its data and a delegate object handling user interaction, the table view can focus on data presentation. The result is a highly reusable and performant UIKit component that is in perfect alignment with the MVC (Model-View-Controller) pattern that we discussed in the previous article. The UITableView class inherits from UIView and is therefore only responsible for displaying application data.

A data source object is similar but not identical to a delegate object. A delegate object is delegated control of the user interface by the delegating object. A data source object, however, is delegated control of data. The table view asks the data source object for the data that it should display. This implies that the data source object is also responsible for managing the data it feeds the table view.


Table View Components

The UITableView class inherits from UIScrollView, a UIView subclass that provides support for displaying content that is larger than the size of the application’s window. An instance of UITableView is composed of rows with each row containing one cell, an instance of UITableViewCell, or a subclass thereof. In contrast to UITableView‘s counterpart on OS X, NSTableView, instances of UITableView are one column wide. Nested data sets and hierarchies can be displayed by using a combination of table views and navigation controllers (UINavigationController) as we will see later in this series.

I already mentioned that table views are only in charge of (1) displaying data, delivered by the data source object, and (2) detecting touch events, which are routed to the delegate object. A table view is nothing more than a view managing a number of subviews, the table view cells (figure 2).

The Ins and Outs of Table Views - Table View Components - Figure 2

A New Project

Instead of overloading you with theory, it is better to create a new iOS project and show you how to set up a table view, populate it with data, and have it respond to touch events.

Open Xcode, create a new project (File > New > Project…, figure 3), and select the Single View Application template (figure 4). Name the project Table Views, assign an organization name and company identifier, set the Devices option to iPhone, and enable Automatic Reference Counting (ARC) for the project (figure 5). Tell Xcode where you want to save the project and hit Create (figure 6).

The Ins and Outs of Table Views - Creating a New Project - Figure 3
The Ins and Outs of Table Views - Choosing the Project Template - Figure 4
The Ins and Outs of Table Views - Configuring the Project - Figure 5
The Ins and Outs of Table Views - Specify a Location to Save the Project - Figure 6

The new project should look familiar, because we chose the same project template in the previous article. Xcode has already created an application delegate class for us (MTAppDelegate) and it also gave us a view controller class to start with (MTViewController).


Adding a Table View

Build and run the project to see what we are starting with. The gray screen that you see when running the application in the iOS Simulator is the view of the view controller (MTViewController) that Xcode instantiated for us in the application delegate. Take a look at the previous article if you need to refresh your memory.

The easiest way to add a table view to the view controller’s view is through Interface Builder. Open the view controller’s nib file, MTViewController.xib, and locate the Object Library on the right as we saw in the previous article (figure 7). Browse the Object Library and drag a UITableView instance to the view controller’s view (figure 7). The dimensions of the table view should automatically adjust to fit the bounds of the view controller’s view. You can manually adjust the dimensions of the table view by dragging the white squares at the edges of the table view (figure 8). Remember that the white squares are only visible when the table view is selected.

The Ins and Outs of Table Views - Adding a Table View from the Object Library - Figure 7
The Ins and Outs of Table Views - Resizing the Table View - Figure 8

This is pretty much all that we need to do to add a table view to our view controller’s view. Build and run the project to see the result in the iOS Simulator. You should see a table view with no data (figure 9).

The Ins and Outs of Table Views - An Empty, Plain Table View - Figure 9

A table view has two default styles, (1) plain and (2) grouped. To change the current style of the table view (Plain), select the table view in Interface Builder, open the Attributes Inspector and change the style attribute to Grouped (figure 10). For this project, though, we will work with a plain table view so make sure to switch the table view’s style back to plain.

The Ins and Outs of Table Views - Setting the Table View's Style Attribute - Figure 10

Connecting Data Source and Delegate

You already know that a table view is supposed to have both a data source and a delegate object. However, our table view doesn’t have a data source or a delegate just yet. We need to connect the dataSource and delegate outlets of the table view to an object that conforms to the UITableViewDataSource and UITableViewDelegate protocols. In most cases, that object is the view controller that manages the view which the table view is a subview of. Select the table view in Interface Builder, open the Connections Inspector on the right and drag from the dataSource outlet (the empty circle on its right) to the File’s Owner of the nib file in the Placeholders section (figure 11). Do the same for the delegate outlet. Our view controller is now set as the data source and delegate of the table view.

The Ins and Outs of Table Views - Connecting Data Source and Delegate - Figure 11

If you were to build and run the project now, it would crash almost instantly. The reason for this will become clear in a few moments. Before taking a closer look at the UITableViewDataSource protocol, we need to update the header file of the view controller class, MTViewController. The data source and delegate objects of the table view need to conform to the UITableViewDataSource and UITableViewDelegate protocol, respectively. As we saw earlier in this series, protocols are specified between angle brackets after the superclass in the header file. Multiple protocols are separated by commas.

#import <UIKit/UIKit.h>
@interface MTViewController : UIViewController <UITableViewDataSource, UITableViewDelegate>
@end

Creating the Data Source

Before we start implementing the methods of the data source protocol, we need some data to display in the table view. The data will be stored in an instance of NSArray so we first need to add a new property to our view controller class. Select the view controller’s header file, MTViewController.h, and add a property named fruits. The property should be of type NSArray.

#import <UIKit/UIKit.h>
@interface MTViewController : UIViewController
@property NSArray *fruits;
@end

In the view controller’s viewDidLoad method, we populate the fruits property with a list of fruit names, which we will display in the table view a bit later. The viewDidLoad method is automatically invoked after the view controller’s view and its subviews are loaded into memory, hence the name. viewDidLoad is therefore a good place to initialize the fruits array.

- (void)viewDidLoad {
    [super viewDidLoad];
    // self.fruits = @[@"Apple", @"Pineapple", @"Orange", @"Banana", @"Pear", @"Kiwi", @"Strawberry", @"Mango", @"Walnut", @"Apricot", @"Tomato", @"Almond", @"Date", @"Melon", @"Water Melon", @"Lemon", @"Blackberry", @"Coconut", @"Fig", @"Passionfruit", @"Star Fruit"];
}

In the viewDidLoad method, we assign an array literal to the view controller’s fruits property. This should be familiar to you if you have read the previous article. The fruits array contains the data that we will display in the table view.


The UIViewController class, the superclass of the MTViewController class, also defines a viewDidLoad method. The MTViewController class overrides the viewDidLoad method defined by the UIViewController class. However, overriding a method of a superclass is never without risk. What if the UIViewController class does some important things in the viewDidLoad method? How do we make sure that we don’t break anything when we override the viewDidLoad method? In situations like this, it is key to invoke the viewDidLoad method of the superclass first before doing anything else in the viewDidLoad method. The keyword super refers to the superclass and we send it a message of viewDidLoad. This will invoke the viewDidLoad method of the superclass. This is an important concept to grasp so make sure that you understand this properly before proceeding.


Data Source Protocol

Because we assigned the view controller as the data source object of the table view, the table view will ask the view controller what it should display. The first piece of information the table view wants from its dataSource object is the number of sections it should display. The table view does this by invoking the numberOfSectionsInTableView: method on the data source object. This is an optional method of the UITableViewDataSource protocol. If the table view’s dataSource object does not implement this method, the table view will assume that it needs to display only one section. We implement this method anyway as we are going to need it later in this article.

What is a table view section? A table view section is a group of rows. The Contacts application on iOS, for example, groups contacts based on the first letter of the last (or first) name. Each group of contacts forms a section, which is preceded with a section header at the top of the section and/or a section footer at the bottom of the section.

- (NSInteger)numberOfSectionsInTableView:(UITableView *)tableView {
    return 1;
}

The numberOfSectionsInTableView: method accepts one argument, tableView, which is the table view that sent the message to the data source object. This is important as it will allow a view controller to be the data source of multiple table views if necessary. As you can see, the implementation of numberOfSectionsInTableView: is quite easy.

You might be thrown off by the use of NSInteger as the return type of numberOfSectionsInTableView:. NSInteger is a data type defined in the Foundation framework. NSInteger and its unsigned variant, NSUInteger, have a dynamic definition to enhance portability.

Now that the table view knows how many sections it will need to display, it will ask its dataSource object how many rows each section contains. For each section in the table view, the table view will send the dataSource object a message of tableView:numberOfRowsInSection:. The method accepts two arguments, (1) the table view sending the message, and (2) the section of which the table view wants to know the number of rows. The implementation of this method is pretty simple as you can see below. We start by declaring an integer named numberOfRows and assign it the number of items in the fruits array by calling count on the array. We then return the numberOfRows variable as the method expects.

- (NSInteger)tableView:(UITableView *)tableView numberOfRowsInSection:(NSInteger)section {
    NSInteger numberOfRows = [self.fruits count];
    return numberOfRows;
}

The implementation of this method is so easy that we might as well make it a bit more concise. Take a look at the implementation below to make sure that you understand what changed.

- (NSInteger)tableView:(UITableView *)tableView numberOfRowsInSection:(NSInteger)section
{
    return [self.fruits count];
}

If you were to build and run the project now, the application would still crash. The table view expects the data source, our view controller, to return a table view cell for each item of each section. The message displayed in the console after the crash is clear about what we need to do next.

UITableView dataSource must return a cell from tableView:cellForRowAtIndexPath:

To remedy this, we need to implement tableView:cellForRowAtIndexPath:, another method of the UITableViewDataSource protocol. Like most Objective-C method names, the name of the method is very descriptive. By sending this message to the table view’s dataSource object, the table view asks its data source for the table view cell of the row specified by indexPath.

Before continuing, I would like to take a minute to talk about the NSIndexPath class. As the documentation explains, “The NSIndexPath class represents the path to a specific node in a tree of nested array collections.” An instance of this class can hold one or more indices. In the case of our table view, it holds an index for the section an item is in and the row of that item in the section. A table view is never deeper than two levels, the first level being the section and the second level being the row in the section. Even though NSIndexPath is a Foundation class, the UIKit framework adds a handful of extra methods to the class, which make working with table views easier. Let’s inspect the implementation of the tableView:cellForRowAtIndexPath: method.

- (UITableViewCell *)tableView:(UITableView *)tableView cellForRowAtIndexPath:(NSIndexPath *)indexPath {
    static NSString *CellIdentifier = @"Cell Identifier";
    [tableView registerClass:[UITableViewCell class] forCellReuseIdentifier:CellIdentifier];
    UITableViewCell *cell = [tableView dequeueReusableCellWithIdentifier:CellIdentifier forIndexPath:indexPath];
    // Fetch Fruit
    NSString *fruit = [self.fruits objectAtIndex:[indexPath row]];
    [cell.textLabel setText:fruit];
    return cell;
}

In the first line of tableView:cellForRowAtIndexPath:, we declare a static string. The advantage of declaring the string as static is that the compiler will use only one copy of this string instead of creating a new string every time the tableView:cellForRowAtIndexPath: method is called. This helps to keep down the memory usage of the table view.

static NSString *CellIdentifier = @"Cell Identifier";

Reusing Table View Cells

In the previous article, I told you that views are an important component of an iOS application. However, views are expensive in terms of the memory and processing power they consume. When working with table views, it is important to reuse table view cells as much as possible. By reusing table view cells, the table view doesn’t have to initialize a new table view cell from scratch every time a new row needs to be drawn to the screen.

Table view cells that move off-screen are not thrown into the trash. Table view cells can be marked for reuse by specifying a reuse identifier during initialization. When a table view cell that is marked for reuse moves off-screen, the table view puts it into a reuse queue for later reuse. When the table view’s dataSource object asks the table view for a new cell and specifies a reuse identifier, the table view will first inspect the reuse queue if a table view cell with the specified reuse identifier is available. If no table view cell is available, the table view will instantiate a new one and hand it over to its dataSource object.

UITableViewCell *cell = [tableView dequeueReusableCellWithIdentifier:CellIdentifier forIndexPath:indexPath];

The table view’s dataSource object asks the table view for a table view cell by sending it a message of dequeueReusableCellWithIdentifier:forIndexPath:. The method accepts the reuse identifier I mentioned earlier as well as the index path of the table view cell. How does the table view know how to create a new table view cell? In other words, how does the table view know what class to use to instantiate a new table view cell? The answer is simple. Before sending the table view the message dequeueReusableCellWithIdentifier:forIndexPath:, the table view needs to know what class to use with a particular reuse identifier, which is accomplished by sending the table view a message of registerClass:forCellReuseIdentifier: and specifying the class to use and a reuse identifier. Take a look at the example below.

[tableView registerClass:[UITableViewCell class] forCellReuseIdentifier:CellIdentifier];
UITableViewCell *cell = [tableView dequeueReusableCellWithIdentifier:CellIdentifier forIndexPath:indexPath];

Configuring the Table View Cell

The next step involves populating the table view cell with the data stored in the fruits array. This means that we need to know what element to use from the fruits array, which in turn means that we need to somehow know the row index of the table view cell. The indexPath argument of the tableView:cellForRowAtIndexPath: method has this information. As I mentioned earlier, it has a few extra methods for making working with table views easier. One of these methods is row, which returns the row for the cell. We fetch the correct fruit by sending the fruits array a message of objectAtIndex: and passing the correct row as shown below.

NSString *fruit = [self.fruits objectAtIndex:[indexPath row]];

Finally, we set the text of the textLabel property of the cell to the fruit name we fetched from the fruits array. The UITableViewCell class is a UIView subclass and it has a number of subviews. One of these subviews is an instance of UILabel and we use this label to display the name of the fruit in the table view cell.

[cell.textLabel setText:fruit];

The tableView:cellForRowAtIndexPath: method expects us to return an instance of the UITableViewCell class and that is what we do at the end of the method.

return cell;

Build and run the project once more. You should now have a fully functional table view populated with the array of fruit names stored in the view controller’s fruits property.


Sections

Before we take a look at the UITableViewDelegate protocol, I want to modify the current implementation of the data source protocol by adding sections to the table view. If the list of fruits were to grow over time, it would be better and more user friendly to sort the fruits alphabetically and group them into sections based on the fruit’s first letter.

If we want to add sections to the table view, the current array of fruit names won’t suffice. Instead, the data needs to be divided into sections and the fruits in each section need to be sorted alphabetically. A dictionary (NSDictionary) is the ideal candidate for this purpose. Add a new property named alphabetizedFruits to the view controller’s header file and head back to the viewDidLoad method in the view controller’s implementation file.

#import <UIKit/UIKit.h>
@interface MTViewController : UIViewController
@property NSArray *fruits;
@property NSDictionary *alphabetizedFruits;
@end

In the viewDidLoad method, we use the fruits array to create a dictionary of fruits. The dictionary should contain an array of fruits for each letter of the alphabet. The dictionary is created in a helper method, the alphabetizeFruits: method, which accepts the fruits array as an argument. The alphabetizeFruits: method might be a bit overwhelming at first sight, but it is actually pretty straightforward. We first create a mutable dictionary (NSMutableDictionary) to temporarily store the sections in and we then loop over the fruits in the fruits array, grab the first letter of each fruit, and, based on the first letter, add it to the corresponding array in the temporary mutable array. Each section is represented by a mutable array (NSMutableArray).

In a second for loop, we iterate through the temporary dictionary and sort each array of fruits alphabetically. Finally, we create a new dictionary from the temporary mutable dictionary and return that dictionary at the end of the method. Don’t worry if the implementation of alphabetizeFruits: isn’t entirely clear. The focus of this article is on table views and not on creating an alphabetized list of fruits.

- (NSDictionary *)alphabetizeFruits:(NSArray *)fruits {
    NSMutableDictionary *buffer = [[NSMutableDictionary alloc] init];
    // Put Fruits in Sections
    for (int i = 0; i < [fruits count]; i++) {
        NSString *fruit = [fruits objectAtIndex:i];
        NSString *firstLetter = [[fruit substringToIndex:1] uppercaseString];
        if ([buffer objectForKey:firstLetter]) {
            [(NSMutableArray *)[buffer objectForKey:firstLetter] addObject:fruit];
        } else {
            NSMutableArray *mutableArray = [[NSMutableArray alloc] initWithObjects:fruit, nil];
            [buffer setObject:mutableArray forKey:firstLetter];
        }
    }
    // Sort Fruits
    NSArray *keys = [buffer allKeys];
    for (int j = 0; j < [keys count]; j++) {
        NSString *key = [keys objectAtIndex:j];
        [(NSMutableArray *)[buffer objectForKey:key] sortUsingSelector:@selector(localizedCaseInsensitiveCompare:)];
    }
    NSDictionary *result = [NSDictionary dictionaryWithDictionary:buffer];
    return result;
}

Number of Sections

With the new data source into place, the first thing we need to do is update the numberOfSectionsInTableView: method of the UITableViewDataSource protocol. The updated implementation is quite easy as you can see below. We start by asking the dictionary, alphabetizedFruits, for all its keys by sending it a message of allKeys. This will pull out all the keys of the dictionary and put them in an array. The number of keys in the returned array equals the number of sections in the table view.

- (NSInteger)numberOfSectionsInTableView:(UITableView *)tableView {
    NSArray *keys = [self.alphabetizedFruits allKeys];
    return [keys count];
}

Next, we need to update tableView:numberOfRowsInSection:. As in numberOfSectionsInTableView:, we start by asking alphabetizedFruits for its keys and we then sort the array of keys. Sorting the array of keys is important, because the key-value pairs of a dictionary are not ordered. This is one key differences with arrays and something that often trips up developers who are new to Objective-C. In the next step, we fetch the correct key for the section and we can then ask alphabetizedFruits for the array associated with that key. Finally, the number of items in the array is returned.

- (NSInteger)tableView:(UITableView *)tableView numberOfRowsInSection:(NSInteger)section {
    NSArray *unsortedKeys = [self.alphabetizedFruits allKeys];
    NSArray *sortedKeys = [unsortedKeys sortedArrayUsingSelector:@selector(localizedCaseInsensitiveCompare:)];
    NSString *key = [sortedKeys objectAtIndex:section];
    NSArray *fruitsForSection = [self.alphabetizedFruits objectForKey:key];
    return [fruitsForSection count];
}

The changes that we need to make to tableView:cellForRowAtIndexPath: are very similar. Everything remains the same except for the way we fetch the fruit name that the table view cell will display.

- (UITableViewCell *)tableView:(UITableView *)tableView cellForRowAtIndexPath:(NSIndexPath *)indexPath {
    static NSString *CellIdentifier = @"Cell Identifier";
    [tableView registerClass:[UITableViewCell class] forCellReuseIdentifier:CellIdentifier];
    UITableViewCell *cell = [tableView dequeueReusableCellWithIdentifier:CellIdentifier forIndexPath:indexPath];
    // Fetch Fruit
    NSArray *unsortedKeys = [self.alphabetizedFruits allKeys];
    NSArray *sortedKeys = [unsortedKeys sortedArrayUsingSelector:@selector(localizedCaseInsensitiveCompare:)];
    NSString *key = [sortedKeys objectAtIndex:[indexPath section]];
    NSArray *fruitsForSection = [self.alphabetizedFruits objectForKey:key];
    NSString *fruit = [fruitsForSection objectAtIndex:[indexPath row]];
    [cell.textLabel setText:fruit];
    return cell;
}

If you were to build and run the project, you would not see any section headers like in the Contacts application. This is because we need to tell the table view what should be displayed in the section header of each section. The most obvious choice is to display the name of each section, that is, a letter of the alphabet. The easiest way to do this is by implementing tableView:titleForHeaderInSection:, which is another method from the UITableViewDataSource protocol. Take a look at the method implementation below. It is very similar to the implementation of tableView:numberOfRowsInSection:.

- (NSString *)tableView:(UITableView *)tableView titleForHeaderInSection:(NSInteger)section {
    NSArray *keys = [[self.alphabetizedFruits allKeys] sortedArrayUsingSelector:@selector(localizedCaseInsensitiveCompare:)];
    NSString *key = [keys objectAtIndex:section];
    return key;
}

Build and run your application and see how the table view is now a list of sections with each section containing an alphabetized list of fruits.


Delegation

In addition to the UITableViewDataSource protocol, the UIKit framework also defines the UITableViewDelegate protocol to which the table view’s delegate object needs to conform.

In Interface Builder, we already set our view controller as the delegate of the table view. Even though we have not yet implemented any of the delegate methods defined in the UITableViewDelegate protocol, our application worked just fine. This is because all the method of the UITableViewDelegate protocol are optional.

It would be nice, however, to be able to respond to touch events. Whenever a user touches a row, we should be able to log the name of the corresponding fruit to the console window. Even though this isn’t very useful, it will show you how the delegate pattern works. Implementing this behavior is actually very easy. All we have to do is implement the tableView:didSelectRowAtIndexPath: method of the UITableViewDelegate protocol.

- (void)tableView:(UITableView *)tableView didSelectRowAtIndexPath:(NSIndexPath *)indexPath {
    // Fetch Fruit
    NSArray *unsortedKeys = [self.alphabetizedFruits allKeys];
    NSArray *sortedKeys = [unsortedKeys sortedArrayUsingSelector:@selector(localizedCaseInsensitiveCompare:)];
    NSString *key = [sortedKeys objectAtIndex:[indexPath section]];
    NSArray *fruitsForSection = [self.alphabetizedFruits objectForKey:key];
    NSString *fruit = [fruitsForSection objectAtIndex:[indexPath row]];
    NSLog(@"Fruit Selected > %@", fruit);
}

Fetching the name of the fruit that corresponds to the selected row should be familiar by now. The only difference is that we log the fruit’s name to the console window.

It might surprise you that we use the alphabetizedFruits dictionary to look up the corresponding fruit. Why don’t we ask the table view or the table view cell that displays the fruit’s name? A table view cell is a view and its sole purpose is displaying information to the user. It doesn’t know what it is displaying other than how to display it. The table view itself doesn’t have the responsibility to know about its data source, it only knows how to display the sections and rows that it contains and manages.

This example is another good illustration of the separation of concerns of the Model-View-Controller (MVC) pattern that we saw earlier in this series. Views don’t know anything about application data apart from how to display it. If you want to write reliable and robust iOS applications, it is very important to know about and respect this separation of responsibilities.


Conclusion

Table views are not that complicated once you understand how they behave and know about their various components, such as the data source and delegate objects of the table view. However, I do want to emphasize that we only saw a glimpse of what a table view is capable of doing in this tutorial. In the rest of this series, we will revisit the table view and explore a few more pieces of the puzzle. In the next installment of this series, we will take a look at navigation controllers.

Navigation Controllers and View Controller Hierarchies

$
0
0

Navigation controllers are one of the primary tools for presenting multiple screens of content with the iOS SDK. This article will teach you how to do just that!


Introduction

As we saw in the previous lesson, UIKit’s table view class is a great way to present tabular or columnar data. However, when content needs to be spread across multiple screens, a Navigation Controller, implemented in the UINavigationController class, is often the tool of choice. Just like any other UIViewController subclass, a navigation controller manages a UIView instance. The navigation controller’s view manages several subviews including a navigation bar at the top, a view containing custom content, and an optional toolbar at the bottom. A navigation controller creates and manages a hierarchy of view controllers, which is known as a navigation stack (figure 1).

Navigation Controllers and View Controller Hierarchies - A Navigation Controller's Navigation Stack - Figure 1

Once you understand how navigation controllers work they will become very easy to use. In this article, we will create a new iOS application to become familiar with the UINavigationController class. You will notice that the combination of a navigation controller and a stack of (table) view controllers is an elegant and powerful solution.

In addition to the UINavigationController class, I will also cover the UITableViewController class, another UIViewController subclass. The UITableViewController class manages a UITableView instance instead of the default UIView instance. By default, it adopts the UITableViewDataSource and UITableViewDelegate protocols, which will save us quite a bit of time.


Another Project

The application that we are about to create is named Library. With our application, users can browse a list of authors and view the books that they have written. The list of authors is presented in a table view. When the user taps the name of an author, a list of books written by the author animates into view. Similarly, when the user selects a title from the list of books, another view animates into view, showing a fullscreen image of the book cover. Let’s get started.

Creating the Project

Open Xcode, create a new project (File > New > Project…, figure 2), and select the Empty Application template (figure 3). Name the project Library, assign an organization name and company identifier, set Devices to iPhone, and enable Automatic Reference Counting (ARC) for the project (figure 4). Tell Xcode where you want to save the project and hit Create (figure 5).

Navigation Controllers and View Controller Hierarchies - Creating a New Project - Figure 2
Navigation Controllers and View Controller Hierarchies - Choosing the Project Template - Figure 3
Navigation Controllers and View Controller Hierarchies - Configuring the Project - Figure 4
Navigation Controllers and View Controller Hierarchies - Specify a Location to Save the Project - Figure 5

The template that we chose for this project only contains an application delegate class (MTAppDelegate). Open MTAppDelegate.m and take a look at the implementation of application:didFinishLaunchingWithOptions: (see below). Apart from the initialization of the application’s window, not much else is happening. It is up to us to fill in the blanks.

- (BOOL)application:(UIApplication *)application didFinishLaunchingWithOptions:(NSDictionary *)launchOptions {
    self.window = [[UIWindow alloc] initWithFrame:[[UIScreen mainScreen] bounds]];
    [self.window setBackgroundColor:[UIColor whiteColor]];
    [self.window makeKeyAndVisible];
    return YES;
}

Adding Resources

The source files provided with this article include the data that we will be using. You can find them in the folder named Resources. The folder includes (1) a property list (Books.plist) containing information about the authors, the books they have written, and some information about each book, and (2) an image for each book included in the property list. Drag the Resources folder into your project to add them to the project (figure 6). Xcode will show you a few options when you add the folder to the project (figure 7). Make sure to check the checkbox labeled Copy items into destination group’s folder (if needed) and don’t forget to add the files to the Library target (figure 7).

Navigation Controllers and View Controller Hierarchies - Add the Folder of Resources to the Project  - Figure 6
Navigation Controllers and View Controller Hierarchies - Copy the Contents of the Folder to the Project - Figure 7

Property Lists

Before continuing, I want to take a moment to talk about property lists and what they are. A property list is nothing more than a representation of an object graph. As we saw earlier in this series, an object graph is a group of objects forming a network through the connections or references they share with each other.

It is easy to read and write property lists from and to disk, which makes them ideal for storing small amounts of data. When working with property lists, it is also important to remember that only certain types of data can be stored in property lists, such as strings, numbers, dates, arrays, dictionaries, and binary data.

Xcode makes browsing property lists very easy as we saw earlier. Select Books.plist from the Resources folder, which you just added to the project, and browse the contents of Books.plist using Xcode’s built-in property list browser (figure 8). This will be a helpful tool later in this article when we start working with the contents of Books.plist.

Navigation Controllers and View Controller Hierarchies - Browsing Property Lists in Xcode - Figure 8

Subclassing UITableViewController

Before we can start using the data stored in Books.plist, we first need to lay some groundwork. This includes creating a view controller that manages a table view, which will display the authors listed in Books.plist. Instead of creating a UIViewController subclass and adding a table view to the view controller’s view, as we did in the previous article, we will create a UITableViewController subclass as I alluded to earlier in this article.

Create a new class (File > New > File…) by selecting the Objective-C class template form the iOS > Cocoa Touch category (figure 9). Name the new class MTAuthorsViewController and make it a subclass of UITableViewController (figure 10). Leave all the checkboxes unchecked as we do not target iPads and do not want Xcode to create a nib file for the new class. Tell Xcode where to save the new class and hit Create.

Navigation Controllers and View Controller Hierarchies - Create a New Objective-C Class - Figure 9
Navigation Controllers and View Controller Hierarchies - Configure the New Objective-C Class - Figure 10

Let’s put the new class to use in the application delegate’s application:didFinishLaunchingWithOptions: method. Start by importing the header file of the new class at the top of the application delegate’s implementation file (MTAppDelegate.m). Do you remember why we need to do this?

#import &quot;MTAuthorsViewController.h&quot;

In application:didFinishLaunchingWithOptions:, create a new instance of the MTAuthorsViewController class and set the rootViewController property of the application delegate’s window property to the new view controller as we saw earlier in this series. Take a look at the updated implementation of application:didFinishLaunchingWithOptions: as shown below.

- (BOOL)application:(UIApplication *)application didFinishLaunchingWithOptions:(NSDictionary *)launchOptions {
    // Initialize Authors View Controller
    MTAuthorsViewController *authorsViewController = [[MTAuthorsViewController alloc] init];
    self.window = [[UIWindow alloc] initWithFrame:[[UIScreen mainScreen] bounds]];
    // Configure Window
    [self.window setRootViewController:authorsViewController];
    [self.window setBackgroundColor:[UIColor whiteColor]];
    [self.window makeKeyAndVisible];
    return YES;
}

These are the only changes we need to make to put the new view controller class to use. Build and run the project to see the new view controller in action. The table view is not displaying any data. Let’s fix that.

Populating the Table View

Open MTAuthorsViewController.m and inspect the file’s contents. Because MTAuthorsViewController is a subclass of UITableViewController, the implementation file is populated with default implementations of the required and a few optional methods of the UITableViewDataSource and UITableViewDelegate protocols.

Before we can display data in the table view, we need data to display. As I mentioned earlier, the property list Books.plist will serve as the data source of the table view. To use the data stored in Books.plist, we first need to load its contents into an object, an array to be precise. Create a property of type NSArray in the view controller’s header file and name it authors.

#import &lt;UIKit/UIKit.h&gt;
@interface MTAuthorsViewController : UITableViewController
@property NSArray *authors;
@end

The view controller’s viewDidLoad method is a good place to load the data from Books.plist into the view controller’s authors property. We can load the contents of Books.plist into the view controller’s authors property by using an NSArray class method, arrayWithContentsOfFile: (see below). The method accepts a file path, which means that we need to figure out what the file path of Books.plist is.

self.authors = [NSArray arrayWithContentsOfFile:filePath];

The file, Books.plist, is located in the application bundle, which is a fancy name for the directory that contains the application executable and the application’s resources (images, sounds, etc.). To obtain the file path of Books.plist, we first need a reference to the application’s (main) bundle by using mainBundle, an NSBundle class method. The next step is to ask the application’s bundle for the path of one of its resources, Books.plist. We do this by sending it a message of pathForResource:ofType: and passing the name and type (extension) of the file we want the path for. We store the file path in an instance of NSString as shown below.

NSString *filePath = [[NSBundle mainBundle] pathForResource:@&quot;Books&quot; ofType:@&quot;plist&quot;];

If we put the two pieces together, we end up with the following implementation of viewDidLoad. I also added an NSLog statement to log the contents of the authors property to the console so we can inspect its contents after loading the property list.

- (void)viewDidLoad {
    [super viewDidLoad];
    NSString *filePath = [[NSBundle mainBundle] pathForResource:@&quot;Books&quot; ofType:@&quot;plist&quot;];
    self.authors = [NSArray arrayWithContentsOfFile:filePath];
    NSLog(@&quot;authors &gt; %@&quot;, self.authors);
}

If you have read the previous article of this series, then populating the table view should be straightforward. The table view will contain only one section, which makes the implementation of numberOfSectionsInTableView: trivial.

- (NSInteger)numberOfSectionsInTableView:(UITableView *)tableView {
    return 1;
}

The number of rows in the only section of the table view is equal to the number of authors in the authors array so all we need to do is count its items.

- (NSInteger)tableView:(UITableView *)tableView numberOfRowsInSection:(NSInteger)section {
    return [self.authors count];
}

The implementation of tableView:cellForRowAtIndexPath: is similar to the one we saw in the previous article. The main difference is how we fetch the data that we display in the table view cell. The array of authors contains an ordered list of dictionaries, with each dictionary containing two key-value pairs. The object for the key named Author is an instance of NSString, whereas the object for the key Books is an array of dictionaries with each dictionary representing a book written by the author. Open Books.plist in Xcode to inspect the structure of the data source if this isn’t clear. With this information in mind, the implementation of tableView:cellForRowAtIndexPath: shouldn’t be too difficult.

- (UITableViewCell *)tableView:(UITableView *)tableView cellForRowAtIndexPath:(NSIndexPath *)indexPath {
    static NSString *CellIdentifier = @&quot;Cell Identifier&quot;;
    [tableView registerClass:[UITableViewCell class] forCellReuseIdentifier:CellIdentifier];
    UITableViewCell *cell = [tableView dequeueReusableCellWithIdentifier:CellIdentifier forIndexPath:indexPath];
    // Fetch Author
    NSDictionary *author = [self.authors objectAtIndex:[indexPath row]];
    // Configure Cell
    [cell.textLabel setText:[author objectForKey:@&quot;Author&quot;]];
    return cell;
}

The keys of a dictionary are case sensitive so double-check the keys if you run into any problems. Build and run the project once more to see the final result.


Adding a Navigation Controller

Adding a navigation controller requires only one line of code. However, before we add a navigation controller, it is important to understand how navigation controllers work on iOS. Just like any other UIViewController subclass, a navigation controller manages a UIView instance. The navigation controller’s view manages several subviews including a navigation bar at the top, a view containing custom content, and an optional toolbar at the bottom. What makes a navigation controller unique is that it manages a stack of view controllers (figure 11). The term stack can almost be taken literally. When a navigation controller is initialized, a root view controller is specified as we will see in a moment. The root view controller is the view controller at the bottom of the navigation stack. By pushing another view controller onto the navigation stack, the view of the root view controller is replaced with the view of the new view controller. When working with navigation controllers, the visible view is always the view of the topmost view controller of the navigation stack.

When a view controller is removed or popped from the navigation stack, the view of the view controller beneath it becomes visible once again. By pushing and popping view controllers onto and from a navigation controller’s navigation stack, a view hierarchy is created and, as a result, a data hierarchy can be created. Let’s see how all this pushing and popping works in practice.

Navigation Controllers and View Controller Hierarchies - The Navigation Stack of a Navigation Controller - Figure 11

Revisit application:didFinishLaunchingWithOptions: in the application delegate and instantiate a new navigation controller as shown below. We initialize the navigation controller using the initWithRootViewController: method and pass authorsViewController, which we created earlier, as the root view controller. By doing so, the authorsViewController becomes the first view controller of the navigation controller’s navigation stack.

- (BOOL)application:(UIApplication *)application didFinishLaunchingWithOptions:(NSDictionary *)launchOptions {
    // Initialize Authors View Controller
    MTAuthorsViewController *authorsViewController = [[MTAuthorsViewController alloc] init];
    // Initialize Navigation Controller
    UINavigationController *navigationController = [[UINavigationController alloc] initWithRootViewController:authorsViewController];
    self.window = [[UIWindow alloc] initWithFrame:[[UIScreen mainScreen] bounds]];
    // Configure Window
    [self.window setRootViewController:navigationController];
    [self.window setBackgroundColor:[UIColor whiteColor]];
    [self.window makeKeyAndVisible];
    return YES;
}

Don’t forget to set the rootViewController property of the application delegate’s window property to the newly created navigation controller. Build and run the project. Can you spot the differences? When working with navigation controllers, we get a few things for free, such as the navigation bar at the top of the window. The navigation bar is an instance of the UINavigationBar class.

To add a title to the navigation bar, insert the following line into the viewDidLoad method of the MTAuthorsViewController class. Every view controller has a title property that is used in various places, such as the navigation bar. Build and run the project to see the result of this small change.

self.title = @&quot;Authors&quot;;

Pushing and Popping

The next element to add to the application is the ability to see a list of books when the user taps the name of an author. This means that we need to capture the selection (the name of the author), instantiate a new view controller based on that selection, and push the new view controller onto the navigation stack to show it to the user. Does this sound complicated? It’s not. Let me show you.

Another Table View Controller

Why not display the list of books in another table view. Create a new subclass of UITableViewController and name it MTBooksViewController (figure 12). Loading the list of books is easy as we saw earlier, but how does the books view controller know what author the user has selected? There are several ways to tell the new view controller about the user’s selection, but the approach that Apple recommends is known as passing by reference. How does this work? The books view controller declares a property named author, which can be set to configure the books view controller to display the books of the selected author.

Navigation Controllers and View Controller Hierarchies - Creating Another Table View Controller Subclass - Figure 12

Open MTBooksViewController.h and add a property of type NSString and name it author as shown below. The nonatomic attribute that we pass in the property declaration is related to multithreading and data integrity. The nitty gritty details are not important for us at this point.

#import &lt;UIKit/UIKit.h&gt;
@interface MTBooksViewController : UITableViewController
@property (nonatomic) NSString *author;
@end

Remember from a few lessons ago that the advantage of Objective-C properties is that getter and setter methods for the corresponding instance variables are generated automatically for us. Sometimes, however, it can be necessary or useful to implement your own getter or setter method. This is one of those times. When the author property of the MTBooksViewController class is set, the data source of the table view needs to be modified. We will do this in the setter method of the _author instance variable. Let’s see how this works.

Open MTBooksViewController.m and add a property to the @interface block at the top of the implementation file. You might be surprised to see an @interface block in the class’s implementation file. This is known as a class extension and, as the name implies, it allows you to extend the interface of the class. The advantage of adding a class extension to the implementation file of a class is that the properties and instance variables you specify in a class extension are private. This means that they are only accessible by instances of the class. By declaring the books property in the class extension of MTBooksViewController, it can only be accessed and modified by an instance of the class. If an instance variable or property should only be accessed by instances of the class, then it is recommended to declare it as private.

@interface MTAuthorsViewController ()
@property NSArray *books;
@end

The setter method of the view controller’s _author instance variable is pasted below. You can add it anywhere in the class’ @implementation block. Don’t be intimidated by the implementation. Let’s start at the top. We first verify if the new value, author, differs from the the current value of _author. The underscore in front of author indicates that we are directly accessing the instance variable. The reasoning for this check is that it is (usually) not necessary to set the value of an instance variable if the value hasn’t changed.

- (void)setAuthor:(NSString *)author {
    if (_author != author) {
        _author = author;
        NSString *filePath = [[NSBundle mainBundle] pathForResource:@&quot;Books&quot; ofType:@&quot;plist&quot;];
        NSArray *authors = [NSArray arrayWithContentsOfFile:filePath];
        for (int i = 0; i &lt; [authors count]; i++) {
            NSDictionary *authorDictionary = [authors objectAtIndex:i];
            NSString *tempAuthor = [authorDictionary objectForKey:@&quot;Author&quot;];
            if ([tempAuthor isEqualToString:_author]) {
                self.books = [authorDictionary objectForKey:@&quot;Books&quot;];
            }
        }
    }
}

If the new value is different from the current value, then we update the value of the _author instance variable with the new value. A traditional setter usually ends here. However, we are implementing a custom setter method for a reason, that is, to dynamically set or update the books array, the data source of the table view.

The next two lines should be familiar. We load the property list from the application bundle and store its contents in an array named authors. We then iterate over the list of authors and search for the author that matches the author stored in _author. The most important detail of this setter is the comparison between tempAuthor and _author. If you were to use a double equal sign for this comparison, you would be comparing the references to the objects (pointers) and not the strings the objects are managing. The NSString class defines a method, isEqualToString:, that allows us to compare the strings instead of the object pointers.

For more information about setters and getters (accessors), I would like to refer to Apple’s documentation. It is well worth your time to read this section of the documentation.

The rest of the MTBooksViewController class is easy compared to what we have covered so far. Take a look at the implementations of the three UITableViewDataSource protocol methods shown below.

- (NSInteger)numberOfSectionsInTableView:(UITableView *)tableView {
    return 1;
}
- (NSInteger)tableView:(UITableView *)tableView numberOfRowsInSection:(NSInteger)section {
    return [self.books count];
}
- (UITableViewCell *)tableView:(UITableView *)tableView cellForRowAtIndexPath:(NSIndexPath *)indexPath {
    static NSString *CellIdentifier = @&quot;Cell Identifier&quot;;
    [tableView registerClass:[UITableViewCell class] forCellReuseIdentifier:CellIdentifier];
    UITableViewCell *cell = [tableView dequeueReusableCellWithIdentifier:CellIdentifier forIndexPath:indexPath];
    // Fetch Books
    NSDictionary *book = [self.books objectAtIndex:[indexPath row]];
    // Configure Cell
    [cell.textLabel setText:[book objectForKey:@&quot;Title&quot;]];
    return cell;
}

Pushing a View Controller

When the user taps an author’s name in the authors view controller, the application should show the list of books written by the author. This means that we need to instantiate an instance of the MTBooksViewController class, tell the instance what author was selected by the user, and push the new view controller onto the navigation stack to show it. This all takes place in the tableView:didSelectRowAtIndexPath: method of the authors view controller. The tableView:didSelectRowAtIndexPath: method is a method defined by the UITableViewDelegate protocol as we saw in the previous article about table views. First, however, we need to add an import statement at the top of MTAuthorsViewController.m to import the header file of the MTBooksViewController class.

#import &quot;MTBooksViewController.h&quot;

The implementation of tableView:didSelectRowAtIndexPath: is quite short. We initialize an instance of MTBooksViewController, set its author property, and push it onto the navigation stack by calling pushViewController:animated: on the navigation controller.

- (void)tableView:(UITableView *)tableView didSelectRowAtIndexPath:(NSIndexPath *)indexPath {
    // Initialize Books View Controller
    MTBooksViewController *booksViewController = [[MTBooksViewController alloc] init];
    // Fetch and Set Author
    NSDictionary *author = [self.authors objectAtIndex:[indexPath row]];
    [booksViewController setAuthor:[author objectForKey:@&quot;Author&quot;]];
    // Push View Controller onto Navigation Stack
    [self.navigationController pushViewController:booksViewController animated:YES];
}

The second argument of pushViewController:animated: specifies whether the transition between view controllers should be animated (YES) or not (NO). You might be wondering how we have access to the navigation controller in the above code snippet? Whenever a view controller is pushed onto a navigation controller’s navigation stack, the view controller keeps a reference to the navigation controller through the navigationController property, which is declared in the UIViewController class. You can browse the class reference of UIViewController to verify this.

Build and run the project. Tap the name of an author in the table view and observe how a new instance of the MTBooksViewController class is pushed onto the navigation stack and displayed to the user. Have you noticed that we also get a back button for free when using a navigation controller. The title of the back button is taken from the title of the previous view controller.


Adding a Book Cover

Whenever the user taps a book title in the books view controller, the application should show the book’s cover. We won’t be using a table view controller for this. Instead, we use a regular UIViewController subclass and display the book cover in an instance of the UIImageView class. The UIImageView class is a UIView subclass built for displaying images.

Create a new subclass of UIViewController (not UITableViewController) and name it UIBookCoverViewController. Make sure to check the checkbox labeled With XIB for user interface (figure 13).

Navigation Controllers and View Controller Hierarchies - Creating the MTBookCoverViewController Class - Figure 13

We need to add two properties to the new view controller’s header file as shown below. The first property is of type UIImage and is a reference to the book cover that will be displayed in the image view. The second property is a reference to the image view that we will use to display the book cover. The IBOutlet keyword indicates that we will make the connection in Interface Builder. Let’s do that now.

#import &lt;UIKit/UIKit.h&gt;
@interface MTBookCoverViewController : UIViewController
@property UIImage *bookCover;
@property IBOutlet UIImageView *bookCoverView;
@end

Open MTBookCoverViewController.xib and drag an instance of UIImageView from the Object Library to the view controller’s view (figure 14). Make sure that the image view covers the entire view. Next, select the File’s Owner object, open the Connections Inspector, and drag from the bookCoverView outlet to the UIImageView instance that we just added to the view controller’s view (figure 15).

Navigation Controllers and View Controller Hierarchies - Adding an Image View - Figure 14
Navigation Controllers and View Controller Hierarchies - Connecting the Outlet - Figure 15

We could override the setter method of the _bookCover instance variable, but to show you an alternative approach, we set the image view’s image property in the view controller’s viewDidLoad method as shown below. We first check if the bookCover property is set (not nil) and then set the bookCoverView‘s image property to the value stored in the bookCover property.

- (void)viewDidLoad {
    [super viewDidLoad];
    if (self.bookCover) {
        [self.bookCoverView setImage:self.bookCover];
    }
}

Closing the Loop

All that is left for us to do, is show the book cover when the user tap’s a book title in the books view controller. That means implementing the table view delegate method tableView:didSelectRowAtIndexPath: in the MTBooksViewController class. Don’t forget to first import the header file of the MTBookCoverViewController class by adding an import statement at the top of MTBooksViewController.m.

#import &quot;MTBookCoverViewController.h&quot;

The differences with the implementation of tableView:didSelectRowAtIndexPath: in the MTAuthorsViewController class are small. Initializing an instance of the MTBookCoverViewController class is done by invoking initWithNibName:bundle: and passing the name of the nib file (without the xib extension) and a reference to the application bundle. We then fetch the book dictionary, create an image by passing the name of the image file to the imageNamed: class method of the UIImage class, and set the bookCover property of the new view controller, bookCoverViewController.

- (void)tableView:(UITableView *)tableView didSelectRowAtIndexPath:(NSIndexPath *)indexPath {
    // Initialize Book Cover View Controller
    MTBookCoverViewController *bookCoverViewController = [[MTBookCoverViewController alloc] initWithNibName:@&quot;MTBookCoverViewController&quot; bundle:[NSBundle mainBundle]];
    // Fetch and Set Book Cover
    NSDictionary *book = [self.books objectAtIndex:[indexPath row]];
    UIImage *bookCover = [UIImage imageNamed:[book objectForKey:@&quot;Cover&quot;]];
    [bookCoverViewController setBookCover:bookCover];
    // Push View Controller onto Navigation Stack
    [self.navigationController pushViewController:bookCoverViewController animated:YES];
}

Finally, we push the view controller onto the navigation stack to show it to the user. Build and run the project to see the final result.

The UIImage class inherits directly from one of the Foundation root classes, NSObject. The UIImage class is more than a container for storing image data. UIImage is a powerful UIKit component for creating images from various sources including raw image data. The class also defines methods for drawing images with various options, such as blend modes and opacity values.


Where Does It Pop?

Earlier in this article, I explained that view controllers can be pushed onto and popped from a navigation stack. So far, we only explicitly pushed view controllers onto a navigation stack. Popping a view controller from a navigation stack happens when the user taps the back button in the navigation bar. This is another bit of functionality that we get for free.

However, chances are that you may need to manually pop a view controller from a navigation stack at some point. You can do so by sending the navigation controller a message of popViewControllerAnimated:, which will remove the topmost view controller from the navigation stack. Alternatively, you can pop all the view controllers from the navigation stack with the exception of the root view controller by sending the navigation controller a message of popToRootViewControllerAnimated:.


Conclusion

I hope you agree that navigation controllers aren’t that complicated. To be honest, this article could have been much shorter, but I hope that you have learned a few more things in addition to working with navigation controllers. In the next article, we will take a look at tab bar controllers, which also allows you to manage a collection of view controllers.

Build an Apple Catcher Game – Tuts+ Premium

$
0
0

In this tutorial series, you’ll learn how to create an Apple Catcher game. The objective of the game is to grab the apples that fall on the screen by dragging the basket. Read on!


Tutorial Teaser

Step 1: Start Button Listeners

This function adds the necesary listeners to the TitleView buttons.

function startButtonListeners(action)
	if(action == 'add') then
		titleBg:addEventListener('tap', showGameView)
		creditsBtn:addEventListener('tap', showCredits)
	else
		titleBg:removeEventListener('tap', showGameView)
		creditsBtn:removeEventListener('tap', showCredits)
	end
end

Step 2: Show Credits

The credits screen is shown when the user taps the about button. A tap listener is added to the credits view to remove it.

function showCredits:tap(e)
	creditsBtn.isVisible = false
	creditsView = display.newImage('credits.png', -130, display.contentHeight-140)
	transition.to(creditsView, {time = 300, x = 65, onComplete = function() creditsView:addEventListener('tap', hideCredits) end})
end

Step 3: Hide Credits

When the credits screen is tapped, it’ll be tweened out of the stage and removed.

function hideCredits:tap(e)
	creditsBtn.isVisible = true
	transition.to(creditsView, {time = 300, y = display.contentHeight+creditsView.height, onComplete = function() creditsView:removeEventListener('tap', hideCredits) display.remove(creditsView) creditsView = nil end})
end

Step 4: Show Game View

When the Start button is tapped, the title view is tweened and removed, revealing the game view. There are many parts involved in this view, so we’ll split them in the next steps.

function showGameView:tap(e)
	transition.to(titleView, {time = 300, x = -titleView.height, onComplete = function() startButtonListeners('rmv') display.remove(titleView) titleView = nil end})

Step 5: Add Basket

This code places the basket on the stage.

-- Basket
basket = display.newImage('basket.png', 203, 240)

Step 6: Info Bar

Next we add the Info Bar image and create the corresponding TextFields that will display the current score and time remaining.

-- Info Bar
infoBar = display.newImage('infoBar.png', 280)
score = display.newText('0', 65, -2, native.systemFontBold, 14)
score:setTextColor(0)
timeLeft = display.newText('20', 175, -2, native.systemFontBold, 14)
timeLeft:setTextColor(0)

Step 7: Add Physics

Now we add physics to the basket and call the function that will add the game listeners.

-- Add Physics
physics.addBody(basket, 'static')
-- Game Listeners
gameListeners('add')

Get the Full Series!

This tutorial series is available to Tuts+ Premium members only. Read a preview of this tutorial on the Tuts+ Premium web site or login to Tuts+ Premium to access the full content.


Joining Tuts+ Premium. . .

For those unfamiliar, the family of Tuts+ sites runs a premium membership service called Tuts+ Premium. For $19 per month, you gain access to exclusive premium tutorials, screencasts, and freebies from Mobiletuts+, Nettuts+, Aetuts+, Audiotuts+, Vectortuts+, and CgTuts+. You’ll learn from some of the best minds in the business. Become a premium member to access this tutorial, as well as hundreds of other advanced tutorials and screencasts.

Exploring Tab Bar Controllers

$
0
0

While navigation controllers let users navigate hierarchical content or complex data by managing a stack of view controllers, tab bar controllers manage an array of view controllers that don’t necessarily have a relation to one another. In this article, we will explore tab bar controllers in more detail by creating a tabbed application from scratch.


Introduction

The UITabBarController class is another UIViewController subclass. While navigation controllers manage a stack of related view controllers, tab bar controllers manage an array of view controllers that have no explicit relation with one another (figure 1). The Clock (figure 1) and Music (figure 2) applications on iOS are two prime examples of tab bar controllers. Just like any other UIViewController subclass, a tab bar controller manages a UIView instance. The view of a tab bar controller is composed of two subviews, (1) the tab bar at the bottom of the view and (2) the view of one of the view controllers the tab bar controller manages (figure 2).

Exploring Tab Bar Controllers - The Clock Application on the iPhone and iPod Touch - Figure 1
Exploring Tab Bar Controllers - Dissecting the Tab Bar Controller View - Figure 2

Before We Start

There are a few caveats to be aware of when working with tab bar controllers. Even though instances of UITabBar can only display five tabs, the UITabBarController class can manage more view controllers. Whenever a tab bar controller manages more than five view controllers, the tab bar’s last tab is titled More (figure 3). The additional view controllers can be accessed via this tab and it is even possible to edit the position of the tabs in the tab bar (figure 4).

Although tab bar controllers manage a view, your application is not supposed to directly interact with a tab bar controller’s view. If you decide that a tab bar controller is the right choice for an application, the tab bar controller is required to be the root view controller of the application window. In other words, the root view of the application window is always the tab bar controller’s view. A tab bar controller should never be installed as a child of another view controller. This is one of the key differences with navigation controllers.

Exploring Tab Bar Controllers - The More Tab in the Native Music Application - Figure 3
Exploring Tab Bar Controllers - Editing the Tab Positions in the Native Music Application - Figure 4

Tabbed Library

In this article, we will revisit the Library application that we built in the previous article. By doing so, we can reuse several classes and get up to speed faster. In addition, it will show you that navigation controllers and tab bar controllers are quite different and that they are used in different situations and use cases. The application that we will build in this lesson will be named Tabbed Library and will be based on the UITabBarController class. While we build the Tabbed Library application, you will notice that the use of a tab bar controller forces the application in a very specific user interface paradigm that allows for little flexibility. Tab bar controllers are incredibly useful, but you have to accept that they put constraints on your application’s user interface to some extent.

Open Xcode, create a new project (File > New > Project…), and select the Empty Application template (figure 5). Name the project Tabbed Library, assign an organization name and company identifier, set Devices to iPhone, and enable Automatic Reference Counting (ARC) for the project (figure 6). Tell Xcode where you want to save the project and hit Create.

Exploring Tab Bar Controllers - Choosing the Project Template - Figure 5
Exploring Tab Bar Controllers - Configuring the Project - Figure 6

Even though Xcode includes a Tabbed Application template, I prefer to start with an empty application template so you understand how the various pieces of the puzzle fit together. You will notice that tab bar controllers aren’t that complicated.


Taking a Head Start

When the Tabbed Library application is finished, the tab bar controller of the application will manage six view controllers. Instead of creating every view controller class from scratch, we are going to cheat a little bit by reusing the view controller classes that we created in the previous article. In addition, we will create several instances of the same view controller class to save us some time. The goal of this article is not to create a bunch of view controller classes. At this point, you should be pretty familiar with that process.

Download the source code from the previous article and open the Xcode project that is included in the source files in a new Finder window. Find the MTAuthorsViewController, MTBooksViewController, and MTBookCoverViewController classes and drag them over into our new project. While doing so, make sure to copy the files into the new project by checking the checkbox labeled Copy items into destination group’s folder (if needed) and don’t forget to add the files to the Tabbed Library target (figure 7). Don’t forget to also include the nib file of the MTBookCoverViewController class, MTBookCoverViewController.xib.

Exploring Tab Bar Controllers - Copy Files to the Project - Figure 7

In addition to these three classes, we also need to copy the folder of resources, containing Books.plist and the image files, into our new project. Drag the folder named Resources into our project and use the same settings that we used to copy the class files (figure 7). We are now ready to instantiate the application’s tab bar controller and populate it with its first view controller.


Adding a Tab Bar Controller

Open MTAppDelegate.m and import the header file of the MTAuthorsViewController class by adding the following import statement at the top.

#import "MTAuthorsViewController.h"

In application:didFinishLaunchingWithOptions:, we initialize an instance of the UITabBarController class. Without any view controllers, the tab bar controller won’t be very useful so the next step is to initialize an instance of the MTAuthorsViewController class. Then set the viewControllers property of the tab bar controller by passing an array literal to the setViewControllers: method. At the moment, the array that we pass only contains the MTAuthorsViewController instance that we created earlier. As I have already mentioned, when working with a tab bar controller, the tab bar controller needs to be the root view controller of the application’s window (see below).

- (BOOL)application:(UIApplication *)application didFinishLaunchingWithOptions:(NSDictionary *)launchOptions {
    // Initialize Tab Bar Controller
    UITabBarController *tabBarController = [[UITabBarController alloc] init];
    // Initialize Authors View Controller
    MTAuthorsViewController *authorsViewController = [[MTAuthorsViewController alloc] init];
    // Set View Controllers Tab Bar Controller
    [tabBarController setViewControllers:@[authorsViewController]];
    // Initialize Window
    self.window = [[UIWindow alloc] initWithFrame:[[UIScreen mainScreen] bounds]];
    // Configure Window
    [self.window setRootViewController:tabBarController];
    [self.window setBackgroundColor:[UIColor whiteColor]];
    [self.window makeKeyAndVisible];
    return YES;
}

Build and run the application. At this point, the tab bar contains only one tab making the tab bar not very useful. We will remedy this in a few minutes. Have you tried tapping the name of an author in the table view? Nothing seems to happen when an author is selected in the table view, apart from the row being highlighted. Why is this? It is time for some debugging.

Open MTAuthorsViewController.m and revisit the implementation of tableView:didSelectRowAtIndexPath:. It is this table view delegate method that is called by the table view whenever a row is tapped. One of the most simplistic yet still useful debugging tools in your arsenal is NSLog. Add three log statements to the implementation of tableView:didSelectRowAtIndexPath: as shown below.

- (void)tableView:(UITableView *)tableView didSelectRowAtIndexPath:(NSIndexPath *)indexPath {
    // Initialize Books View Controller
    MTBooksViewController *booksViewController = [[MTBooksViewController alloc] init];
    NSLog(@"Books View Controller > %@", booksViewController);
    // Fetch and Set Author
    NSDictionary *author = [self.authors objectAtIndex:[indexPath row]];
    [booksViewController setAuthor:[author objectForKey:@"Author"]];
    NSLog(@"Author > %@", [author objectForKey:@"Author"]);
    // Push View Controller onto Navigation Stack
    NSLog(@"Navigation Controller > %@", self.navigationController);
    [self.navigationController pushViewController:booksViewController animated:YES];
}

Run our application once more, select an author from the list, and inspect the output in the console window (see below). Do you notice anything peculiar?

2012-12-19 17:39:49.358 Tabbed Library[15334:c07] Books View Controller > <MTBooksViewController: 0x741ab00>
2012-12-19 17:39:49.360 Tabbed Library[15334:c07] Author > J.R.R. Tolkien
2012-12-19 17:39:49.360 Tabbed Library[15334:c07] Navigation Controller > (null)

The navigationController property of the view controller is not set as it is equal to nil. A few lessons ago, I emphasized that it is possible to send messages to nil in Objective-C. The Objective-C runtime won’t throw an exception if you do. I also mentioned that some Cocoa patterns rely on this capability. However, as you can see in this example, it can also result in behavior that you might not expect.

Fixing this bug is easy, though. Head back to MTAppDelegate.m and initialize a navigation controller in application:didFinishLaunchingWithOptions: as shown below. Instead of adding authorsViewController to the tab bar controller’s list of view controllers, we set authorsViewController as the root view controller of the navigation controller and add the navigation controller to the tab bar controller’s list of view controllers.

- (BOOL)application:(UIApplication *)application didFinishLaunchingWithOptions:(NSDictionary *)launchOptions {
    // Initialize Tab Bar Controller
    UITabBarController *tabBarController = [[UITabBarController alloc] init];
    // Initialize Authors View Controller
    MTAuthorsViewController *authorsViewController = [[MTAuthorsViewController alloc] init];
    // Initialize Navigation Controller
    UINavigationController *navigationController = [[UINavigationController alloc] initWithRootViewController:authorsViewController];
    // Set View Controllers Tab Bar Controller
    [tabBarController setViewControllers:@[navigationController]];
    // Initialize Window
    self.window = [[UIWindow alloc] initWithFrame:[[UIScreen mainScreen] bounds]];
    // Configure Window
    [self.window setRootViewController:tabBarController];
    [self.window setBackgroundColor:[UIColor whiteColor]];
    [self.window makeKeyAndVisible];
    return YES;
}

Build and run the project once more. The navigation bar is where it is supposed to be and the authors view controller behaves as expected.


Adding Another Table View Controller

Create a new UITableViewController subclass and name it MTAllBooksViewController. This view controller will extract all the books from Books.plist and display them alphabetically in a table view. Open MTAllBooksViewController.m and add a new property (NSArray) named books to the class extension at the top.

#import "MTAllBooksViewController.h"
@interface MTAllBooksViewController ()
@property NSArray *books;
@end

In the view controller’s viewDidLoad method, we invoke extractBooks, a helper method that we will create shortly. I generally try to keep viewDidLoad as concise as possible by wrapping tasks in helper methods, such as extractBooks. This makes the code easier to read and consequently more maintainable.

- (void)viewDidLoad {
    [super viewDidLoad];
    // Set Title
    self.title = @"Books";
    // Extract Books
    self.books = [self extractBooks];
}

Let’s inspect the implementation of the extractBooks helper method. We start by creating a mutable array to which we will be adding the books of each author in the property list. The next two lines should be familiar if you have read the previous article. We ask the application bundle for the file path of Books.plist and use it to load the contents of Books.plist into an array named authors. Next, we iterate over the array of authors and add the books of each author to the mutable array we created earlier. To sort the array of books, we create a sort descriptor with a key of Title. After we sort the books by title, a new array is created, result, by sorting the mutable array using the sort descriptor. Finally, we return the sorted list of books.

- (NSArray *)extractBooks {
    // Buffer
    NSMutableArray *buffer = [[NSMutableArray alloc] init];
    // Load Authors
    NSString *filePath = [[NSBundle mainBundle] pathForResource:@"Books" ofType:@"plist"];
    NSArray *authors = [NSArray arrayWithContentsOfFile:filePath];
    for (int i = 0; i < [authors count]; i++) {
        NSDictionary *author = [authors objectAtIndex:i];
        // Add Books to Buffer
        [buffer addObjectsFromArray:[author objectForKey:@"Books"]];
    }
    // Sort Books Alphabetically
    NSSortDescriptor *sortDescriptor = [NSSortDescriptor sortDescriptorWithKey:@"Title" ascending:YES];
    NSArray *result = [buffer sortedArrayUsingDescriptors:@[sortDescriptor]];
    return result;
}

Sort descriptors, instances of NSSortDescriptor, are used to sort a collection of objects, such as arrays, by specifying the property that needs to be used to compare two objects of the collection. You can safely ignore this portion of the implementation of extractBooks if it isn’t entirely clear because it isn’t important to us in the scope of this article.

The implementations of the UITableViewDataSource protocol method is very similar to what we saw earlier in this series. Take a moment to inspect the implementation of each method below.

- (NSInteger)numberOfSectionsInTableView:(UITableView *)tableView {
    return 1;
}
- (NSInteger)tableView:(UITableView *)tableView numberOfRowsInSection:(NSInteger)section {
    return [self.books count];
}
- (UITableViewCell *)tableView:(UITableView *)tableView cellForRowAtIndexPath:(NSIndexPath *)indexPath {
    static NSString *CellIdentifier = @"Cell Identifier";
    [tableView registerClass:[UITableViewCell class] forCellReuseIdentifier:CellIdentifier];
    UITableViewCell *cell = [tableView dequeueReusableCellWithIdentifier:CellIdentifier forIndexPath:indexPath];
    // Fetch Book
    NSDictionary *book = [self.books objectAtIndex:[indexPath row]];
    // Configure Cell
    [cell.textLabel setText:[book objectForKey:@"Title"]];
    return cell;
}

With the new view controller class ready to use, head back to the application delegate’s application:didFinishLaunchingWithOptions: method, instantiate an instance of the MTAllBooksViewController class, and add the instance to the tab bar controller’s array of view controllers. Don’t forget to first import the header file of the MTAllBooksViewController class.

#import "MTAllBooksViewController.h"
- (BOOL)application:(UIApplication *)application didFinishLaunchingWithOptions:(NSDictionary *)launchOptions {
    // Initialize Tab Bar Controller
    UITabBarController *tabBarController = [[UITabBarController alloc] init];
    // Initialize Authors View Controller
    MTAuthorsViewController *authorsViewController = [[MTAuthorsViewController alloc] init];
    // Initialize Navigation Controller
    UINavigationController *navigationController = [[UINavigationController alloc] initWithRootViewController:authorsViewController];
    // Initialize All Books View Controller
    MTAllBooksViewController *allBooksViewController = [[MTAllBooksViewController alloc] init];
    // Set View Controllers Tab Bar Controller
    [tabBarController setViewControllers:@[navigationController, allBooksViewController]];
    // Initialize Window
    self.window = [[UIWindow alloc] initWithFrame:[[UIScreen mainScreen] bounds]];
    // Configure Window
    [self.window setRootViewController:tabBarController];
    [self.window setBackgroundColor:[UIColor whiteColor]];
    [self.window makeKeyAndVisible];
    return YES;
}

Build and run the project to see the result of our hard work. If you have an eye for detail, you may have noticed that the title of the second tab only appears after the tab is selected. Can you guess why that is?


View Did … Not Load

The cause of this odd quirk is actually quite simple. In general, a view isn’t loaded into memory until it is absolutely necessary. This usually means that a view is loaded into memory when it is about to be shown to the user. When the Tabbed Library application is launched, the first tab is selected by default. As long as the second tab isn’t selected (by either the user or programmatically), there is no need to load the view of the second view controller. As a result, the viewDidLoad method is not called until the second tab is selected, which in turn means that the title is not set until the second tab is selected.

The solution is simple. A better approach is to set the view controller’s title when the view controller is initialized. If we set the title in the class’ init method, we can be confident that the view controller’s title will be set in time.

Open MTAllBooksViewController.m and search for the initWithStyle: method. This is the designated initializer of the UITableViewController subclass. The style argument of initWithStyle: refers to the style of the table view managed by the table view controller. Remember from two lessons ago that a table view can have one of two styles, (1) plain (UITableViewStylePlain) or (2) grouped (UITableViewStyleGrouped).

This is also a good time to inspect the flow of a typical init method. An initialization method typically start with a call to the superclass’ init method, in this case initWithStyle:. I emphasized why this is important when we discussed the viewDidLoad method earlier in this series. The result of invoking the superclass’ initialization method is assigned to self, the instance of the class that we are working with. Next, we verify that self is not nil. If self is set (not nil), it is time to further configure the instance, that is, self. An initialization method should always return either the class instance or nil if something has gone wrong.

The primary initializer of a class that is typically a required part of object instantiation is referred to as the designated initializer.

Let’s revisit and solve the initial problem by setting the view controller’s title in the initWithStyle: method as shown below.

- (id)initWithStyle:(UITableViewStyle)style {
    self = [super initWithStyle:style];
    if (self) {
        // Set Title
        self.title = @"Books";
    }
    return self;
}

Even though we don’t explicitly call initWithStyle: in the application delegate’s application:didFinishLaunchingWithOptions: method, when the init method of a UITableViewController subclass is invoked, behind the scenes the initWithStyle: is automatically invoked with UITableViewStylePlain as its argument. You can test this by adding a log statement in the initWithStyle: method as shown below.

- (id)initWithStyle:(UITableViewStyle)style {
self = [super initWithStyle:style];

if (self) {
// Set Title
self.title = @”Books”;

// Proof of Concept
NSLog(@”initWithStyle: is invoked automatically when init is invoked”);
}

return self;
}

That was a lot of talk for fixing a trivial problem. However, the above explanation is a good introduction to another important element of tab bar controllers, tab bar items. At the moment, the tabs of the tab bar only show the title of each view controller. In most applications, the tabs also show a small icon hinting at the function or purpose of the view controller behind the tab. Let’s see how to implement this.


Tab Bar Items

In the previous lesson, I wrote that every view controller on a navigation stack keeps a reference to the navigation controller managing the stack. The same is true for view controllers that are managed by a tab bar controller. A view controller managed by a tab bar controller keeps a reference to the tab bar controller.

In addition to these properties, a view controller also has a tabBarItem property, a unique instance of the UITabBarItem class. This property is used when the view controller is a child of a tab bar controller. A tab bar item has a title, an image, and a tag. The tag is just an integer that can be used to identify a tab bar item in the tab bar. By default, the tab bar item’s title is inherited from the view controller’s title property, which is why the tabs in the Tabbed Library application bear the title of their respective view controller.

Open MTAuthorsViewController.m and amend the initWithStyle: method to look like the implementation shown below. We create a tab bar item and assign it to the view controller’s tabBarItem property. The designated initializer of the UITabBarItem class accepts a title (NSString), an image (UIImage), and a tag (NSInteger). Before building and running the project, download the source files of this lesson and drag icon-authors.png and icon-authors@2x.png into your project. As you might remember, the file with the @2x suffix targets devices with a retina display, whereas the file without the @2x suffix targets non-retina devices.

- (id)initWithStyle:(UITableViewStyle)style {
    self = [super initWithStyle:style];
    if (self) {
        // Set Title
        self.title = @"Authors";
        // Set Tab Bar Item
        self.tabBarItem = [[UITabBarItem alloc] initWithTitle:@"Authors" image:[UIImage imageNamed:@"icon-authors"] tag:0];
    }
    return self;
}

Note that it is not necessary to specify the file extension of the image file when using the class method imageNamed: of UIImage. In general, you don’t need to specify what version of the file (retina or non-retina) to use. The file name suffices as the operating system knows which version to use based on the hardware of the device the application runs on.

I also moved the title assignment to the initWithStyle: method as we did in the MTAllBooksViewController class. Build and run the project once more to see the result.

We can do the same for the MTAllBooksViewController class. Open MTAllBooksViewController.m and update the initWithStyle: method as shown below. In addition to setting the view controller’s title, we set its tabBarItem property. However, this time we make use of initWithTabBarSystemItem:tag: to configure the tab bar item. You can use this method if you wish to use a system supplied tab bar item. The first argument of this method, UITabBarSystemItem, determines both the title and the image of the tab bar item.

It is also possible to give a tab bar item a badge value as shown in the implementation below. The badge value is expected to be an NSString instance.

- (id)initWithStyle:(UITableViewStyle)style {
    self = [super initWithStyle:style];
    if (self) {
        // Set Title
        self.title = @"Books";
        // Set Tab Bar Item
        self.tabBarItem = [[UITabBarItem alloc] initWithTabBarSystemItem:UITabBarSystemItemContacts tag:1];
        // Set Badge Value
        [self.tabBarItem setBadgeValue:@"12"];
    }
    return self;
}

When working with tab bar controllers, keep in mind that it is the root view controller of each tab that determines how the tab bar item of the respective tab looks. For example, if a tab bar controller manages a navigation controller with a number of view controllers, it is the tab bar item of the navigation controller’s root view controller that is used by the tab bar controller’s tab bar. The UITabBarItem class has a few other methods to further customize the look and feel of a tab bar item.


More View Controllers

Before ending this article, I would like to show you how the tab bar controller manages more than five view controllers. As I mentioned earlier, only five tabs are displayed at any one time, but the tab bar controller does provide support for managing more than five child view controllers. Update the application:didFinishLaunchingWithOptions: method as shown below.

- (BOOL)application:(UIApplication *)application didFinishLaunchingWithOptions:(NSDictionary *)launchOptions {
    // Initialize Tab Bar Controller
    UITabBarController *tabBarController = [[UITabBarController alloc] init];
    // Initialize Authors View Controller
    MTAuthorsViewController *authorsViewController = [[MTAuthorsViewController alloc] init];
    // Initialize Navigation Controller
    UINavigationController *navigationController = [[UINavigationController alloc] initWithRootViewController:authorsViewController];
    // Initialize All Books View Controller
    MTAllBooksViewController *allBooksViewController = [[MTAllBooksViewController alloc] init];
    // Initialize All Books View Controller
    MTAllBooksViewController *vc3 = [[MTAllBooksViewController alloc] init];
    MTAllBooksViewController *vc4 = [[MTAllBooksViewController alloc] init];
    MTAllBooksViewController *vc5 = [[MTAllBooksViewController alloc] init];
    MTAllBooksViewController *vc6 = [[MTAllBooksViewController alloc] init];
    // Set View Controllers Tab Bar Controller
    [tabBarController setViewControllers:@[navigationController, allBooksViewController, vc3, vc4, vc5, vc6]];
    // Initialize Window
    self.window = [[UIWindow alloc] initWithFrame:[[UIScreen mainScreen] bounds]];
    // Configure Window
    [self.window setRootViewController:tabBarController];
    [self.window setBackgroundColor:[UIColor whiteColor]];
    [self.window makeKeyAndVisible];
    return YES;
}

The extra view controllers that we added aren’t very useful, but they will show how a tab bar controller manages more than five child view controllers. Build and run the project and see how the additional view controllers are managed by the tab bar controller.


Conclusion

It is important to understand that the UITabBarController and UINavigationController classes each represent a unique user interface paradigm. This article also shows that tab bar controllers aren’t difficult to master once you understand the various components involved. In the next article, we will take a look at data persistence on iOS and the various options you have as a developer.

Viewing all 1836 articles
Browse latest View live