Quantcast
Channel: Envato Tuts+ Code - Mobile Development
Viewing all 1836 articles
Browse latest View live

iBooks Bootcamp: Fixed Layout Project Setup

$
0
0
This entry is part 2 of 2 in the series iBooks Bootcamp

In part one of the iBooks Bootcamp series, we talked about how to get an iBooks content provider account from Apple and discussed the iBooks platform at a high level. In this second installment, we’ll go over how to actually create your first fixed layout iBooks project.


Step 1: Create the Folder System

The first thing we need to do is set up the necessary folders.

Main Folder

Start by creating a main project folder in which to store everything.

Screenshot: naming main folder

You can name the folder whatever you like. For this tutorial, I’ll name ours “iBookDemo”.

META-INF and OEBPS Folders

Inside the main folder we’ll create two new folders. The first must be named “META-INF” and the second “OEBPS”.

Screenshot: naming the META-INF and OEBPS folders

The META-INF folder will contain metadata that iBooks can use to identify the book. The OEBPS folder will contain all the content and supporting files for the book. These two folders are required. If not provided, the book will not validate as an iBook and will not open in the iBooks app.


Step 2: Set Up the EPUB Specific Files

Mimetype File

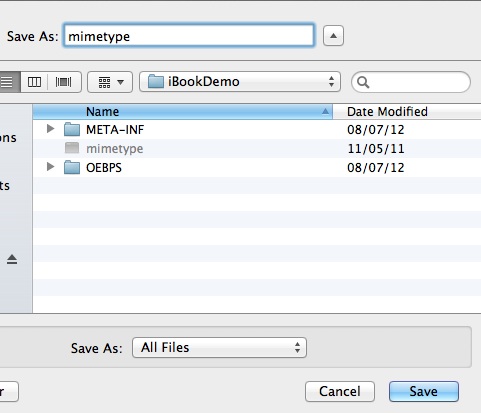
Besides the META-INF and OEBPS folders, the only other file that should be present in the main level of the folder is the mimetype file. Launch your text editor and select a new file. Type the following code on the first line:

application/epub+zip

This mimetype file tells iBooks that this is a zipped EPUB application. Make sure there are no carriage returns and that the code appears on the first line. Click “Save”, and then name the file “mimetype”. Note that the file does not have an extension after the name.

Screenshot: placing the mimetype file

com.apple.ibooks.display-options.xml

Let’s specify some iBooks options. Create another new file in your text editor, and type the following code:

<?xml version="1.0" encoding="UTF-8"?>
<display_options>
</display_options>

The above code sets up the file to add display options for the book. We’ll add the specific options for each one a little later. Save the file as “com.apple.ibooks.display-options.xml” inside the META-INF folder.

Container.xml

As we discussed in part one of this tutorial, the container.xml file points iBooks in the direction of the .opf file, which contains the metadata for the book. Create a new file in your text editor and add the following code:

<?xml version="1.0"?>
<container version="1.0" xmlns="urn:oasis:names:tc:opendocument:xmlns:container">
  <rootfiles>
    <rootfile full-path="OEBPS/content.opf"
     media-type="application/oebps-package+xml" />
  </rootfiles>
</container>

As long as you always name your .opf file the same name and save it in the same location, you can reuse the same container.xml file each time you create a new iBook. Save the file as “container.xml” and make sure to put it in the same META-INF folder.

OPF File

Easily the largest file in the bunch, the .opf file is where you will list the contents and order of your book. Create a new file in your text editor and add the following code:

<?xml version='1.0' encoding='utf-8'?>
<package xmlns="http://www.idpf.org/2007/opf"
            xmlns:dc="http://purl.org/dc/elements/1.1/"
            unique-identifier="bookid" version="2.0">
  <metadata>
  </metadata>
  
  <manifest>
  </manifest>
  
  <spine toc="ncx">
  </spine>
  
  <guide>
  </guide>
</package>

The .opf file starts out with the required namespaces and is followed by four main sections. The first section is metadata for the book. This includes things like the title, author, and copyright. The second is the manifest which details every file used in the content of the book. All the XHTML files, fonts, images, CSS, JavaScript, audio and video; every bit of content used in the book must be listed here. The third section is the spine, and this is where each page of the book is listed in the order it will be displayed. The final section is the guide which specifies important sections of the book, such as an index, glossary, or table of contents. The guide is optional, however if your book has an official table of contents or index, it is a good idea to add these references to the guide. Save your file as “content.opf” and make sure it is inside the OEBPS folder.

NCX File

The last EPUB specific file is the .ncx file, the directory of bookmarks in your book. Create a new file in your text editor and add the following code:

<?xml version='1.0' encoding='utf-8'?>
<!DOCTYPE ncx PUBLIC "-//NISO//DTD ncx 2005-1//EN"
                 "http://www.daisy.org/z3986/2005/ncx-2005-1.dtd">
<ncx xmlns="http://www.daisy.org/z3986/2005/ncx/" version="2005-1">
  <head>
  </head>
  
  <docTitle>
  </docTitle>
  
  <navMap>
  </navMap>
</ncx>

Like nearly all of the EPUB specific files we have created, this file is also based on XML. Save the file as “toc.ncx” in the OEBPS folder.


Step 3: Create the Remaining Files

Creating the CSS File

While you can use external, internal, or in-line CSS with iBooks, for organizational purposes, we’re going to stick with externally linked CSS. Create a new file in your text editor and add the following code:

body {
    width: 612px;
    height: 792px;
    margin: 0;
}

We will only add one tag for now, and that is the body tag. The size of the page is defined in two places in an iBook, the body tag of the CSS and the viewport tag in the XHTML file. Save the file and name it “cssstyles.css”. For this example, we will save the CSS files directly in the OEBPS folder, however you may want to have a separate folder in the OEBPS folder in your own project if you plan to use a separate CSS file for each page.

Creating the XHTML Template

Each page of a Fixed Layout iBook is a separate XHTML file. This means that if your book has ten pages, you will have ten separate XHTML files. The easiest way to create that many pages is to start by building a template containing the code that will be present on every page, and click “Save As” to save the file as the other XHTML pages you will need. Let’s start by building the template for our project. Create a new file in your text editor and add the following code.

<?xml version="1.0" encoding="utf-8"?>
<!DOCTYPE html PUBLIC "-//W3C//DTD XHTML 1.1//EN" "http://www.w3.org/TR/xhtml11/DTD/xhtml11.dtd">
<html xmlns="http://www.w3.org/1999/xhtml" xmlns:epub="http://www.idpf.org/2007/ops">
    <head>
        <title>iBooks Demo</title>
        <meta name="viewport" content="width=612, height=792" />
        <link rel="stylesheet" type="text/css" href="cssstyles.css" />
    </head>

    <body>
    </body> 

</html>

There are a few important pieces to this code. The first section includes the XHTML and EPUB namespaces and corresponding URIs. Inside the head tag is the book’s title and a tag for the viewport. Just like the body tag in the CSS file, the viewport lets iBooks know the size of a book’s page in pixels. We also link the newly created external CSS file. The last section, the body, is where all our content goes. Save the file as “page01.xhtml” and make sure it is saved in the OEBPS folder.

Using the XHTML Template

With “page01.xhtml” still open, click File > Save As and save the file as “page02.xhtml” in the OEBPS folder. Click File > Save As again and save the file as “page03.xhtml” in the OEBPS folder. You now have three pages for your demo iBook without having to write the same code three times!


Conclusion

Your project is now set up, however there is no content yet and nothing to test if we upload to a device. In the next installment of this series, we will add some content to create a working example of an iBook.


Announcing The Envato Birthday Bundle!

$
0
0

It’s Envato’s sixth birthday and, to celebrate, we’ve created the Birthday Bundle! Envato has grown up fast over the past six years to become the bustling network of sites it is today, and the Birthday Bundle is our way of saying, “thanks for being part of the journey!” Read on to find out more…


The Birthday Bundle is Now on Sale

The Birthday Bundle includes more than $500 worth of Motion Graphics, Sound Effects, Music, Themes, Code, Site Templates, Stock Photography, Flash and Unity, Graphics and Vectors, 3D models and more, all for only $20!

Grab 51 files, including an exclusive RockablePress voucher! But be quick, this deal is available for 4 days only…

Envato's 2012 Birthday Bundle

Due to the exclusive nature of the Birthday Bundle, the Bundle items are purchased ‘as-is’, meaning no Bundle files are eligible for item support.

This Birthday Bundle will run from 12pm on 20th of August until 12pm on the 24th of August AEST. Buy now!

Thanks for being part of the Envato community, and we hope to celebrate many more birthdays in the future with you!


iBooks Bootcamp: Adding Fixed Layout Content

$
0
0
This entry is part 3 of 3 in the series iBooks Bootcamp

In the first two installments of this series, we went over the basics of iBooks and explained how to set up your project. In this installment, we’ll add some content to our fixed-layout project and begin building a working iBook. Let’s get started!


Getting the Project Images

The downloadable source files provide images you can use in your project to complete the tutorial. If you have not already done so, download the source files at the top of this page. Double-click to open the “iBookDemo” folder, then open the “OEBPS” folder and right-click on the “images” folder. Select “Copy ‘images’” from the menu before navigating back to the project folder you have been working with in this series. Navigate inside your project’s “OEBPS” folder and right-click. Select “Paste Item” from the menu to paste the images folder inside your project folder.


Step 1: Adding XHTML content

Background Images

Let’s add background images to the XHTML files. Open “page01.xhtml”, “page02.xhtml”, and “page03.xhtml” in your text editor, and then add the following code inside each page’s body tag:

<div class="backgroundImage">
            <img src="images/demoBackground.jpg"
                 alt="A big, green, grassy hill
                 with a bright blue sky in the
                 background."/>
</div>

Notice the descriptiveness of the alt tag. Apple places a high level of importance on accessibility, requiring alt tags to be descriptive for visually impaired users. The file “demoBackround.jpg” is located in the “images” folder we pasted into the OEBPS folder earlier.

Adding the Bird Image

The bird image is a PNG file while the background image is a JPEG file. This is because the bird image requires transparency outside of its edges. When an image doesn’t need transparency to see the image below, as is the case with the background image, you’ll want to stick with JPEG file types with a high quality level.

Add the following code inside the body tag of “page01.xhtml”, “page02.xhtml”, and “page03.xhtml” to place the bird image on each page.

<div class="bird" id="bird">
            <img src="images/bird.png" alt="a round, red bird" />
</div>

Many elements added to a book will have an associated CSS class and/or id. If you are unfamiliar with CSS, these identifiers will allow us to adjust the properties of the elements, such as positioning, size, layering, and font specifications for text. A class attribute is used to create groups of like HTML elements, whereas an id is used to specify one specific kind of element. In this demo, we really just need the ID attribute, but in your own projects you may want to group like objects together with a class. We will add the attributes to the external CSS file for these in a bit.

Adding Text

Now that we have a couple of images, let’s add some text to our iBook. Navigate back to “page01.xhtml” and type the following code inside the body tag.

<div id="page01Text">
            My iBook Demo Project
</div>

All the text in an iBook should be coded into the project versus placed in an image. This allows a user to search for or look up text at any time, as well as provides full accessibility for iOS device users with Voice Over activated.

Click on “page02.xhtml” and add the following code inside the body tag:

        <div id="page02Text">
            Little bird sees a blue sky. 
        </div>

Click on “page03.xhtml” and add the following code inside the body tag:

    <div id="page03Text">
        Little bird sees green grass. 
    </div>

Step 2: Creating the CSS

Let’s add some CSS to place the elements on the page. Open the “cssstyles.css” file and add the following code to place the background image:

.backgroundImage 
{
    position: absolute;
    margin: 0;
    z-index: 0;
    top: 0px;
    left: 0px;
}

.backgroundImage img
{
    width: 800px;
    height: 600px;
    top: 0px;
    left: 0px;
}

The first CSS rule positions the container in the top, left corner with no margin. The second rule provides the height and width specifications for the image itself, as well as placing the image in the top, left corner of the container.

Positioning the Bird

Just below the .backgroundImage img rule, add the following code to position the bird on each page:

#bird {
    position: absolute;
    z-index: 10;
    left: 200px;
    top: 250px;
}

#bird img{
    width: 200px;
    height: 123px;
}

Once again, the image size is set along with the location on the page and placement on top of the background image.

Positioning and Formatting the Text

CSS rules for text usually involve additional properties, such as font size and family. Add the following code just below the previous code:

#page01Text {
    position: absolute;
    z-index: 20;
    top: 74px;
    left: 90px;
    width: 600px;
    font-family: serif;
    font-size: 28pt;
    letter-spacing: 2px;
    font-weight: bold;
    -webkit-text-fill-color: #000000;
    text-shadow: 1.5px 1.5px #ffffff;
}

#page02Text {
    position: absolute;
    z-index: 20;
    top: 74px;
    left: 80px;
    width: 600px;
    font-family: serif;
    font-size: 28pt;
    letter-spacing: 2px;
    font-weight: bold;
    -webkit-text-fill-color: #000000;
    text-shadow: 1.5px 1.5px #ffffff;
}

#page03Text {
    position: absolute;
    z-index: 20;
    top: 74px;
    left: 65px;
    width: 600px;
    font-family: serif;
    font-size: 28pt;
    letter-spacing: 2px;
    font-weight: bold;
    -webkit-text-fill-color: #000000;
    text-shadow: 1.5px 1.5px #ffffff;
}

Because iBooks fully supports the WebKit web browser engine, text can be formatted in various ways. WebKit has a variety of properties that can be changed to create the look you want for your text.


Step 3: Formatting the EPUB Specific Files

com.apple.ibooks.display-options.xml

Now that the content has been added, let’s finish setting up the EPUB files. Open the “com.apple.ibooks.display-options.xml” file and add the following code inside the display_options tag.

<platform name="*">
        <option name="fixed-layout">true</option>
        <option name="orientation-lock">landscape-only</option>
        <option name="open-to-spread">false</option>
</platform>

There is a lot going on here; let’s take a look at the different options. The first option tells iBooks that the book is a Fixed Layout iBook, not a Flowing or Multi-Touch book. The second option locks the book in landscape orientation. This means if the user rotates the device, the book stays locked in the landscape orientation. If you want your book to lay out in portrait orientation, use the value portrait-only. If you want it to rotate freely, leave this option out completely. The last option determines if the book opens as a two-page spread or just a single page. By specifying a value of false, the book will open to a single page. Replace the value with true to have the book open in a two-page spread.

OPF File: Metadata

The first part of the .opf file is the book’s metadata. Open the “content.opf” file and add the following code inside the metadata tag.

    <dc:title>iBooks Demo</dc:title>
    <dc:creator>Aaron Crabtree</dc:creator>
    <dc:identifier id="bookid">12345</dc:identifier>
    <dc:language>en-US</dc:language>
    <meta name="cover" content="cover-image" />

This is just a small sampling of the many available meta tags. Three tags are required for EPUBs: title, identifier, and language. The tags are fairly straightforward. Title is the title of the book, creator is the author, identifier is used to identify the book and is almost always an ISBN. Language is the language in which the book is written, and cover identifies the image to use as the cover of the book.

OPF File: Manifest

In order for the EPUB to work properly, all the files that are included in the project must be listed in the manifest. In the “content.opf” file add the following code inside the manifest tag:

    <item id="ncx" href="toc.ncx" media-type="application/x-dtbncx+xml" />

    <item id="cover" href="page01.xhtml" media-type="application/xhtml+xml" />
    <item id="page02" href="page02.xhtml" media-type="application/xhtml+xml" />
    <item id="page03" href="page03.xhtml" media-type="application/xhtml+xml" />
    
    <item id="cover-image" href="images/demo01.jpg" media-type="image/jpeg" />
    
    <item id="bird-image" href="images/bird.png" media-type="image/png" />
    
    <item id="css" href="cssstyles.css" media-type="text/css" />

There are a few attributes to each item in the manifest. The first attribute is id, a value of your choosing. The second attribute is href, which specifies the file associated with the id and its location. The last attribute is media-type, a type and subtype that indicate the file type of the item. The first item in the list is the toc.ncx file we created in part two of the series. The second section contains the XHTML files. The third section contains the background image, the JPEG. The fourth section is the bird image, a PNG, and the last item references the CSS file.

OPF File: Spine

The spine determines the order of the pages in the book. Add the following code inside the spine tag.

    <itemref idref="cover" />
    <itemref idref="page02" />
    <itemref idref="page03" />

Notice the item’s id from the manifest section is used to reference the page, not the name of the file itself.

OPF File: Guide

The guide is an optional element used to identify important reference-related sections of the book, such as the glossary, index, or table of contents. Add the following code inside the guide tags.

<reference href="page01.xhtml" type="cover" title="Cover" />

Since we don’t have any reference sections in our book, we’ll only include a reference to “page01.xhtml” as the cover of the book.

NCX File: Head

The .ncx file, or table of contents file, is used to generate bookmarks for the important sections of your book. Open the .ncx file and add the following code inside the

tag.
    <meta name="dtb:uid" content="12345"/>
    <meta name="dtb:depth" content="1"/>
    <meta name="dtb:totalPageCount" content="0"/>
    <meta name="dtb:maxPageNumber" content="0"/>

The most important part of this section is that the value of the first line is identical to the value of the book identifier in the metadata section of the .opf file.

NCX File: docTitle

Move down to the docTitle tag and add the following code.

<text>iBook Demo</text>

This value should match the value of the title tag in the .opf metadata tag.

NCX File: navMap

The last section of the .ncx file contains the starting page for the book. Since we are creating a simple book, we don’t need a complex page of bookmarks to various chapters and sections. Add the following code inside the navMap tag.

<navPoint id="navpoint-1" playOrder="1">
      <navLabel>
        <text>Book Cover</text>
      </navLabel>
      <content src="page01.xhtml"/>
</navPoint>

The text tag indicates the text to be displayed in the table of contents for your book, and the content src="" tag is its link location.


Step 4: Building the EPUB

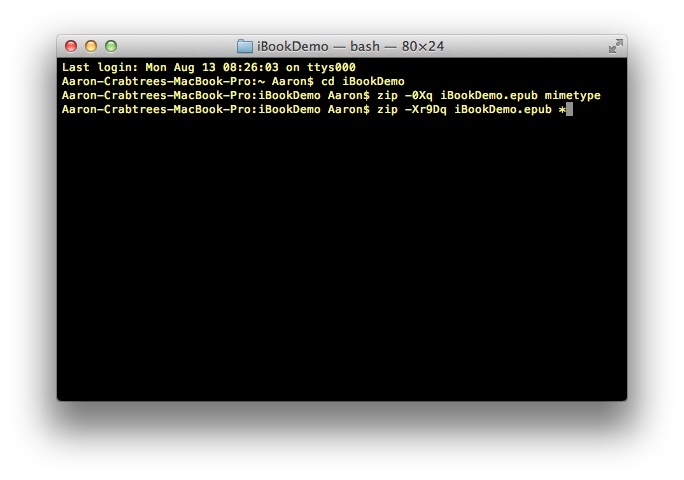
Let’s build and test the iBook on a device. Begin by launching Terminal. Make sure that you are in the same directory as your main EPUB folder. Type the following commands into Terminal:
zip -0Xq iBooksDemo.epub mimetype.

Screenshot: Terminal command line one

This command instructs Terminal to create a new zip file with the name “iBooksDemo.epub”, without compressing the files, and leaving the mimetype file out of the zip archive. Because iBooks needs to access the mimetype file in order to open the EPUB, the file must remain outside of the zip archive.

Next, we’ll add the META-INF and OEBPS folders to the zip file by typing the following into Terminal:
zip -0Xr9Dq iBooksDemo.epub *.

Screenshot: Terminal command line two

This set of commands tells Terminal to add the two folders and their contents to the zip archive. It is important to make sure you name your EPUB the same name in each line. Open your book’s main folder and you will see the newly created .epub file. This file contains all the elements of your book in one handy file.


Step 5: Testing the iBook on a Device

If you have not downloaded the iBooks application, go to the App Store on your device and search for and download “iBooks”. Launch iTunes and connect a device to your computer. Drag and drop the .epub file into the Library in iTunes. Click on the connected device in iTunes and click “Sync” at the bottom of the page. Once the device syncs, launch iBooks and tap on your book to launch and test the iBook.


Conclusion

Congratulations! You just made a Fixed Layout iBook! As you develop your skills, you will find that iBooks provides an incredible opportunity to create fully interactive, fun, and engaging books for readers of all ages. Books are no longer just text and pictures. Thanks to iBooks, they are multimedia experiences involving animations, video, audio, interactivity, and more!


Mixing Metaphors – Swipe Conference

$
0
0

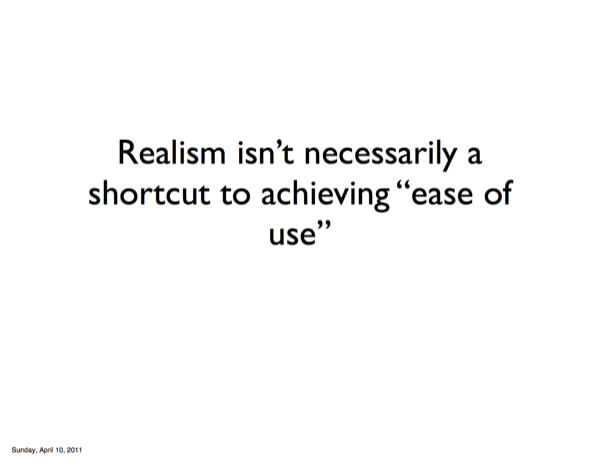
In this featured session from Swipe Conference 2011, Cathy Shive explores the history, meaning, and use of metaphor and realism in software design.


Key Slides & Quotes:

Slide 14
Slide 1
Slide 2
Slide 3
Slide 4
Slide 5
Slide 6
Slide 7
Slide 8
Slide 9
Slide 10
Slide 11
Slide 12
Slide 13

Full Slides

Cathy Shive has released a PDF file containing all of the slides from her presentation available online.


Swipe Conference 2012

Swipe Conference 2012 is just around the corner. For more detail, visit the official web site or go straight to the registration page to sign up.

Swipe 2012

Swipe is the Australian conference for people who create iOS and Mac apps. Over two days attendees will hear from some of the brightest minds in our industry on topics ranging from latest trends in user experience design to better ways to code. Case studies will unearth the secrets of some of Australia’s best known apps and you will get to mingle with designers and developers alike.


Learn Android SDK Development From Scratch!

$
0
0

Interested in learning native Android SDK development? Now is the perfect time to get started! Mobiletuts+ is pleased to announce an in-depth, fully up-to-date session on how to become an Android SDK developer.


Five Reasons to Learn Native Android Development

  • Market Opportunity: According to the International Data Corporation (IDC), Android phones comprise 68.1% of the smartphone market worldwide, with over 104.8 million units sold.
  • Career Advancement: Mobile developers are in high demand. Already know HTML5 or iOS? Adding native Android SDK development to your resume will only enhance your competitiveness in the market.
  • Cross-Platform Distribution: If you’ve been successful with a native application on iOS, Windows, or Blackberry, learning the Android SDK will allow you to port your app natively to the Android platform.
  • Innovative Freedom: The Android Market has far fewer restrictions than the iOS App Store. This means you are primarily limited only by the hardware and your imagination; not seemingly arbitrary business rules.
  • Academic Enhancement: Understanding the fundamentals of the Android SDK will introduce you to a new programming paradigm, regardless of whether you have a prior background in mobile development or not.

As you can see, we think learning the Android SDK is a worthwhile investment of time. By the end of this casually paced yet comprehensive session, we hope you’ll agree!


Session Format

Over the next month and a half, we will be releasing weekly tutorials on getting started with the Android SDK. The tutorials in this session will cover everything you need to know to become comfortable working with the SDK and begin writing Android applications. We will also release interviews with successful Android developers and will quiz you on your understanding of the material.

Tutorials published to-date include:

This list will be updated weekly as new content is published. Check back soon!


Session Preparation

In order to prepare for this session, you may want to read through the Mobiletuts+ Learn Java for Android SDK Development series. Java is the programming language used by the Android SDK, and you’ll need to be at least somewhat familiar with Java syntax in order to build native SDK apps.


What Do You Want to Build?

Planning on following along? Sound off in the comments section below to let us know what kind of Android applications you would like to build.


Android Prerequisites: Mac Preparation

$
0
0

Want to start writing your own Android apps on your Mac? Make sure your machine is ready to install the Android SDK by taking these preliminary steps. This tutorial will guide you through the installation of tools needed before you install the Android SDK on your Mac development machine.


Step 0: Getting Started

This tutorial is for those familiar with Java and interested in getting started learning app development with the Android SDK. This version of the tutorial is specifically designed to help the Mac developer install the prerequisite applications for Android development on Mac operating systems. You must be running OS X 10.5.8 or later. We used Mac OS X 10.8 (aka Mountain Lion) for this tutorial. If you are using an operating system other than Mac OS, you may want to read the Windows prerequisites tutorial or the Ubuntu prerequisites tutorial before moving forward with this session.

If you’re interested in learning Android SDK development but are unfamiliar with Java or just in need of a refresher, you can prepare for this session by reading the Learn Java for Android Development series previously published by Mobiletuts+.


Step 1: Installing a Java Development Kit

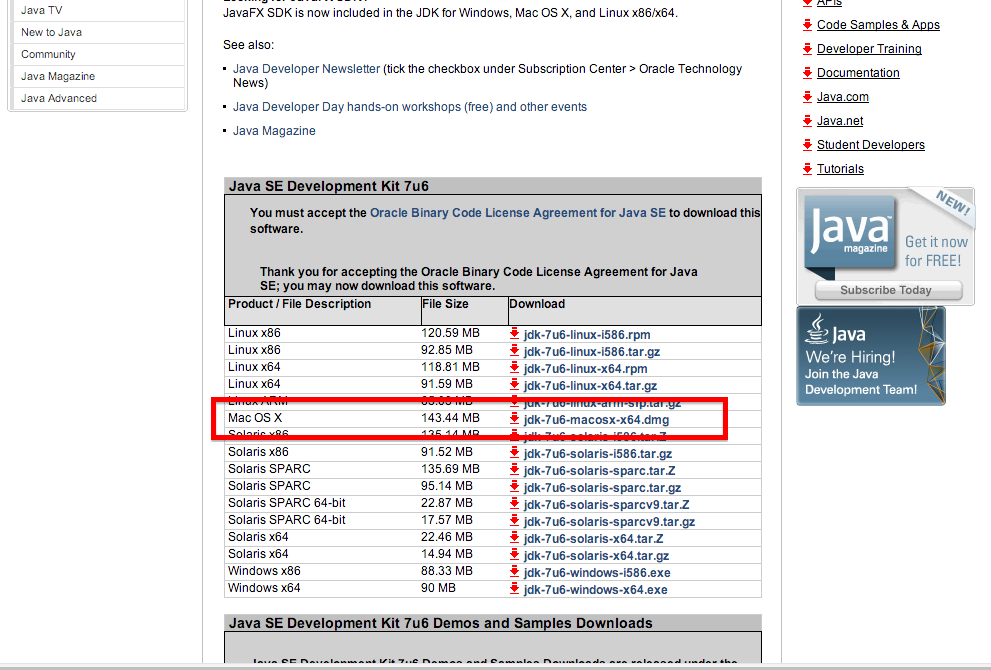
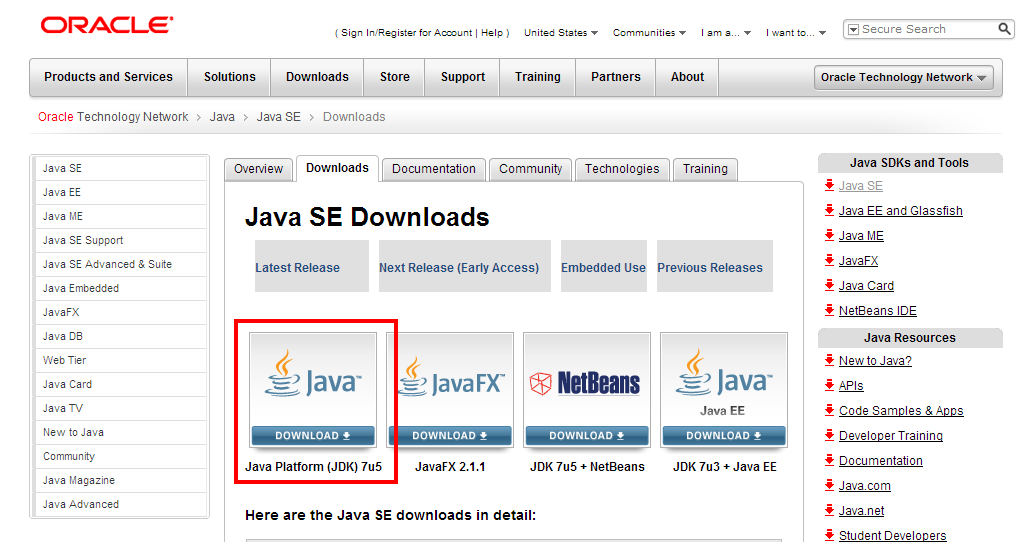
Your machine may already have a Java Runtime environment installed, but you must have the JDK installed as well. We’ll be using the Oracle Java Development Kit, so go to the official download page and choose the Java Platform link.

On the next page, scroll down and choose your platform and accept the licensing agreement. The installation for Mac is 64-bit only, which is not a problem for most Mac users. It is certainly not an issue for Mac OS X 10.8, which requires newer 64-bit hardware and runs in 64-bit mode by default.

Note: You may need to create an Oracle account to continue downloading the JDK.

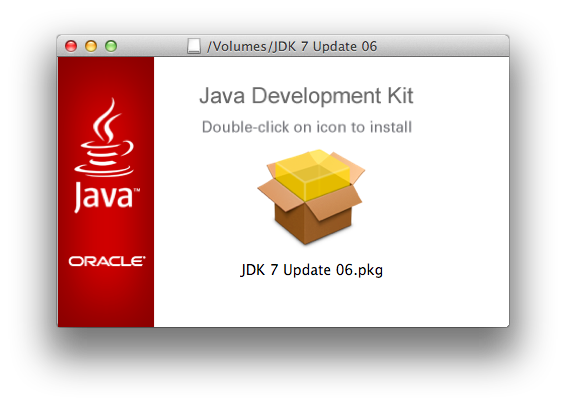
Once the disk image is downloaded, find it in Finder and open it. After the volume is opened you should see a window like this:

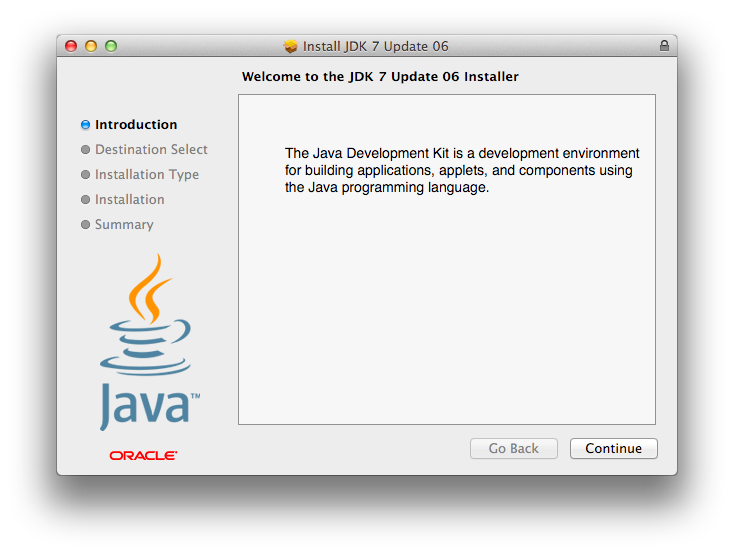
Double-click on the package to bring up the Installation Wizard.

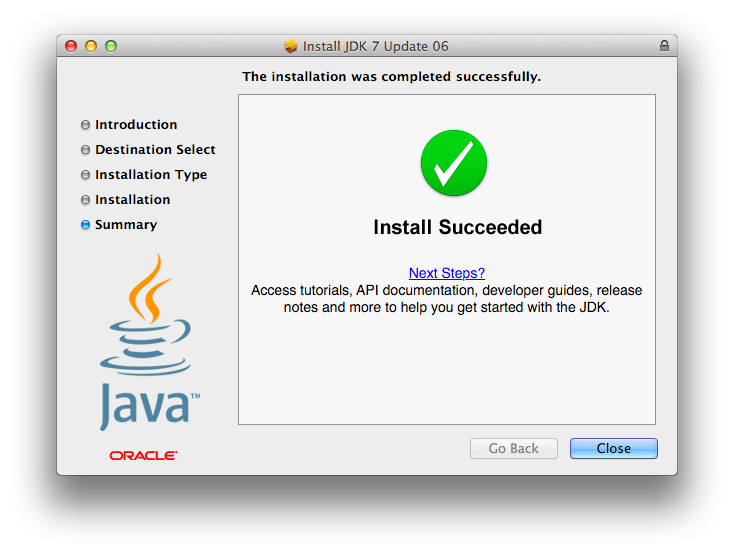
Follow the installation steps by clicking Continue until you’ve successfully installed the JDK.


Step 2: Installing Eclipse

Next, you need to install the Eclipse development environment in order to create Android projects. Although Eclipse isn’t the only development environment you can use to create Android apps, it has the best support from the Android team and is the easiest for those just getting started with Android development.

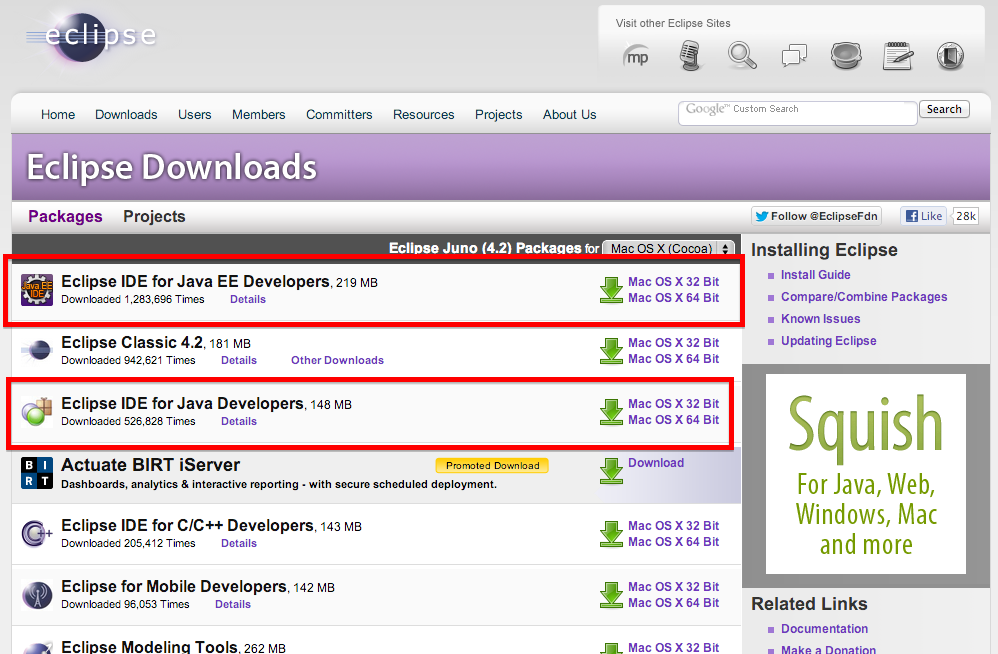
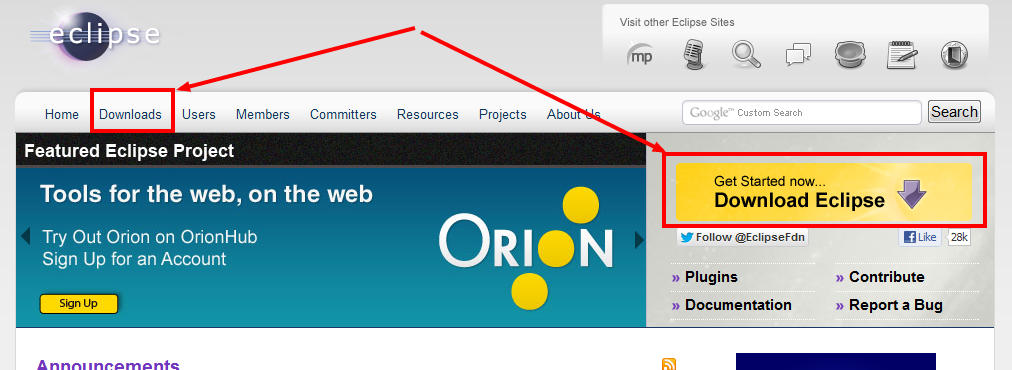
Start by going to Eclipse.org and finding one of the download links.

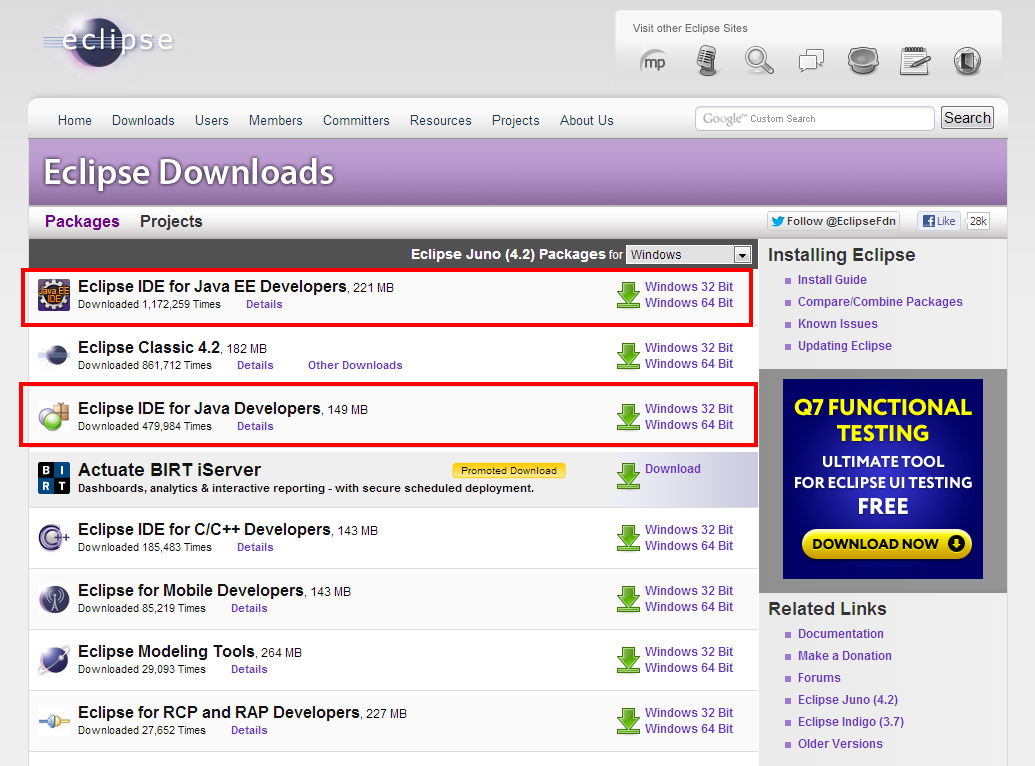
Now choose your version of Eclipse and your platform. For most Mac users, you can choose the 64-bit version. In fact, if you made it through the last step, 64-bit should be the correct option. You should either choose Eclipse IDE for Java EE Developers or Eclipse IDE for Java Developers.

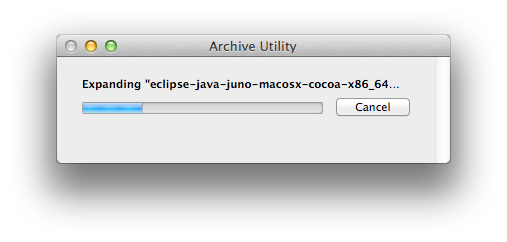
When you have finished downloading the Eclipse package, you’ll have a compressed archive (.tar.gz) on your computer. Double-click on it to extract the files from the archive.

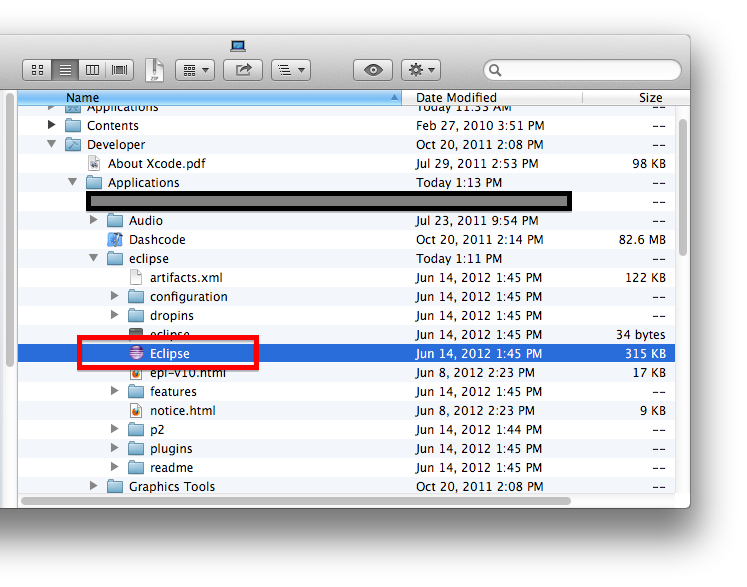
When you finish extracting and placing the entire Eclipse directory files in a good location on your Mac (likely the Applications folder), find the Eclipse executable file in your new Eclipse directory and double-click it to launch Eclipse for the first time.

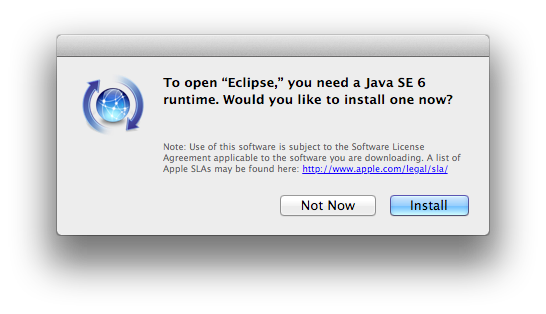
Even though you’ve installed the JDK, it’s possible that you still need to install the Java runtime. If this is the case, Mac OS X will ask you to install it at this time:

Choose Install. The installation will be performed automatically.

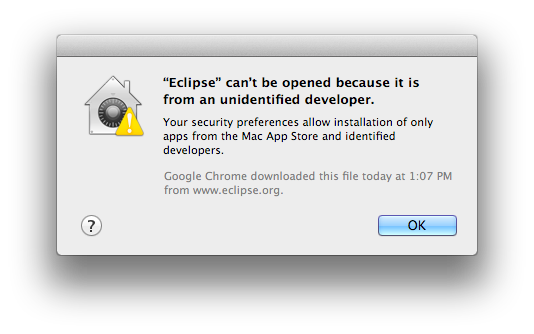
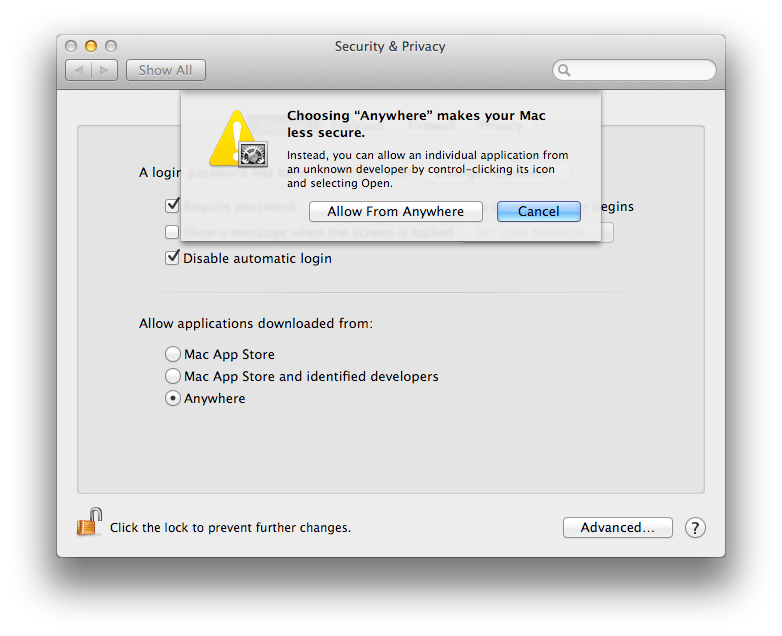
Next, you may find that you are still unable to run Eclipse if you’re running Mac OS X 10.8 due to security settings. If this is the case, you will be prompted as follows:

At this time, Eclipse is not available via the Mac App Store and, since it doesn’t have an installer and isn’t from an identified developer, you’ll have to change your system security settings to accommodate using this tool.

To fix this issue for all apps, go to System Preferences > Security & Privacy > General, and turn on All applications downloaded from “Anywhere.” Doing this is not recommended for everyone, but if you install a lot of third-party applications that don’t support the new Mac OS X 10.8 security system, it could save a bunch of time. However, note that doing this does have some risk; malicious apps may be able to install and/or run without your knowledge.

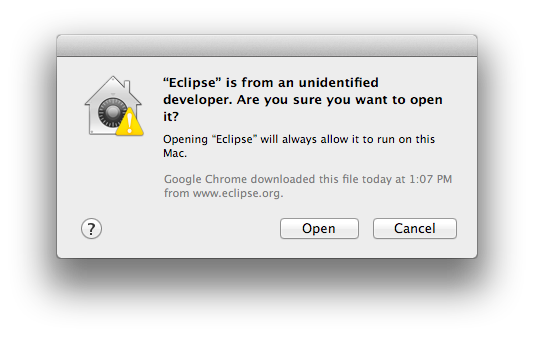
Instead of changing your security policy to allow all third party apps, we recommend the individual application exception method. To make a specific exception solely for Eclipse, control-click Eclipse and choose Open from the menu. This will bring up a dialog warning you of the risks, but this time with an Open button.

Click the Open button and Eclipse will launch. After you have done this once, you won’t have to do it again.

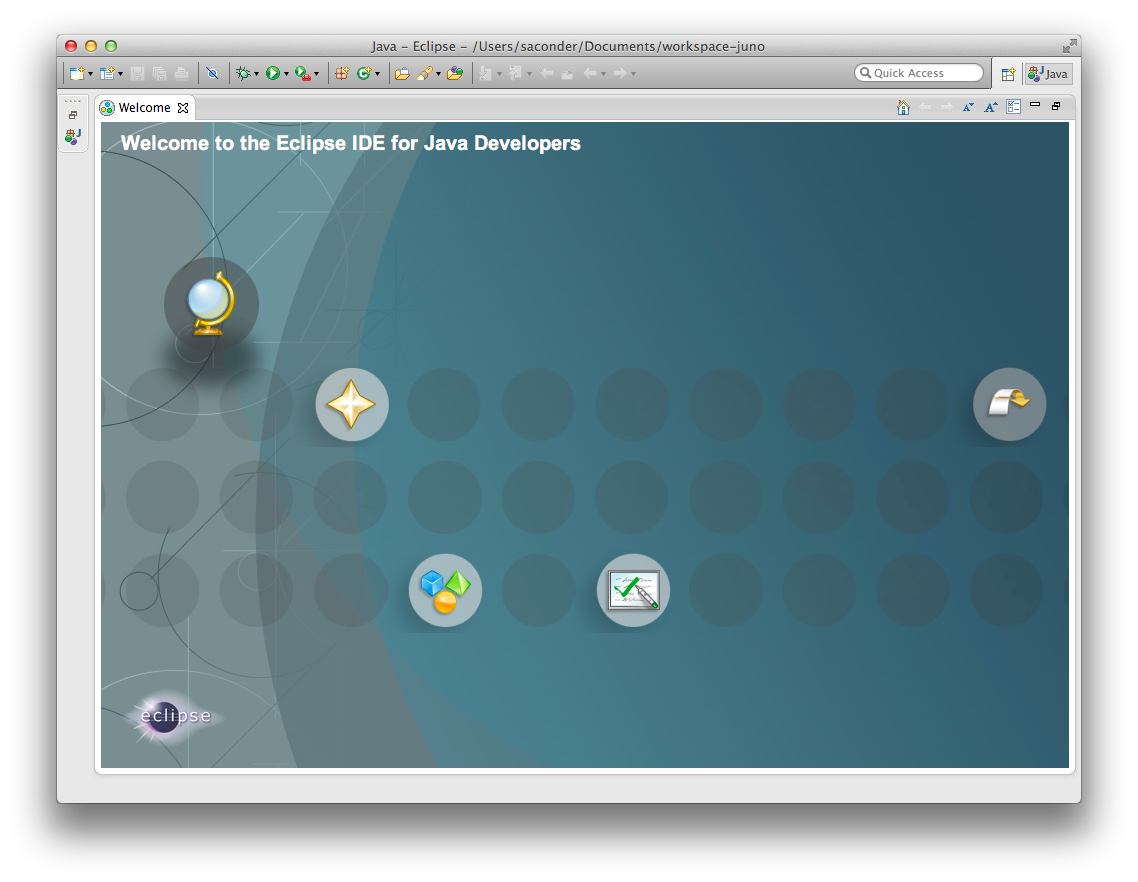
If you see the Eclipse splash screen displayed on your screen, it’s a good sign:

When you see the Welcome screen, you’re ready to move on to the next tutorial in this session and install the Android SDK!


Conclusion

Your Mac development machine is now ready for installation of the Android SDK. In the next tutorial, you’ll learn how to install and configure the Android SDK for Android app development. In the meantime, you might considering familiarizing yourself with Eclipse.

You’re on your way to becoming an Android developer. What kinds of apps are you looking forward to creating? Let us know in the comments!

About the Authors

Mobile developers Lauren Darcey and Shane Conder have coauthored several books on Android development: an in-depth programming book entitled Android Wireless Application Development (now in it’s third edition as a two-volume set), Sams Teach Yourself Android Application Development in 24 Hours, and Learning Android Application Programming for the Kindle Fire: A Hands-On Guide to Building Your First Android Application. When not writing, they spend their time developing mobile software at their company and providing consulting services. They can be reached at via email to androidwirelessdev+mt@gmail.com, via their blog at androidbook.blogspot.com, and on Twitter @androidwireless.

Need More Help Writing Android Apps? Check out our Latest Books and Resources!

Buy Android Wireless Application Development, 3rd Edition, Volume 1  Buy Sam's Teach Yourself Android Application Development in 24 Hours, 2nd Edition  Mamlambo code at Code Canyon


Android Prerequisites: Windows Preparation

$
0
0

Want to start writing your own Android apps? Make sure your machine is ready to install the Android SDK by taking these preliminary steps. This tutorial will guide you through the installation of tools needed before you install the Android SDK on your Windows machine.


Step 0: Getting Started

This tutorial is for those familiar with Java and interested in getting started learning app development with the Android SDK. This version of the tutorial is specific to installing prerequisite applications on Windows operating systems. You must be running Windows XP or later. If you are using an operating system other than Windows, you may want to read the Mac OS X prerequisites tutorial or the Ubuntu prerequisites tutorial before moving forward with this session.

If you’re interested in learning Android SDK development but are unfamiliar with Java or just in need of a refresher, you can prepare for this session by reading the Learn Java for Android Development series previously published by Mobiletuts+.


Step 1: Installing a Java Development Kit

Your machine may already have a Java Runtime environment installed, but it doesn’t hurt to install the JDK to make sure you’ve got everything you need. We’ll be using the Oracle Java Development Kit. Go to the oracle download page and choose the Java Platform link.

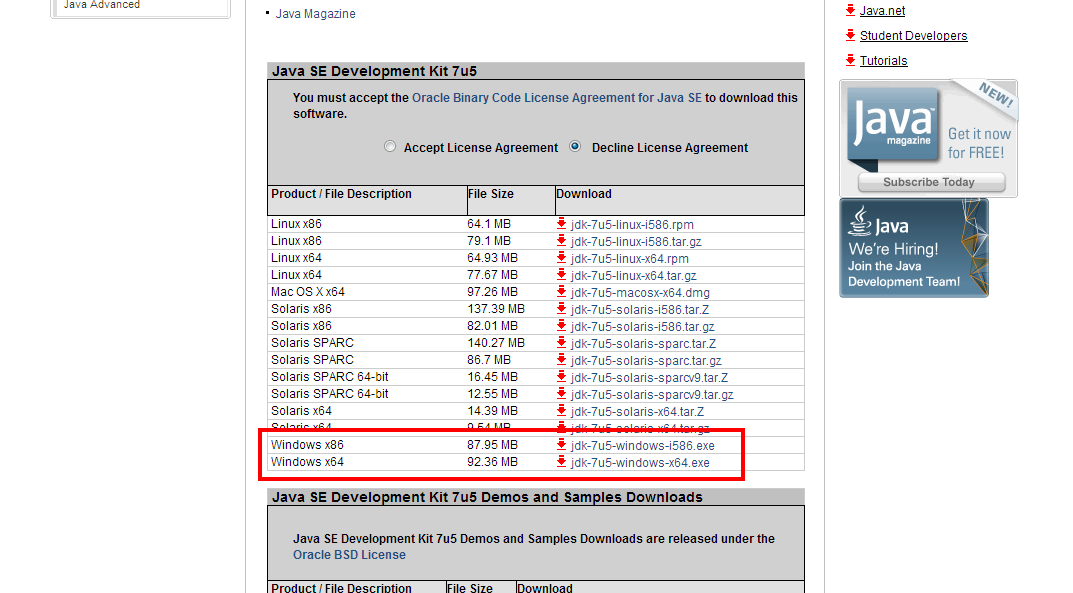
On the next page, scroll down and choose your platform and accept the licensing agreement. For Windows users, you simply need to choose whether you’re running a 32-bit or 64-bit version of the operating system. Don’t know? See the next, bonus step to find out.

Note: You may need to create an Oracle account to continue downloading the JDK.

Once the binary is downloaded, run it to complete your JDK setup.

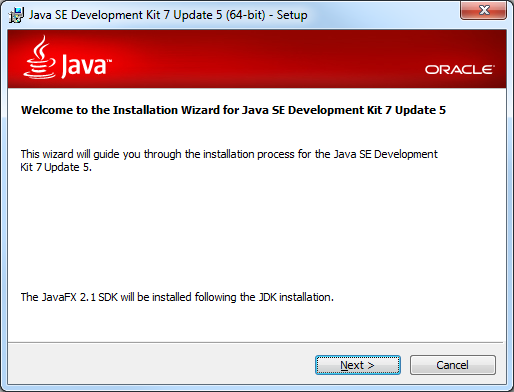
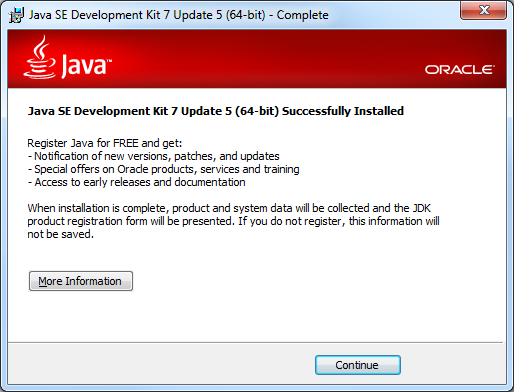
Follow the installation steps, clicking Next until you’ve successfully installed the JDK.


Bonus Step: Determining Which Version of Windows You are Running

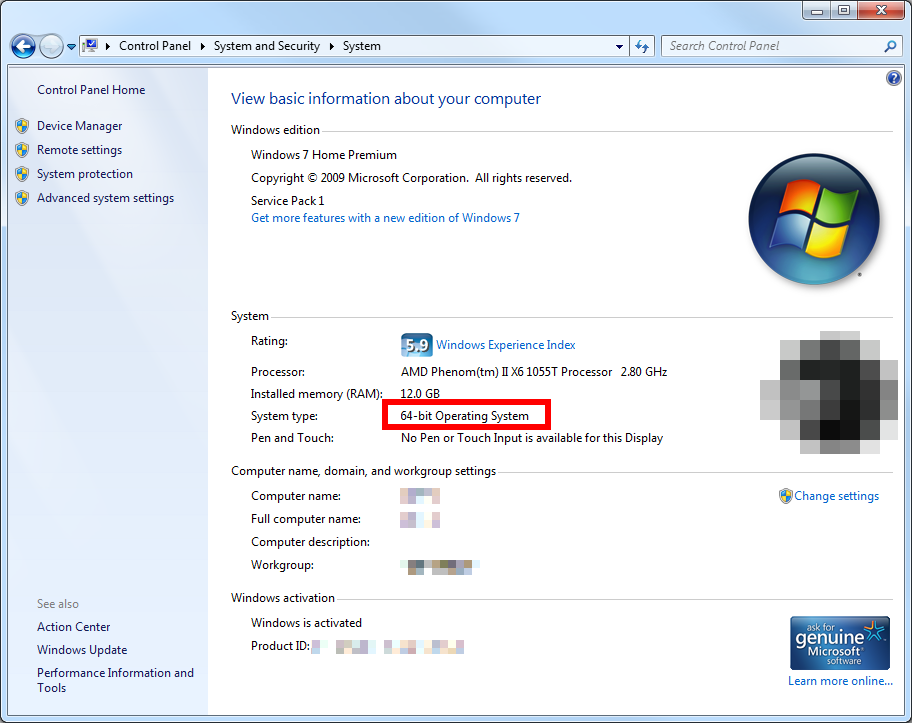
To determine if you’re running the 32-bit or 64-bit version of Windows, simply open the Control Panel, choose System and Security, then choose 64. From there you can see which version you’re running.


Step 2: Installing Eclipse

Next, you need to install Eclipse in order to create your Android projects. Although Eclipse isn’t the only development environment you can use to create Android apps, it has the best support from the Android team and is the easiest for getting started.

Start by going to Eclipse.org and find one of the download links.

Now choose your version of Eclipse and your platform. For Windows users, this is again a choice between 32-bit or 64-bit. You should either choose Eclipse IDE for Java EE Developers or Eclipse IDE for Java Developers.

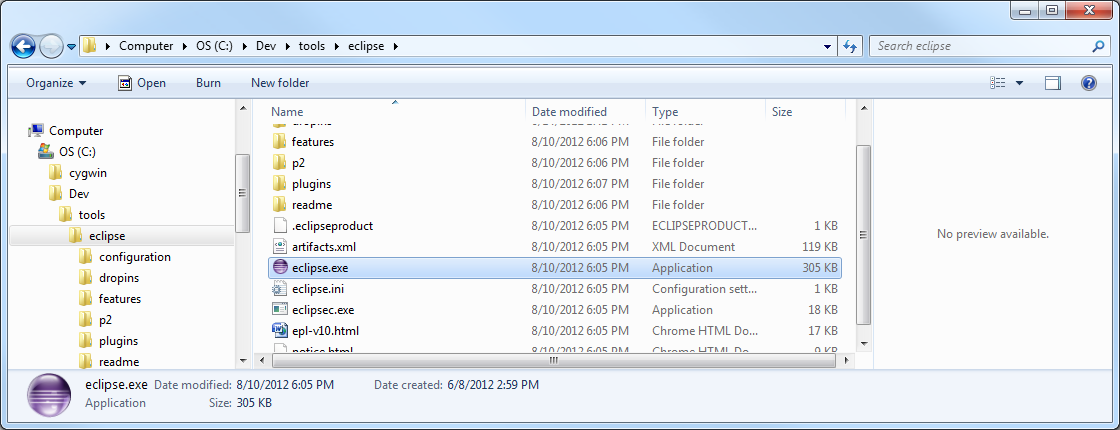
When you have finished downloading the Eclipse package, you’ll simply have a zip file. Unlike most Windows applications, Eclipse does not use an installer. Instead, simply unzip the file (double-click and choose Extract all files works on most versions of Windows these days). You’ll want to put it in a fairly short path name/directory such as “c:\dev\tools\eclipse”.

When you finish extracting and placing the Eclipse directory in a good location, find eclipse.exe executable file in the Extracted directory and double-click it to launch Eclipse for the first time.

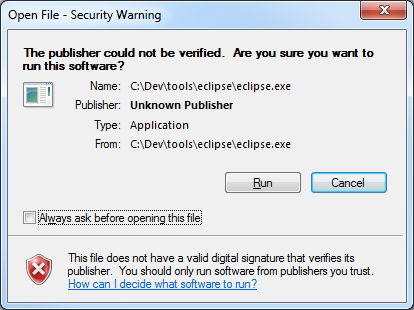
You may need to pass through a Windows security check at this point. We usually uncheck the box so we won’t be asked every time we launch Eclipse.

Seeing the Eclipse splash screen displayed on your screen is a good sign:

When you see the welcome screen, you’re ready to move on to the next tutorial to install the Android SDK.


Conclusion

Your development machine is now ready for the Android SDK. In the next tutorial, you’ll learn how to install and configure the Android SDK for app development. In the meantime, you might considering familiarizing yourself with Eclipse.

You’re on your way to becoming an Android SDK developer. What kinds of apps are you looking forward to creating? Let us know in the comments!

About the Authors

Mobile developers Lauren Darcey and Shane Conder have coauthored several books on Android development: an in-depth programming book entitled Android Wireless Application Development (now in it’s third edition as a two-volume set), Sams Teach Yourself Android Application Development in 24 Hours, and Learning Android Application Programming for the Kindle Fire: A Hands-On Guide to Building Your First Android Application. When not writing, they spend their time developing mobile software at their company and providing consulting services. They can be reached at via email to androidwirelessdev+mt@gmail.com, via their blog at androidbook.blogspot.com, and on Twitter @androidwireless.

Need More Help Writing Android Apps? Check out our Latest Books and Resources!

Buy Android Wireless Application Development, 3rd Edition, Volume 1  Buy Sam's Teach Yourself Android Application Development in 24 Hours, 2nd Edition  Mamlambo code at Code Canyon


Android Prerequisites: Linux Preparation

$
0
0

Want to start developing your own Android apps on your Ubuntu Linux machine? Make sure your machine is ready to install the Android SDK by taking these preliminary steps. This tutorial will guide you through the installation of tools needed before you install the Android SDK on your Linux development machine.


Step 0: Getting Started

This tutorial is for those familiar with Java and interested in getting started learning app development with the Android SDK. This version of the tutorial is specifically designed to help the Linux user install the prerequisite applications for Android development on Linux operating systems. You must be running Ubuntu Linux 8.04 or later. We used Ubuntu Linux 12.04 LTS (aka Precise Pangolin) 64-bit for this tutorial. If you are using an operating system other than Linux, you may want to read the Windows pre-requisites tutorial or the Mac OS X tutorial before moving forward with this session.

If you’re interested in learning Android SDK development but are unfamiliar with Java or just in need of a refresher, you can prepare for this session by reading the Learn Java for Android Development series previously published by Mobiletuts+.


Step 1: Installing a Java Development Kit

Your machine may already have a Java Runtime environment installed, but you must have the JDK installed as well. We’ll be using the OpenJDK JDK. And no, that’s not as redundant as it sounds. You’ll see in a moment!

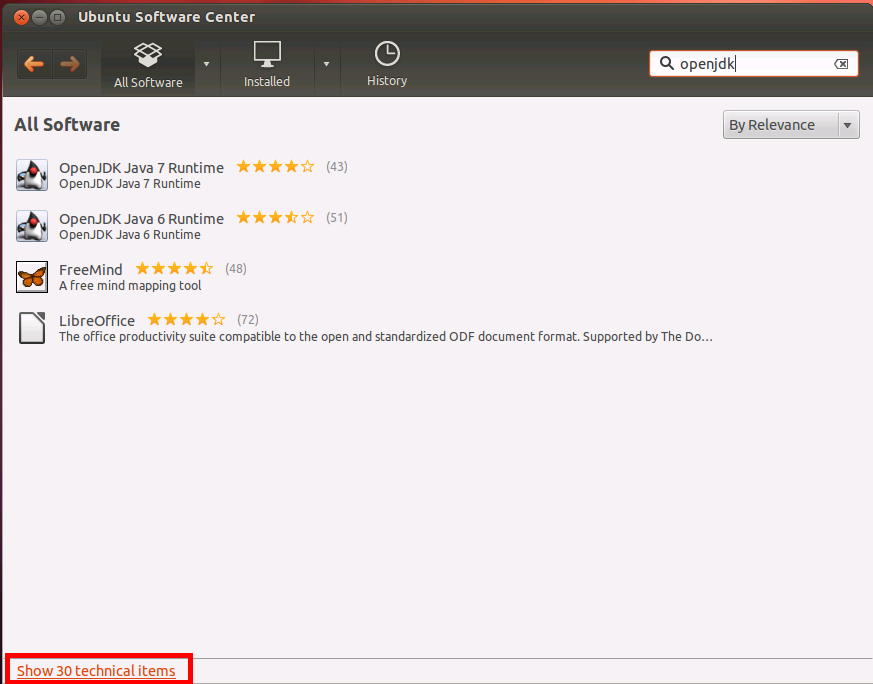
First, launch Ubuntu Software Center and search for openjdk.

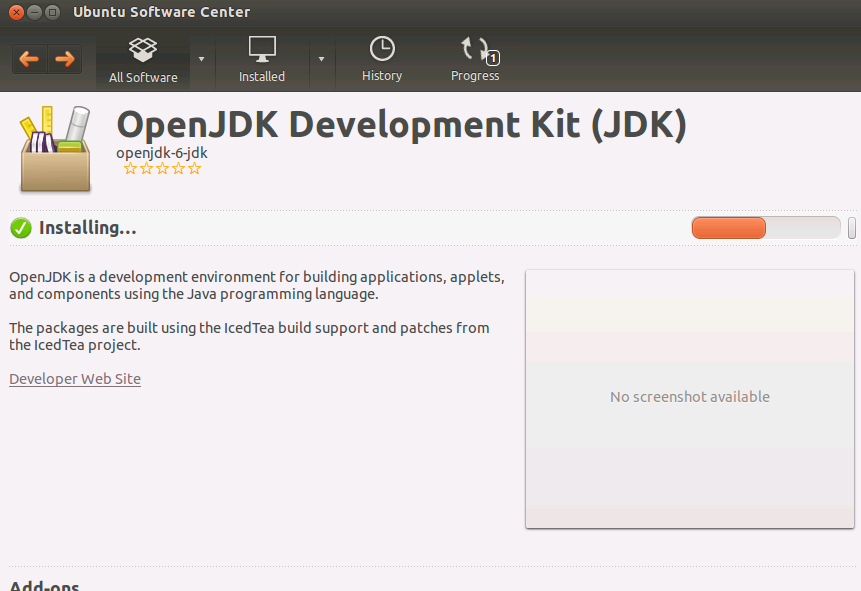
You may not immediately see the correct results. Click the “Show ## technical items” link at the bottom left-hand corner of the window. From here, you should be able to choose OpenJDK Development Kit (JDK). We used the openjdk-6-jdk version.

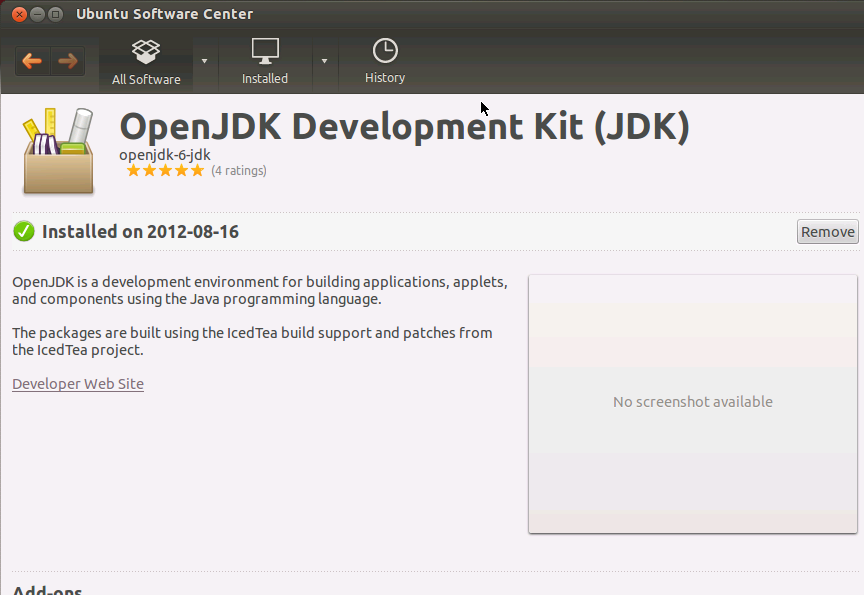
Click the Install button. You may be asked for the system root password. Enter it at this time.

Once the OpenJDK Development Kit is finished installing, you’ll be ready to move on to installing Eclipse.


Step 2: Installing Eclipse

Next, you need to install the Eclipse development environment in order to create Android projects. Although Eclipse isn’t the only development environment you can use to create Android apps, it has the best support from the Android team and is the easiest for those just getting started with Android development.

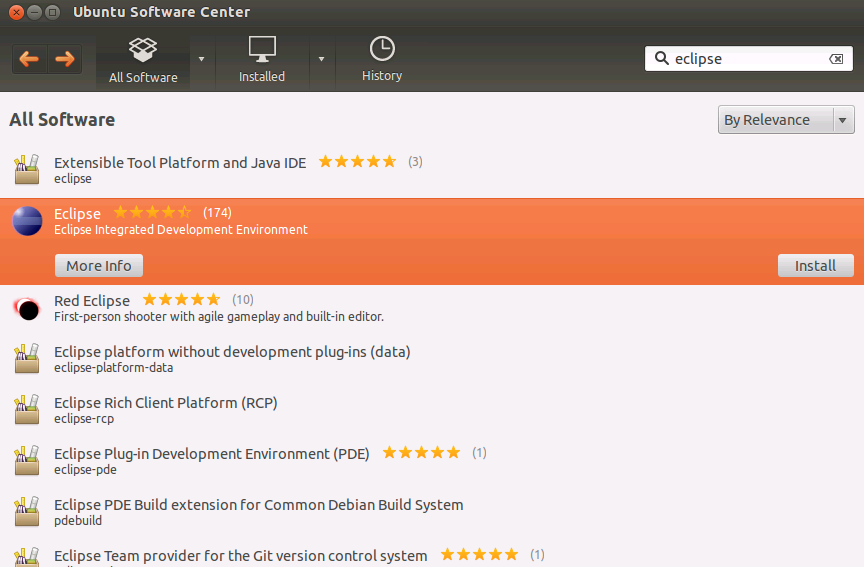
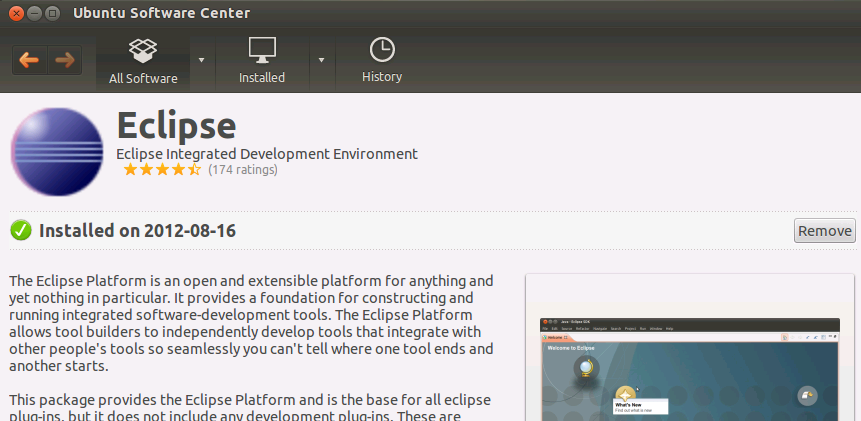
While still in the Ubuntu Software Center, search for Eclipse:

Find the Eclipse package with the standard Eclipse logo and the description “Eclipse Integrated Development Environment” (shown highlighted above). Now click the Install button and enter your system root credentials (if needed).

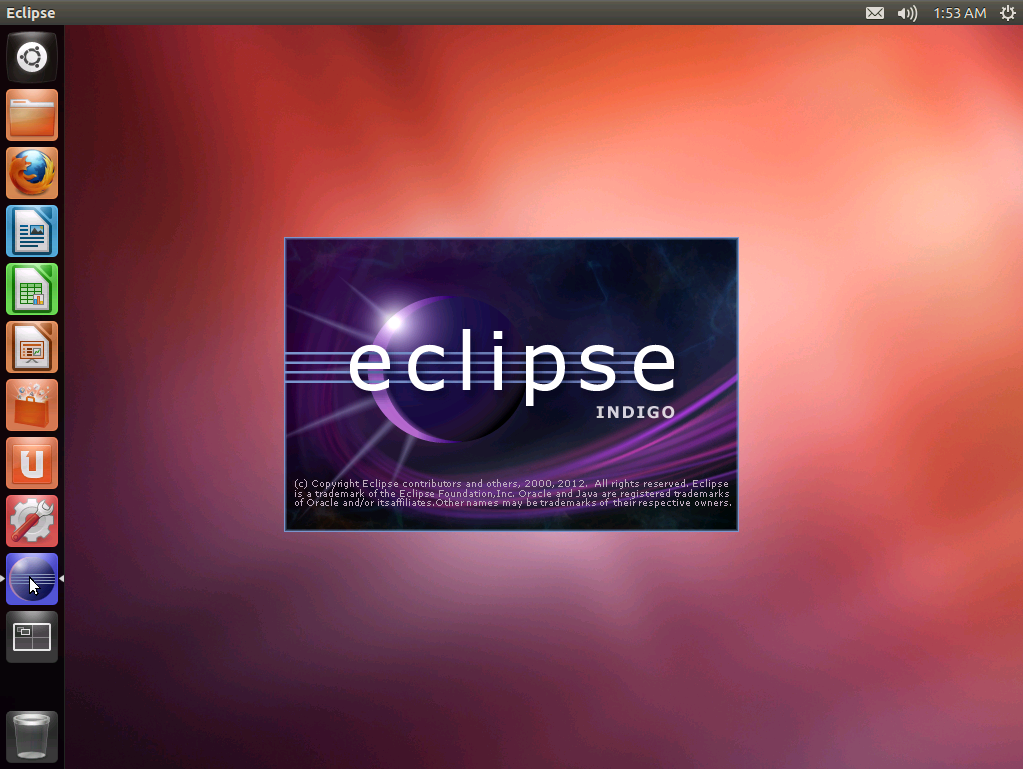
When Eclipse is finished installing, you should see an icon in your Ubuntu launcher (Unity) bar. Otherwise, open Dash and search for Eclipse. Regardless of how you launch it, launch Eclipse now.

When you see the Eclipse splash screen displayed on your screen, it’s a good sign:

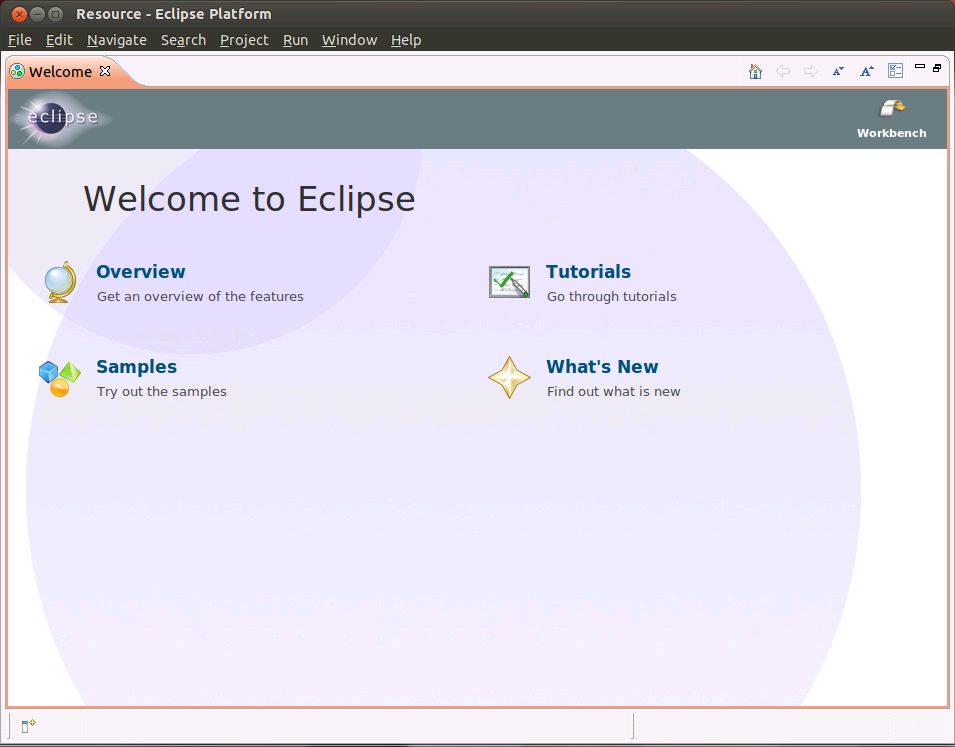
When you see the Welcome screen, you’re ready to move on.


Step 3: Installing ia32-libs

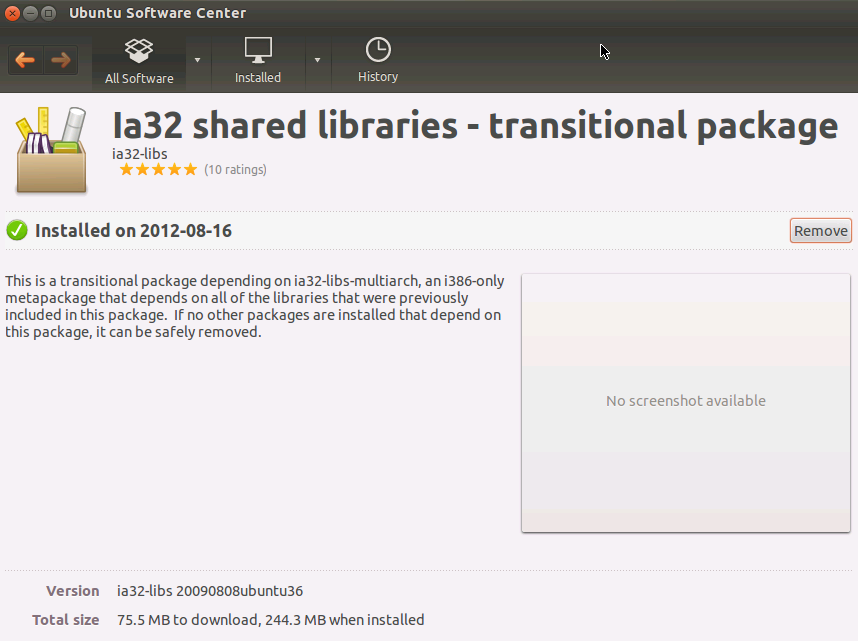
You will also need ia32-libs, a library for running some legacy 32-bit applications. If your system is a 32-bit system, you can ignore this step. If your system is 64-bit, you’ll need to install this to support several Android tools installed in the next tutorial.

As with the previous steps, use Ubuntu Software Center to search for “ia32-libs” and choose to Install it. As a library, it’s installed simply by the Ubuntu Software Center entry:


Conclusion

Your Ubuntu Linux development machine is now ready for installation of the Android SDK. In the next tutorial, you’ll learn how to install and configure the Android SDK for Android app development. In the meantime, you might considering familiarizing yourself with Eclipse.

You’re on your way to Android development. What kinds of apps are you looking forward to creating? Let us know in the comments!

About the Authors

Mobile developers Lauren Darcey and Shane Conder have coauthored several books on Android development: an in-depth programming book entitled Android Wireless Application Development (now in it’s third edition as a two-volume set), Sams Teach Yourself Android Application Development in 24 Hours, and Learning Android Application Programming for the Kindle Fire: A Hands-On Guide to Building Your First Android Application. When not writing, they spend their time developing mobile software at their company and providing consulting services. They can be reached at via email to androidwirelessdev+mt@gmail.com, via their blog at androidbook.blogspot.com, and on Twitter @androidwireless.

Need More Help Writing Android Apps? Check out our Latest Books and Resources!

Buy Android Wireless Application Development, 3rd Edition, Volume 1  Buy Sam's Teach Yourself Android Application Development in 24 Hours, 2nd Edition  Mamlambo code at Code Canyon


Android SDK Installation

$
0
0

If you’ve followed along from the previous tutorial in this session, then your development machine should now be ready for Android SDK installation. This tutorial will guide you through installation and configuration of the Android SDK for all platforms.

Step 0: Getting Started

This tutorial is part of the Mobiletuts+ session “Learn Android SDK Development From Scratch!” The target audience for this tutorial is the Java developer just about to get started learning Android who has already installed the JDK and familiarized themselves a little with Eclipse. In the next 30 – 45 minutes, you will learn how to install the Android SDK, regardless of what operating system you are using. We’ll then break out into some operating system-specific tasks to further configure the Android SDK. These steps will prepare you for the upcoming tutorials where you will start writing code and creating your own Android apps.


Step 1: Installing the Eclipse ADT Plugin

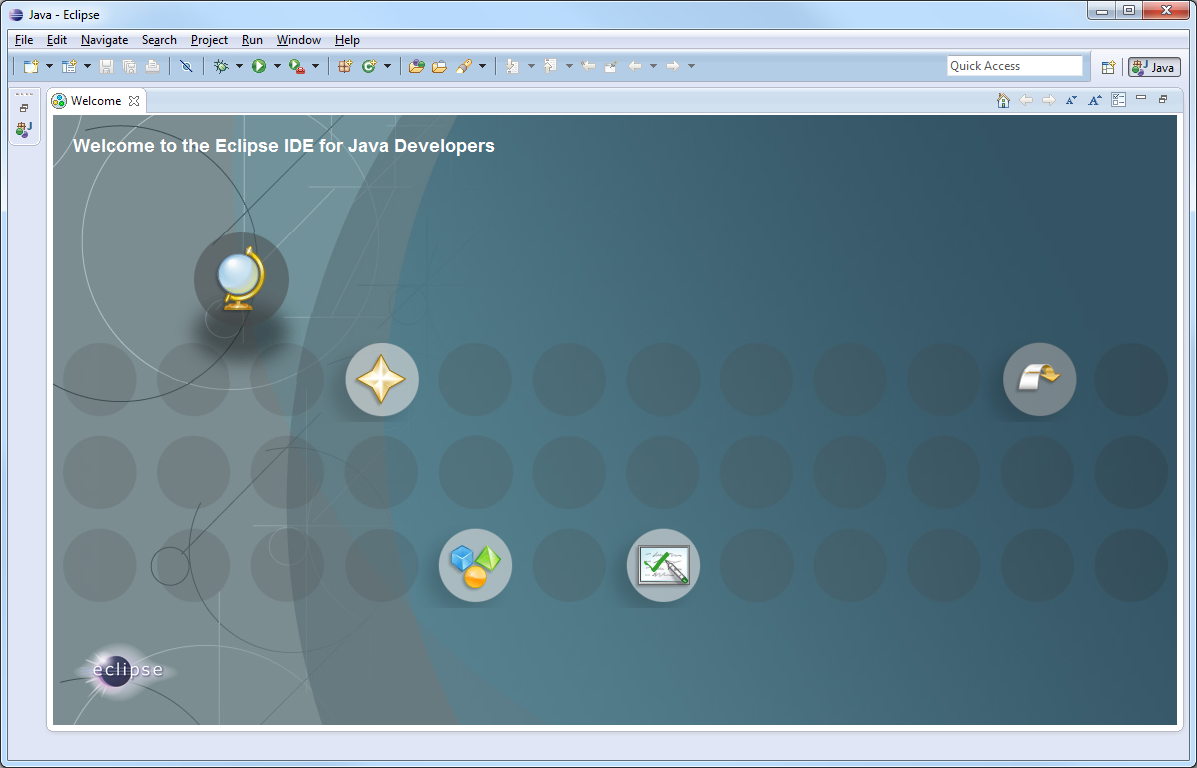
Start right where we left off with the last tutorial -within Eclipse on the Welcome screen:

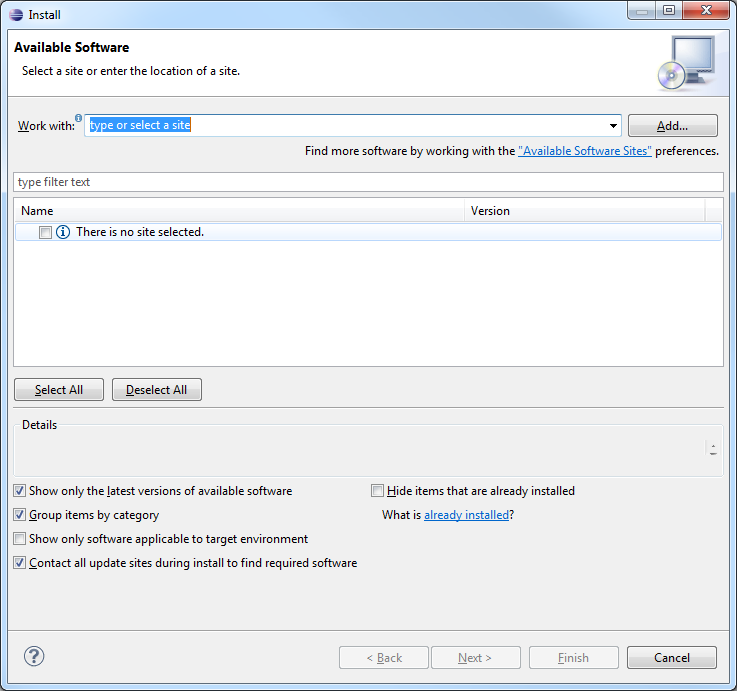
Now go to Help > Install New Software…. You will see the following dialog:

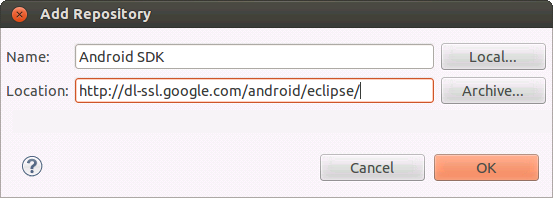
Click on the “Add…” button to add a Repository, then enter “Android SDK” for the Name field and set the URL to “http://dl-ssl.google.com/android/eclipse/” for the Location field.

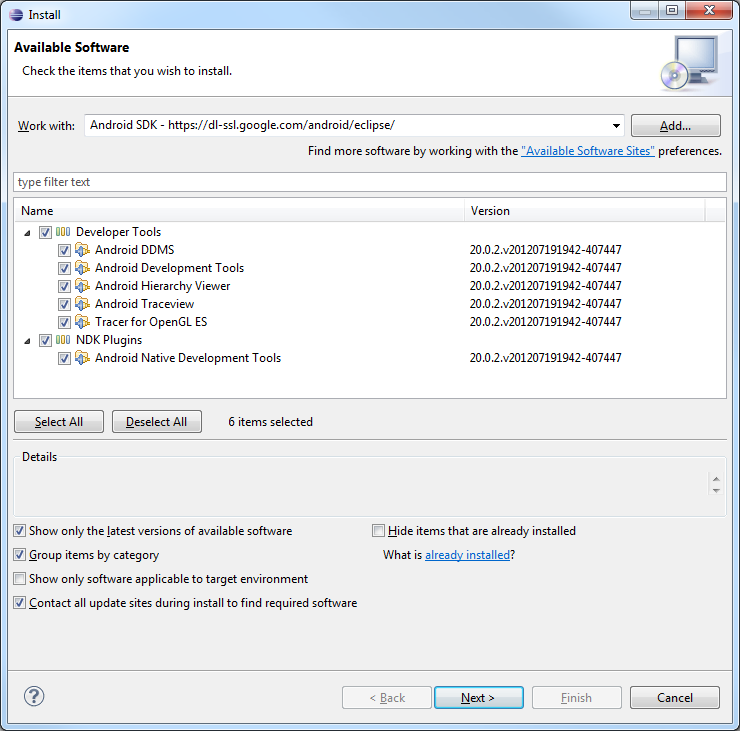
Next, press the OK button. After a moment, you’ll see a list of packages that can be installed from the Android repository. We’ve selected them all for installation and recommend you do so as well.

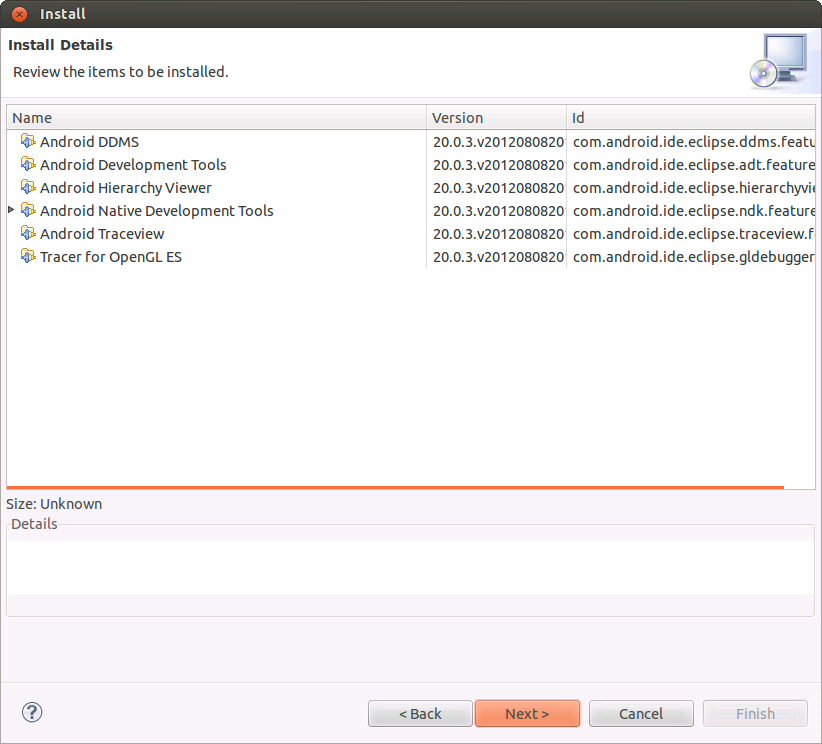
Press the Next button. You’ll be presented with a screen confirming the tools you want to install.

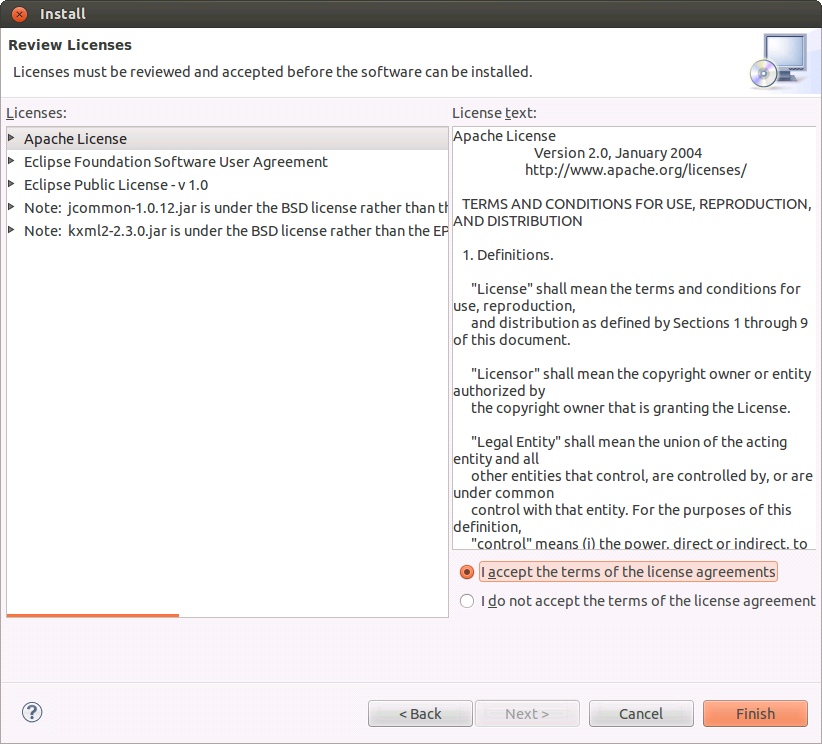
Did you select everything? If so, press the Next button to continue. The next screen provides you with a set of licenses you must agree to before you can download the tools.

Once you have read them and you agree (or the company you’re working for agrees) to the terms, choose the “I accept the terms of the license agreements” and then press the Finish button.

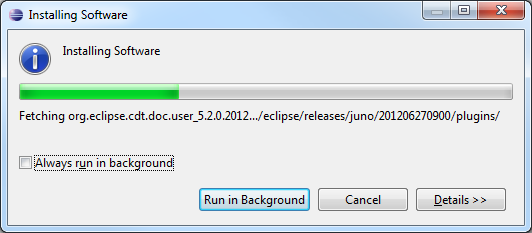
At this point, the downloading of the Android tools will begin. It may take some time to complete, depending on your connection speed.

When the downloads have completed, installation will begin automatically. You’ll likely be greeted with a security warning from Eclipse. The ADT plugin, or portions of it, are not signed by the developers, but you do know where they are coming from as you entered the location yourself. Assuming you still want to proceed with installing the ADT plugin (of course you do!), press the OK button to continue installing the unsigned content.

Once installation completes, you’ll be prompted to apply the changes directly to Eclipse or to restart the program.

We highly recommend that you restart Eclipse. Don’t worry, it’s fast.


Step 2: Installing the Android SDK

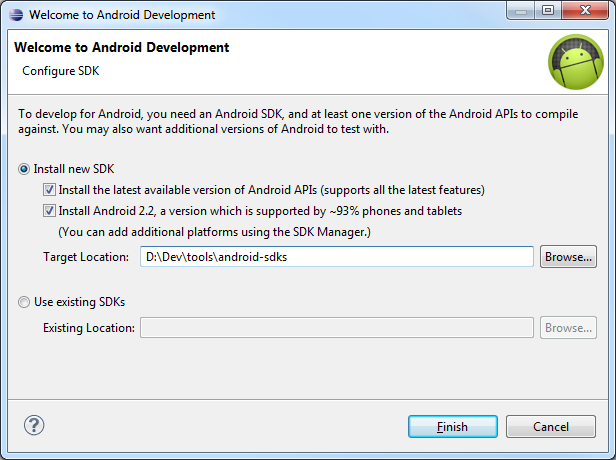
When Eclipse loads up again, you’ll be presented with the following dialog welcoming you to Android Development and prompting you to install the Android SDK:

If you’ve installed the Android SDK manually in the past, this step may be a surprise. However, the Android team has greatly simplified the SDK installation through the ADT tool within Eclipse. We recommend you select to install both the latest SDK and the 2.2 SDK. You can choose where you want to install the SDKs, although the default location usually works fine.

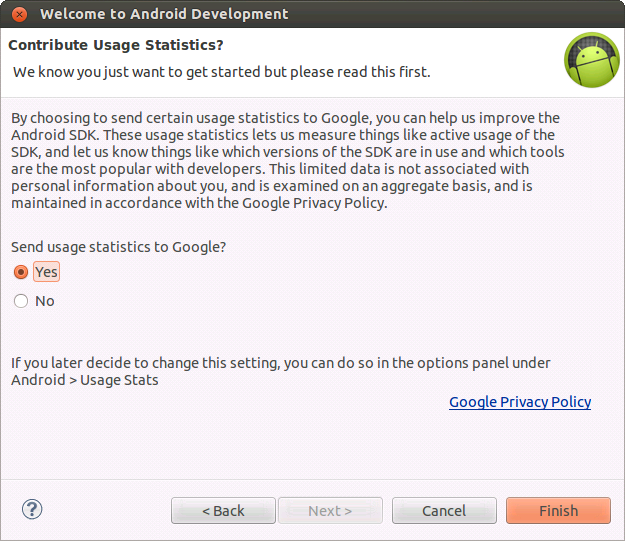
Press the Finish button. You may now be presented with a dialog offering you the opportunity to help improve the ADT by providing usage statistics.

We recommend you send stats, especially since these are freely available tools and are updated frequently. They can always use improvement! Either way you choose, you’ll be asked to confirm the download of the packages.

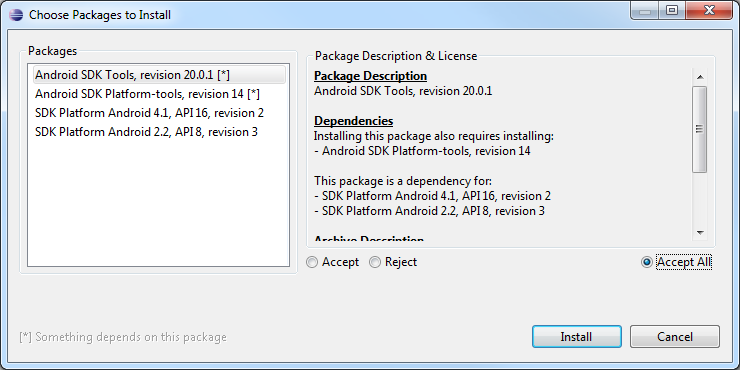
Select the Accept All radio button and then press the Install button. Downloading and installation will now proceed.

When downloading is complete, you may need (or want) to restart Eclipse again. You now have the Android SDK installed!


Step 3: Update Your Path

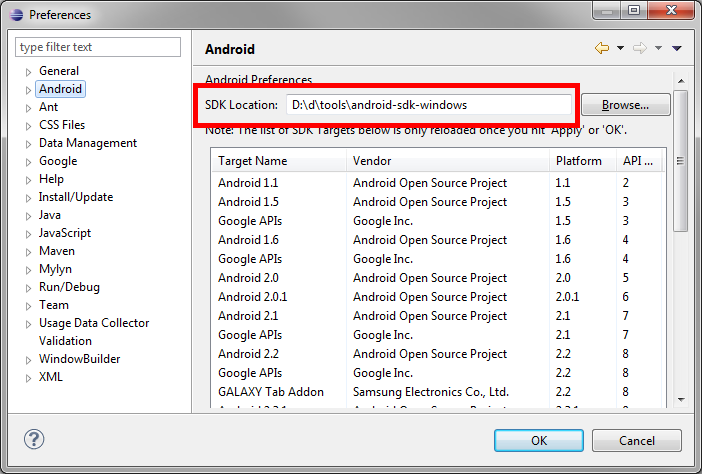
The Android SDK includes many command-line tools. It’s easiest to run them if you have the directories with these tools in them within your environment’s Path. On Linux and Mac, this usually involves editing your .profile or .bashrc file. On Windows, you edit the PATH environment variable. You’ll want to add the paths to both the tools and the platform-tools directories, wherever they happen to reside on your system. Both are at the top level of the SDK directory. Did you forget where that is already? In Eclipse, go to Preferences > Android. The SDK Location will be filled in with the path.


Conclusion

Your development machine is now ready to begin Android app development! We’ll continue with some tips and tricks to keep your system updated, talk about some of the tools you’ve installed, and then continue with what you’re waiting for: writing Android apps! Now is also a good time to wrangle up some Android devices so you can test your development efforts on actual hardware. Don’t worry, if you keep following along, you’ll be needing them soon enough!

You’re on your way to Android development. What kinds of apps are you looking forward to creating? Let us know in the comments!

About the Authors

Mobile developers Lauren Darcey and Shane Conder have coauthored several books on Android development: an in-depth programming book entitled Android Wireless Application Development (now in it’s third edition as a two-volume set), Sams Teach Yourself Android Application Development in 24 Hours, and Learning Android Application Programming for the Kindle Fire: A Hands-On Guide to Building Your First Android Application. When not writing, they spend their time developing mobile software at their company and providing consulting services. They can be reached at via email to androidwirelessdev+mt@gmail.com, via their blog at androidbook.blogspot.com, and on Twitter @androidwireless.

Need More Help Writing Android Apps? Check out our Latest Books and Resources!

Buy Android Wireless Application Development, 3rd Edition, Volume 1  Buy Sam's Teach Yourself Android Application Development in 24 Hours, 2nd Edition  Mamlambo code at Code Canyon


Keeping the Android SDK & Eclipse Updated

$
0
0

You’ve prepared your development machine and installed the Android SDK. Great! But are you sure all of your tools are updated? Learn how to keep the Android SDK and your app development tools up-to-date with this tutorial.


Step 0: Getting Started

This tutorial is part of the Mobiletuts+ “Learn Android SDK Development From Scratch!” session. This installment covers Eclipse, Android ADT, and Android SDK updates and will perform some operations from the command-line. These tips and tricks apply to all supported development environments -Windows, Mac, and Linux.


Tip 1: Updating Eclipse

Eclipse has a built-in software update system to update both itself and any installed plugins, such as the Android tools (ADT). To initiate an update from within Eclipse, complete the following steps:

Step 1

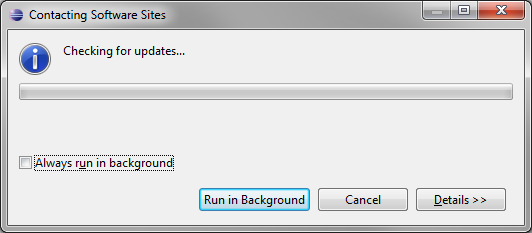
Launch Eclipse. Go to Help, Check for updates…

Step 2

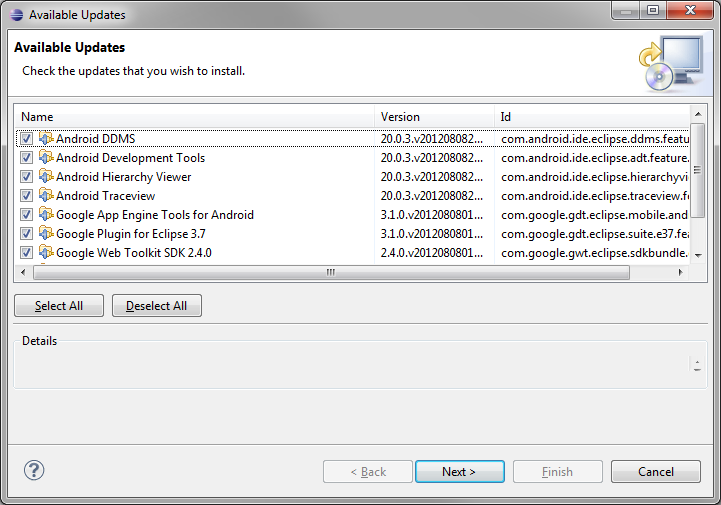
When the check is completed, you’ll be presented with a screen of Available Updates, if any. Updates are not automatically installed, you must select the software updates you wish to install. This screenshot shows an Eclipse environment where the Android tools have updates available.

Step 3

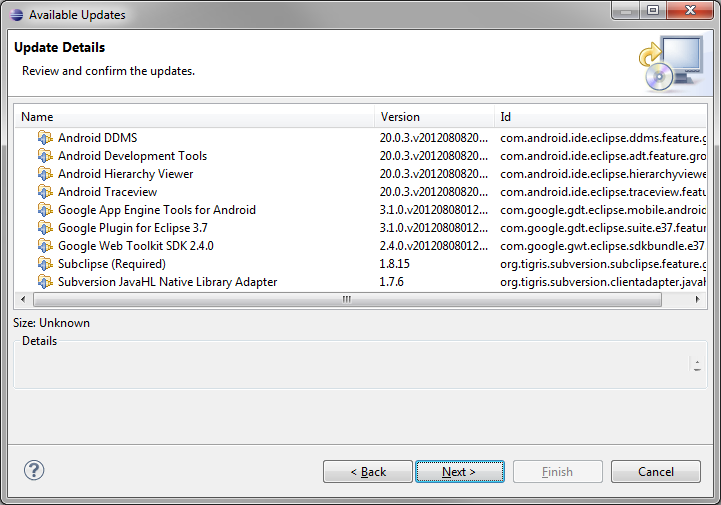
Select any updates you wish to install. Generally, you’ll want all of the checkboxes selected. Press the Next button. Review your choices. Press Next again.

On some platforms, you may see a message stating you don’t have sufficient privileges to update some components. On these platforms, you’ll need to relaunch Eclipse with administrator or root privileges.

Step 4

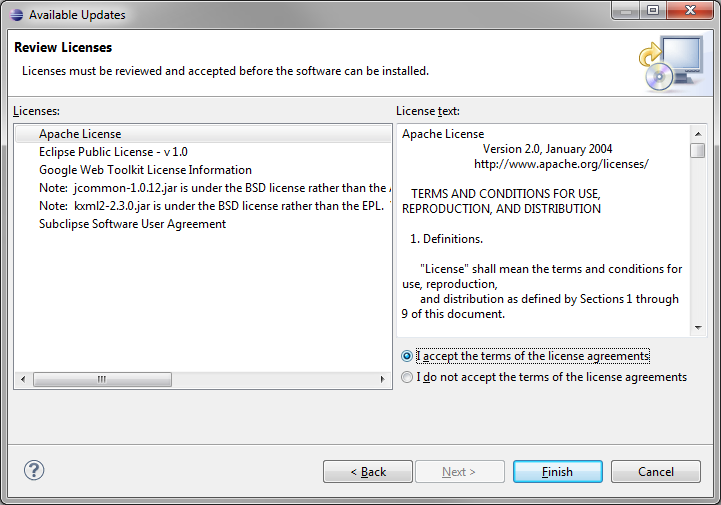
Next, review and accept the license agreements associated with the software updates.

Step 5

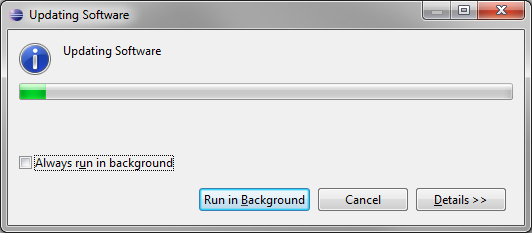
Finally, press Finish to complete the update wizard.

As with installing new software, Eclipse may ask you to restart. You should do so to make sure the installation is complete.

Tip 2: Check for New Tools in Existing Repositories

Sometimes new tools are added to the Android Eclipse repository. This has happened several times with the ADT. New items are not automatically downloaded during the Eclipse update process, either. Instead, you will need to check for new tools in the repository. To do this, follow these steps:

Step 1

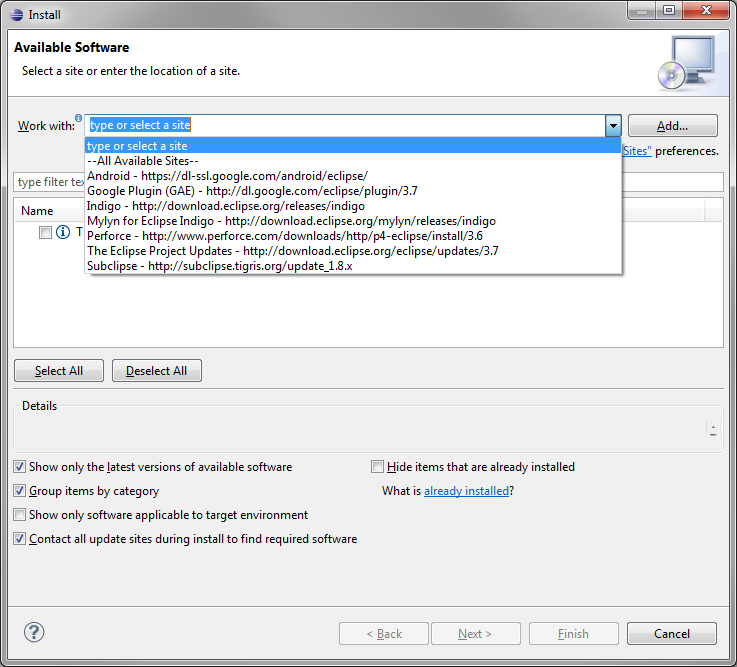
Go to Help, Install New Software… Then click on the drop down for the “Work with” field.

Step 2

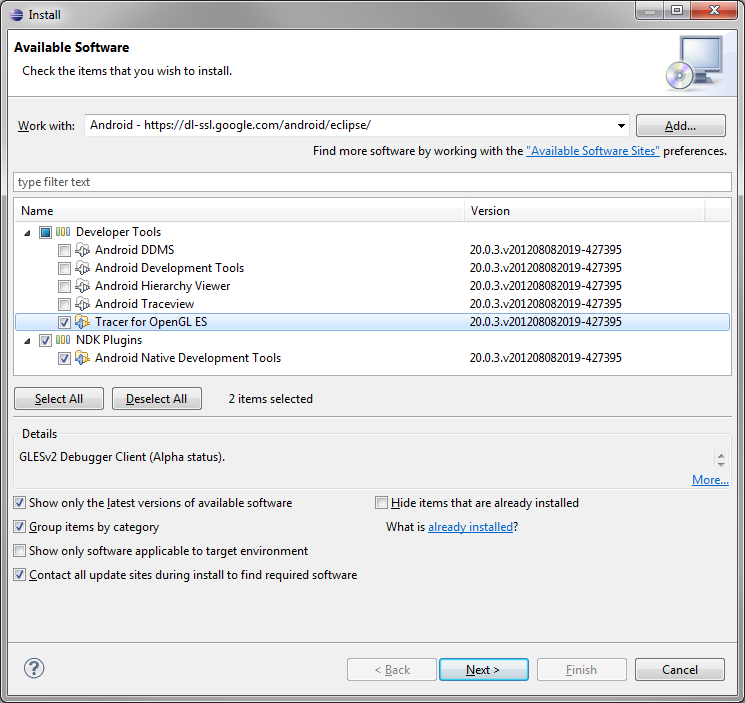
Choose the Android repository you previously created. Wait a moment and you’ll see all available packages from this site.

Step 3

Select any newly available packages you might want to add to your development environment.

Here in the demo environment you can see the NDK Plugins and the Tracer for OpenGL ES are newly available for download. We’ll install those now.

Step 4

Press the Next button and complete the installation as you normally would.


Tip 3: Update Android SDK Components

In addition to components available through Eclipse, the ADT can also update components and download new ones using the Android SDK Manager.

Step 1

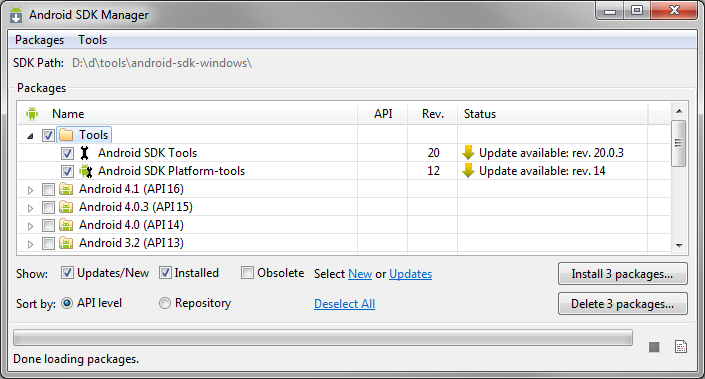
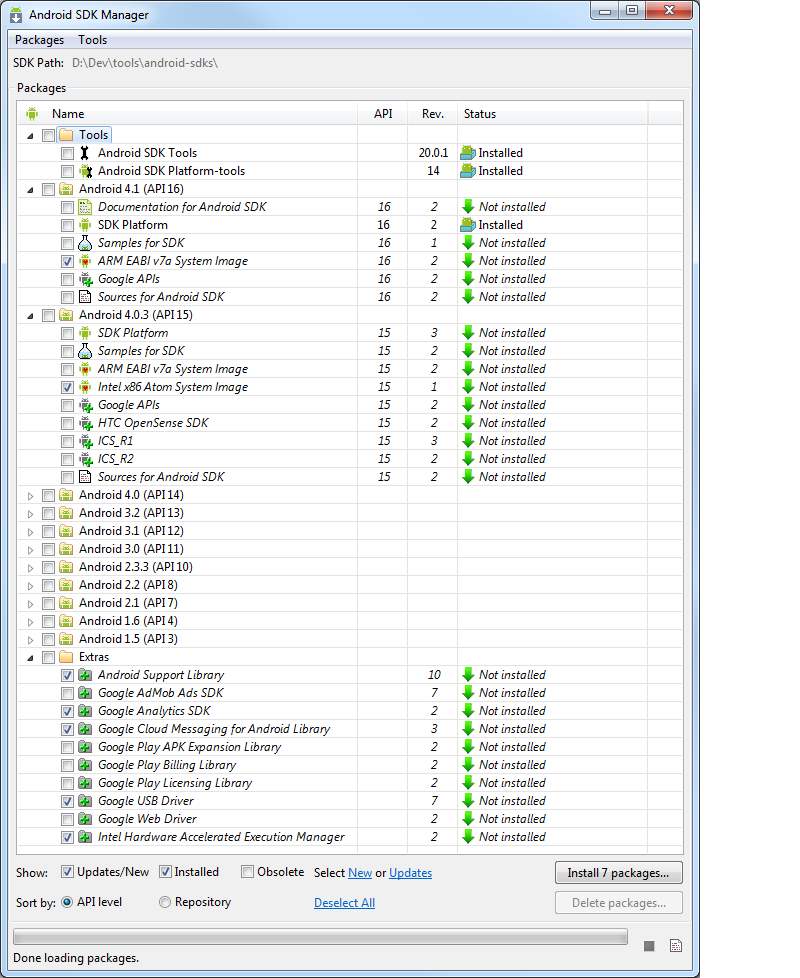
Launch the Android SDK Manager from within Eclipse by selecting Window > Android SDK Manager. An easier way to do this is simply clicking the little icon with the bugdroid head and the down arrow (shown in the upper left corner of the screenshot below). Wait for it to fully load and refresh. “Done loading packages” should display at the bottom when ready.

Step 2

Select all of the updates you’d like to install. Then press the Install # packages… button. As with the original Android SDK install, you’ll need to confirm the packages and then downloading and installation will commence. This part usually asks if you want to restart adb. You usually will want to since this ensures a good installation.

You will then get a reminder about updating Eclipse. But you’ve already done this, right? If you haven’t, you may need to go back into the Android SDK Manager to check for newer items; some items are only available once you’ve updated ADT itself.


Tip 4: Handling Android SDK Update Failures

On operating systems where in-use files and directories can be locked, the Android SDK Manager will sometimes fail to update existing SDK files. If this happens to you, the solution is fairly simple -you need to perform the update outside of Eclipse.

Step 1

Exit Eclipse. Wait for it to fully close. Make sure no other instances of Eclipse are running.

Step 2

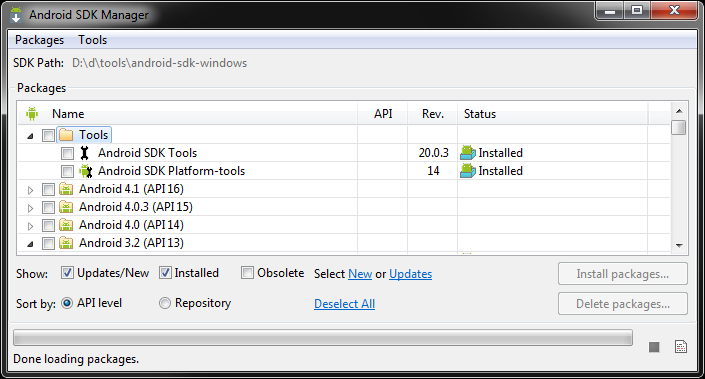
From the command line, run the “android” tool with no parameters. (You have the Android SDK binaries in your path, right?) When the android tool loads up, it should look very familiar:

It’s the stand-alone version of the Android SDK Manager. With Eclipse now shut down, you should be able to complete your package update or installation.


Conclusion

We hope these tips have helped you out.

Do you have your own tips for keeping your development environment up-to-date? Let us know in the comments and perhaps they’ll be added to the next update of this tip list!

You’re on your way to Android development. What kinds of apps are you looking forward to creating? Let us know in the comments!

About the Authors

Mobile developers Lauren Darcey and Shane Conder have coauthored several books on Android development: an in-depth programming book entitled Android Wireless Application Development (now in it’s third edition as a two-volume set), Sams Teach Yourself Android Application Development in 24 Hours, and Learning Android Application Programming for the Kindle Fire: A Hands-On Guide to Building Your First Android Application. When not writing, they spend their time developing mobile software at their company and providing consulting services. They can be reached at via email to androidwirelessdev+mt@gmail.com, via their blog at androidbook.blogspot.com, and on Twitter @androidwireless.

Need More Help Writing Android Apps? Check out our Latest Books and Resources!

Buy Android Wireless Application Development, 3rd Edition, Volume 1  Buy Sam's Teach Yourself Android Application Development in 24 Hours, 2nd Edition  Mamlambo code at Code Canyon


Using SVG & Illustrator to Create Curvy Text

$
0
0

Adding a straight line of text in an iBook is pretty straightforward, but what if you want to add some flair to your book with text that follows a curved line? That’s when a little SVG and Adobe Illustrator knowledge goes a long way. By letting Illustrator generate the SVG code, you’ll save the time of calculating the curve and text placement on your own.


Step 1: Create the Curve in Illustrator

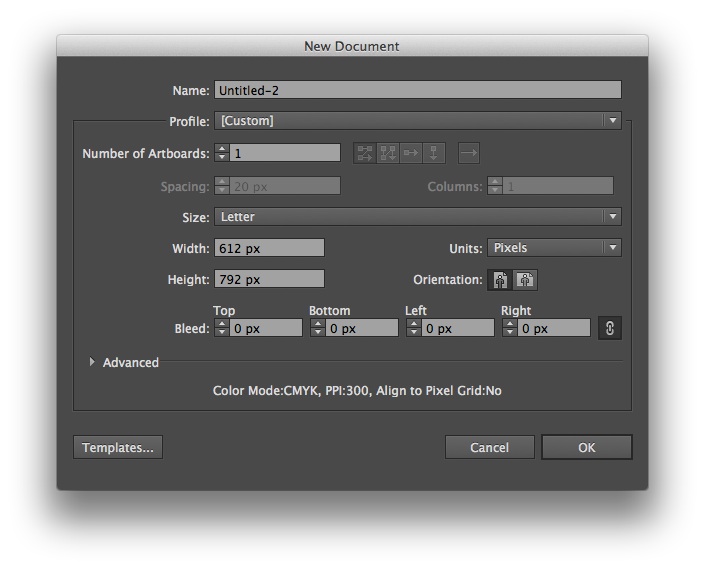
Start by launching Adobe Illustrator. Click File > New to create a new file. Make sure the width and height of your Illustrator file is the same width and height as your viewport in your XHTML file. In this example we’ll use the dimensions 612px by 792px:

Screenshot: setting up the Illustrator file.

Click on the Pen Tool in the Tools Palette. Click on the art board window to make an anchor point and click another location across the screen to make a second anchor point.

screenshot: creating a line

Click and hold the Pen Tool to reveal the additional tools, and select Convert Anchor Point. Click and drag one of the anchor points to make a curve.

screenshot: creating the curve

Click the Type Tool and hover over the beginning of the curvy line until the cursor shows a wavy line.

screenshot: typing on the curved line

Click the art board and the cursor will be positioned on the curvy line. Type “Check out my awesome curvy line!!” (or something equally cool).

screenshot: curved path with text on it

Step 2: Setting the Options

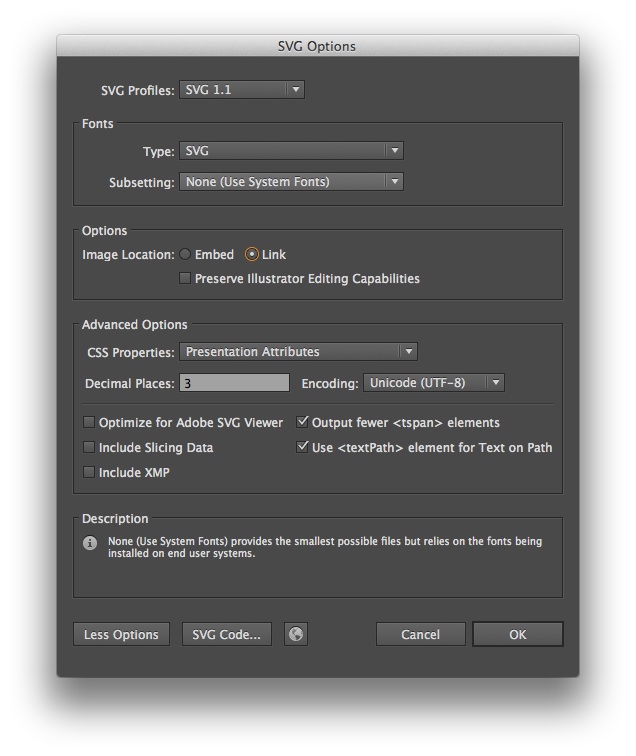
Increase the size of the text if needed, then click File > Save As. Choose “SVG” from the Format drop down and choose a name and location for your file before clicking “Save”. Some of the SVG Options settings don’t apply to our situation; let’s go over the settings we need to specify. Set “SVG Profiles” to “SVG 1.1”. In the “Fonts” box set “Type” to “SVG” and “Subsetting” to “None (Use System Fonts)”. Click the “More Options” button in the bottom left corner. In the “Advanced Options” box set “CSS Properties” to “Presentation Attributes”. Make sure to only check the boxes next to “Output fewer elements” and “Use element for Text on Path”.

screenshot: setting up svg options

Click “OK” and close Illustrator.


Step 3: Preparing the XHTML File

Launch your text editor and create a new XHTML file. Add the following code to the file:

<?xml version="1.0" encoding="utf-8"?>
<!DOCTYPE html PUBLIC "-//W3C//DTD XHTML 1.1//EN" "http://www.w3.org/TR/xhtml11/DTD/xhtml11.dtd">
<html xml:lang="en"
      xmlns="http://www.w3.org/1999/xhtml"
      xmlns:epub="http://www.idpf.org/2007/ops"
      xmlns:svg="http://www.w3.org/2000/svg"
      xmlns:xlink="http://www.w3.org/1999/xlink">
    
    <head>
        <title>SVG iBooks Example</title>
        <meta name="viewport" content="width=612, height=792" />
    </head>
    <body>

    </body>
</html>

Aside from the typical EPUB and XHTML namespaces, you’ll notice two new namespaces, one for “svg” and the other for “xlink”. Both of these namespaces are required for SVG. The viewport here matches the size of our original Illustrator file. If you selected different dimensions for your Illustrator file, you’ll want to change your viewport code to match the Illustrator dimensions.


Step 4: Adding the SVG Code

Add the following SVG code inside the body tag.

<svg:svg version="1.1"
                id="curvyText"
                xml:space="preserve">
            
            <svg:path id="path01" style="fill:none;" d=" " />
                <svg:text>
                    <svg:textPath  xlink:href="#path01" startOffset=" ">
                        <svg:tspan  font-family="' '" font-size=" ">    </svg:tspan>
                    </svg:textPath>
                </svg:text>
        </svg:svg>

Using the “svg:” namespace, we define a few different things, such as the version of SVG we are using and how to handle white space. The “id” can be anything you like.

Path Data

We’re going to copy five pieces of information from the Illustrator SVG file and place them in the same location inside the XHTML file. Open the Illustrator SVG file in your text editor. Copy the alphanumeric path data located inside the quotes next to the d=.

screenshot: highlight path data code

Paste the path data inside the quotes next to the d= in your XHTML file. The SVG path data holds the key to the curve, providing instructions for where to move to, how to create the curve, and where to end the line.

startOffset

Back in the SVG file, copy the percentage next to startOffset= and paste it inside the startOffset= quotes in your XHTML file.

screenshot: highlighting startOffset code

The startOffset determines how far from the beginning of the line the text should begin.

font-family

Navigate back to the SVG file and copy the name of the font inside the quotes next to font-family=. Click on the XHTML file and paste the font inside the quotes next to font-family=.

screenshot: highlighting font-family code

font-size

Click on the SVG file again and copy the number inside the quotes next to font-size=. Click on the XHTML file and paste the size inside the quotes next to font-size=.

screenshot: highlighting font-size code

Text

Once more, navigate back to the SVG file. Copy the line of text that appears on the curve and paste it between the opening and closing svg:tspan tags.

screenshot: highlighting curved text code

Step 5: Testing

Let’s take a quick look in Safari to see how it looks. Open the XHTML file in Safari to see the curvy line.

screenshot: final product

Conclusion

Adding curvy text to your iBook can bring your text to life, adding emotion and a sense of realism to your project.


Best of Tuts+ in August 2012

$
0
0

Each month, we bring together a selection of the best tutorials and articles from across the whole Tuts+ network. Whether you’d like to read the top posts from your favourite site, or would like to start learning something completely new, this is the best place to start!


Psdtuts+ — Photoshop Tutorials


Nettuts+ — Web Development Tutorials


Vectortuts+ — Illustrator Tutorials


Webdesigntuts+ — Web Design Tutorials

  • Emulating Microsoft’s Metro Design Language

    Emulating Microsoft’s Metro Design Language

    Over the past few years, Microsoft has adopted its incumbent design language to a significant extent. Metro is the aesthetic basis of Windows 8; Microsoft’s next operating system shipping this October. Let’s take a look at what Metro is, how we can emulate some of its desirable principles and take a look at where it’s being used already.

    Visit Article

  • Quick and Easy Documentation Using Markdown

    Quick and Easy Documentation Using Markdown

    So youve created an awesome theme, template or web application. Now for the tedious part; the documentation. Writing the content won’t necessarily be that problematic, it’s more likely creating the help files which will take up precious time. Markdown, a lightweight and *really* simple formatting syntax can solve all that for you.

    Visit Article

  • Skeleton to WordPress: Getting up and Running

    Skeleton to WordPress: Getting up and Running

    During previous parts of this series we’ve covered a lot. We took a Photoshop layout, built it into an adaptive web page using the Skeleton framework, explored aspects of CSS3, implemented various jQuery plugins and considered our options


    Phototuts+ — Photography Tutorials

    • Phototuts+ & Lomography Present the Portraits of Summer Competition

      Phototuts+ & Lomography Present the Portraits of Summer Competition

      Lomography and Phototuts+ have joined forces to bring you a photo competition that will bring out your true photography skills. We would like to present the Portraits of Summer competition! Just follow one of the two tutorials and submit your photos. Check out more information after the jump!

      Visit Article

    • An Introduction to Holga Photography

      An Introduction to Holga Photography

      The Holga is a camera, first manufactured in China in 1981, made almost entirely of plastic, some even have plastic lenses. It was an invention intended for the Chinese consumer as a low-budget, everyday kind of camera for capturing family photos and portraits, but has since gathered a cult following.

      Visit Article

    • Making Your Vacation Portraits Pop!

      Making Your Vacation Portraits Pop!

      Its holiday season, and what better time to take your camera out and about to capture not only those scenic holiday destinations, but the people that youre sharing them with. Here are a few top tips on how to take eye catching and engaging vacation portraits.

      Visit Article

    • The Principles and Strategies of Brand Photography

      The Principles and Strategies of Brand Photography

      For many photographers, it can be difficult to earn a living from taking the photos that inspire and excite them and therefore have to find other means to support themselves. However, sometimes the answer is closer to home than you think. Working as a commercial product photographer can not only provide financially, but also has it’s own specific creative challenges and difficulties to face.

      Visit Article


    Cgtuts+ — Computer Graphics Tutorials

    • Correctly Setting Up a Linear Workflow in Maya

      Correctly Setting Up a Linear Workflow in Maya

      So you might often find yourself wondering “what the hell is a linear workflow?” It’s the kind of thing that gives cg artists nightmares, waking in a cold sweat, afraid, left stumbling to your computer looking for answers…well you’re not alone. Working linearly is one of the most misunderstood, confusing aspects of computer graphics for all artists, new or experienced. But fear not friends, James Whiffin is here to help turn that frown upside down by giving you a crash course on working linearly.

      Visit Article

    • Creating The iPhone 4S In 3D Studio Max, Part 1

      Creating The iPhone 4S In 3D Studio Max, Part 1

      In this new multi-part project, we’ll be creating the iPhone 4S in 3d Studio Max using tried and true poly modeling techniques. You’ll learn how to setup and model from six view blueprints, create precision cuts and holes, terminate edge loops and how to add proper supporting geometry to retain surface shape when adding subdivision.

      Visit Article


    Aetuts+ — After Effects Tutorials

    • Summer 2012 DSLR Camera Line-up

      Summer 2012 DSLR Camera Line-up

      This article features a list of cameras released since the publishing of Knowing The Basics Of The Video Mode On Your DSLR Camera, and is designed to be an appendage to that article, along with an updated sensor chart for reference. *see below
      Note: Cameras are first listed by maker and then by price. All ISO specifications are the expanded limits of the cameras.

      Visit Article

    • Iron Man Interface Battle Widget – Parts 1 and 2

      Iron Man Interface Battle Widget – Parts 1 and 2

      In this tutorial series we are going to go beyond basics using the true power of shape layers inside After Effects. As you can see we are going to dive into the magic of creating this Iron Man battle widget inspired from The Avengers movie. We are going to recreate the element from start to finish using various different techniques and learning some pretty cool workflow tips as well.

      Visit Article

    • Linear Workflow For The After Effects User

      Linear Workflow For The After Effects User

      In this tutorial we’ll look at some of the problems caused when working in sRGB color space and how we can fix these problems using a linear workflow. Let’s jump in!

      Visit Article


    Audiotuts+ — Audio & Production Tutorials

    • Dynamic Reverb Returns

      Dynamic Reverb Returns

      In this tutorial Mo Volans teaches you a great technique for taming your reverb: Dynamic Reverb Returns. Here we demonstrate with Logic Pro, but the technique works in most other DAWs.

      Visit Article

    • How the Hell do I Use Reverb Again?!?

      How the Hell do I Use Reverb Again?!?

      Welcome to the unannounced bastard child of my old and golden tutorial, How the Hell do I Use Reverb Anyway?!? If you need a primer on the basics of reverb, I highly recommend you read that one before you jump into this one. It goes over everything you need to know about reverb: all the knobs and buttons you need to familiarize yourself with.

      Instead of continuing on with the theory that you can read in the previous tutorial, I’m going to jump into some easy to use reverb tricks that can really help you in your mixes. We’ll be looking at some simple, but invaluable tips to using reverb effectively without cluttering up your instruments.

      Visit Article

    • EQ -

      EQ – The Most Important Part of Mastering

      I was mastering an EP recently and I really thought I’d done a decent job on the mix. I set up the tracks in order and found the correct levels for all of them, making sure they all sound equally loud and such. Then I got to work and set up my mastering processors, which are basically just EQ and compression. After a few EQ tweaks here and there, a little bit in the lows, a small boost in the highs, a subtle dip in the mids, you know the drill. Well, after a while I started A/B’ing the before and after.

      Visit Article


    Wptuts+ — WordPress Tutorials

    • Functionality: Plugins vs Themes

      Functionality: Plugins vs Themes

      There are a lot of factors that influence performance on your WordPress site, and one of the tricks that “experts” will often tell you to do is avoid plugins. They will tell you it is better to place functionality inside of your theme, instead of activating a plugin. Is this true?

      Visit Article

    • Conquering the wp-config.php File – 11 Good Practices

      Conquering the wp-config.php File – 11 Good Practices

      There are 981 files and 95 folders which come with the WordPress (v3.4.1) package. None of these files need manual modification, except the wp-config.php file. Of course, we don’t have to edit the file if we’re fine with the default WordPress configuration but it’s essential that we learn how to conquer the file in order to apply security precautions, speed tricks and other stuff which we will be studying in this article.

      Visit Article

    • How to Include and Require Files and Templates in WordPress

      How to Include and Require Files and Templates in WordPress

      When it comes to PHP, a lot of developers love the language, a lot of the developers hate the language, and a lot of developers generally just use it to get their work done.

      Visit Article


    Mobiletuts+ — Mobile Development Tutorials


    Mactuts+ — Mac & OS X Tutorials

    • 11 Things You Didn’t Know About Mountain Lion

      Things You Didn’t Know About Mountain Lion

      OS X Mountain Lion includes over 200 new features for your Mac, but some of the major ones arent mentioned on the official webpage. If you go looking around in nooks and crannies, you might just find some valuable minor features that youd never even thought of. Ive been using the operating system since its first developer preview was released and there are a few nifty features that lie tucked away and out of plain sight. Read on to see what they are!

      Visit Article

    • Navigating the Terminal: A Gentle Introduction

      Navigating the Terminal: A Gentle Introduction

      It may seem like the kind of geeky realm that only hackers are fit to inhabit, but the OS X Terminal is a powerful and versatile method of interacting with your computer that offers advantages to users of all skill levels. It’s quite a departure from what you might be used to though, so we’re here to help you take your first steps.

      Visit Article


    Gamedevtuts+ — Game Development

    • Make a Splash With Dynamic 2D Water Effects

      Make a Splash With Dynamic 2D Water Effects

      Sploosh! In this tutorial, I’ll show you how you can use simple math, physics, and particle effects to simulate great looking 2D water waves and droplets.

      Visit Article

    • Growing From (and Surviving) Mod Teams

      Growing From (and Surviving) Mod Teams

      Breaking into the game industry can be a long and rocky road — where does one even begin? There are many avenues to take on the journey to making games, and the best path is different for each person. For those looking to jump right in and start making games, I propose to you this: join a mod team! But what exactly is a mod team and how do you find one that’s right for you? Let’s figure that out…

      Visit Article

    • Collision Detection Using the Separating Axis Theorem

      Collision Detection Using the Separating Axis Theorem

      The Separating Axis Theorem is often used to check for collisions between two simple polygons, or between a polygon and a circle. As with all algorithms, it has its strengths and its weaknesses. In this tutorial, we’ll go over the math behind the theorem, and show how it can be used in game development with some sample code and demos.

      Visit Article


Build a Photo App with GPUImage

$
0
0

This tutorial will teach you how to apply Instagram-like filters and special effects to images with the incredibly powerful GPUImage project. Along the way, you’ll learn how to build a simple camera application capable of either taking new photos or accessing existing images from the photo album.


Project Demo

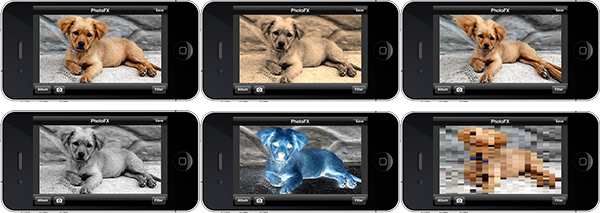
Final Effect

The above is a collage of image filters applied with the app this tutorial will teach you how to build. The source image is from ep.Sos.de on Flickr.


Step 1: Start a New Xcode Project

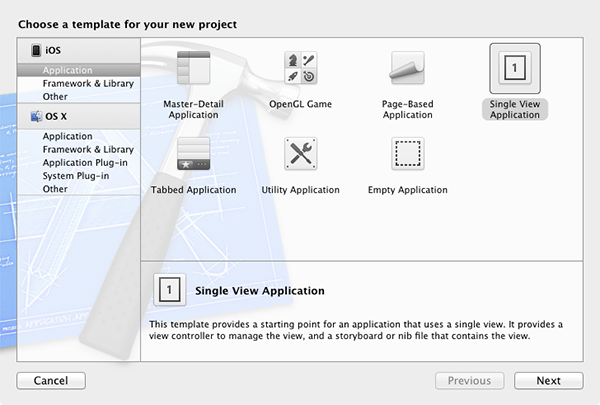
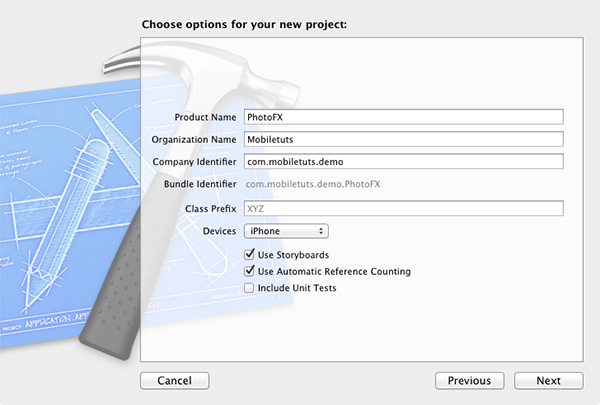
Launch Xcode and create a new application using the Single View template.

Figure 1: Choosing a Project Template

For this tutorial, we’ll use both Storyboards and Automatic Reference counting, so be sure to select both boxes. Name the project “PhotoFX” and supply a unique company identifier for device testing.

Figure 2: Project Setup Screen

Step 2: Create the Application Interface

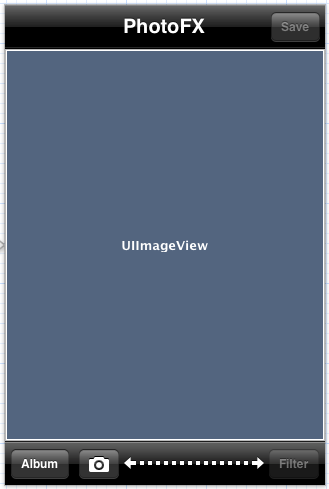
The application interface will consist of a UINavigationBar for the app title on the UIView and save button, a UIToolbar for the album, camera, and filter utility buttons, and a UIImageView set to aspect fill for viewing and modifying selected images.

Figure 3: App Interface Images

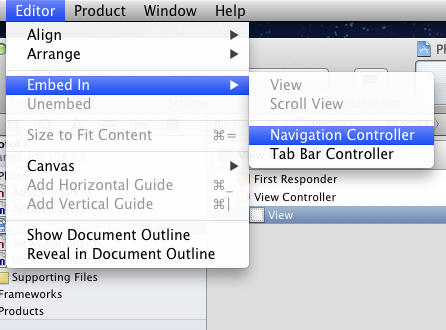
Open the MainStoryboard.storyboard file. Select the UIView on screen and then select Editor > Embed In > Navigation Controller.

Figure 4: App Interface Images

Select the UINavigationController and then go to the Attributes Inspector in the Utility pane. Set the “Top Bar” drop down to “Black Navigation Bar” and the “Status Bar” to “None”. To finalize the status bar removal, go to the PhotoFX-Info.plist file and add a new key with the text “Status bar is initially hidden”. Set the value to “YES”.

Because we’ve just transitioned our app into a UINavigationController template, you should now go to ViewController.h and add the following delegate declaration:

#import <UIKit/UIKit.h>

@interface ViewController : UIViewController <UINavigationControllerDelegate>

@end

We’ll need that later.

Now go back to the Storyboard file and double-click the title in the center of the UINavigationItem and replace the default text with “PhotoFX”.

Drag a UIBarButtonItem from the Object Library onto the UINavigationItem. With the new button item selected, go to the Attributes Inspector tab of the Utilities panel and set the button’s Identifier property to “Save”. Next, with the “Save” button still selected, uncheck the “Enabled” checkbox for this button. This will prevent the user from trying to save an image before either loading one from the photo album or taking a picture with the camera (we’ll enable it with code again later).

Figure 5: App Interface Images

Return to the object library and drag a UIToolbar onto the main UIView. Next add a total of three UIBarButtonItem objects on the toolbar. Change the title text for the first button to “Album”, set the Identifier property for the second to “Camera”, and set the third button’s title text to “Filter”. The “Filter” button should be disabled by default, just like the “Save” button from above.

To polish the toolbar layout, we need to right-align the filter button on the toolbar. You can achieve this effect by using a Flexible Space Bar Button Item, which you can simply drag onto the toolbar from the Object library.

Figure 6: App Interface Images

Notice how glaring the white UIView is in contrast to the black, shiny navigation bar and tool bar? Let’s do something about that. Select the UIView and set the background color to “tungsten”.

The only subview left to add is the main UIImageView used to show the user’s image. Drag a UIImageView from the Object Library and center it between the UINavigationItem and the UIToolbar. Pull up the Attributes Inspector and select “Aspect Fit” as the UIImageView mode under the “View” Inspector subsection.

All the major components of the interface are now in place! The next step is to wire these elements from the Storyboard to the ViewController class.

Open the ViewController.m file. Add the following IBOutlet properties and IBAction methods into the ViewController class extension:

@interface ViewController ()

@property(nonatomic, weak) IBOutlet UIImageView *selectedImageView;
@property(nonatomic, weak) IBOutlet UIBarButtonItem *filterButton;
@property(nonatomic, weak) IBOutlet UIBarButtonItem *saveButton;

- (IBAction)photoFromAlbum;
- (IBAction)photoFromCamera;
- (IBAction)applyImageFilter:(id)sender;
- (IBAction)saveImageToAlbum;

@end

So, why create IBOutlet properties for the image view, filter button, and save button, but not the other Interface Builder components? The answer is that these are the only objects that we’ll need to access programmatically. The image view will be accessed to set images selected by the user while the filter and save buttons will be accessed to switch the state from disabled to enabled after the user selects an image or takes a photo.

The IBAction methods should be mostly self-explanatory and will connect directly to the UIBarButtonItem selector implied by each name.

After creating the IBOutlet properties, you should synthesize them by adding the following line of code to the class @implementation:

@implementation ViewController

@synthesize selectedImageView, filterButton, saveButton;

To complete the Interface Builder setup, map each of the above IBOutlet objects and IBAction methods declared to the proper Interface Builder components (Need help doing this? Leave a question in the comments section below). Be sure to save your changes before moving on.

With the application’s interface created, we’re ready to begin coding the functionality!


Step 3: Selecting Photos From the Album

This tutorial will use the UIImagePickerController class for directly accessing the images within the user’s photo album. Using this class will overlay a modal view gallery browser on top of our existing interface. When a user selects the image they want, the picker will use delegation to notify our ViewController class that a selection has been made. If you’re new to iOS development, don’t worry, this is a lot easier than it might sound.

In the ViewController.m file, add the following implementation for the photoFromAlbum method:

@synthesize selectedImageView, filterButton, saveButton;

- (IBAction)photoFromAlbum
{
    UIImagePickerController *photoPicker = [[UIImagePickerController alloc] init];
    photoPicker.delegate = self;
    photoPicker.sourceType = UIImagePickerControllerSourceTypePhotoLibrary;
    
    [self presentViewController:photoPicker animated:YES completion:NULL];

}

Simple, right? Now we just need to implement the UIImagePickerController delegate protocol in order to respond to image selections. You will do this in Step 5 of this tutorial.


Step 4: Taking Photos with the Camera

There are two primary approaches to taking photos with the device camera. You can either use the UIImagePickerController to access Apple’s default camera implementation, or you can create a completely customized experience with the AVFoundation framework. GPUImage actually builds upon the functionality provided by AVFoundation to provide a class specifically with this purpose in mind. However, for this tutorial, we’ll be using UIImagePickerController for photo selection exclusively. In a future tutorial on GPUImage (likely to be published in the next 1-3 weeks), I’ll show you how to use the more advanced GPUImage classes to achieve this.

The code for taking photos in this tutorial is as follows:

- (IBAction)photoFromCamera
{
    UIImagePickerController *photoPicker = [[UIImagePickerController alloc] init];

    photoPicker.delegate = self;
    photoPicker.sourceType = UIImagePickerControllerSourceTypeCamera;
    
    [self presentViewController:photoPicker animated:YES completion:NULL];

}

If you compare the method above with the photoFromAlbum method from step 3, you’ll see that the only difference is whether sourceType is set to UIImagePickerControllerSourceTypePhotoLibrary or UIImagePickerControllerSourceTypeCamera. Because of this, you could easily combine these two methods into one. However, I’ve decided to leave photoFromCamera as a separate method as I’ll be refactoring it to use AVFoundation in a future tutorial and the logic will need to be separated.


Step 5: Code the Photo Picker Delegate

The user can now browser the device library or use the device camera to select an image with UIImagePickerController. Regardless of how the user selects an image, the next step is to implement the delegate method that will be responsible for placing that image on the screen.

First, go to ViewController.h and declare that this class will conform to UIImagePickerControllerDelegate:

#import <UIKit/UIKit.h>

@interface ViewController : UIViewController <UINavigationControllerDelegate, UIImagePickerControllerDelegate>

@end

Now flip to ViewController.m and implement the imagePickerController:didFinishPickingMediaWithInfo: delegate method called by the photo picker upon selection:

- (void)imagePickerController:(UIImagePickerController *)photoPicker didFinishPickingMediaWithInfo:(NSDictionary *)info
{
    self.saveButton.enabled = YES;
    self.filterButton.enabled = YES;
    
    UIImage *selectedImage = [info valueForKey:UIImagePickerControllerOriginalImage];
    
    [self.selectedImageView setImage:selectedImage];
    
    [photoPicker dismissModalViewControllerAnimated:YES];
}

On lines 3-4 above, the save and filter buttons are enabled because we now have an image upon which those actions can be taken.

Line 6 creates a UIImage object with the photo selected by the user, and line 8 sets the image property of the UIImageViewController to the chosen image which will display it on the screen.

Finally, line 10 dismisses the modal view used to select the photo.

The above code should work well, but there’s one enhancement needed. Rather than simply storing the image selected in the selectedImageView, we should also retain a copy in an internal UIImage data member. This will allow the application to apply each filter selected directly to the original image rather than iteratively layering the effects. It will also allow the user to easily revert to the original image from a filtered perspective. To do this, first add a UIImage object to the class extension at the top of ViewController.m:

#import "ViewController.h"
#import "GPUImage.h"

@interface ViewController ()
{
    UIImage *originalImage;
}

@property(nonatomic, weak) IBOutlet UIImageView *selectedImageView;
@property(nonatomic, weak) IBOutlet UIBarButtonItem *filterButton;

Next modify the imagePickerController:didFinishPickingMediaWithInfo: method as follows:

- (void)imagePickerController:(UIImagePickerController *)photoPicker didFinishPickingMediaWithInfo:(NSDictionary *)info
{
    self.saveButton.enabled = YES;
    self.filterButton.enabled = YES;
    
    originalImage = [info valueForKey:UIImagePickerControllerOriginalImage];
    
    [self.selectedImageView setImage:originalImage];
    
    [photoPicker dismissModalViewControllerAnimated:YES];
}

If you build and run the project now, you should be able to select photos directly from the device album!


Step 6: Saving the Chosen Image

The last thing we need to do before tackling GPUImage is allow users to save the photos they take with the device camera. You can do this with a single line of code within the saveImageToAlbum method:

- (IBAction)saveImageToAlbum
{
    UIImageWriteToSavedPhotosAlbum(self.selectedImageView.image, self, @selector(image:didFinishSavingWithError:contextInfo:), nil);
}

The line of code above will attempt to save the image to the photo album, but you’ll need to implement the selector specified in order to respond upon success or failure:

- (void)image:(UIImage *)image didFinishSavingWithError:(NSError *)error contextInfo:(void *)contextInfo
{
    NSString *alertTitle;
    NSString *alertMessage;
    
    if(!error)
    {
        alertTitle   = @"Image Saved";
        alertMessage = @"Image saved to photo album successfully.";
    }
    else
    {
        alertTitle   = @"Error";
        alertMessage = @"Unable to save to photo album.";
    }

    UIAlertView *alert = [[UIAlertView alloc] initWithTitle:alertTitle
                                                    message:alertMessage
                                                   delegate:self
                                          cancelButtonTitle:@"Okay"
                                          otherButtonTitles:nil];
    [alert show];
}

The above lines of code are rather straightforward and simply display a UIAlertView message notifying the user of whether or not the image was saved successfully.


Step 7: Add GPUImage to Your Project

Adding GPUImage to your project is a bit trickier than you might expect, but by following this step it should only take a few minutes for you to be up and running.

First, you need to download a copy of GPUImage from the official project GitHub. Unarchive the downloaded file and open the “framework” folder. These are the essential files needed to import GPUImage in your project. Rather than copying all of these into your project directly, use Finder to go to the location you saved your Xcode project in Step 1 (for me that’s ~/Desktop/PhotoFX).Create a new folder called “Submodules” with a child folder called “GPUImage”. Now copy the “framework” folder downloaded from GitHub and paste it into the “GPUImage” folder. Next, open the “framework” folder and select the GPUImage.xcodeproj file. Your screen should look something like this:

Figure 7: Adding GPUImage to the Project

Now drag the GPUImage.xcodeproj file into the Xcode Project Navigator. If you did this successfully, you should see something like the following:

Figure 8: GPUImage in Xcode

With the project added successfully, you’ll need to add GPUImage as a dependency in your app’s build settings. Select “PhotoFX” from the project navigator, select the “PhotoFX” target, and then go to the “Build Phases” tab. Expand the “Target Dependencies” drop down and then click the “+” icon. Select “GPUImage” from the list that appears. Take a look at the following image to get a feel for how this is done:

Figure 9: GPUImage Dependency

Now you need to drag the libGPUImage.a file (found within Xcode’s Project Navigator at GPUImage.xcodeproj > Products) to the “Link Binary with Libraries” drop down. With this completed, you should see something like the following:

Figure 10: GPUImage Framework

While you’re focused on the “Link Binary With Libraries” dropdown, go ahead and add the following required frameworks by clicking the “+” button in the bottom left corner:

  • CoreMedia
  • CoreVideo
  • OpenGLES
  • AVFoundation
  • QuartzCore

Almost done! The next step is to select the PhotoFX project and go to “Build Settings”. Search for “Header Search Paths” (you may need to select the “All” button instead of “Basic” in order for this option to appear), and then double-click to add Submodules/GPUImage/framework in the popup dialog that will appear. Click the checkbox next to the entry in order to indicate that this path should be searched recursively. If you did this correctly, you should be looking at something like the following:

Figure 11: Adding GPUImage Framework

The final step is to return to ViewController.m and add the following line at the top:

#import "ViewController.h"
#import "GPUImage.h"

You should now be able to compile and run the project without issue. Having trouble? Leave a comment below.


Step 8: Display a List of Filters

GPUImage comes with an impressive number of filters for use within your applications. For this tutorial, I’ve selected the following sample to get our feet wet:

  • GPUImageGrayscaleFilter
  • GPUImageSepiaFilter
  • GPUImageSketchFilter
  • GPUImagePixellateFilter
  • GPUImageColorInvertFilter
  • GPUImageToonFilter
  • GPUImagePinchDistortionFilter

To create your own list or simply see all the filters GPUImage has to offer, check out the official documentation on GitHub.

In order to present the above list of filters to the user, we’ll be using a simple UIActionSheet. Implement the applyImageFilter: method as follows:

- (IBAction)applyImageFilter:(id)sender
{
    UIActionSheet *filterActionSheet = [[UIActionSheet alloc] initWithTitle:@"Select Filter"
                                                                   delegate:self
                                                          cancelButtonTitle:@"Cancel"
                                                     destructiveButtonTitle:nil
                                                          otherButtonTitles:@"Grayscale", @"Sepia", @"Sketch", @"Pixellate", @"Color Invert", @"Toon", @"Pinch Distort", @"None", nil];

    [filterActionSheet showFromBarButtonItem:sender animated:YES];
}

Step 9: Implement Filter Selection

In order to respond to the filter selection, we’ll have to implement the UIActionSheetDelegate. Go to ViewController.h and declare that the class will conform to this delegate as follows:

#import <UIKit/UIKit.h>

@interface ViewController : UIViewController <UINavigationControllerDelegate, UIImagePickerControllerDelegate, UIActionSheetDelegate>

@end

Now jump back to ViewController.m and add the following method:

- (void)actionSheet:(UIActionSheet *)actionSheet clickedButtonAtIndex:(NSInteger)buttonIndex
{
    GPUImageFilter *selectedFilter;
    
    switch (buttonIndex) {
        case 0:
            selectedFilter = [[GPUImageGrayscaleFilter alloc] init];
            break;
        case 1:
            selectedFilter = [[GPUImageSepiaFilter alloc] init];
            break;
        case 2:
            selectedFilter = [[GPUImageSketchFilter alloc] init];
            break;
        case 3:
            selectedFilter = [[GPUImagePixellateFilter alloc] init];
            break;
        case 4:
            selectedFilter = [[GPUImageColorInvertFilter alloc] init];
            break;
        case 5:
            selectedFilter = [[GPUImageToonFilter alloc] init];
            break;
        case 6:
            selectedFilter = [[GPUImagePinchDistortionFilter alloc] init];
            break;
        case 7:
            selectedFilter = [[GPUImageFilter alloc] init];
            break;
        default:
            break;
    }
    
    UIImage *filteredImage = [selectedFilter imageByFilteringImage:originalImage];
    [self.selectedImageView setImage:filteredImage];
}

Bam! Your app should now work as desired. As you can see from the above, applying filters to an existing image with GPUImage couldn’t be simpler. You simply need to instantiate a GPUImageFilter and then call the imageByFilteringImage:originalImage method.


Step 10: Add an App Icon

This app just needs one last thing: a good dock icon. Thanks to our sister-site Psdtuts+, I was able to find just what I was looking for:


The above is simply a 57×57 (non-retina) and 114×114 (retina) pixel crop from the final effect taught in How to Draw a Leica Camera in Photoshop by Mohammad Jeprie.

In order to get these into your app, you just have to drag them into the Xcode Project Navigator.


Wrap Up

This tutorial has just barely scratched the surface of what is possible with GPUImage. If you’ve enjoyed this tutorial or think you’ll benefit from the power of GPUImage in the future, find @bradlarson and thank him for creating such an awesome open source project.


More GPUImage Content?

Do you want to see more content on GPUImage and image processing? If so, let me know! You can either leave your feedback in the comments section below (preferred) or just send me a message on Twitter (@markhammonds).


Android Downloads and Extras

$
0
0

The Android SDK comes with many tools and an easy software management system for updating and adding new tools and SDK components. This tutorial will show you how to add new tools, where to look for them once added, and give you an idea of the types of tools you’ll find available for download outside the normal toolchain.


Step 0: Getting Started

This tutorial is for the Java developer just about to get started learning Android, who is familiar with Eclipse, and has installed the Android SDK and Android Developer Plugin for Eclipse. If you have not, see the previous tutorials in this series.


Step 1: Downloading New Tools

Launch the Android SDK Manager tool (either in Eclipse or standalone). Wait for the “Fetching URL” task to finish. At the bottom of the screen, you can choose between organizing the available downloads by API Level or Repository. We recommend API Level.

In here, you’ll find all the SDK versions, downloads for each version, the tools useful for all versions, and an extras section for other downloads that do not fall into a specific category, or are applicable only to certain developers or devices.

When you first install the Android SDK, some downloads useful for normal day-to-day development aren’t included by default.

For example, we’ve noted that no System Image is included when installed via the Eclipse plugin, which means you won’t be able to use the Emulator until you download more components.

To download a tool, simply click on the appropriate checkbox and then choose the “Install X packages…” button. Some downloads are automatically used and integrated with other tools. Some downloads are merely components downloaded into specific directories. Still others may need to be installed separately after they are downloaded. We’ll go over some of the tool types later on.


Step 2: Finding Downloaded Tools

You’ve downloaded something through the Android SDK Manager. Now what?

Most of the downloads are automatically integrated into your development environment (Eclipse), but not all. If you download the SDK Platform, that API level will appear as a version you can build against within Eclipse. If you also download the System Image, you can launch an Emulator with that API level. Likewise for sample content; each sample will appear in the new app creation wizard once downloaded.

However, other tool installations are more subtle. Android sources, for example, simply appear in a directory somewhere in your Android SDK path.

Where do you look for other downloads?

Almost without exception, downloads appear somewhere in your Android SDK path. If it’s an add-on, such as a skin for a particular device, or a Google API, it will show up in the add-ons directory in the SDK path.

Anything grouped in the “Extras” folder of the Android SDK Manager will be saved into an extras directory under your SDK path. Extras are further organized by the company they are associated with. Download the Google Analytics SDK? It goes under the analytics_sdk of the google subdirectory of the extras directory.

Samples, while also integrated into the new Eclipse app wizard, appear in a sample directory (organized by API Level).

You may need to look around a little to find your downloads as there are many directories with many subdirectories. There is some rhyme and reason to it all though!


Step 3: Overview of Tools and Extras

Let’s talk about several of these tools and downloads. The descriptions in the SDK Manager are, well, non-existent at the moment. We won’t dive very deep into each at this time because many of these tools deserves a series of tutorials on their own. In broad strokes then, here are their purposes:

  • Android Support Library: Provides a compatibility API that back-ports some new (and integral) platform features to earlier versions of the Android SDK.
  • Google Analytics SDK: Integrate analytics tracking inside your apps using Google’s library and service.
  • Google USB Driver: For windows only, this is a set of USB drivers enabling developers to connect via USB to many different Android devices.
  • ARM EAB v7a System Image: Found for each of the API levels. Required for using the emulator. This is the standard system image used for the emulator.
  • Intel Atom x86 System Image: A system image that uses Intel Atom CPU emulation rather than ARM emulation. Only available for select API levels.
  • Intel Hardware Accelerated Execution Manager: Mac and Windows only. A driver for making performance of Intel Atom System Images very smooth on development machines. Once downloaded, must also be installed manually.
  • Google APIs: Available for each API Level. Adds Google-specific services, such as Google Maps mapping functionality.
  • Google AdMob Ads SDK: Integrate advertising into your apps using Google’s library and service.

Step 4: Manufacturer Portals

Unfortunately, not every tool available for Android developers is available for download through the Android SDK Manager. New tools are being added to the Android SDK Manager all the time, but there are still some components not bundled there which must be downloaded from elsewhere.

Many device manufacturers have their own developer programs. Finding them can sometimes be challenging, though. Here are a couple we know about. Feel free to let us know about others in the comments and we will add them to the list.

HTC Dev: Provides OpenSense SDK, bootloader unlocking, consulting, information, and more

MOTODEV: For general information as well as their own IDE (Motodev Studio for Android).

LG Mobile Developer Network: SDKs, online testing with real LG hardware, and more.

Samsung Developers: SDKs, App challenges, and online testing with real Samsung hardware.

Note that many of these companies require you to register as a developer before you can access their downloads. This may mean you are subject to further terms and conditions so read the fine print carefully when you are downloading and installing any Android SDK component, either from the Android SDK Manager or otherwise.

We could go on, but there are dozens of manufacturers. If you really want to fully access the development-enabled features of a device that has more than the standard set of hardware (such as fingerprint scanners, 3D displays, dual displays, and other such goodies you might want to integrate into your apps), you’ll either find support via the Android SDK Manager or the manufacturer’s developer website.


Conclusion

You’re another step closer to being fully prepared for getting started with Android development. You have your Android SDK installed, your tools in hand, and information on where to get more of what you need for specific developer projects.

You’re well on your way to Android development. What kinds of apps are you looking forward to creating? Let us know in the comments!

About the Authors

Mobile developers Lauren Darcey and Shane Conder have coauthored several books on Android development: an in-depth programming book entitled Android Wireless Application Development (now in it’s third edition as a two-volume set), Sams Teach Yourself Android Application Development in 24 Hours, and Learning Android Application Programming for the Kindle Fire: A Hands-On Guide to Building Your First Android Application. When not writing, they spend their time developing mobile software at their company and providing consulting services. They can be reached at via email to androidwirelessdev+mt@gmail.com, via their blog at androidbook.blogspot.com, and on Twitter @androidwireless.

Need More Help Writing Android Apps? Check out our Latest Books and Resources!

Buy Android Wireless Application Development, 3rd Edition, Volume 1  Buy Sam's Teach Yourself Android Application Development in 24 Hours, 2nd Edition  Mamlambo code at Code Canyon


Build an Air Hockey Game – Interface Creation

$
0
0

In this tutorial series, you’ll learn how to create an Air Hockey game. The objective of the game is to hit the puck using the paddles to raise the score. Read on!


Tutorial Teaser

Step 1: Application Overview

Using pre-made graphics, we will code an entertaining game using Lua and the Corona SDK APIs.

The player will be able to hit a puck by dragging the paddle on the screen. You can modify the parameters in the code to customize the game.

Step 2: Target Device

The first thing we have to do is select the platform we want to run our app within, this way we’ll be able to choose the size for the images we will use.

The iOS platform has these characteristics:

  • iPad: 1024x768px, 132 ppi
  • iPhone/iPod Touch: 320x480px, 163 ppi
  • iPhone 4: 960x640px, 326 ppi

Because Android is an open platform, there are many different devices and resolutions. A few of the more common screen characteristics are:

  • Google Nexus One: 480x800px, 254 ppi
  • Motorola Droid X: 854x480px, 228 ppi
  • HTC Evo: 480x800px, 217 ppi

In this tutorial we’ll be focusing on the iOS platform with the graphic design, specifically developing for distribution to an iPhone/iPod touch, but the code presented here should apply to Android development with the Corona SDK as well.

Step 3: Interface

A simple and friendly interface will be used, this involves multiple shapes, buttons, bitmaps and more.

The interface graphic resources necessary for this tutorial can be found in the attached download.

Step 4: Export Graphics

Depending on the device you have selected, you may need to export the graphics in the recommended ppi, you can do that in your favorite image editor.

I used the Adjust Size… function in the Preview app on Mac OS X.

Remember to give the images a descriptive name and save them in your project folder.

Step 5: Sound

We’ll use Sound Effects to enhance the feeling of the game, you can find the sounds used in this example in Soungle.com using the keywords bell and buzz.

Step 6: App Configuration

An external file will be used to make the application go fullscreen across devices, the config.lua file. This file shows the original screen size and the method used to scale that content in case the app is run in a different screen resolution.

application =
{
    content =
    {
        width = 320,
        height = 480,
        scale = "letterbox"
    },
}

Get the Full Series!

This tutorial series is available to Tuts+ Premium members only. Read a preview of this tutorial on the Tuts+ Premium web site or login to Tuts+ Premium to access the full content.


Joining Tuts+ Premium. . .

For those unfamiliar, the family of Tuts+ sites runs a premium membership service called Tuts+ Premium. For $19 per month, you gain access to exclusive premium tutorials, screencasts, and freebies from Mobiletuts+, Nettuts+, Aetuts+, Audiotuts+, Vectortuts+, and CgTuts+. You’ll learn from some of the best minds in the business. Become a premium member to access this tutorial, as well as hundreds of other advanced tutorials and screencasts.


Android Virtual Device Creation

$
0
0

A fundamental part of creating Android applications is running and testing them. Testing your code and app implementation on real devices is important, but emulating other scenarios and having the convenience, protection, and cost savings of not owning every Android device ever created keeps development realistic. Learn how to create Android Virtual Devices (AVDs) in this tutorial.


Getting Started

This tutorial is for the Java developer just getting started learning Android, who is familiar with Eclipse, and has installed the Android SDK and Android Developer Plugin for Eclipse, and is ready to run the emulator. If you have not prepared as such, see the previous tutorials in this series.


Part 1: Creating a Simple AVD

We’ll get started by creating a simple, stock AVD that represents a fairly generic Android device. This AVD will be your “goto” configuration when you launch your app for testing and debugging.

Step 1: Launch the AVD Manager

The easiest way to launch the Android Virtual Device Manager is to click on the Android toolbar button that looks like a tiny phone from within Eclipse. This will launch the tool, as shown, and display any AVD configurations you have already created.

Step 2: Start the New AVD Wizard

Now click the New… button from within the Android Virtual Device Manager. You’ll be presented with a dialog to fill in some configuration details about your AVD:

Step 3: Describe Your AVD

Not much information is needed to create a basic AVD. Give the AVD a descriptive name (such as “AVD-API16″) and choose the target platform such as “Android 4.1 – API Level 16″. The CPU/ABI is automatically chosen, but you must have at least one System Image downloaded for any to appear. Choose an SD Card size. For basic testing AVDs, we usually use 64MB for the SD Card size, but keep in mind that this space will be blocked off on your development machine, so if you create a lot of AVDs, they will take up a lot of space. Leave the rest of the options as the defaults for now.

Step 4: Finishing Up

Press the Create AVD button. The AVD creation process can take a few moments. Once complete, you’ll be back at the list of AVDs, with your newly created one now available.


Part 2: Starting the Emulator With an AVD

AVDs are basically definitions that tell how to configure the Android emulator. Launching an AVD and starting the emulator are synonymous. There are several ways to launch an AVD. Within Eclipse, some options include automatically launching an emulator with a specific AVD when you start debugging, manually launching when you start debugging, and simply launching through the Android Virtual Device Manager. We recommend launching AVDs ahead of time through the Android Virtual Device Manager before you dive into compiling and debugging your actual code. This way, your emulator and AVD are up and running before debugging starts. This is the method we’ll use now.

Note: If you’re coming here with Android experience, this tutorial technically comes before debugging so we’ll not get into that just yet.

Step 1: Open the AVD Manager

If you’re not already in the AVD Manager, launch it now. Typically, you’ll do this with the button that looks like a little phone icon ( as we did in Part 1, Step 1).

Step 2: Open the Launch Options Dialog

Now select the AVD you wish to launch and press the Start… button. You’ll get a dialog like this one.

Starting from the bottom (and least complex), you’ll see two snapshot options. Save to snapshot means when you exit the emulator, the state of the emulator will be saved. This takes some time to set up, depending on the amount of RAM given to the emulator. Launching from snapshot means the emulator will use a previously saved snapshot to restore. When one exists, launch times are very fast compared to a cold launch without the snapshot feature.

Next up is an option to wipe user data. This basically resets the AVD to a fresh state, much like a factory reset. There are many testing scenarios where you’ll want a nice clear slate, although once you are further along in developing and testing your application, you’re more likely to want user data to stick around while you perform deeper and broader test scenarios.

Next, there is the option to scale the emulator display to real physical screen size. This means, if the numbers are all chosen correctly, that the emulator screen on your monitor will appear at the same size as the screen on a device. The density of the two devices (your computer monitor and the device screen) are probably different, so a different number of pixels will be used on your computer monitor (usually less, unless you have a very high density monitor or are simulating a low density device). Pressing the little “?” button will display another dialog that gives some sample screen resolutions and monitor sizes and will fill in some details. It covers a wide variety of common cases, but certainly not all.

The following figure shows a sample configuration. We used settings to draw the WVGA800 screen on a common 24″ 1080p monitor at 4″ diagonal. Our desktops have multiple monitors (of different sizes), so we’ll have to keep this in mind when moving the emulator between screens.

The Scale value implies that it’s going to use 40% fewer pixels both vertically and horizontally. This isn’t the place to look for pixel level-detail, rather it’s the place to look for useful sizing, such as whether or not a button is big enough for a finger to tap it.

Leaving this option off draws the emulator screen pixel for pixel on your monitor. This is how we usually use it unless we are focusing in UI/UX design.

Step 3: Launch the Emulator

Now press the Launch button. The emulator will start. In it’s current form, the emulator will take a while to launch the first time. Subsequent launches will be faster. Some tools and extras can be used on some machines to dramatically speed up the emulator. Here’s an emulator screen scaled to 4″ on a 24″ 1920×1080 monitor.


Part 3: Creating AVDs That Mimic True Devices

The AVDs have many options to control screen size, memory size, input types, and several other characteristics found on Android hardware devices. We’ve covered how to configure AVDs for various types of devices in Common Android Virtual Device Configurations and Android Tablet Virtual Device Configurations. This section will not repeat that information. Instead, we’ll talk about another way to create AVDs that closely mimic popular Android devices: by using manufacturer-supplied add-ons.

Step 1: Pick a Device

You’ve learned how to download add-ons using the Android SDK Manager. Pick a device and download the add-on. We’ve picked the ICS_R2 one from Motorola for this demonstration, which is a bit of a hard to figure name that really just provides an add-on for the Atrix HD handset.

Step 2: Create a New AVD

Open the Android Virtual Device Manager. Begin to create a new AVD as usual. In the Target section, select”ICS_R2 (Motorola Mobility, LLC.) – API Level 15.” This will fill in a variety of AVD options for you, including many hardware flags and a skin. Click Create AVD.

One setting this “preset” doesn’t do is set the screen size. If you know the screen size you want to emulate, you can fill in the physical size of your device and set the DPI of your development machine’s monitor, as we did earlier.

Step 3: Launch Your New AVD

Launch the AVD using one of th
e several methods described earlier. You’ll immediately see some differences:

But don’t let all these differences let you think you’re running the real device. You aren’t. This is still the emulator and can’t replace testing on the real device. When it comes to stock apps and third party APIs, though, you’ll be able to test much more accurately than with the generic Android emulator configurations. Many of the add-ons come with new system images that contain many of the manufacturers updates that are not found in the base versions. There is a catch, though. Most manufacturer’s system images don’t come with the Google apps, whereas the real devices do.


Conclusion

You’ve learned how to create AVDs for a variety of Android device types. You’ve learned how to launch the emulator using these AVDs. If you’re like us, it won’t be long before you’ll be cleaning up your AVD list because you’ve created too many you don’t use; for organizational purposes, we highly recommend you use descriptive names for your AVDs so you can tell what led you to create them in the first place!.

You’re well on your way to Android development. What kinds of apps are you looking forward to creating? Let us know in the comments!


About the Authors

Mobile developers Lauren Darcey and Shane Conder have coauthored several books on Android development: an in-depth programming book entitled Android Wireless Application Development (now in it’s third edition as a two-volume set), Sams Teach Yourself Android Application Development in 24 Hours, and Learning Android Application Programming for the Kindle Fire: A Hands-On Guide to Building Your First Android Application. When not writing, they spend their time developing mobile software at their company and providing consulting services. They can be reached at via email to androidwirelessdev+mt@gmail.com, via their blog at androidbook.blogspot.com, and on Twitter @androidwireless.

Need More Help Writing Android Apps? Check out our Latest Books and Resources!

Buy Android Wireless Application Development, 3rd Edition, Volume 1  Buy Sam's Teach Yourself Android Application Development in 24 Hours, 2nd Edition  Mamlambo code at Code Canyon


Build an Air Hockey Game – Adding Interactivity

$
0
0

In this tutorial series, you’ll learn how to create an Air Hockey game. The objective of the game is to hit the puck using the paddles to raise the score. Read on!


Tutorial Teaser

Step 1: Start Button Listeners

This function adds the necesary listeners to the TitleView buttons.

function startButtonListeners(action)
	if(action == 'add') then
		playBtn:addEventListener('tap', showGameView)
		creditsBtn:addEventListener('tap', showCredits)
	else
		playBtn:removeEventListener('tap', showGameView)
		creditsBtn:removeEventListener('tap', showCredits)
	end
end

Step 2: Show Credits

The credits screen is shown when the user taps the about button. A tap listener is added to the credits view to remove it.

function showCredits:tap(e)
	playBtn.isVisible = false
	creditsBtn.isVisible = false
	creditsView = display.newImage('credits.png', 0, display.contentHeight)
	lastY = titleBg.y
	transition.to(titleBg, {time = 300, y = (display.contentHeight * 0.5) - (titleBg.height + 50)})
	transition.to(creditsView, {time = 300, y = (display.contentHeight * 0.5) + 35, onComplete = function() creditsView:addEventListener('tap', hideCredits) end})
end

Step 3: Hide Credits

When the credits screen is tapped, it’ll be tweened out of the stage and removed.

function hideCredits:tap(e)
	transition.to(creditsView, {time = 300, y = display.contentHeight + 25, onComplete = function() creditsBtn.isVisible = true playBtn.isVisible = true creditsView:removeEventListener('tap', hideCredits) display.remove(creditsView) creditsView = nil end})
	transition.to(titleBg, {time = 300, y = lastY});
end

Step 4: Show Game View

When the Start button is tapped, the title view is tweened and removed, revealing the game view. There are many parts involved in this view, so we’ll split them in the next steps.

function showGameView:tap(e)
	transition.to(titleView, {time = 300, x = -titleView.height, onComplete = function() startButtonListeners('rmv') display.remove(titleView) titleView = nil end})

Get the Full Series!

This tutorial series is available to Tuts+ Premium members only. Read a preview of this tutorial on the Tuts+ Premium web site or login to Tuts+ Premium to access the full content.


Joining Tuts+ Premium. . .

For those unfamiliar, the family of Tuts+ sites runs a premium membership service called Tuts+ Premium. For $19 per month, you gain access to exclusive premium tutorials, screencasts, and freebies from Mobiletuts+, Nettuts+, Aetuts+, Audiotuts+, Vectortuts+, and CgTuts+. You’ll learn from some of the best minds in the business. Become a premium member to access this tutorial, as well as hundreds of other advanced tutorials and screencasts.


Enhancing a Photo App with GPUImage & iCarousel

$
0
0

This tutorial will teach you how to use GPUImage to apply image filters in real-time as the device’s camera feed is displayed. Along the way, you’ll learn how to automatically populate images within a carousel controller and how to resize images with UIImage+Categories.


Project Overview


Tutorial Prerequisites

This tutorial builds on a previous post entitled “Build a Photo App with GPUImage”. The previous lesson demonstrated how to use UIImagePickerController to select photos from the device’s photo album or camera, how to add the GPUImage library to your project, and how to use the GPUImageFilter class to enhance still camera frames. If you’re already familiar with UIImagePickerController and can figure out how to add GPUImage to your project on your own, you should be able to pick up from where the last tutorial left off just fine.


Step 1: Import iCarousel

This project will make extensive use of an open-source project called iCarousel in order to add stylish display of selected photos.

In order to include iCarousel in your project, go to the official GitHub page and download the source code as a zip file. Extract the code from the ZIP file and then drag-and-drop the folder titled “iCarousel” into the Xcode Project Navigator. This folder should contain both iCarousel.h and iCarousel.m. Be sure to select “Create groups for any added folders” and check the box next to “Copy items into destination group’s folder (if needed)” as well as the box next to your project’s target name in the “Add to targets” area.

Next go to ViewController.m and add an import statement for iCarousel:

#import "ViewController.h"
#import "GPUImage.h"
#import "iCarousel/iCarousel.h"

Step 2: Import UIImage+Categories

Before we display our images with iCarousel, we’ll need to scale them down to an acceptable size. Rather than write all of the code to do this by hand, we’ll make use of the excellent UIImage+Categories project, which provides basic functionality for resizing images as well as a few other image manipulation tricks.

Tip: You could alternatively use the MGImageUtilities project for this task. While the implementation details will differ slightly, it also provides excellent support for UIImage scaling.

Download the UIImage+Categories code from GitHub and then create a new group with the same name within Xcode. Drag both the implementation and header files for UIImage+Alpha, UIImage+Resize, and UIImage+RoundedCorner into your project. Be sure to select “Create groups for any added folders” and check the box next to “Copy items into destination group’s folder (if needed)” as well as the box next to your project’s target name in the “Add to targets” area.

Within the ViewController.m file, import the image categories with the following line of code:

#import "ViewController.h"
#import "GPUImage.h"
#import "iCarousel.h"
#import "UIImage+Resize.h"

Step 3: Add the iCarousel View in IB

With the iCarousel code imported into our project, switch over to the MainStoryboard.storyboard file to rework our interface.

First, select the current UIImageView connected to the selectedImageView IBOutlet and delete it. Switch back to ViewController.m and modify the project code to read as follows:

@property(nonatomic, weak) IBOutlet iCarousel *photoCarousel;
@property(nonatomic, weak) IBOutlet UIBarButtonItem *filterButton;
@property(nonatomic, weak) IBOutlet UIBarButtonItem *saveButton;
- (IBAction)photoFromAlbum;
- (IBAction)photoFromCamera;
- (IBAction)saveImageToAlbum;
- (IBAction)applyImageFilter:(id)sender;
@end
@implementation ViewController
@synthesize photoCarousel, filterButton, saveButton;

On line 1 above, replace the selectedImageView outlet with a iCarousel outlet called photoCarousel. Swap out the variables in the synthesize statement on line 14 above as well.

Go back to Interface Builder and drag a new UIView onto the view controller. With the new UIView selected, go to the “Identity inspector” tab within the Utilities pane and set the value for the “Class” field to “iCarousel”. This tells Interface Builder that the UIView we added to the project should be instantiated as an instance of the iCarousel class.

Adding the iCarousel View

Now make a connection between the photoCarousel outlet just declared and the UIView just added as a subview.

Adding the iCarousel View

We need to set both the data source and delegate for photoCarousel as well, and we can achieve this from within Interface Builder. First, go to ViewController.h and declare that this view controller will conform to the appropriate protocols:

#import <UIKit/UIKit.h>
#import "iCarousel/iCarousel.h"
@interface ViewController : UIViewController <UINavigationControllerDelegate, UIImagePickerControllerDelegate, UIActionSheetDelegate, iCarouselDataSource, iCarouselDelegate>

On line 2 we import iCarousel, and on line 4 we then declare conformance to both the delegate and the data source.

Back in the storyboard file, you can now map both the data source and the delegate to the view controller.

Adding the iCarousel View

Before moving on, go ahead and change the background color of the iCarousel view to black.

Okay, just one more thing. We want the iCarousel view to appear below the UIToolbar in the view hierarchy. You can do this visually by simply dragging them to the correct order in Interface Builder:

Adding the iCarousel View

Note how the iCarousel view now appears before the Toolbar.

Save your work in Interface Builder.


Step 4: Implement the iCarousel Protocols

iCarousel uses a design pattern similar to UITableView in that a data source is used to feed input into the control and a delegate is used to handle interaction with the control.

For our project, the data source will be a simple NSMutableArray called “displayImages”. Add this to the class extension in ViewController.m now:

#import "UIImage+Resize.h"
@interface ViewController ()
{
    NSMutableArray *displayImages;
}
@property(nonatomic, weak) IBOutlet iCarousel *photoCarousel;

Next, we want to allocate memory for the array in the class’ designated initializer. In our case, the view controller will be instantiated from a Storyboard, so the proper initializer is initWithCoder:. However, if the class were to be instantiated programmatically from a XIB, the proper initializer would be initWithNibName:bundle:. In order to accommodate either initialization style, we’ll write our own custom initializer and call it from both, like so:

- (void)customSetup
{
    displayImages = [[NSMutableArray alloc] init];
}
- (id)initWithNibName:(NSString *)nibNameOrNil bundle:(NSBundle *)nibBundleOrNil
{
    if ((self = [super initWithNibName:nibNameOrNil bundle:nibBundleOrNil]))
    {
        [self customSetup];
    }
    return self;
}
- (id)initWithCoder:(NSCoder *)aDecoder
{
    if ((self = [super initWithCoder:aDecoder]))
    {
        [self customSetup];
    }
    return self;
}

Now we can implement the data source and delegate. Start with the data source method numberOfItemsInCarousel:, like so:

#pragma mark
#pragma mark iCarousel DataSource/Delegate/Custom
- (NSUInteger)numberOfItemsInCarousel:(iCarousel *)carousel
{
    return [displayImages count];
}

This will tell iCarousel how many images to display by looking at the number of images stored in the data source array.

Next, write the method that will actually generate a view for each image displayed in the carousel:

- (UIView *)carousel:(iCarousel *)carousel viewForItemAtIndex:(NSUInteger)index reusingView:(UIView *)view
{
    // Create new view if no view is available for recycling
    if (view == nil)
    {
        view = [[UIImageView alloc] initWithFrame:CGRectMake(0, 0, 300.0f, 300.0f)];
        view.contentMode = UIViewContentModeCenter;
    }
   ((UIImageView *)view).image = [displayImages objectAtIndex:index];
    return view;
}

This is a good start, but there’s one very significant issue with the above: the images should be scaled down before being supplied to iCarousel. Add the following lines of code to update the method:

- (UIView *)carousel:(iCarousel *)carousel viewForItemAtIndex:(NSUInteger)index reusingView:(UIView *)view
{
    // Create new view if no view is available for recycling
    if (view == nil)
    {
        view = [[UIImageView alloc] initWithFrame:CGRectMake(0, 0, 300.0f, 300.0f)];
        view.contentMode = UIViewContentModeCenter;
    }
    // Intelligently scale down to a max of 250px in width or height
    UIImage *originalImage = [displayImages objectAtIndex:index];
    CGSize maxSize = CGSizeMake(250.0f, 250.0f);
    CGSize targetSize;
    // If image is landscape, set width to 250px and dynamically figure out height
    if(originalImage.size.width >= originalImage.size.height)
    {
        float newHeightMultiplier = maxSize.width / originalImage.size.width;
        targetSize = CGSizeMake(maxSize.width, round(originalImage.size.height * newHeightMultiplier));
    } // If image is portrait, set height to 250px and dynamically figure out width
    else
    {
        float newWidthMultiplier = maxSize.height / originalImage.size.height;
        targetSize = CGSizeMake( round(newWidthMultiplier * originalImage.size.width), maxSize.height );
    }
    // Resize the source image down to fit nicely in iCarousel
    ((UIImageView *)view).image = [[displayImages objectAtIndex:index] resizedImage:targetSize interpolationQuality:kCGInterpolationHigh];
    return view;
}
Pro Tip: Using this method in a production app? Consider enhancing the code for performance by doing image resizing on a background thread and keeping a separate NSMutableArray that caches the scaled down image versions.

Above, we set a maximum size of 250px for either the width or height of the image, and then we scale the opposite attribute down to match. This constrains the proportions of the image and looks much nicer than simply scaling down to a 250px by 250px square.

The above two methods are all iCarousel needs to start displaying images.

With the delegate and data source methods configured, now is a good time to setup the iCarousel object in the viewDidLoad method as well:

- (void)viewDidLoad
{
    [super viewDidLoad];
    // iCarousel Configuration
    self.photoCarousel.type = iCarouselTypeCoverFlow2;
    self.photoCarousel.bounces = NO;
}

With just a few more tweaks, the project will be able to display images within a carousel!


Step 5: Switch to the New Data Model

Earlier in this tutorial, we replaced the selectedImageView property with the photoCarousel property, updated the Storyboard interface to match, and created an NSMutableArray to act as the iCarousel data model. However, there are a few methods in ViewController.m still using the old data model that will prevent the project from compiling, so let’s fix those now. Update the saveImageToAlbum method like so:

- (IBAction)saveImageToAlbum
{
    UIImage *selectedImage = [displayImages objectAtIndex:self.photoCarousel.currentItemIndex];
    UIImageWriteToSavedPhotosAlbum(selectedImage, self, @selector(image:didFinishSavingWithError:contextInfo:), nil);
}

Line 3 selects the UIImage from the data model that matches the current iCarousel index. Line 4 performs the actual disk write with that image.

Next, go to the UIImagePickerController delegate method and modify the code:

- (void)imagePickerController:(UIImagePickerController *)photoPicker didFinishPickingMediaWithInfo:(NSDictionary *)info
{
    self.saveButton.enabled = YES;
    self.filterButton.enabled = YES;
    [displayImages addObject:[info valueForKey:UIImagePickerControllerOriginalImage]];
    [self.photoCarousel reloadData];
    [photoPicker dismissViewControllerAnimated:YES completion:NULL];
}

On line 6 above, we add the selected photo to the new model and on line 8 we force a refresh of the carousel.

Just one more change to make. Go to the action sheet’s clickedButtonAtIndex: method and modify the code as follows:

#pragma mark -
#pragma mark UIActionSheetDelegate
- (void)actionSheet:(UIActionSheet *)actionSheet clickedButtonAtIndex:(NSInteger)buttonIndex
{
    if(buttonIndex == actionSheet.cancelButtonIndex)
    {
        return;
    }
    GPUImageFilter *selectedFilter;
    switch (buttonIndex) {
        case 0:
            selectedFilter = [[GPUImageGrayscaleFilter alloc] init];
            break;
        case 1:
            selectedFilter = [[GPUImageSepiaFilter alloc] init];
            break;
        case 2:
            selectedFilter = [[GPUImageSketchFilter alloc] init];
            break;
        case 3:
            selectedFilter = [[GPUImagePixellateFilter alloc] init];
            break;
        case 4:
            selectedFilter = [[GPUImageColorInvertFilter alloc] init];
            break;
        case 5:
            selectedFilter = [[GPUImageToonFilter alloc] init];
            break;
        case 6:
            selectedFilter = [[GPUImagePinchDistortionFilter alloc] init];
            break;
        case 7:
            selectedFilter = [[GPUImageFilter alloc] init];
            break;
        default:
            break;
    }
    UIImage *filteredImage = [selectedFilter imageByFilteringImage:[displayImages objectAtIndex:self.photoCarousel.currentItemIndex]];
    [displayImages replaceObjectAtIndex:self.photoCarousel.currentItemIndex withObject:filteredImage];
    [self.photoCarousel reloadData];
}

The final three lines of this method will filter the data model image that corresponds to the current carousel index, replace the carousel display with that image, and then refresh the carousel.

If all went well, you should now be able to compile and run the project! Doing so will allow you to view your images within the carousel instead of simply within an image view.


Step 6: Add a Gesture for Deleting Images

The app is looking good so far, but it would be nice if the user could remove a photo from the carousel after adding it to the display. No problem! We can select any UIGestureRecognizer subclass to make this happen. For this tutorial, I’ve chosen to use a two-finger double-tap. This gesture may not be immediately intuitive, but it is easy to perform and the added complexity will help prevent the removal of images accidentally.

Within the ViewController.m file, go to the carousel:viewForItemAtIndex:reusingView: method and add the following lines just before the end of method:

    // Resize the source image down to fit nicely in iCarousel
    ((UIImageView *)view).image = [[displayImages objectAtIndex:index] resizedImage:targetSize interpolationQuality:kCGInterpolationHigh];
    // Two finger double-tap will delete an image
    UITapGestureRecognizer *gesture = [[UITapGestureRecognizer alloc] initWithTarget:self action:@selector(removeImageFromCarousel:)];
    gesture.numberOfTouchesRequired = 2;
    gesture.numberOfTapsRequired = 2;
    view.gestureRecognizers = [NSArray arrayWithObject:gesture];
    return view;

Lines 4 – 8 declare a new UITapGestureRecognizer object, set the number of touches (i.e. fingers) required to trigger the gesture to 2, and set the number of taps required to 2 as well. Finally, just before passing the view back to the iCarousel object, we set the gestureRecognizers property with the newly formed recognizer.

Note that when triggered, this gesture recognizer will fire the selector removeImageFromCarousel:. Let’s implement that next:

- (void)removeImageFromCarousel:(UIGestureRecognizer *)gesture
{
    [gesture removeTarget:self action:@selector(removeImageFromCarousel:)];
    [displayImages removeObjectAtIndex:self.photoCarousel.currentItemIndex];
    [self.photoCarousel reloadData];
}

Line 3 removes the gesture from the current target to prevent multiple gestures being triggered while processing. The remaining two lines are nothing new at this point.

Build and run the app again. You should now be able to dynamically remove items from the carousel!


Step 7: Create MTCameraViewController

The remainder of this tutorial will focus on using GPUImageStillCamera to build a custom camera picker control that can apply filters to the incoming video stream in real time. GPUImageStillCamera works closely with a class called GPUImageView. Camera frames generated by GPUImageStillCamera are sent to an assigned GPUImageView object for display to the user. All of this is accomplished with the underlying functionality provided by the AVFoundation framework, which provides programmatic access to camera frame data.

Because GPUImageView is a child class of UIView, we can embed the entire camera display into our own custom UIViewController class.

Add a new UIViewController subclass to the project by right clicking “PhotoFX” in the project navigator, and then selecting New File > Objective-C class. Name the class “MTCameraViewController” and enter “UIViewController” in for the “subclass of” field.

Creating MTCameraViewController

Click “Next” and then “Create” to complete the process.

Go to the MTCameraViewController.m file and import GPUImage:

#import "MTCameraViewController.h"
#import "GPUImage.h"

Next create a class extension with the necessary GPUImage data members:

@interface MTCameraViewController () <UIActionSheetDelegate>
{
    GPUImageStillCamera *stillCamera;
    GPUImageFilter *filter;
}
@end

Finally, go to the viewDidLoad: method and add the code to start up the camera capture:

- (void)viewDidLoad
{
    [super viewDidLoad];
    // Setup initial camera filter
    filter = [[GPUImageFilter alloc] init];
    [filter prepareForImageCapture];
    GPUImageView *filterView = (GPUImageView *)self.view;
    [filter addTarget:filterView];
    // Create custom GPUImage camera
    stillCamera = [[GPUImageStillCamera alloc] init];
    stillCamera.outputImageOrientation = UIInterfaceOrientationPortrait;
    [stillCamera addTarget:filter];
    // Begin showing video camera stream
    [stillCamera startCameraCapture];
}

Lines 5 – 9 create a new GPUImageView for displaying the camera feed and a default GPUImageFilter instance for applying a special effect to the view. We could have just as easily used one of the GPUImageFilter subclasses, such as GPUImageSketchFilter, but we’ll instead start off with the default filter (i.e. no manipulations) and let the user dynamically select a filter later.

Lines 11 – 17 instantiate the GPU camera instance and apply the filter created previously to the camera before starting the capture.


Step 8: Add the Custom Camera in IB

Before the code from Step 8 will work, we need to add the custom MTCameraViewController class just created to the project’s Storyboard.

Open the MainStoryboard.storyboard file and drag out a new View Controller from the Object library. With this object selected, go to the Identity inspector tab and set the “Class” field value to “MTCameraViewController”.

Next, drag a UIToolbar onto the screen and set its style property to “Black Opaque” in the Attributes inspector. Then add two flexible width bar button items to the toolbar with a “Take Photo” UIBarButtonItem in the center.

Adding MTCameraViewController Subviews

To connect this view controller to the application flow, right click the “camera” button from the main view controller and drag the triggered segues outlet to the new view controller:

Adding New Segue

When prompted, select “Push” as the segue style.

With the newly added segue object still selected, go to the “Attributes inspector” and set the identifier to “pushMTCamera”. Go ahead and make sure that “Push” is selected from the “Style” drop down.

Configuring Segue

With the segue created, ensure that the UIImagePicker will no longer be displayed when the user taps the camera button on the first app screen by disconnecting the IBAction outlet from the photoFromCamera method.

Finally, select the primary view of the newly created MTCameraViewController. Go to the Identity inspector and set the class value to “GPUImageView”.

While not perfect just yet, if you build and run the app now, you should be able to push MTCameraViewController onto the view hierarchy and watch GPUImageView display the frames from the camera in real-time!


Step 9: Add Realtime Filter Selection

We can now add the logic necessary to control the filter applied to the camera display. First, go to the viewDidLoad: method within the MTCameraViewController.m file and add the code that will create a “Filter” button in the top right of the view controller:

- (void)viewDidLoad
{
    [super viewDidLoad];
    // Add Filter Button to Interface
    UIBarButtonItem *filterButton = [[UIBarButtonItem alloc] initWithTitle:@"Filter" style:UIBarButtonItemStylePlain target:self action:@selector(applyImageFilter:)];
    self.navigationItem.rightBarButtonItem = filterButton;

On line 6 above, we create a custom UIBarButtonItem that will trigger applyImageFilter: when selected.

Now create the selector method:

- (IBAction)applyImageFilter:(id)sender
{
    UIActionSheet *filterActionSheet = [[UIActionSheet alloc] initWithTitle:@"Select Filter"
                                                                   delegate:self
                                                          cancelButtonTitle:@"Cancel"
                                                     destructiveButtonTitle:nil
                                                          otherButtonTitles:@"Grayscale", @"Sepia", @"Sketch", @"Pixellate", @"Color Invert", @"Toon", @"Pinch Distort", @"None", nil];
    [filterActionSheet showFromBarButtonItem:sender animated:YES];
}

After adding the above you’ll see a compiler warning stating that the current view controller doesn’t conform to the UIActionSheetDelegate protocol. Fix that issue now by going to MTCameraViewController.h and modifying the class declaration like so:

#import <UIKit/UIKit.h>
@interface MTCameraViewController : UIViewController <UIActionSheetDelegate>
@end

Complete the circle by going back to the MTCameraViewController.m file and adding the logic that will respond to the UIActionSheet presented:

- (void)actionSheet:(UIActionSheet *)actionSheet clickedButtonAtIndex:(NSInteger)buttonIndex
{
    // Bail if the cancel button was tapped
    if(actionSheet.cancelButtonIndex == buttonIndex)
    {
        return;
    }
    GPUImageFilter *selectedFilter;
    [stillCamera removeAllTargets];
    [filter removeAllTargets];
    switch (buttonIndex) {
        case 0:
            selectedFilter = [[GPUImageGrayscaleFilter alloc] init];
            break;
        case 1:
            selectedFilter = [[GPUImageSepiaFilter alloc] init];
            break;
        case 2:
            selectedFilter = [[GPUImageSketchFilter alloc] init];
            break;
        case 3:
            selectedFilter = [[GPUImagePixellateFilter alloc] init];
            break;
        case 4:
            selectedFilter = [[GPUImageColorInvertFilter alloc] init];
            break;
        case 5:
            selectedFilter = [[GPUImageToonFilter alloc] init];
            break;
        case 6:
            selectedFilter = [[GPUImagePinchDistortionFilter alloc] init];
            break;
        case 7:
            selectedFilter = [[GPUImageFilter alloc] init];
            break;
        default:
            break;
    }
    filter = selectedFilter;
    GPUImageView *filterView = (GPUImageView *)self.view;
    [filter addTarget:filterView];
    [stillCamera addTarget:filter];
}

Lines 11-12 are used to reset the currently selected filter.

Lines 15 – 42 above should look familiar to the logic in ViewController.m; we’re just switching on the selected button to create an instance of the correlating filter.

Lines 44 – 47 take the newly created filter and apply it to the GPUImage camera.

If you build and run the project now, you should see that the newly created filter button allows the user to try out GPUImage filters in real time!


Step 10: Create a Camera Delegate Protocol

Now that we have the live feed filters working, the last major step in the tutorial is to allow the user to take snapshots with the GPUImage camera and then display them back in the main view controller’s photo carousel.

In order to achieve this, we’ll pass messages between view controllers using the delegation design pattern. Specifically, we’ll create our own custom formal delegate protocol in MTCameraViewController and then configure the main ViewController class to conform to that protocol in order to receive delegation messages.

To get started, go to MTViewController.h and modify the code as follows:

#import <UIKit/UIKit.h>
@protocol MTCameraViewControllerDelegate
- (void)didSelectStillImage:(NSData *)image withError:(NSError *)error;
@end
@interface MTCameraViewController : UIViewController
@property(nonatomic, unsafe_unretained) id delegate;
@end

The above code declares a formal delegate pattern called MTCameraViewControllerDelegate on lines 3-7, and then creates a delegate object on line 11.

Next switch to MTCameraViewController.m and synthesize the delegate property:

@implementation MTCameraViewController
@synthesize delegate;

With the protocol declared, we now need to implement it in the main ViewController class. Go to ViewController.h and add the following lines:

#import <UIKit/UIKit.h>
#import "iCarousel.h"
#import "MTCameraViewController.h"
@interface ViewController : UIViewController <UINavigationControllerDelegate, UIImagePickerControllerDelegate, UIActionSheetDelegate, MTCameraViewControllerDelegate, iCarouselDataSource, iCarouselDelegate>
@end

Now open up the ViewController.m file. We want to assign the delegate property when the view controller is instantiated. Because we’re using Storyboards, the proper place to do this is in the prepareForSegue:sender: method, which will be called just before the new view controller is pushed onto the screen:

- (void)prepareForSegue:(UIStoryboardSegue *)segue sender:(id)sender
{
    if([segue.identifier isEqualToString:@"pushMTCamera"])
    {
        // Set the delegate so this controller can received snapped photos
        MTCameraViewController *cameraViewController = (MTCameraViewController *) segue.destinationViewController;
        cameraViewController.delegate = self;
    }
}

Next we need to implement the didSelectStillImage:withError: method required by the MTCameraViewControllerDelegate protocol:

#pragma mark -
#pragma mark MTCameraViewController
// This delegate method is called after our custom camera class takes a photo
- (void)didSelectStillImage:(NSData *)imageData withError:(NSError *)error
{
    if(!error)
    {
        UIImage *image = [[UIImage alloc] initWithData:imageData];
        [displayImages addObject:image];
        [self.photoCarousel reloadData];
        self.filterButton.enabled = YES;
        self.saveButton.enabled = YES;
    }
    else
    {
        UIAlertView *alert = [[UIAlertView alloc] initWithTitle:@"Capture Error" message:@"Unable to capture photo." delegate:nil cancelButtonTitle:@"OK" otherButtonTitles:nil];
        [alert show];
    }
}

The above code will convert the NSData object handed to the method to a UIImage and then reload the photo carousel.

Finally, we need to wrap things up by returning to MTCameraViewController.m and adding in the appropriate delegate method call. First, setup an IBAction method that will trigger a camera snap:

    GPUImageFilter *filter;
}
- (IBAction)captureImage:(id)sender;
@end

Before continuing, connect this method to the “Take Photo” button in the MainStoryboard.storyboard file.

Finally, add the method implementation:

-(IBAction)captureImage:(id)sender
{
    // Disable to prevent multiple taps while processing
    UIButton *captureButton = (UIButton *)sender;
    captureButton.enabled = NO;
    // Snap Image from GPU camera, send back to main view controller
    [stillCamera capturePhotoAsJPEGProcessedUpToFilter:filter withCompletionHandler:^(NSData *processedJPEG, NSError *error)
     {
         if([delegate respondsToSelector:@selector(didSelectStillImage:withError:)])
         {
             [self.delegate didSelectStillImage:processedJPEG withError:error];
         }
         else
         {
             NSLog(@"Delegate did not respond to message");
         }
         runOnMainQueueWithoutDeadlocking(^{
             [self.navigationController popToRootViewControllerAnimated:YES];
         });
     }];
}

Lines 3-5 above disable the “Take Photo” button to prevent multiple presses while processing.

Lines 7 – 22 use the GPUImage method capturePhotoAsJPEGProcessedUpToFilter:withCompletionHandler: to actually save a JPEG image, check to see if a delegate has been set, and then send the image data on to the delegate if it is set.

Line 19 pops the current view controller, but does so on the main application thread.


Wrap Up

Congratulations! If you’ve followed the tutorial this far, then you should have a fully functional, advanced photo taking application! If you have questions or feedback, feel free to leave it in the comments section below or send them to me directly over Twitter (@markhammonds).

Thanks for reading!


Connecting Physical Android Devices To Your Development Machine

$
0
0

While the Android emulator and Android Virtual Device configurations (AVDs) go a long way towards testing a variety of aspects of app device compatibility issues, users run apps on real devices and with real mobile networks. This tutorial will show you how to connect your Android devices to the Android tools in order to more accurately debug your apps.


Part 0: Getting Started

This tutorial is for the Java developer just getting started learning Android, who is familiar with Eclipse, and has installed the Android SDK and Android Developer Plugin for Eclipse, is familiar with USB devices and drivers for their system, and is ready to connect their Android devices up to the Android tools. If you are not prepared as such, see the previous tutorials in this series.

This specific tutorial assumes you have at least one Android device that you wish to connect to your development machine via USB. You will need the Android device, the compatible USB cable (one usually comes with the device), and a free USB port on your development machine in order to complete this tutorial.


Step 1: Setup USB Debugging Mode

First, you will need to enable your device for USB debugging. To do this, you will need to change some device configuration details in the Settings application. For recent Android versions, you will find the settings you want under the Settings, Developer options. Enable the USB debugging checkbox.

Note: The USB setting isn’t in the same place on all devices, especially Android 2.x and earlier devices. Sometimes it will even come up as a notification when you plug your device in. You may need to hunt around a little if the USB debugging setting is not in the expected location on the device.

Step 2: Development Machine Preparation

If you have a Mac development machine, skip this step.

If you have a Windows development machine, you’ll need to install USB drivers. For Google devices, such as the Nexus lineup, you can download the Google USB Driver using the Android SDK Manager and install it. It will be found in the sdk directory under extras/google/usb_driver. If this driver doesn’t support your handset, you’ll need to download a more specific driver directly from the device manufacturer. Google maintains a list of OEM pages for USB driver downloads.

If you have a Linux development machine, you’ll have some file editing to do. Essentially, you’ll need to add USB vendor identifiers to a udev file on your system. Google maintains a list of USB vendor identifiers.


Step 3: Connect Your Device

Using an appropriate USB cable, connect your device to your development machine.


Step 4: Check Device Configuration

How can you tell if you’ve done everything right? On the command line, type in “adb -d devices” — this will tell adb to list all devices (not emulators) that it can see. Assuming you only have one device plugged in, you should see one result similar to the following screenshot. This also assumes you have correctly set up your tool paths as described in previous tutorials.


Troubleshooting

If you have trouble getting a device connected (and you will eventually) we recommend starting with the basics. Is the cable connected correctly? Is it actually a sync cable or is it one of those charge only cables? Do you for sure have the right driver? Is the system using the driver you think it’s using? Is the device set to USB debugging mode? Is the device — forgive us here — on? Is your computer on??? Just kidding!


Conclusion

You’ve now learned how to connect your Android devices to your development machine. It’s not particularly complex. On most machines, even Windows, it’ll usually just works. Sometimes you have to hunt down drivers. Once you’ve got your device configured for debugging and hooked up to your development machine, you can start deploying apps to it for testing. You may need to go through these steps for each device you want to be able to test with, which may mean installing multiple drivers. If you’re just getting started, we recommend starting out with a popular target smartphone and a popular tablet for device sanity testing.

You’re well on your way to Android development. What kinds of apps are you looking forward to creating? Let us know in the comments!

About the Authors

Mobile developers Lauren Darcey and Shane Conder have coauthored several books on Android development: an in-depth programming book entitled Android Wireless Application Development (now in it’s third edition as a two-volume set), Sams Teach Yourself Android Application Development in 24 Hours, and Learning Android Application Programming for the Kindle Fire: A Hands-On Guide to Building Your First Android Application. When not writing, they spend their time developing mobile software at their company and providing consulting services. They can be reached at via email to androidwirelessdev+mt@gmail.com, via their blog at androidbook.blogspot.com, and on Twitter @androidwireless.

Need More Help Writing Android Apps? Check out our Latest Books and Resources!

Buy Android Wireless Application Development, 3rd Edition, Volume 1  Buy Sam's Teach Yourself Android Application Development in 24 Hours, 2nd Edition  Mamlambo code at Code Canyon


Using Version Control with Unity3D

$
0
0

This article is meant to be a definitive guide on how to properly version control your Unity projects!

Version control is one of the most important tools in any developer’s arsenal. It allows you to easily roll back changes if you accidentally break something, compare older and newer versions of your code to see what’s different, and it allows teams to work on the same code without accidentally overwriting each other’s work. Until recently, only Unity Pro projects were able to be properly version controlled. However, since Unity 3.5, it is now possible to version control projects in the free version of Unity as well.


What is Version Control?

A version control system, or VCS, keeps track of changes you’ve made to files in folder, also known as your “working copy”. These changes are stored alongside the folder in a database known as a “repository”. Each time you change something in your working copy, you need to commit those changes to the repository. The VCS then compares what’s already in the repository to the incoming changes and only stores the differences. This keeps the repository as small as possible.

Committing to Local Repository

For this project, we’ll be using Mercurial which is a distributed VCS. Unlike centralized VCS systems like Subversion (SVN), which typically rely on a remote repository stored on a server, a distributed VCS can host local repositories, sometimes called “local branches”, directly on your computer. This means you can make changes, commit them to your local branch, test them and even discard them if something breaks, all without having to subject your team members to your changes until you know they’re perfect. Once you’re sure, you can “push” those changes to a remote repository for your team to “pull” into their own local branches.

Pushing and Pulling from a Remote Repository

Preparing a Unity Project for Version Control

A Unity project requires certain meta information to remember what components and connections are set on the various assets. Traditionally, this meta information was stored as a set of binary files in the Library folder of a Unity project. However, this “binary blob” can’t be properly merged, so changes made by two people could stomp all over each other, causing things to break in the editor, even if they were editing different assets.

The solution to this is to turn on Meta Files in the project settings.

  • Click Edit > Project Settings > Editor
  • Under the Version Control heading, change the Mode to Meta Files
  • Click File > Save
Editor settings

This will cause Unity to create meta files beside each asset in the project Assets folder. Now, when an asset is modified in the editor, only the asset and it’s associated meta file will report changes, instead of the entire Library folder.

Meta files

Installing Mercurial

Both Windows and OSX have Mercurial installers. Visit the Mercurial website and click the big download button. The site will automatically recognize what operating system you’re using and download the appropriate installer.

Download button

Unzip the installer and run it. Click through all the steps and it should install itself without any intervention necessary.

Installers

To make sure Mercurial installed correctly, open a command line. On Windows, press Start and type cmd into the search box. On OSX, open Spotlight and search for terminal.

Command line

On the command line, enter:

hg .

A short list of information should appear including what version of Mercurial you’re using, as well as a list of common commands. To get the complete list of commands, enter:

hg help

And to get help on a specific command, simply enter the name of the command after help:

hg help clone

NOTE: Mercurial commands always begin with hg, the element for mercury on the periodic table. Thankfully, this bit of clever naming was used because it’s easy to type.


Initializing the Repository

The first thing we need to do is give our project folder a repository.

On the command line enter:

hg init

That’s it. Our folder now has a repository and is ready for version control. If you have hidden files turned on you’ll notice a .hg folder has been created in the project folder. This is where the repository resides. If, for some reason, you ever want to remove version control, simply delete the .hg folder. Your working copy of the files will be unharmed.

hg folder

Checking the Status

Now that our project folder has a repository, let’s check the status of the repository to see what’s changed. Mercurial will accept shortened command names, so any of the following will work:

hg status
hg stat
hg st

A status report should come up with a list of files, each with a single letter beside them. In this case, all the files will have question marks beside them. The question mark indicates the file isn’t being version controlled in the repository yet.

?A file that is in the working copy but not being tracked by the repository.
!A file that is being tracked by the repository but is missing in the working copy.
AA file that has been added to the repository since the last commit.
MA file that has been modified since the last commit.
RA file that is slated for removal from the repository on the next commit.

Adding Files to the Repository

We need to explicitly add files to our repository in order to let Mercurial know we want them to be version controlled.

Individual files can be added:

hg add myfile.txt

Entire folders can be added:

hg add scripts/

Let’s add every single un-versioned file (with a ? question mark in the status report) in one fell swoop by not specifying any filename at all:

hg add

Perform a status check.

hg status

Any files that were added should now have a letter A beside them, indicating they’ve been added to the repository and are now being tracked by Mercurial.


Committing Changes

Now that we’ve told Mercurial which files we want to be version controlled, we need to commit them to the repository. Each commit is like a snapshot known as a revision, that keeps track of the differences between the previous revisions and the current one.

There are two parts to any commit, a message and your username. The message is where you get to describe what you did, but keep it short and sweet. The username is just an identifier to let anyone else who might use the repository know who made certain changes. The username is set with the -u flag and the message is set with the -m flag:

hg commit -u ian -m "initial"

To make sure the commit was successful, we need to check the log:

hg log

To be doubly sure, check the status to make sure no changes are left.

hg status

An empty status report means everything was properly committed.

NOTE: It is recommended that you commit often. Each commit should be as “atomic” as possible. That is, it should be easily described by a simple phrase like “increased player jump height”. If you find yourself needing to use “and” or commas in your commit messages, then it’s probably time to make two separate commits. The reason for this is to make it easy to rollback specific changes you’ve made when you encounter issues.


Fixing Mistakes

There are two key ways to fix mistakes: a rollback or a revert. A rollback will undo the last command you entered which is ideal for fixing spelling mistakes in your commit messages or over zealous adding.

hg rollback

Perform a status check to make sure everything got rolled back correctly.

hg status

A revert is more powerful, allowing you to travel back in time through several revisions, in case you need to back out of several changes you’ve made. In order to find out what revision you’ll want to revert to you first need to check the log:

hg log
Log

Either the number or hash can be used to refer to a specific revision while reverting. The number is specific to your repository since someone else’s branch might have more changes so their numbers would be different. The hash is universal, this means anyone could revert to a specific revision on a shared repository by using that hash string.

To revert to a specific revision, we need to specify the revision number using the -r flag. We also need to tell Mercurial to “revert all” using the -a flag. Finally, we need to tell Mercurial that we don’t want it to create any backup files using the –no-backup flag.

hg revert -r 0 -a --no-backup

Perform a status check to make sure everything reverted correctly.

hg status

NOTE: If you omit the –no-backup flag, Mercurial will create backup files for any files affected by the revert procedure. These backup files will all have a .orig extension. Be sure not to add .orig files.


Ignoring Unwanted Files

Now that we’ve undone our mistake, let’s make sure it doesn’t happen again. We want to permanently ignore the Library and Temp folders so that it can’t be added by accidentally the next time we get trigger happy with the add command.

Mercurial uses a special file called .hgignore to store the names of files and folders you want to permanently ignore. This file goes right inside your project folder and is version controlled just like everything else. This ensures everyone using the repo can’t accidentally pollute it with unwanted files.

Using your favourite text editor to enter the following:

syntax: glob
Library
Temp
*.pidb
*.sln
*.userprefs
*.csprog
*.orig

This tells Mercurial what we want to use shell-style syntax (known as “glob” syntax) to ignore the Library and Temp folders, ignore several temporary files that MonoDevelop creates, and to ignore .orig files just in case we accidentally create them when reverting.

Save the file in the root of your project folder as .hgignore (noting the dot at the beginning). Then perform another status check:

hg status

The .hgignore file should now be listed in the status report, but the Library folder, Temp folder and other ignored files should not. So we can safely use the add command without needing to use exact file names and then commit the results.

hg add
hg commit -u ian -m "Initial"

Check the log to make sure the commit was successful.

hg log

NOTE: More information about hgignore files can be found here.


Pushing Changes to a Remote Repository

If you want to share your repository with other developers, the easiest way is to create a remote repository on a server and push your changes to that.

The first thing you’ll need to do is find a Mercurial host. Several exist including BitBucket and Kiln; Both have free accounts for small teams. In our case, we’ll use BitBucket, but both services work essentially the same. Once you have signed up for an account on either service, be sure to create a new repository using their web interface.

Hosts

Once created, look for the “clone path”. It should look something like this:

hg clone https://bitbucket.org/username/reponame

Normally, this command would be used to create a local copy of the repository. But we already have a local repository and we want to send changes from it to the remote repository instead. To do this, we can take the URL address at the end of the clone string and use it as the destination for the push command.

hg push https://bitbucket.org/username/reponame

Mercurial will compare the local repository to the remote repository to see how they differ. It will see that our local repository has newer changes that the remote repository is missing and will send them to the remote repository.

However, it will first prompt for a username and a password. These should correspond to the username/email and password you signed up to the host service with.

Mercurial should report that all changes were successfully pushed and that means anyone who depends on your repository can now “pull” from it to receive your changes. First, they’ll have to clone the repository to make a local copy.

hg clone https://bitbucket.org/username/reponame

And then pull any changes that you or anyone else make as time goes on:

hg pull

You’ll then have to do an “update” to make sure that your working copy is updated:

hg update

But to save time, you can do the pull and update all at once using the -u flag:

hg pull -u

NOTE: Mercurial will prompt you whenever a binary file is updated or merged. Unless you are certain you’ve made changes to local binary files, always choose the “(O)other” option instead of the “(L)ocal” option.


Settings to Make Life Easier

There are several tedious aspects to issuing the same commands over and over, such as having to remember to supply a username when committing, having to type in a password every time you push, etc. Many of these settings can be stored in what’s known as an hgrc file. To create an hgrc file, use your favourite text editor and enter the following:

[paths]
default = https://bitbucket.org/username/reponame

This tells Mercurial what path to use by default for push and pull commands. Be sure to replace this fake address with the real address to your remote repository. Next, enter the following:

[ui]
username = Firstname Lastname

This tells Mercurial what username to use by default when committing. Once again, replace this with your correct credentials and be sure the email address matches the one you signed up with. Finally, enter:

[auth]
host.prefix = bitbucket.org
host.username = username
host.password = password
host.schemes = http https

This tells Mercurial what credentials to use when pushing to a secure remote repository so you won’t have to enter a username and password every time you push or pull. Be sure to replace the prefix with the shortest possible portion of your host’s address and don’t include the http:// protocol in the prefix either. Next, replace the username and password with the one you signed up to your host with. The schema tell Mercurial which protocols to attempt to connect with.

Finally, save the file as hgrc (with no dot or extension on the end) inside the .hg folder in your repository. You should no longer need to manually give usernames, passwords or paths when issuing commands from now on.


Conclusion

Version control may seem a little daunting to the uninitiated, but the effort is worthwhile. It gives you peace of mind to know that at any point you can roll a broken project back to a point where it was working before. Likewise, using remote repositories means that code can not only be shared with team members, but recovering your project after something catastrophic happens (like a hard drive failure) is easy.

Hg Init

To learn more about distributed version control and Mercurial, I highly recommend visiting Hg Init. It has a series of articles explaining version control practices and Mercurial features in depth. It’s brief, highly informative, easy to read, easy to understand and even a little funny.


Viewing all 1836 articles
Browse latest View live